Use Agent Identity in AgentRun
This tutorial shows you how to integrate Agent Identity with AgentRun, enabling agents to securely access third-party services such as DingTalk.
Overview
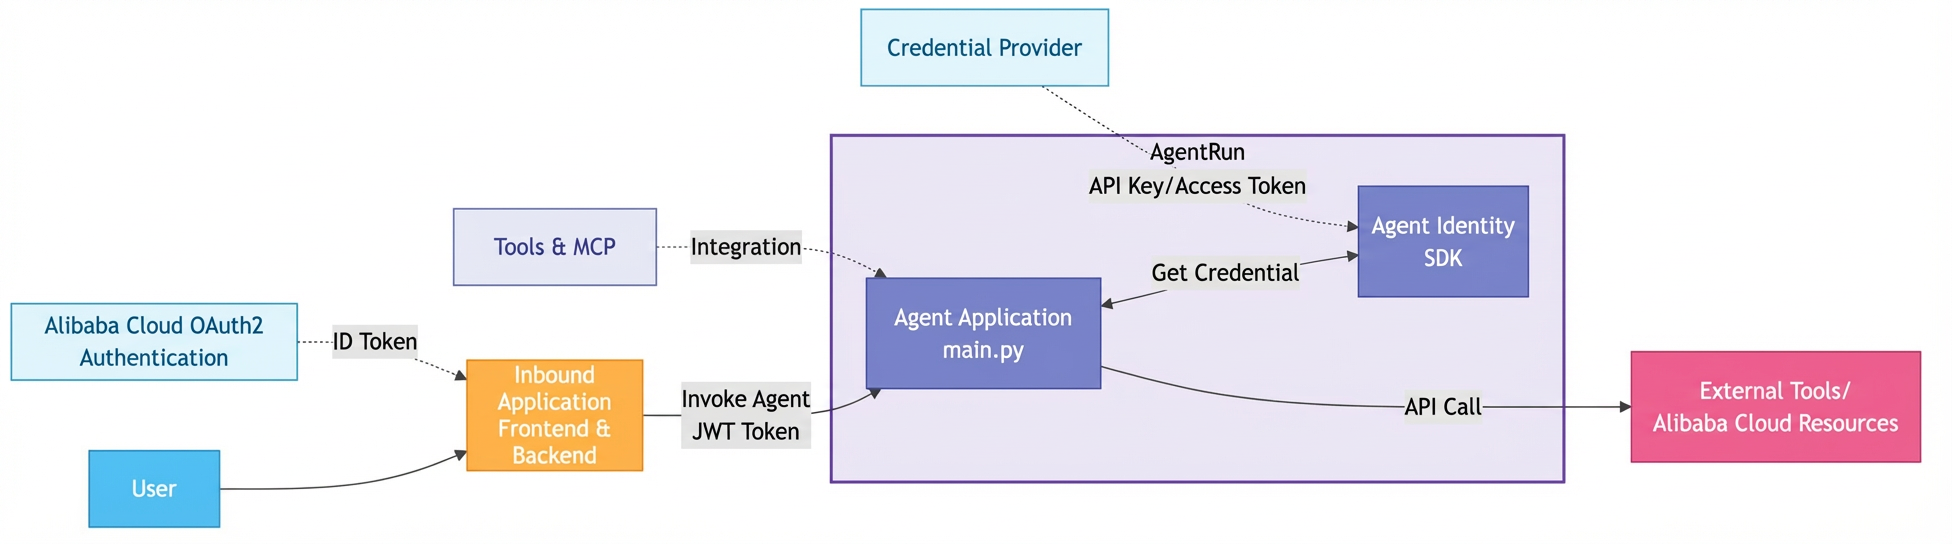
AgentRun is a one-stop agentic AI infrastructure platform on Alibaba Cloud Function Compute that provides serverless hosting capabilities for agents. By integrating Agent Identity with AgentRun, you can achieve the following:
-
Inbound authentication: A caller authenticates with an OAuth 2.0/OIDC-compatible identity provider (IdP), such as Alibaba Cloud, Okta, or Microsoft Entra ID, to obtain a JWT token. This token is passed when calling the agent. AgentRun and Agent Identity validate the token to control access. This tutorial uses Alibaba Cloud RAM as the inbound IdP and a RAM user as the inbound identity.
-
Outbound credential management: The agent uses the Agent Identity SDK to call service APIs and obtain an Alibaba Cloud STS temporary credential or a third-party API key/OAuth 2.0 access token. This allows secure access to downstream resources. This tutorial uses the DingTalk Open Platform as an outbound OAuth credential provider.
-
Execution role (Alibaba Cloud resource access): AgentRun supports binding a Function Compute RAM role (an execution role). At runtime, it automatically obtains an STS temporary credential to call Alibaba Cloud APIs. The code assumes this role's permissions without needing to hardcode an access key in the code or configuration.
Architecture
Prerequisites
Environment requirements
-
Python: Version 3.10 or later
-
pip: The package manager for Python
RAM user and permissions
You need a RAM user to run Agent Identity CLI commands to create a workload identity and its associated RAM role, and to automatically configure the required permissions. The RAM user who runs the CLI commands must have at least the following permissions:
{
  "Version": "1",
  "Statement": [
    {
      "Effect": "Allow",
      "Action": "agentidentity:CreateWorkloadIdentity",
      "Resource": "*"
    },
    {
      "Effect": "Allow",
      "Action": [
        "ram:CreateRole",
        "ram:AttachPolicyToRole",
        "ram:CreatePolicy"
      ],
      "Resource": "*"
    }
  ]
}
OAuth 2.0 identity provider
You need an identity provider (IdP) that supports the OIDC/OAuth2 protocol to authenticate end users and issue a JWT token (also known as an ID Token). When you call the agent, pass the JWT token to complete inbound authentication for both AgentRun and Agent Identity. This tutorial uses Alibaba Cloud as the identity provider.
Step 1: Configure AgentRun model and credentials
Create a large language model service
AgentRun manages model calls through a unified model proxy gateway. You need to create a large language model service for the agent to use.
-
Log on to the Function Compute console.
-
In the left-side navigation pane, choose to go to the AgentRun console.
-
In the top navigation bar, choose Model Management, and then click Add Model.
-
Keep the default API Model option selected, and then select a model Service Provider (such as Alibaba Cloud) to configure a specific model.
In the pop-up window, a Name is automatically generated. The API Endpoint defaults to
https://dashscope.aliyuncs.com/compatible-mode/v1. If you leave it blank, the default endpoint is used. -
In the Credential Configuration section, select API key. Enter the API key that you obtained from the model provider, such as a Model Studio API key.
Next to the access key field, you can click the Get Model Studio API key link to get a key. The page indicates that the API key is used only for the current model and is not saved to Credential Management.
-
Click Create Model to finish. After the model is created, copy the model service name and save it for later use.
The model service name (for example,
model-BTAtkv) is displayed above the model card. You can click the copy icon next to it to copy the name.
Create an AgentRun inbound access credential
Use inbound credentials to verify the caller's identity. AgentRun supports multiple authentication methods. This tutorial uses JWT authentication.
-
On the AgentRun console, choose from the top navigation bar.
-
Keep the default Access AgentRun Credentials tab selected and click Create Access Credential.
-
On the Create Access Credential page, configure the following settings:
-
Credential Name: Enter a name to identify the credential, for example,
aliyun. -
Authentication Type: Select JWT (JSON Web Token).
-
JWKS Configuration Method: Select how to obtain the JWKS URL.
-
JWKS Endpoint URL: Enter the Alibaba Cloud JWKS endpoint URL
https://oauth.aliyun.com/v1/keys.
Timeout (seconds): Enter
30(valid range: 1–30). Cache Time (seconds): Enter3600(valid range: 300–7,200). Select Enable after creation, and then click Create Credential. -
-
Keep the other settings at their default values. Click Create Credential to create the access credential.
In the credential management list, a JWT-type credential named aliyun appears, with its status as Enabled and 1 bound resource.
Step 2: Create an Agent Identity workload identity
A workload identity is the agent's identity in Alibaba Cloud Agent Identity. It allows the agent to securely obtain credentials for accessing other services or resources.
Install Agent Identity CLI
Install the Agent Identity CLI in your local environment (global installation).
pip install agent-identity-cliPrepare RAM user credentials
In your local environment, configure credentials using the RAM user mentioned in the RAM user and permissions section.
Alibaba Cloud CLI
-
Install Alibaba Cloud CLI (skip if already installed). For details, see Quick start with Alibaba Cloud CLI.
-
Log on to Alibaba Cloud CLI. For details, see Configure OAuth authentication for Alibaba Cloud CLI.
-
Check the credential configuration. Run the command
aliyun configure listto check if the credential configuration exists and is valid. The output is similar to the following:Profile | Credential | Valid | Region | Language --------- | ------------------ | ------- | ---------------- | -------- OAuthProfile * | OAuth:xQcliVOdYA@CN | Valid | cn-hangzhou | zh
Access key (not recommended)
Create an access key for the CLI execution user and configure it in your local environment variables.
export ALIBABA_CLOUD_ACCESS_KEY_ID=<your-access-key-id>
export ALIBABA_CLOUD_ACCESS_KEY_SECRET=<your-access-key-secret>
Create a workload identity
Run the following command to create a workload identity and its associated RAM role:
agent-identity-cli create-workload-identity --workload-identity-name <your-workload-identity-name>The CLI automatically creates the following resources:
|
Resource type |
Description |
|
workload identity |
The agent's identity in the cloud. |
|
RAM role |
The default format is |
|
role trust policy |
Allows the workload identity to assume the associated RAM role. |
|
permission policy |
Grants permissions to access tokens or API keys for outbound resources. |
Configure Alibaba Cloud as the inbound IdP
You must associate the workload identity you created with an identity provider to complete inbound authentication with Agent Identity.
-
Log on to the Agent Identity console.
-
Follow the tutorial Configure Alibaba Cloud as an identity provider for Agent Identity to create an inbound identity provider. Set the callback URL to
http://localhost:8090. After you finish, copy the Application ID and save it for later use. -
In the left-side navigation pane, choose Workload Identity and find the workload identity that you created in the previous step.
-
Click Associate Identity Provider and select the inbound identity provider that you created.
-
Click OK to complete the configuration.
Step 3: Deploy agent application to AgentRun
Get sample code
The sample code is based on the LangChain framework and integrates the Agent Identity SDK to enable secure access to third-party services. Open a terminal on your local machine and run the following command to clone the sample code.
git clone https://github.com/aliyun/agent-identity-dev-kit
cd agent_identity_python_samples/agentrun-langchain_sample
Package sample code
Run the following command to package the sample code into a .zip file for deployment to AgentRun:
zip -r agentrun-langchain_sample.zip .Create and configure an agent
-
On the AgentRun console, choose Runtimes and Sandbox from the top navigation bar.
-
Click Create Agent.
-
Select Create from Code.
-
On the Create Agent from Code page, configure the following settings:
-
Agent Name: A name to identify the agent. You can keep the default name.
-
Select Code Source: Keep the default Upload Code Package option.
-
Runtime Type: Select Python 3.12 from the drop-down list.
-
Click the file upload area and upload the .zip file that you generated in the Package sample code step.
The upload area supports .zip and .tar.gz formats. Make sure to package all dependencies (such as those declared in
requirements.txtorpackage.json) together for upload. If you are using a code package with the AgentRun SDK, ensure that the execution role below includes the AliyunAgentRunFullAccess permission. -
Environment Variable Configuration: Configure the following environment variables:
Environment variable
Description
Example value
MODEL_SERVICE_NAMEThe model service name that you saved in the Create a large language model service step.
model-xxxxxxMODEL_NAMEThe specific model name.
qwen-maxAGENT_IDENTITY_WORKLOAD_IDENTITY_NAMEThe workload identity name that you specified in the Create a workload identity step.
workload-id-for-agentrun -
Execution Role Configuration: Select or create a RAM role and ensure the following:
-
In the role's trust policy, the principal (
Principal) must include the Function Compute service (fc.aliyuncs.com). The following is an example trust policy:{ "Statement": [ { "Action": "sts:AssumeRole", "Effect": "Allow", "Principal": { "Service": [ "fc.aliyuncs.com" ] } } ], "Version": "1" } -
The role's permission policy must include the
AliyunAgentIdentityDataFullAccessandAliyunAgentRunReadOnlyAccesssystem policies.On the Execution Role Configuration page, select agent-identity-sample-fc from the Execution Role drop-down list.
-
-
Access Credential: Click the Inbound: Access Credential button, switch to the Use Existing Credential option, and select the JWT credential that you created in the Create an AgentRun inbound access credential step.
-
Click Start Deployment. After the deployment is complete, AgentRun automatically generates a public endpoint. Copy the endpoint and save it for later use.
You can find the endpoint in the Access Endpoint area of the Quick Access Configuration panel on the right side of the page.
-
Install dependencies in Web IDE
To avoid compatibility issues between your local environment and the agent's cloud runtime, install the project dependencies in the Web IDE that AgentRun provides.
-
On the agent's details page, choose Code and Debugging from the left-side navigation pane and wait for the Web IDE to load.
-
In the Web IDE's top menu, click Terminal > New Terminal to open a terminal. Run the following command to install the dependencies into the
pythondirectory of the current project:pip install -r requirements.txt -t ./python -
After all dependencies are installed, click the Update button to deploy the changes to the runtime.
Step 4: Test and verify
This tutorial uses a sample web front-end and back-end application (similar to the one used in the Use Agent Identity in Model Studio (high-code) tutorial) to complete user login, call the agent deployed in AgentRun, and allow your agent to call the DingTalk Open Platform and securely write data to a DingTalk document.
If you want to study the entire workflow in more detail, you can use the method in the README of this tutorial's code repository to call the Agent with the curl command.
Create and configure a DingTalk application
If you have not created and configured a DingTalk application, follow Step 1 in the Securely access DingTalk from an agent tutorial to create and configure it, and then set DingTalk as an OAuth 2.0 credential provider for Agent Identity.
Important: You must set the name of the DingTalk credential provider to test-provider-for-dingtalk to match the configuration in the agent sample project (located in agentrun-langchain_sample/ding_talk_tool.py).
Configure workload identity callback URL
To allow Agent Identity to obtain an OAuth access token from DingTalk for your agent, you need to configure an Application Callback URL for the workload identity you created.
-
Log on to the Agent Identity console.
-
Go to the authentication flow section of the Workload Identity details page and click Set Application Callback URL.
-
In the Set Application Callback URL dialog box, enter the URL
http://localhost:8090/callback. -
Click OK.
Configure the sample web application
-
In the project's root directory (
agent-identity-dev-kit), run the following command to switch to the end-to-end sample directory:cd agent_identity_python_samples/end-to-end_sample -
Install the dependencies required for the end-to-end sample (we recommend doing this in a Python virtual environment):
pip install -r requirements.txt -
Update the
application/app.ymlfile in your project with the Application ID that you saved in the Configure Alibaba Cloud as the inbound identity provider for Agent Identity step, and the Agent public endpoint that you saved in the Create and configure an agent step:INBOUND_APP_ID: "<replace-with-your-oauth-app-id>" AGENT_ENDPOINT: "https://<replace-with-your-agent-access-endpoint>/openai/v1/chat/completions"
Start the front-end and back-end applications
In the end-to-end_sample directory, run the following command:
python -m application.backend.appInteract with the agent
-
After the agent and the front-end/back-end applications have started, enter the application URL
http://localhost:8090in your browser. -
Complete the Alibaba Cloud login and user authorization. You can then interact with the model in the application's chat window. For example, enter: "Write the following content into my DingTalk document: {DingTalk document link or document ID} {content to write}".
After you enter this prompt, the chat interface displays a message with an OAuth authorization link: Please click the link to authorize Write to DingTalk document. Click this link to grant the agent permission to write to the document.
NoteYou need to obtain the link to the DingTalk document in advance. This sample application cannot create a new DingTalk document and write to it.
-
Click the OAuth authorization URL in the returned result and log in with the DingTalk document owner's account to grant authorization.
-
After authorization, if everything is configured correctly, the agent confirms that the document has been successfully written. Example:
In the agent chat UI, the user provides a DingTalk document link and asks the agent to write content. The agent uses Agent Identity to generate an OAuth authorization link and prompts the user to click it. After authorization succeeds, the agent confirms that the content has been written to the target document.
-
Verify that the content has been written to the document.