Write data to AnalyticDB for PostgreSQL
This topic describes how to write data to AnalyticDB for PostgreSQL using Realtime Compute for Apache Flink.
Limitations
-
This feature does not support AnalyticDB for PostgreSQL in Serverless mode.
-
Only Realtime Compute for Apache Flink engine version VVR 6.0.0 or later supports the AnalyticDB for PostgreSQL connector.
-
Realtime Compute for Apache Flink engine version VVR 8.0.1 or later is required to support AnalyticDB for PostgreSQL 7.0.
NoteIf you use a custom connector, see Manage custom connectors.
Prerequisites
-
Create a Fully Managed Flink workspace. For more information, see Activate Realtime Compute for Apache Flink.
-
Create an AnalyticDB for PostgreSQL instance. For more information, see Create an instance.
-
Ensure the AnalyticDB for PostgreSQL instance and the Fully Managed Flink workspace are in the same VPC.
Configure AnalyticDB for PostgreSQL
- Log on to the AnalyticDB for PostgreSQL console.
-
Add the CIDR block of the Flink workspace to the whitelist of the AnalyticDB for PostgreSQL instance. For more information about how to configure a whitelist, see Set a whitelist.
-
Click Log On to Database. For more information about how to connect to the database, see Client connections.
-
Create a table on the AnalyticDB for PostgreSQL instance.
The following code provides a sample SQL statement:
CREATE TABLE test_adbpg_table(
b1 int,
b2 int,
b3 text,
PRIMARY KEY(b1)
);
Configure Realtime Compute for Flink
-
Log in to the Realtime Compute for Apache Flink console.
-
On the Jobs tab, find the workspace that you want to manage and click DataWorks Console in the Actions column.
-
In the left-side navigation pane, click Connectors.
-
On the Connectors page, click Create Custom Connector.
-
Upload the JAR file of the custom connector.
Note-
To obtain the JAR file of the custom Flink connector for AnalyticDB for PostgreSQL, see AnalyticDB PostgreSQL Connector.
-
The version of the JAR file must match the Flink engine version of your workspace.
-
-
After the upload is complete, click Next.
If parsing is successful, you can proceed. If it fails, verify that the connector's code complies with Apache Flink community standards.
-
Click Finish.
The created custom connector appears in the connector list.
Create a Flink job
-
Log on to the Realtime Compute for Apache Flink console. On the Fully Managed Flink tab, find your workspace and click DataWorks Console in the Actions column.
-
In the left-side navigation pane, click SQL Development. Click Create, select Blank Stream Draft, and then click Next.
-
In the New Draft dialog box, configure the parameters.
Parameter
Description
Example
File Name
The name of the draft.
NoteThe draft name must be unique in the current workspace.
adbpg-test
Storage Location
The folder for the draft's code file.
You can also click the
 icon next to an existing folder to create a subfolder.
Drafts
Engine Version
The Flink engine version for this draft. For more information about the meaning of version numbers, version mapping, and key lifecycle dates, see Engine versions.
vvr-6.0.7-flink-1.15
-
Click Create.
Write data to AnalyticDB for PostgreSQL
-
Write the job code.
Create a random source table named
datagen_sourceand a corresponding AnalyticDB for PostgreSQL table namedtest_adbpg_table. Copy the following code to the job editor.CREATE TABLE datagen_source ( f_sequence INT, f_random INT, f_random_str STRING ) WITH ( 'connector' = 'datagen', 'rows-per-second'='5', 'fields.f_sequence.kind'='sequence', 'fields.f_sequence.start'='1', 'fields.f_sequence.end'='1000', 'fields.f_random.min'='1', 'fields.f_random.max'='1000', 'fields.f_random_str.length'='10' ); CREATE TABLE test_adbpg_table ( `B1` bigint , `B2` bigint , `B3` VARCHAR , `B4` VARCHAR, PRIMARY KEY(B1) not ENFORCED ) with ( 'connector' = 'adbpg-nightly-1.13', 'password' = 'xxx', 'tablename' = 'test_adbpg_table', 'username' = 'xxxx', 'url' = 'jdbc:postgresql://url:5432/schema', 'maxretrytimes' = '2', 'batchsize' = '50000', 'connectionmaxactive' = '5', 'conflictmode' = 'ignore', 'usecopy' = '0', 'targetschema' = 'public', 'exceptionmode' = 'ignore', 'casesensitive' = '0', 'writemode' = '1', 'retrywaittime' = '200' );You do not need to modify the parameters for the
datagen_sourcetable. Modify the parameters for thetest_adbpg_tabletable as needed. The following table describes the parameters.Parameter
Required
Description
connector
Yes
The name of the connector. The name must be in the
adbpg-nightly-<VersionNumber>format, such asadbpg-nightly-1.13.url
Yes
The JDBC URL of the AnalyticDB for PostgreSQL instance. The format is
jdbc:postgresql://<InternalEndpoint>:<Port>/<DatabaseName>. Example:jdbc:postgresql://gp-xxxxxx.gpdb.cn-chengdu.rds.aliyuncs.com:5432/postgres.tablename
Yes
The name of the AnalyticDB for PostgreSQL table.
username
Yes
The database account of the AnalyticDB for PostgreSQL instance.
password
Yes
The password of the AnalyticDB for PostgreSQL database account.
maxretrytimes
No
The number of retries if an SQL execution fails. Default value: 3.
batchsize
No
The maximum number of records in a batch write. Default value: 50,000.
exceptionmode
No
The policy for handling exceptions during data writes. Valid values:
-
ignore (default): Ignores data that fails to be written due to an exception.
-
strict: Triggers a failover and reports an error on a data write exception.
conflictmode
No
The policy for handling primary key or unique index conflicts. Valid values:
-
ignore: Ignores the conflict and retains the existing data.
-
strict: Triggers a failover and reports an error on a conflict.
-
update: Updates the existing data with the new data on a conflict.
-
upsert (default): Uses the UPSERT method to write data when a conflict occurs.
AnalyticDB for PostgreSQL uses INSERT ON CONFLICT and COPY ON CONFLICT to perform UPSERT writes. If the target table is a partitioned table, the minor version of the instance must be V6.3.6.1 or later. For information about how to update the minor version, see Update the minor engine version.
targetschema
No
The schema of the AnalyticDB for PostgreSQL database. Default value: public.
writemode
No
The data write mode. Valid values:
-
0: Writes data by using BATCH INSERT.
-
1 (default): Writes data by using the COPY API.
-
2: Writes data by using BATCH UPSERT.
verbose
No
Specifies whether to output connector runtime logs. Valid values:
-
0 (default): Does not output runtime logs.
-
1: Outputs runtime logs.
retrywaittime
No
The interval between retries after an exception occurs. Unit: milliseconds (ms). Default value: 100.
batchwritetimeoutms
No
The maximum time to buffer data for a batch write. When this time is exceeded, the connector writes the current batch. Unit: milliseconds (ms). Default value: 50,000.
connectionmaxactive
No
The maximum number of concurrent connections in the connection pool for a single task manager. Default value: 5.
casesensitive
No
Specifies whether column and table names are case-sensitive. Valid values:
-
0 (default): Case-insensitive.
-
1: Case-sensitive.
NoteFor more information about the supported parameters and data type mappings, see AnalyticDB for PostgreSQL (ADB PG) connector.
-
-
Start the job.
-
In the upper-right corner of the job development page, click Deploy. In the dialog box that appears, click OK.
NoteSession clusters are suitable for development and testing in non-production environments. Using a session cluster to debug jobs improves resource utilization and accelerates job startup. However, for business stability, do not submit production jobs to a session cluster. For more information, see Debug a job.
-
On the Deployments page, find the target job and click Resume in the Actions column.
-
Click Resume.
-
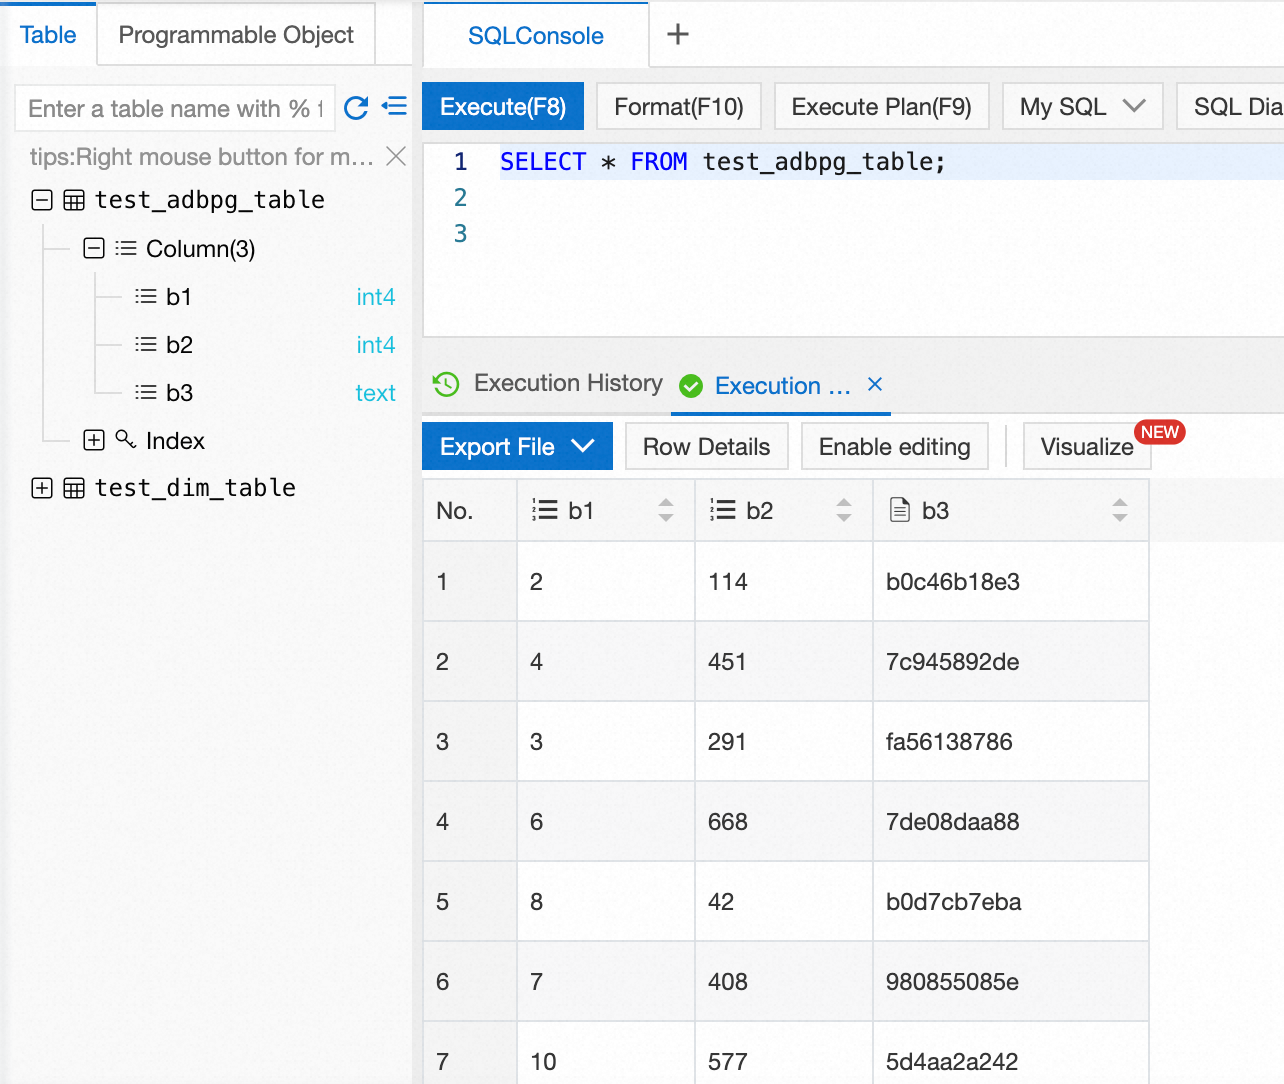
Verify the results
-
Connect to the AnalyticDB for PostgreSQL database. For more information, see Client connections.
-
Execute the following statement to query the
test_adbpg_tabletable:SELECT * FROM test_adbpg_table;The data is successfully written to AnalyticDB for PostgreSQL. A sample response is as follows.