Alibaba Cloud Service Mesh (ASM) integrates with the Open Policy Agent (OPA) plug-in, allowing you to define fine-grained access control policies for your applications. ASM instances of v1.8.6.41 or later support configuring a ConfigMap to automatically push OPA policies to pods, enabling dynamic policy updates. This topic shows you how to dynamically update OPA policies in ASM.
Prerequisites
-
An ASM instance of v1.8.6.41-gb1d8f288-aliyun or later is created. For more information, see Create an ASM instance.
An ACK managed cluster is created. For more information, see Create an ACK managed cluster.
Background information
Hosted by the CNCF as an incubating project, Open Policy Agent (OPA) is a policy engine that you can use to implement fine-grained access control for your applications. As a general-purpose policy engine, OPA can be deployed as a standalone service alongside your microservices. To protect an application, each request to a microservice must be authorized. The microservice queries the OPA API to determine if the request is permitted.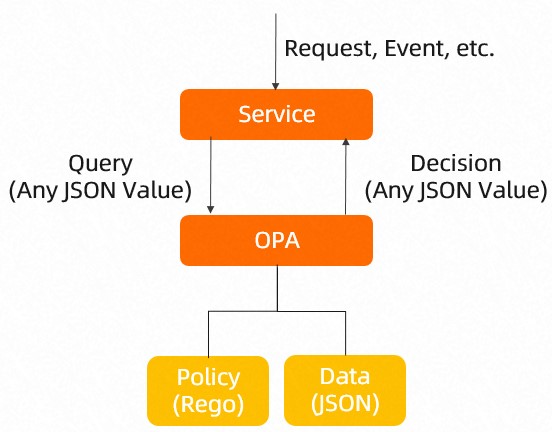
Step 1: Enable OPA
-
Log on to the ASM console.
-
In the left-side navigation pane, choose .
-
On the Mesh Management page, find the ASM instance that you want to configure. Click the name of the ASM instance or click Manage in the Actions column.
-
On the Basic Information page, click Settings in the upper-right corner.
-
In the Settings Update panel, select Enable OPA plug-in.
-
Click OK.
On the Basic Information page, the status of the OPA Plug-in changes to Enable.
Step 2: Create ConfigMaps
ASM supports dynamic updates for OPA policies. You can configure a Service Mesh with the openpolicyagent.org/policy=rego label. The policy is then automatically pushed to all pods with an injected OPA sidecar across all namespaces. Removing the ConfigMap also removes the policy from the pods.
-
When you define an OPA policy for a pod, you can include only one
default allowfield. If multiple OPA policy-related ConfigMaps apply to a pod and each policy defines adefault allowfield, the multipledefault allowfields cause dynamic updates to fail. -
The OPA sidecar depends on a ConfigMap named
opa-policyto start. If you delete this ConfigMap, the corresponding OPA policy is also removed from the OPA sidecar. Re-creating the ConfigMap does not restore the policy. You must re-create the pod.
-
Obtain the kubeconfig file of a cluster and use kubectl to connect to the cluster.
-
Create a ConfigMap that is named opa-policy.
The OPA sidecar requires a ConfigMap named
opa-policyto start. This ConfigMap supports dynamic updates. Use this ConfigMap for basic policy configuration only. Add complex policies dynamically through other ConfigMaps.-
Use the following content to create a YAML file that is named opa-policy:
apiVersion: v1 kind: ConfigMap metadata: name: opa-policy data: policy.rego: | ### The paths allowed in this policy are required for dynamic OPA policy updates. If these paths are not configured, the updates will fail. package istio.authz import input.parsed_path allow { parsed_path[0] = "v1" parsed_path[1] = "policies" } -
Run the following command to create the ConfigMap:
kubectl apply -f opa-policy.yaml
-
-
Create a ConfigMap that is named opa-policy-add.
Use this ConfigMap to define your OPA policy.
-
Use the following content to create a YAML file that is named opa-policy-add:
apiVersion: v1 kind: ConfigMap metadata: name: opa-policy-add labels: ### You must configure the following label in the ConfigMap. Otherwise, the OPA policy that the ConfigMap defines cannot be dynamically updated. openpolicyagent.org/policy: rego data: policy.rego: | ### The following code shows the definition of a sample policy. Define a policy based on your actual needs. package istio.authz import input.attributes.request.http as http_request default allow = false allow { roles_for_user[r] required_roles[r] } roles_for_user[r] { r := user_roles[user_name][_] } required_roles[r] { perm := role_perms[r][_] perm.method = http_request.method perm.path = http_request.path } user_name = parsed { [_, encoded] := split(http_request.headers.authorization, " ") [parsed, _] := split(base64url.decode(encoded), ":") } user_roles = { "guest1": ["guest"], "admin1": ["admin"] } role_perms = { "guest": [ {"method": "GET", "path": "/productpage"}, ], "admin": [ {"method": "GET", "path": "/productpage"}, {"method": "GET", "path": "/api/v1/products"}, ], }-
user_roles: Assigns roles to users. This example assigns theguestrole toguest1and theadminrole toadmin1. -
role_perms: Sets the permissions for each role. This example allows theguestrole to access the application at the /productpage path, and theadminrole to access the application at the /productpage and /api/v1/products paths.
-
-
Run the following command to create the ConfigMap:
kubectl apply -f opa-policy-add.yaml
-
-
Run the following command to view the policy push result:
The push status is updated in the
annotationsof the ConfigMap.kubectl get configmap opa-policy-add -o yamlView the ConfigMap in the command output:
-
If the push is successful, you can see the following information in the ConfigMap.
openpolicyagent.org/policy-status: '{"status":"ok"}' -
If the push fails, a corresponding error message is displayed.
-
Step 3: Inject an OPA sidecar
Deploy the sample application Bookinfo in the ASM instance and check whether an OPA sidecar is injected into each pod of the Bookinfo application.
-
Deploy the Bookinfo sample application to the ASM instance. For more information, see Deploy an application to an ASM instance.
-
Define Istio virtual services and an ingress gateway service as required. For more information, see Version-based traffic routing with Istio.
-
Check whether an OPA sidecar is injected into the pods of each application in the Bookinfo application.
Log on to the Container Service Management Console.
In the left navigation pane, click Cluster.
On the Cluster List page, click the name of the destination cluster or click Details in the Actions column.
In the left navigation pane of the cluster management page, choose .
-
On the Pods page, select default from the Namespace drop-down list and click the name of the target application's pod.
On the Containers tab, confirm that a sidecar proxy (istio-proxy) and an OPA sidecar (opa-istio) are injected. Repeat this check for each application pod.
Step 4: Verify that an OPA policy implements access control as expected
-
Run the following commands. The results show that the
guest1user, who has theguestrole, can access the application at/productpagebut is denied access at/api/v1/products.curl -X GET http://{{The IP address of the ingress gateway service}}/productpage --user guest1:password -IThe following output is expected:
HTTP/1.1 200 OKcurl -X GET http://{{The IP address of the ingress gateway service}}/api/v1/products --user guest1:password -IThe following output is expected:
HTTP/1.1 403 Forbidden -
Run the following commands. The results show that the
admin1user, who has theadminrole, can access the application at both the/productpageand/api/v1/productspaths.curl -X GET http://{{The IP address of the ingress gateway service}}/productpage --user admin1:password -IThe following output is expected:
HTTP/1.1 200 OKcurl -X GET http://{{The IP address of the ingress gateway service}}/api/v1/products --user admin1:password -IThe following output is expected:
HTTP/1.1 200 OKThe preceding results indicate that the defined OPA policy implements access control as expected.
Step 5: Dynamically update an OPA policy
-
Run the following command on the ACK cluster to update the ConfigMap that is named opa-policy-add:
kubectl replace -n {The namespace where the ACK cluster resides} -f - <<EOF apiVersion: v1 kind: ConfigMap metadata: name: opa-policy-add labels: ### You must configure the following label in the ConfigMap. Otherwise, the OPA policy that the ConfigMap defines cannot be dynamically updated. openpolicyagent.org/policy: rego data: policy.rego: | ### The following code shows the definition of a sample policy. Define a policy based on your actual needs. package istio.authz import input.attributes.request.http as http_request default allow = false allow { roles_for_user[r] required_roles[r] } roles_for_user[r] { r := user_roles[user_name][_] } required_roles[r] { perm := role_perms[r][_] perm.method = http_request.method perm.path = http_request.path } user_name = parsed { [_, encoded] := split(http_request.headers.authorization, " ") [parsed, _] := split(base64url.decode(encoded), ":") } user_roles = { "guest1": ["guest", "admin"], "admin1": ["admin"] } role_perms = { "guest": [ {"method": "GET", "path": "/productpage"}, ], "admin": [ {"method": "GET", "path": "/productpage"}, {"method": "GET", "path": "/api/v1/products"}, ], } EOF-
user_roles: Assigns roles to users. This example grantsguest1both theguestandadminroles, whileadmin1has theadminrole. -
role_perms: Sets the permissions for each role. This example allows theguestrole to access the application at the /productpage path, and theadminrole to access it at the /productpage and /api/v1/products paths.
-
-
Run the following command to view the policy push result:
The push status is updated in the
annotationsof the ConfigMap.kubectl get configmap opa-policy-add -o yamlView the ConfigMap in the command output:
-
If the push is successful, you can see the following information in the ConfigMap.
openpolicyagent.org/policy-status: '{"status":"ok"}' -
If the push fails, a corresponding error message is displayed.
-
Step 6: Verify that an OPA policy is dynamically updated
Run the following cURL commands. The results indicate that the admin role is assigned to the guest1 user. In addition, the guest1 user has the permissions to access the application by using a URL that contains /productpage or /api/v1/products.
curl -X GET http://{{The IP address of the ingress gateway service}}/productpage --user guest1:password -IThe following output is expected:
HTTP/1.1 200 OKcurl -X GET http://{{The IP address of the ingress gateway service}}/api/v1/products --user guest1:password -IThe following output is expected:
HTTP/1.1 200 OKBefore the OPA policy is updated, the guest1 user can access the application by using a URL that contains /productpage, but not /api/v1/products. After the OPA policy is updated, the guest1 user can access the application by using a URL that contains /productpage or /api/v1/products. The result indicates that the OPA policy is dynamically updated.