Best practices for GTX_FPGA
Introduction to GTX-FPGA
GTX-FPGA is a whole-genome analysis acceleration tool developed by GTX-Laboratory. It uses a heterogeneous acceleration technology that combines CPUs and FPGAs. This approach leverages the unique characteristics of each component for high-performance computing (HPC) of genetic data. GTX-FPGA can reduce the analysis time for 30× whole-genome data from 30 hours to 30 minutes. It can also reduce the analysis time for 100× whole-exome data from 6 hours to 5 minutes.
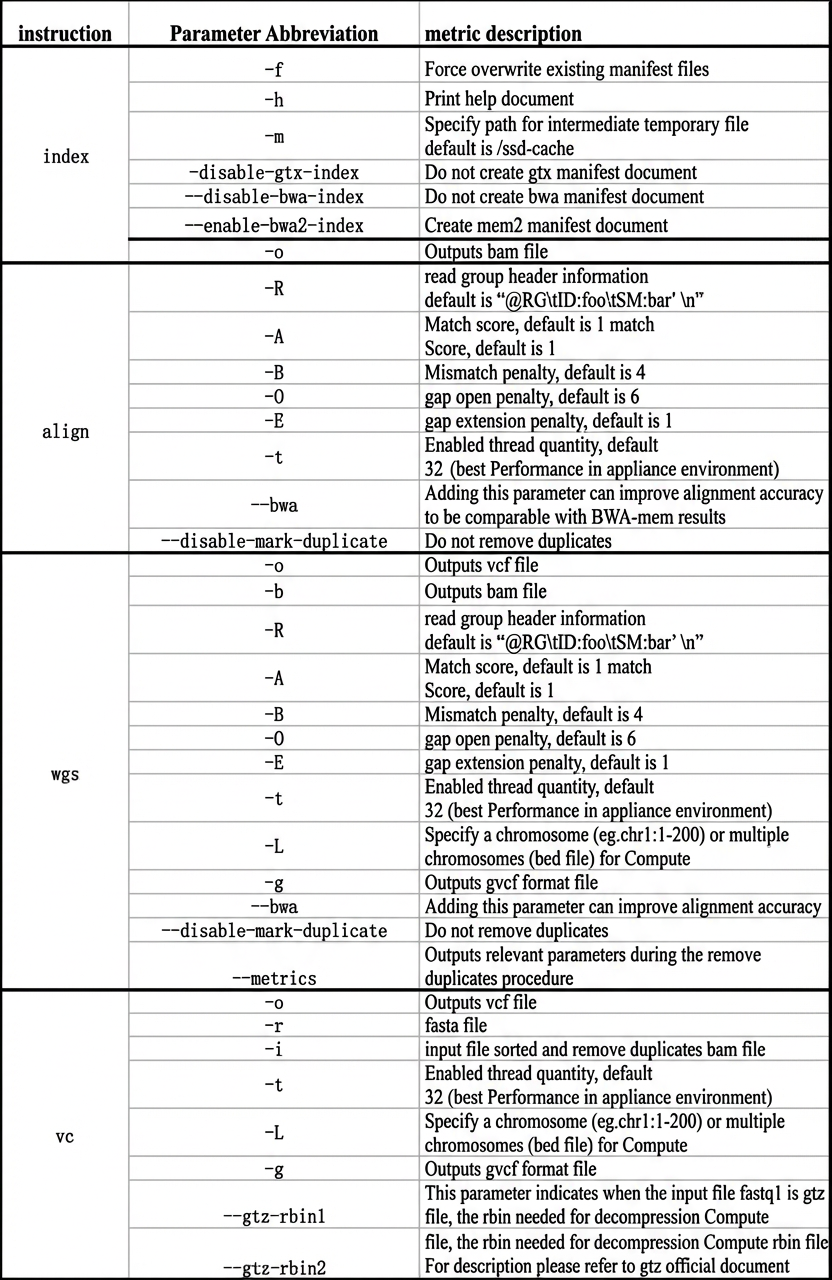
GTX-FPGA analysis includes several steps: index building (index), genome alignment (align), variant calling (vc), and whole-genome sequencing (wgs). The wgs step integrates the align and vc steps. This integrated process is also referred to as "GTX one" in this topic.
This topic describes how to use the GTX-FPGA product in Alibaba Cloud BatchCompute to run whole-genome and whole-exome data analysis jobs.
Constraints
The GTX-FPGA product currently supports only f3 instances in Alibaba Cloud Elastic Compute Service (ECS). Each instance requires a Solid-State Drive (SSD) data disk with a specific capacity. The required capacity depends on the size of the FASTA file. The disk size required for the align step is the sum of the sizes of the two FASTQ files, multiplied by 2. For example, if fastq1 is 40 GB and fastq2 is 42 GB, the required data disk space is 164 GB. For the wgs step, the required disk space depends on the size of the raw data and the calculation results. For example, for a 30× WGS job, if you have 100 GB of raw data and 150 GB of calculation results, the required data disk size is 250 GB. For human genome data, you can use the default data disk size specified in the demo in this topic.
The GTX-FPGA product is currently available for testing only in the China (Beijing) region.
The GTX-FPGA product is in public preview. During the public preview, the product is free of charge. You are charged only for the instances and storage resources that your jobs use.
Prerequisites
Log on to the Alibaba Cloud console and ensure that your account has a sufficient balance to run the entire analysis flow.
Activate the BatchCompute service to execute analysis tasks.
Activate Object Storage Service (OSS) to upload your sequencing data and save the analysis results. Create a bucket, such as gtx-wgs-demo.
Create or obtain an AccessKey. If you use a RAM user, confirm that the user has permissions to use BatchCompute and OSS. For more information, see the Quick start document. Copy the AccessKey ID and AccessKey secret for later use.
Usage
GTX-FPGA supports running jobs in Workflow Description Language (WDL) mode and Directed Acyclic Graph (DAG) mode.
1. GTX command format
2. Run in WDL mode
For more information about how to use WDL mode, see WDL mode usage.
3. Run in DAG mode
3.1. Sample script
Download the DAG job sample code.
Note the following:
The genGtxIndexCmd command builds a GTX index. The genGtxWgsCmd command runs the "GTX one" flow. The genGtxAlignCmd command performs GTX genome alignment. The genGtxVcCmd command performs GTX variant detection. For more information about how to use these commands, see the help information in the code.
You can customize each GTX parameter in the preceding steps or use the default values.
Index building is an optional step. In this demo, the index is built by default. To build an index, add the isNeedIndex parameter when you run the script.
You can pass the read_group_header through the command line or use the default value.
The sample code runs the "GTX one" flow by default. This flow executes the alignment and variant detection processes at the same time. To run the steps separately, set the corresponding parameters.
Use the pip install --upgrade batchcompute command to update the BatchCompute software development kit (SDK) for Python to the latest version.
3.2. Run the command
python test.py --reference oss://xxx/ref/hg19.fa --fastq1 oss://xxx/input/human30x_10m_1.fastq --fastq2 oss://xxxx/_input/human30x_10m_2.fastq --output oss://xxx/testoutput/3.3. Results