IVR modules
An IVR process consists of multiple IVR modules connected by lines and is highly customizable. To use an IVR module, drag it from the module panel onto the canvas. This topic describes the functions of the following modules: start module, play audio module, collect digits module, branch module, transfer to agent module, transfer to external line module, set variables module, voicemail module, hang-up cause module, function module, subprocess module, and end module.
Start module
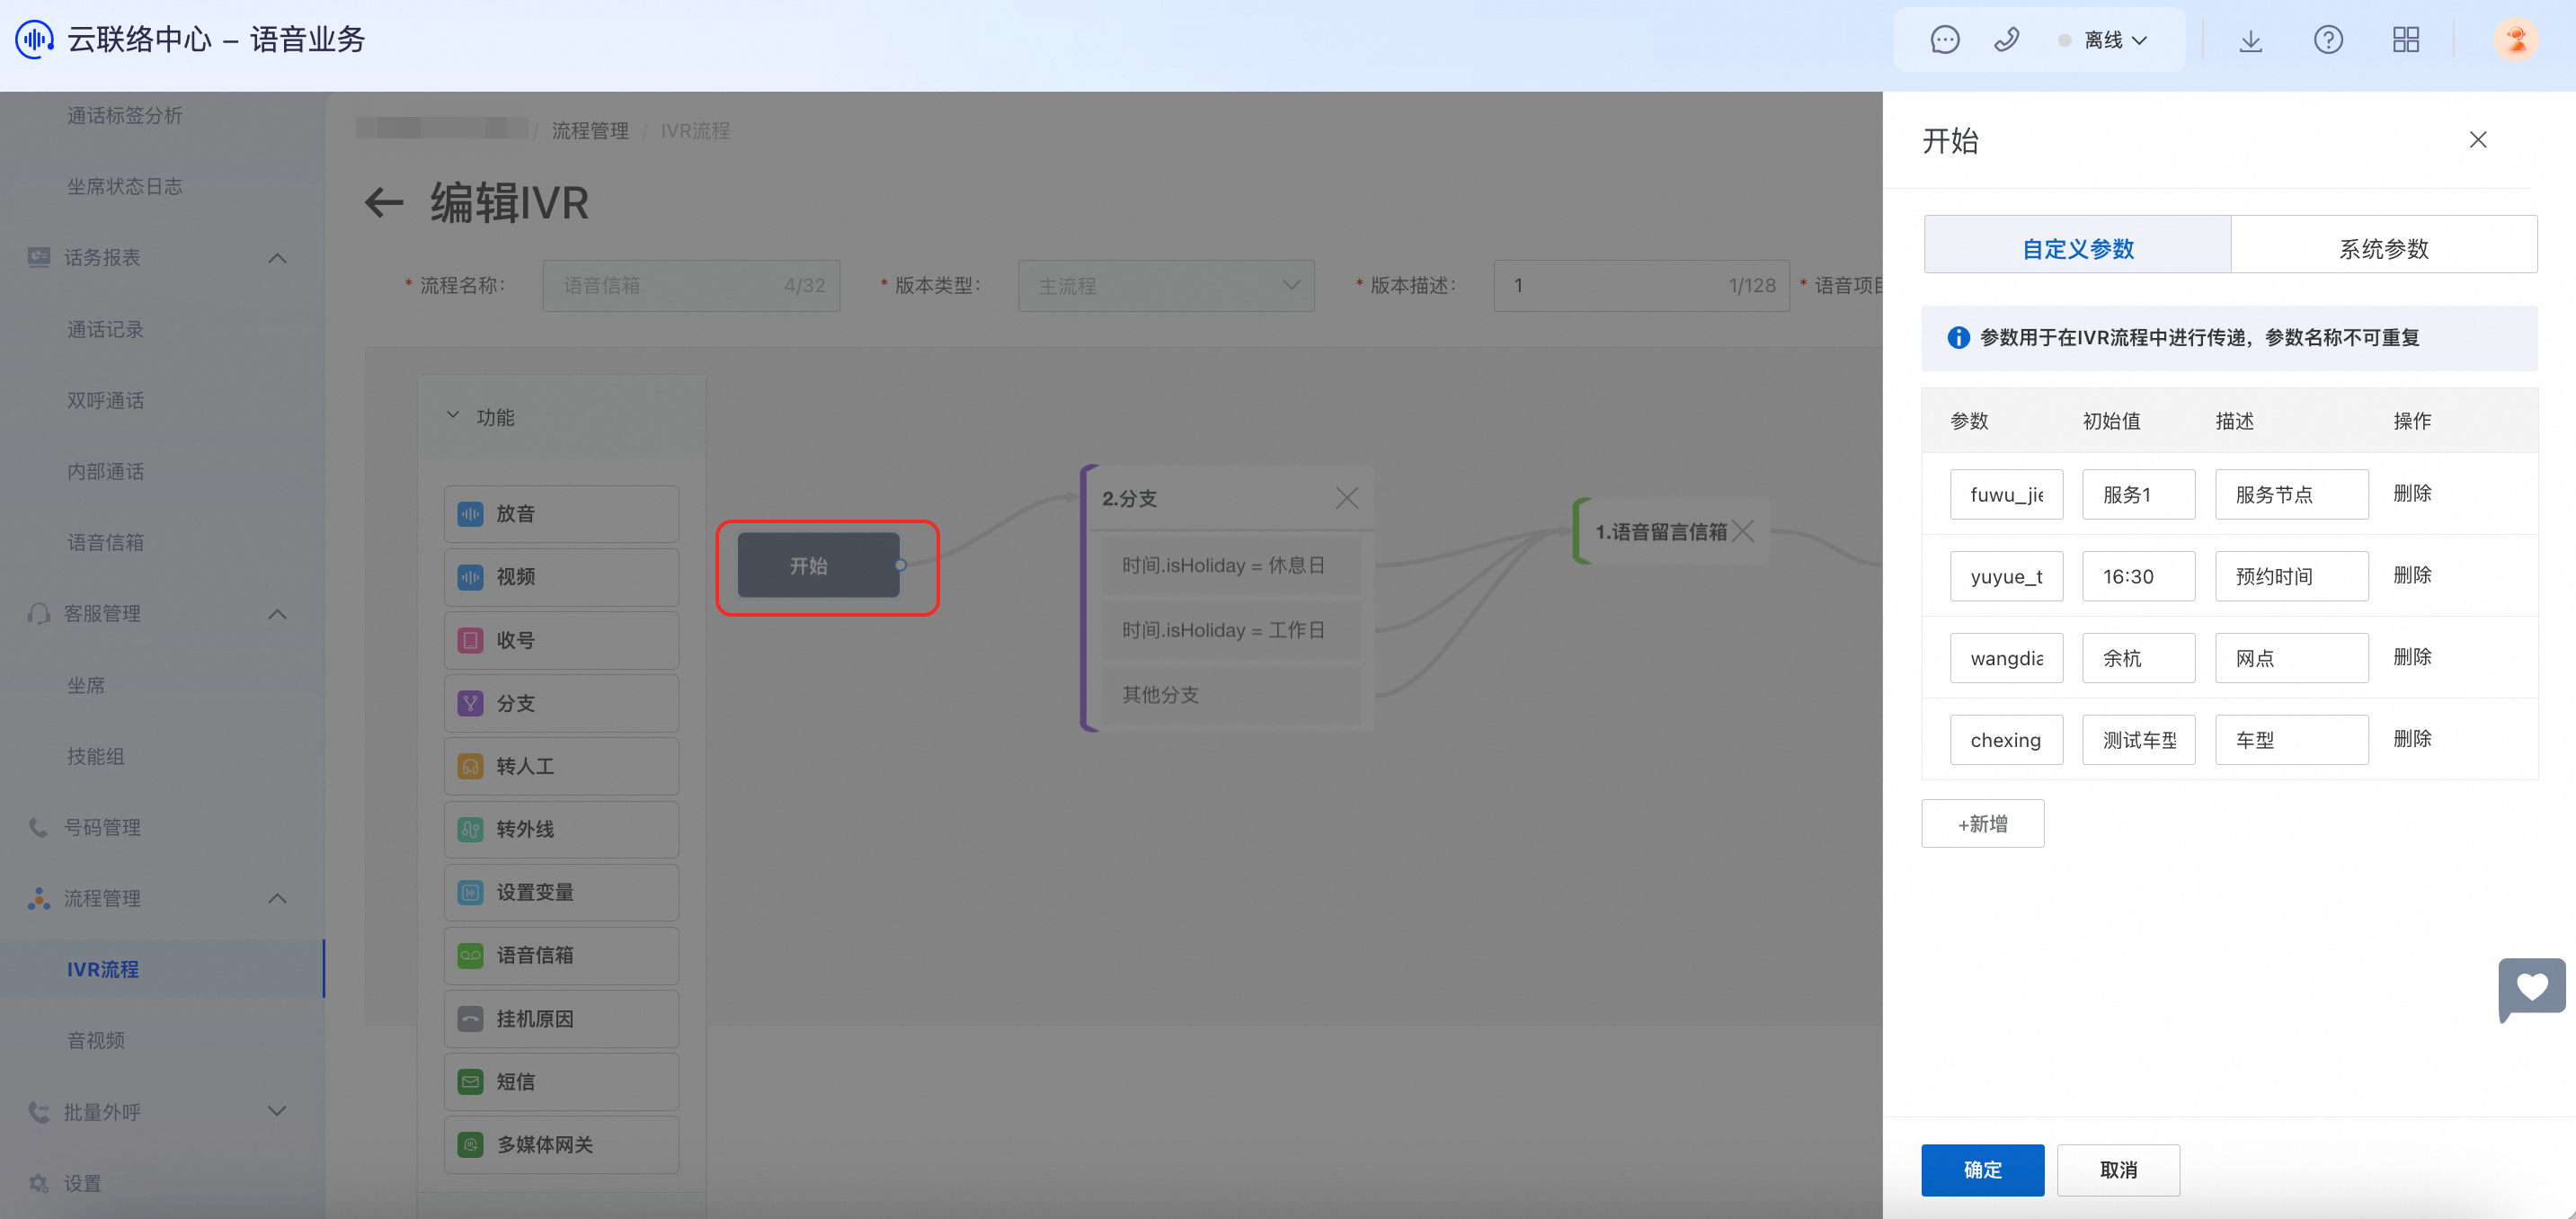
Every IVR process must begin with a start module. This module cannot be edited or deleted. You can define custom parameters in the start module. These parameters are passed throughout the IVR process. Parameter names must be unique.
Play audio module
Use this module to play an audio file or a text-to-speech (TTS) message. It is often used for welcome messages or as a transition between other modules.
Go to the IVR process management page, select a specific IVR process, and click Edit in the Actions column.
On the IVR editor page, select the play audio module to open its configuration window. After you configure the settings, click OK.
Module name: A custom name for the module.
Audio prompt - Use audio file
The drop-down list displays your uploaded private audio files.
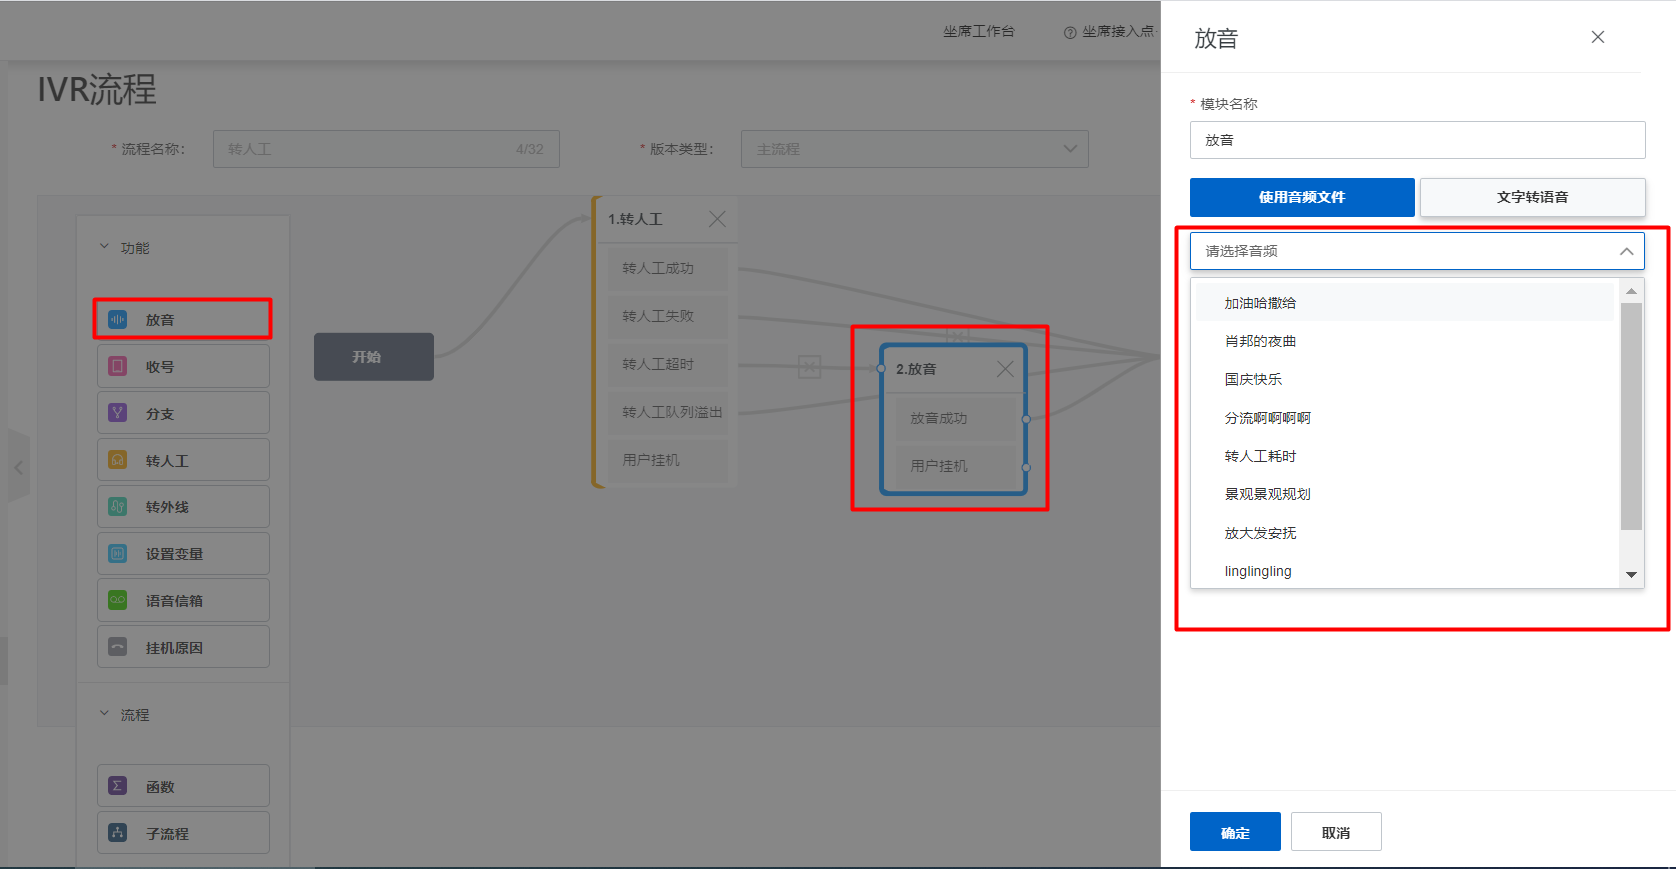
If the audio file you need is not in the list, click Upload audio. A new tab opens to the audio management page where you can add a new file. After the upload is complete, return to the original tab and click the drop-down list again to refresh it. For more information, see the Audio and video guide.
Audio prompt - Text-to-speech
You can enter up to 200 characters for each conversion.
You can reference parameters in the text. Enter a space followed by a dollar sign ($) to select a parameter. For example: "Hello ${start.callee}, welcome to Alibaba Cloud Contact Center."
Collect digits module
This module stores the user's Dual-Tone Multi-Frequency (DTMF) input in a custom parameter, which can be passed to a branch module for processing.
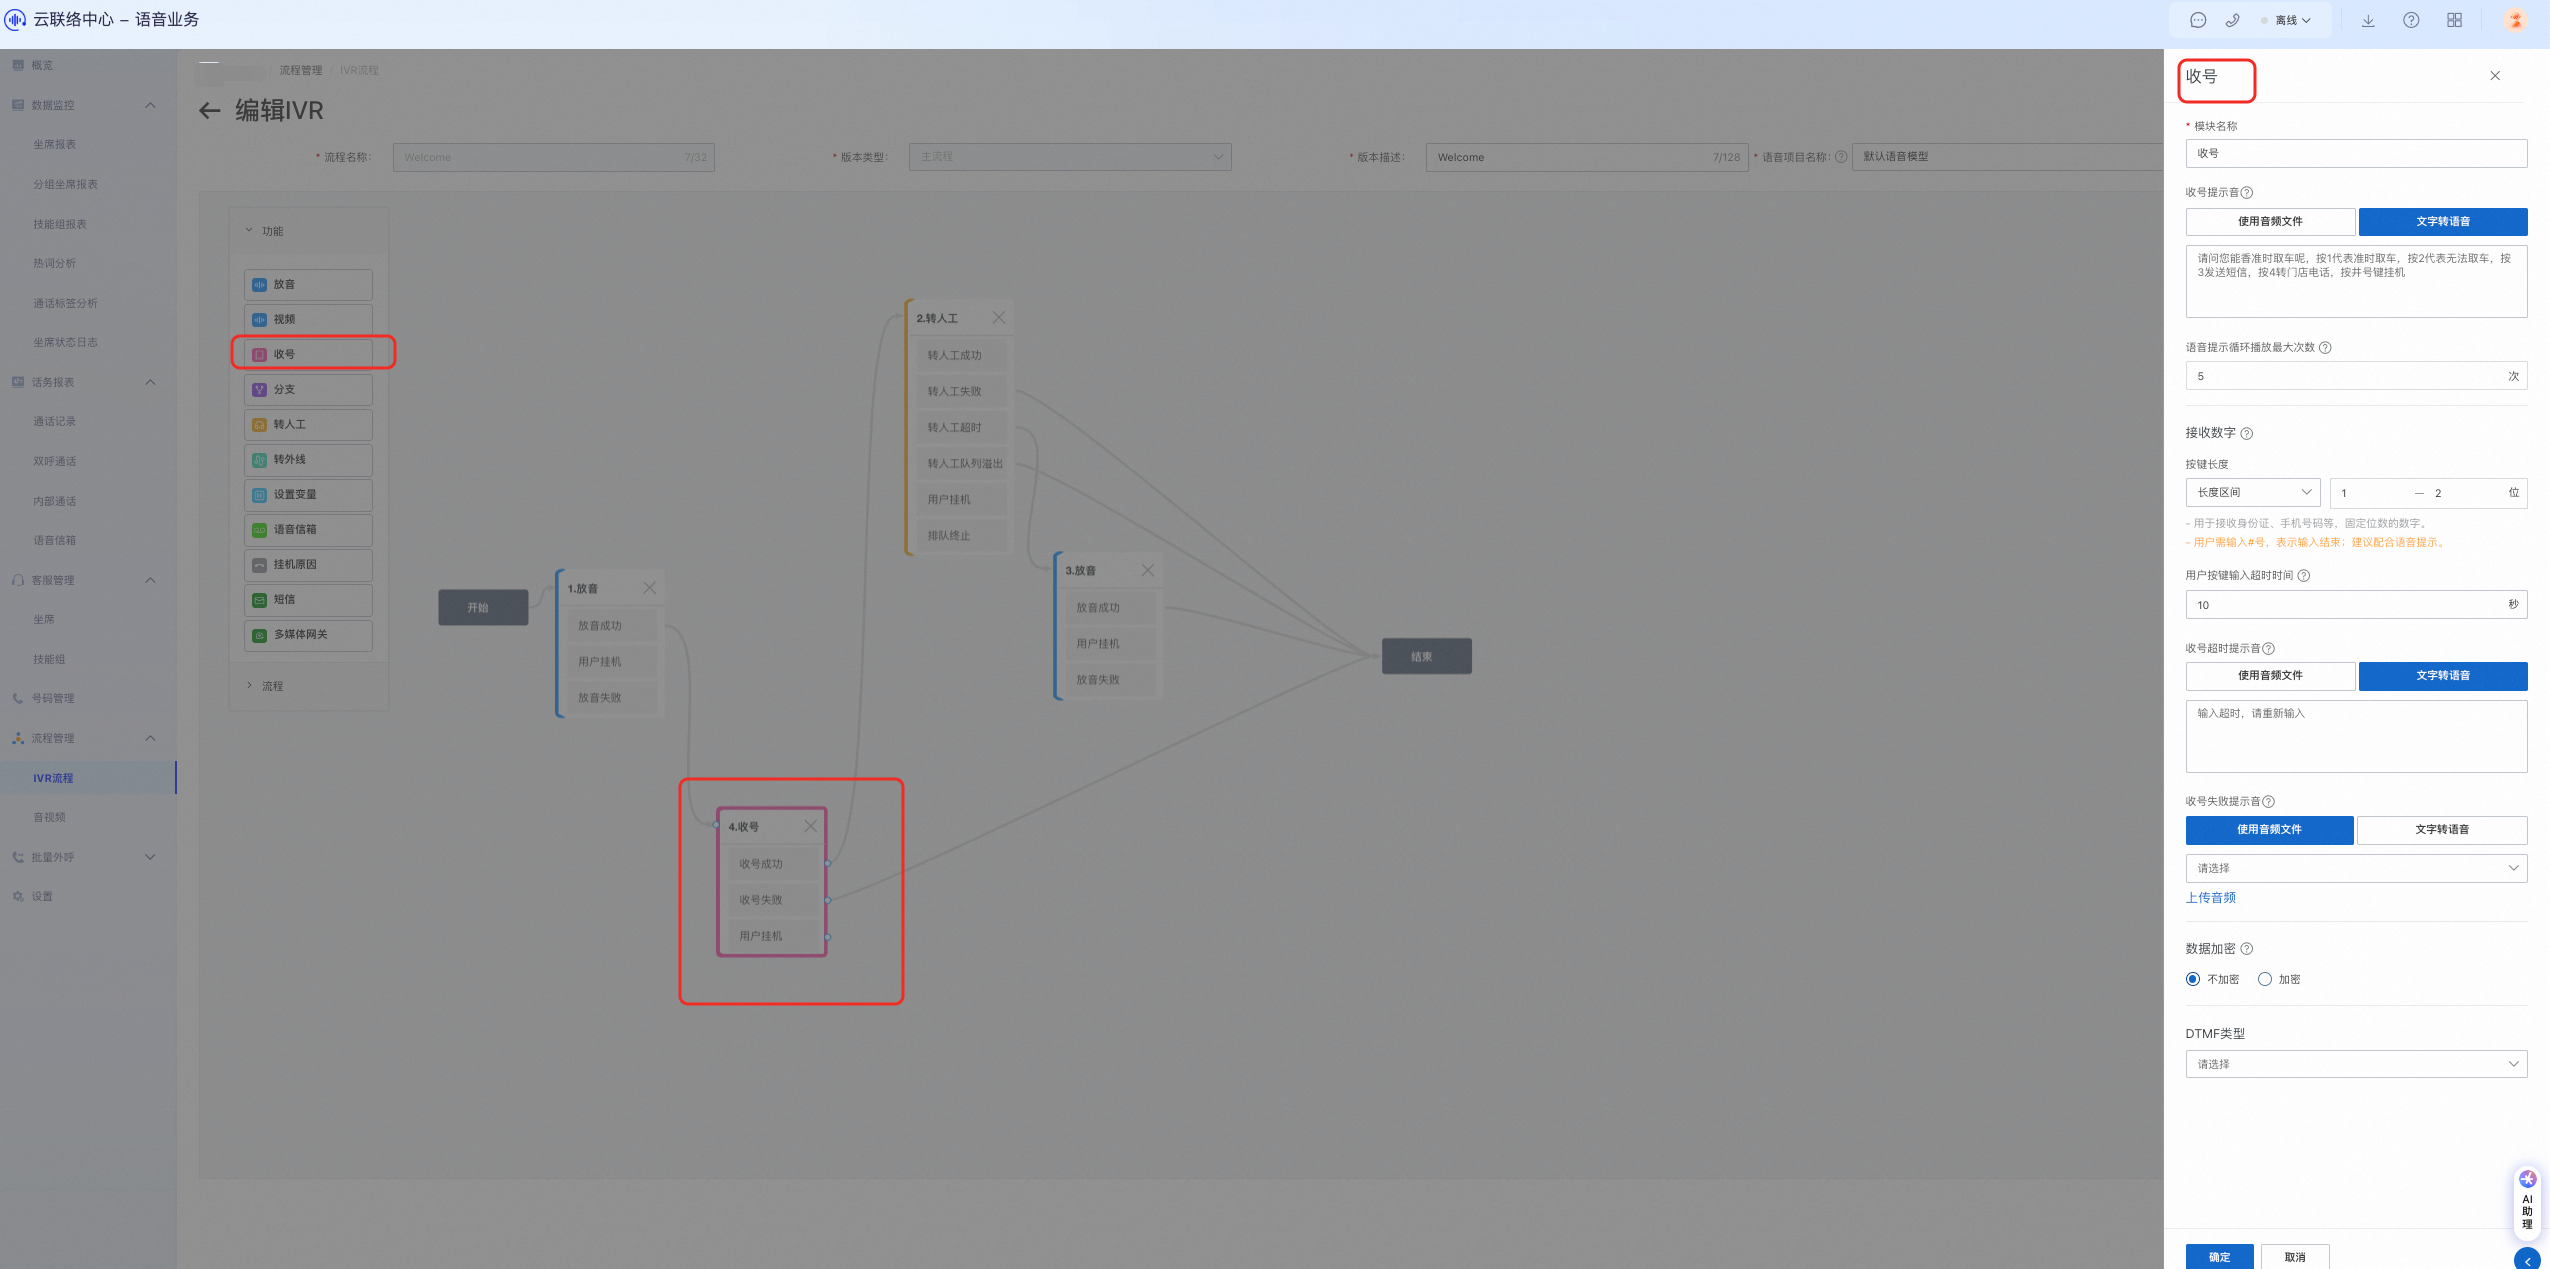
Module name: A custom name for the module.
Audio prompt - Use audio file
The drop-down list displays your uploaded private audio files and public audio files provided by Alibaba Cloud Contact Center.
If the audio file you need is not in the list, click Upload audio. A new tab opens to the audio management page where you can add a new file. After the upload is complete, return to the original tab and click the drop-down list again to refresh it.
Audio prompt - Text-to-speech
You can enter up to 200 characters for each conversion.
You can reference parameters in the text. Enter a space followed by a dollar sign ($) to select a parameter. For example: "Hello ${start.callee}, welcome to Alibaba Cloud Contact Center."
Maximum audio prompt loops: If the user does not press any keys, the audio prompt loops. If the loop limit is reached, the call proceeds to the module connected to the "Digit collection failed" exit (by default, the end module, which hangs up the call). We recommend setting a low number for this value. If the caller does not enter any digits and does not hang up, the call remains active, which can incur charges for pay-as-you-go users.
Collect digits
Digit collection is successful in the following scenarios:
The user input is longer than the minimum length, is shorter than the maximum length, and the input times out.
The user input is longer than the minimum length, is shorter than the maximum length, and the user presses the # key.
The user input reaches the maximum length.
Digit collection fails in the following scenarios:
The user input is shorter than the minimum length, and the input times out.
The user input is shorter than the minimum length, and the user presses the # key.
You can configure the expected input length as a Fixed number of digits or a Range of digits.
Fixed number of digits is used for inputs with a known length, such as an ID number or phone number. The flow proceeds to the next module automatically after the specified number of digits is entered.
Range of digits is used for inputs with a variable length. The user must press the # key to confirm the end of input. We recommend that you include this instruction in the audio prompt.
User input timeout: If the time between a user's key presses exceeds this value, the audio prompt replays, and the user must re-enter the entire input. If you set a long timeout period for a variable-length input, we recommend that you prompt the user to press the # key after they finish entering the digits.
Collection timeout prompt
When the timeout period is reached, the collection timeout prompt plays. After the prompt finishes, the initial collection prompt plays again.
Use audio file
The drop-down list displays your uploaded private audio files and public audio files provided by Alibaba Cloud Contact Center.
If the audio file you need is not in the list, click "Upload audio." A new tab opens to the audio management page where you can add a new file. After the upload is complete, return to the original tab and click the drop-down list again to refresh it.
Use text-to-speech
You can enter up to 200 characters for each conversion.
You can reference parameters in the text. Enter a space followed by a dollar sign ($) to select a parameter. For example: "Hello ${start.callee}, welcome to Alibaba Cloud Contact Center."
Collection failure prompt: If the digit collection fails, this prompt is played. After the prompt finishes, the initial collection prompt plays again.
Use audio file
The drop-down list displays your uploaded private audio files and public audio files provided by Alibaba Cloud Contact Center.
If the audio file you need is not in the list, click Upload audio. A new tab opens to the audio management page where you can add a new file. After the upload is complete, return to the original tab and click the drop-down list again to refresh it.
Use text-to-speech
You can enter up to 200 characters for each conversion.
You can reference parameters in the text. Enter a space followed by a dollar sign ($) to select a parameter. For example: "Hello ${start.callee}, welcome to Alibaba Cloud Contact Center."
Data encryption: Select whether to encrypt the user's input.
DTMF type
NoteDTMF is used to send key-press information for interactive services, such as pressing 1 or 2 to navigate to a specific menu. You do not typically need to configure this setting. If you enable it, select a type based on your needs. Because DTMF protocols are subject to the capabilities of the callee's terminal and carrier network, DTMF recognition may not be 100% accurate. In practice, if your IVR process uses multiple digit collection modules with significantly different input lengths, we recommend using AUTO to improve recognition accuracy.
You can select: All, RFC2833, INBAND_AUDIO, or AUTO. Inband and RFC 2833 are two different methods for transmitting DTMF signals. The module stores the user's input in a variable, which is typically used to collect information such as account details or menu selections. The collect digits module is often followed by a function module, which passes the collected variable as a parameter to a third-party API for processing. The result is then returned to the IVR process to enable customized interactive voice response (IVR) flows.
Use cases
Menu selection: In a phone navigation menu, the collect digits module allows users to select a service by pressing a key, such as "Press 1 for pre-sales, 2 for post-sales, or 3 for complaints." (Set DTMF type to RFC2833).
Account information collection: In financial systems or anti-counterfeiting code verification systems, the collect digits module can be used to collect customer account information, such as account numbers and passwords. (Set DTMF type to RFC2833).
Personalized service: By collecting user input, the IVR system can provide more personalized services, such as adjusting the subsequent conversation flow based on the user's input. (Set DTMF type to AUTO).
Usage
If your IVR process requires only one digit collection instruction, or if multiple instructions collect a similar number of digits, we recommend using RFC2833.
If your IVR process requires multiple digit collection instructions with significantly different input lengths, we recommend using AUTO.
Branch module
This module routes the call based on rules that evaluate a parameter's value. After you configure the settings, click OK.
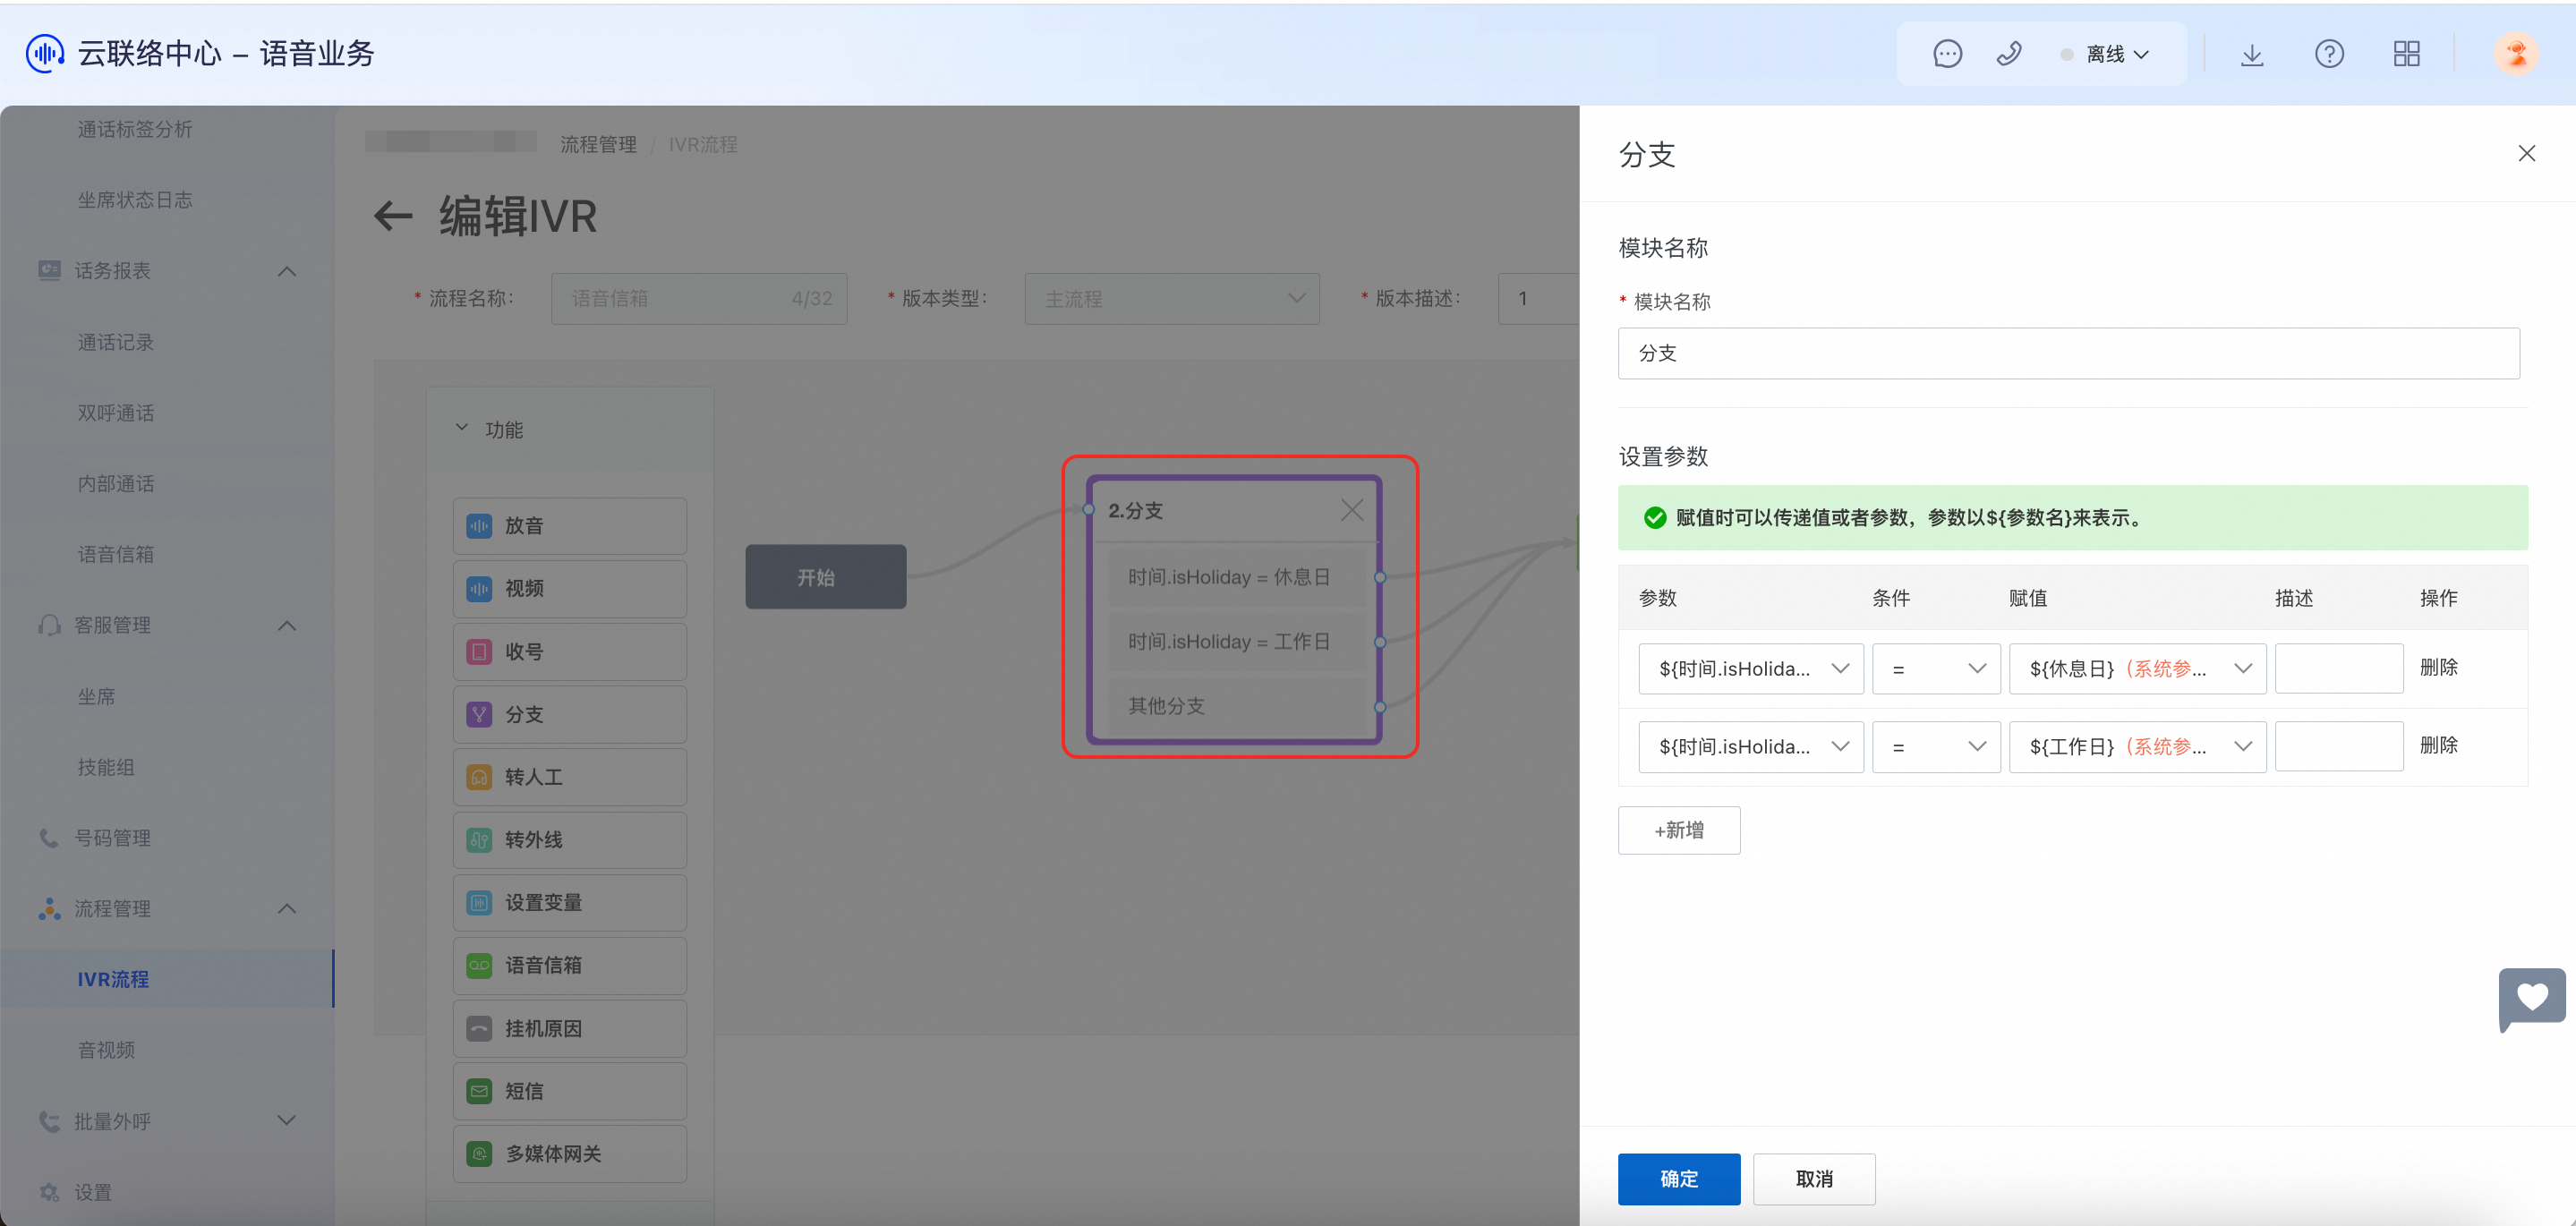
Module name: A custom name for the module.
Set parameters
Parameter: The drop-down list displays system parameters and custom parameters defined in the start, play audio, and function modules.
Condition: The drop-down list provides nine conditions.
Value: Enter a value based on your scenario. You can also reference a parameter by using the format ${ParameterName}.
Description: This field is optional.
Click Add to add a new condition.
Transfer to agent module
Use this module to transfer a call to a skill group. The system routes the call based on the queue priority, agent availability within the skill group, and agent proficiency levels.
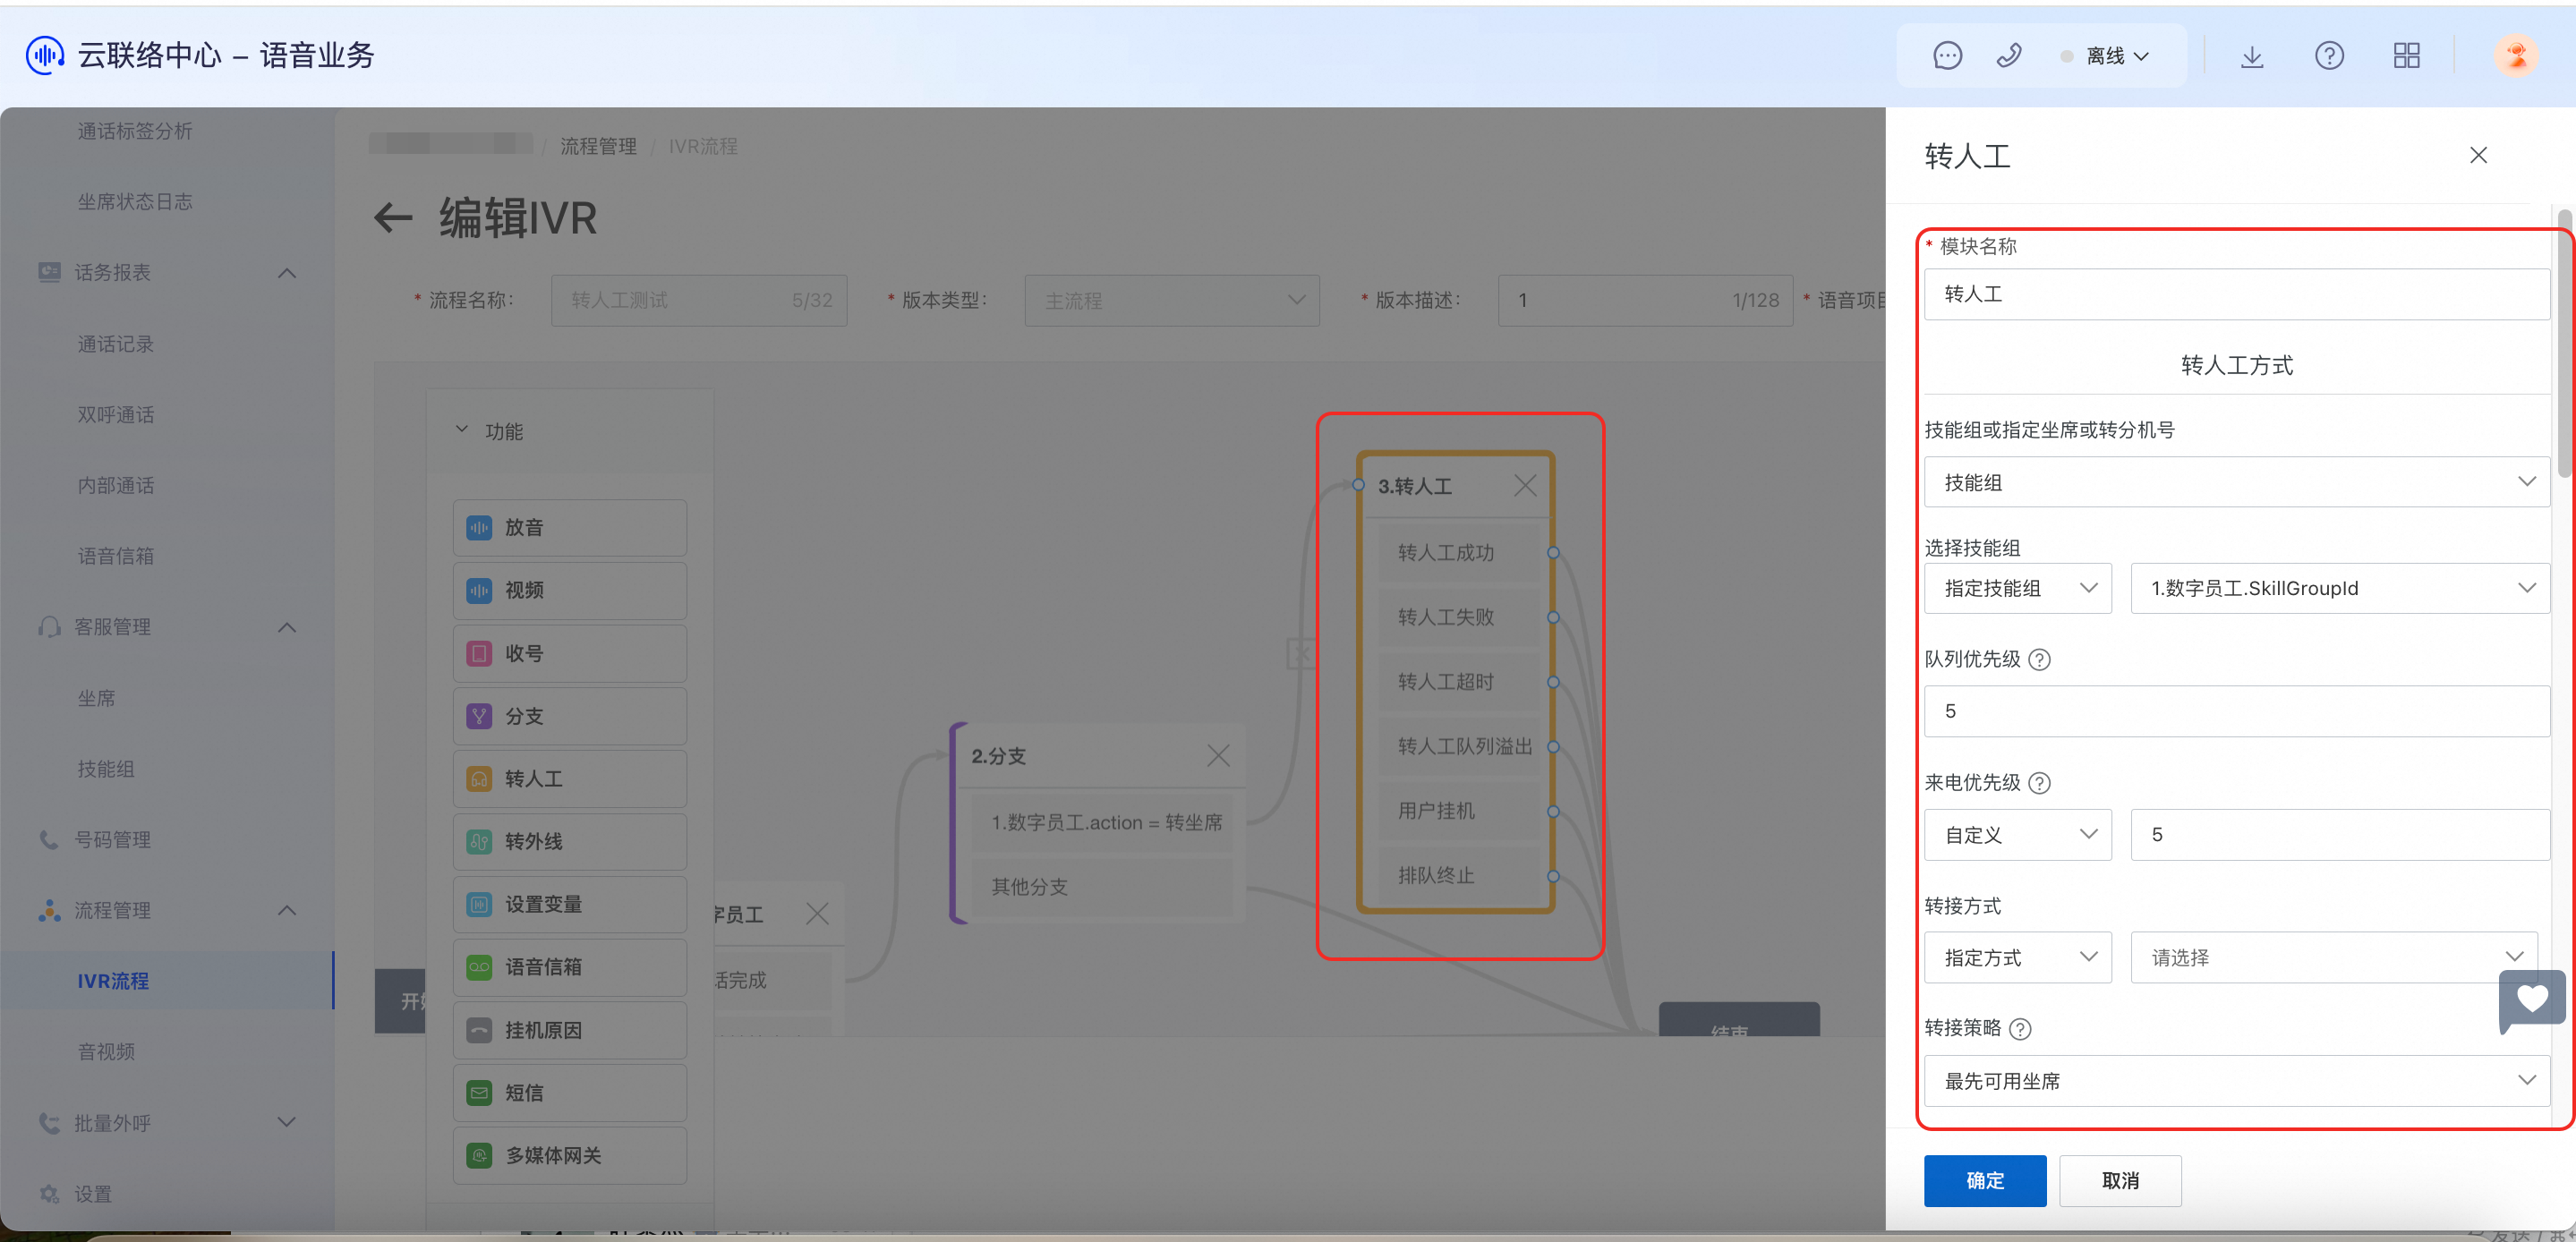
Module name: A custom name for the module.
Branch descriptions
Transfer to agent failed: The call fails to enter the queue (QueuingFailed). A transfer can fail for several reasons.
Queue is full or all agents are busy: If all agents in a skill group are busy and the queue is full, new calls cannot enter the queue.
This typically occurs during peak hours or when there are not enough agents to handle the call volume.
Poor IVR process design: A poorly designed process can affect the success rate of agent transfers.
If the transfer to agent module is poorly designed or contains logical errors, the user might not be able to correctly trigger the transfer option.
System or network failure: System or network issues can also prevent a successful transfer.
For example, server downtime, network latency, or interruptions can affect the normal operation of the IVR system.
Transfer to agent timed out: The call follows this branch if the configured timeout period for the transfer is reached.
Queue overflow: The call follows this branch if the caller's position in the queue exceeds the defined limit.
Transfer method
You can transfer to a skill group or a specific agent.
When you select a skill group, the drop-down list shows all skill groups in the current contact center instance. When a call enters this module, it is routed to the selected skill group and then assigned to an available agent.
When you select an agent, you are prompted to enter the agent's userName. For more information, see Transfer a call to a specific agent in an IVR process.
Timeout: The default value is 600 seconds, and the maximum is 3600 seconds. If all agents are busy and the caller's wait time exceeds this value, the call follows the Transfer to agent timed out exit. We recommend connecting this exit to a play audio module that informs the customer to call back later.
Queue priority: Defines the priority of the queue as an integer from 0 to 9, where 0 is the highest priority. Calls in higher-priority queues are answered first.
Call priority: Defines the priority of the call as an integer from 0 to 9, where 0 is the highest priority. Within the same queue, higher-priority calls are answered first.
Routing strategy
First available agent: Calls are routed in order to the agent who has been idle the longest. For example, if Agent A has been idle for 5 minutes and Agent B has been idle for 1 minute, the next call is routed to Agent A.
Skill group level: Calls are routed based on the agent's skill level, with higher-skilled agents prioritized. For example, if Agent A has a skill level of 1 and Agent B has a skill level of 10, calls are always routed to Agent A unless Agent A is busy.
Familiar agent mode: Prioritizes routing the call to an agent who has handled a call from the same number within the last N days (including agents from multi-party calls). For example, if Agent A handled a call from a customer 3 days ago, the customer's next call is routed to Agent A first. If Agent A is busy, the call is routed using the first available agent strategy.
Lowest utilization: Prioritizes routing the call to the agent with the lowest utilization rate.
NoteIf the selected strategy fails due to an error, missing data, or other reasons, the system defaults to the first available agent strategy.
In-queue/before an agent answers configuration
Text-to-speech
You can enter up to 200 characters for each conversion.
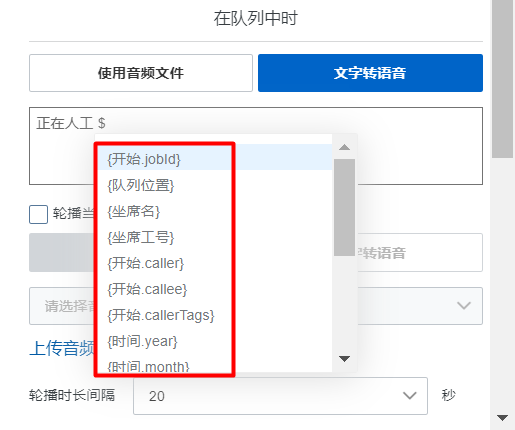
You can reference parameters in the text. Enter a space followed by a dollar sign ($) to select a parameter. For example: "Hello ${start.callee}, welcome to Alibaba Cloud Contact Center." For a list of available parameters, see the following figure:

Use audio file
The drop-down list displays your uploaded private audio files.
If the audio file you need is not in the list, click Upload audio. A new tab opens to the audio management page where you can add a new file. After the upload is complete, return to the original tab and click the drop-down list again to refresh it.
Call-attached data
When a transfer to an agent succeeds, the system passes the configured call-attached data to the agent's softphone SDK. Integrated users can retrieve this data by using the onCallEstablish hook function. These parameters can be system parameters, such as _time and _date; pre-arranged communication-side parameters, such as _x_call_id, which is the XCallId sent in the call-attached data; or other parameters defined in the IVR, such as a parameter from a collect digits module that stores user input.
Transfer to external line module
Use this module to transfer a call to an external phone number.
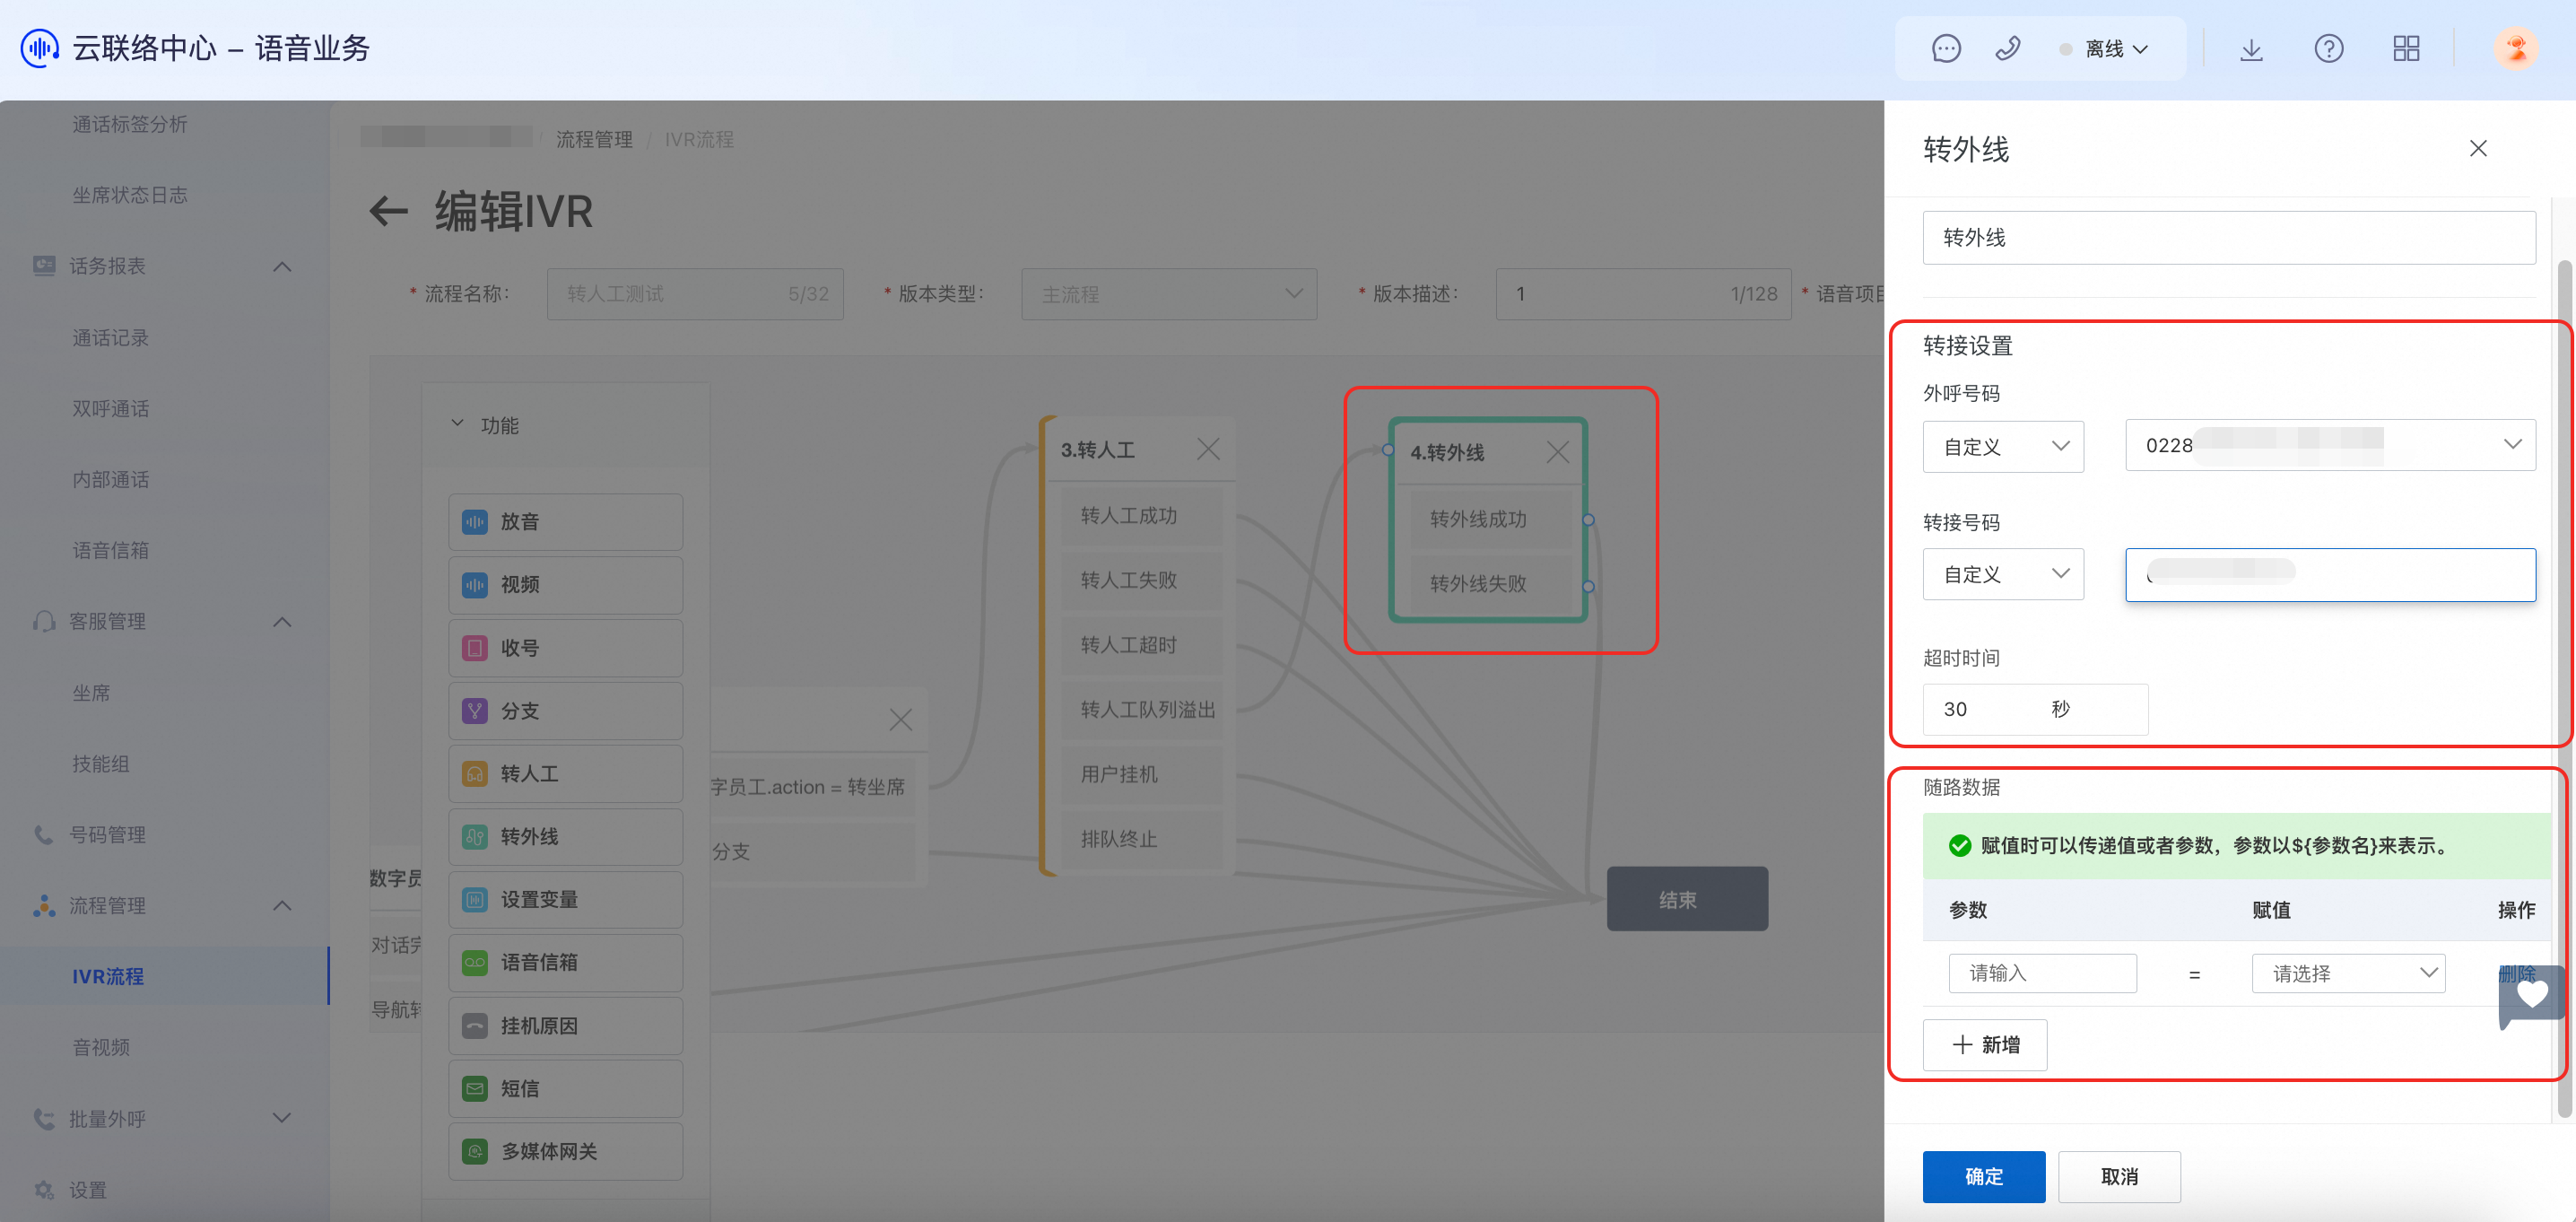
Module name: A custom name for the module.
Outbound number
Custom: Select the number to use for the outbound transfer. The drop-down list shows all available outbound numbers in Alibaba Cloud Contact Center.
Reference parameter: You can use a parameter from a previous step in the process as the outbound number.
Transferred number
Custom: The external number to which the call is transferred. This can be a mobile or landline number. You can also use a custom parameter.
Reference parameter: You can use a parameter from a previous step in the process as the transferred number.
NoteIf the outbound number configured for the transfer is a number you obtained from Alibaba Cloud Contact Center, it is subject to carrier frequency limits (five calls per day to a single number). To use this feature, you must provide a whitelist of transferred numbers. To submit a whitelist, contact Alibaba Cloud Contact Center support by joining the DingTalk group (Group ID: 44752480). Otherwise, the carrier's policy will be triggered, and the outbound call will fail.
Attach recording parameters: You can configure parameters to attach to the recording when transferring to an external line. The parameter value can be another parameter or a custom value.
This module has two exits on the canvas:
Transfer succeeded: This indicates that the system has successfully initiated the action to call the transferred number. The success of the outbound call itself is controlled by the carrier, and Alibaba Cloud Contact Center cannot determine the result. We recommend connecting this exit to an end module.
Transfer failed: The transfer failed due to a system error in the transfer to external line module. We recommend connecting this exit to a play audio module to inform the user of the failure.
Transferring to an external line is equivalent to making an outbound call from Alibaba Cloud Contact Center. When the transfer is initiated, there is a silent period of about 3 to 4 seconds before the ringtone of the transferred number is played. To prevent the customer from hanging up during this period, we recommend adding a play audio module before this module to play a message such as "Calling, please wait."
Set variables module
Use this module to define and assign values to custom parameters for use in different business scenarios within an IVR process. After you complete the configuration, click OK.
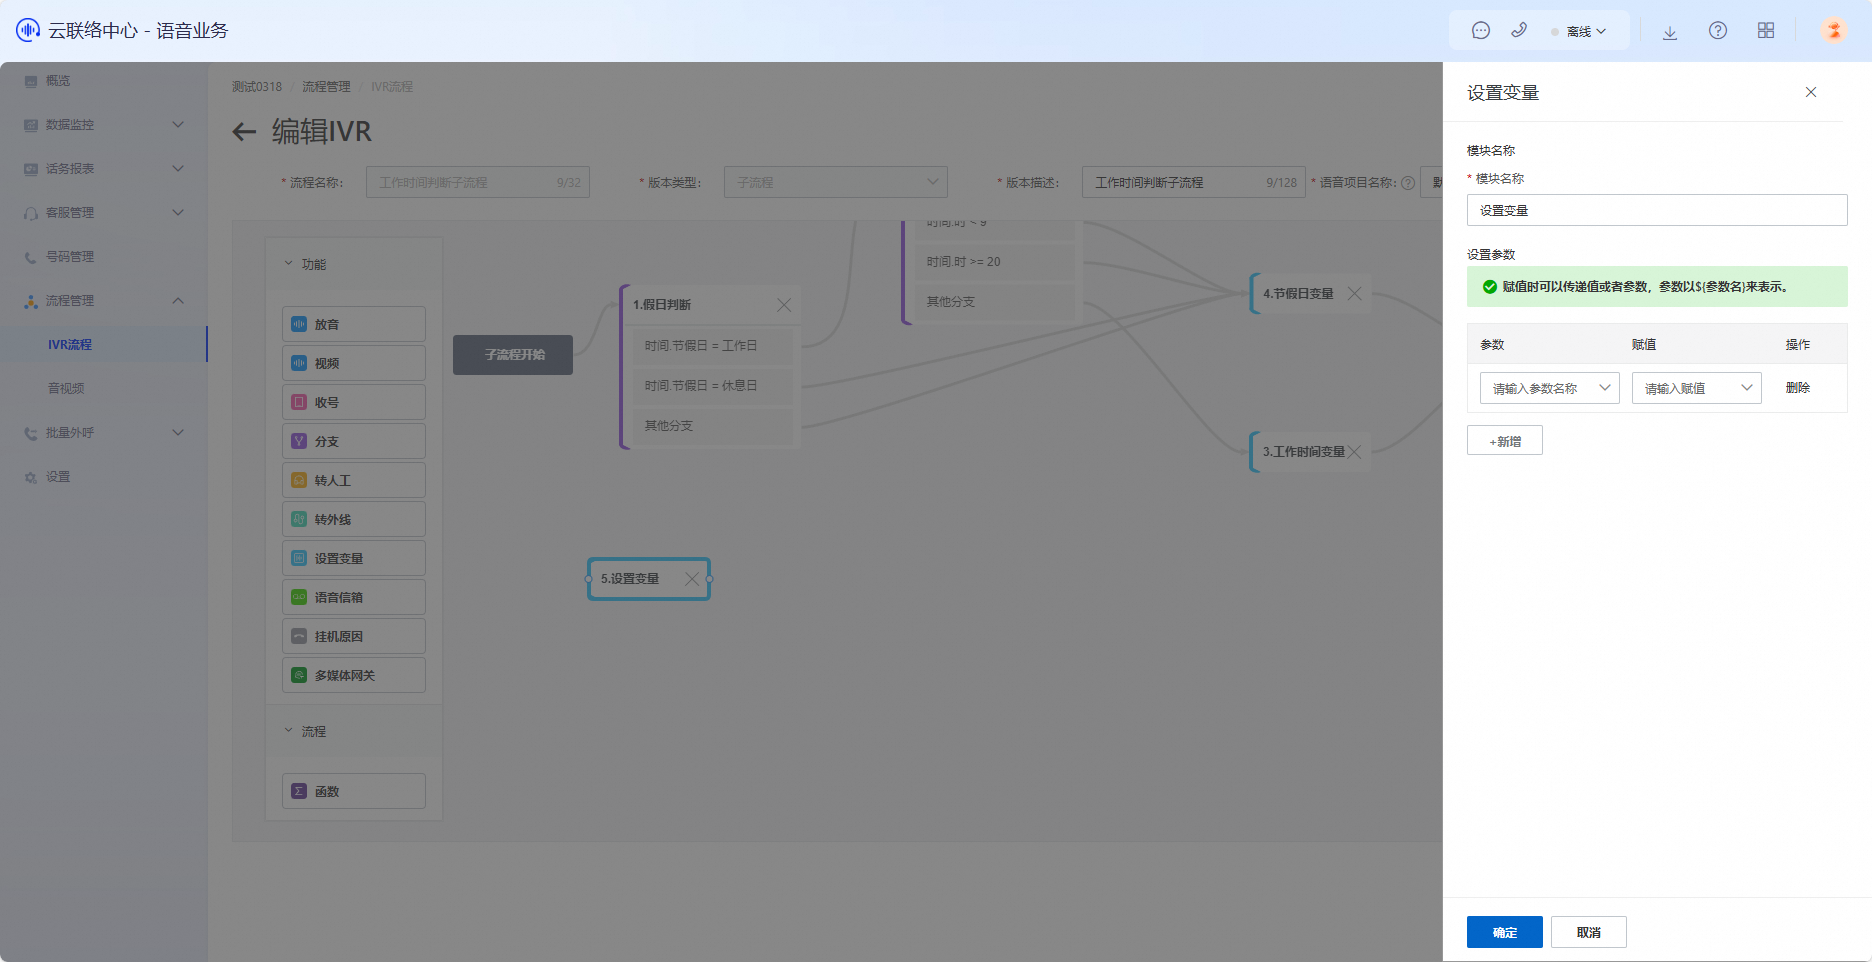
Module name: A custom name for the module.
Set parameters: The Parameter and Value fields are required.
Click Add to add a new custom parameter.
Click Delete to remove the current row.
Function module
Use this module to invoke a Function Compute function. This allows your IVR process to integrate with your own backend systems for self-service tasks such as order lookups, password resets, or identity verification.
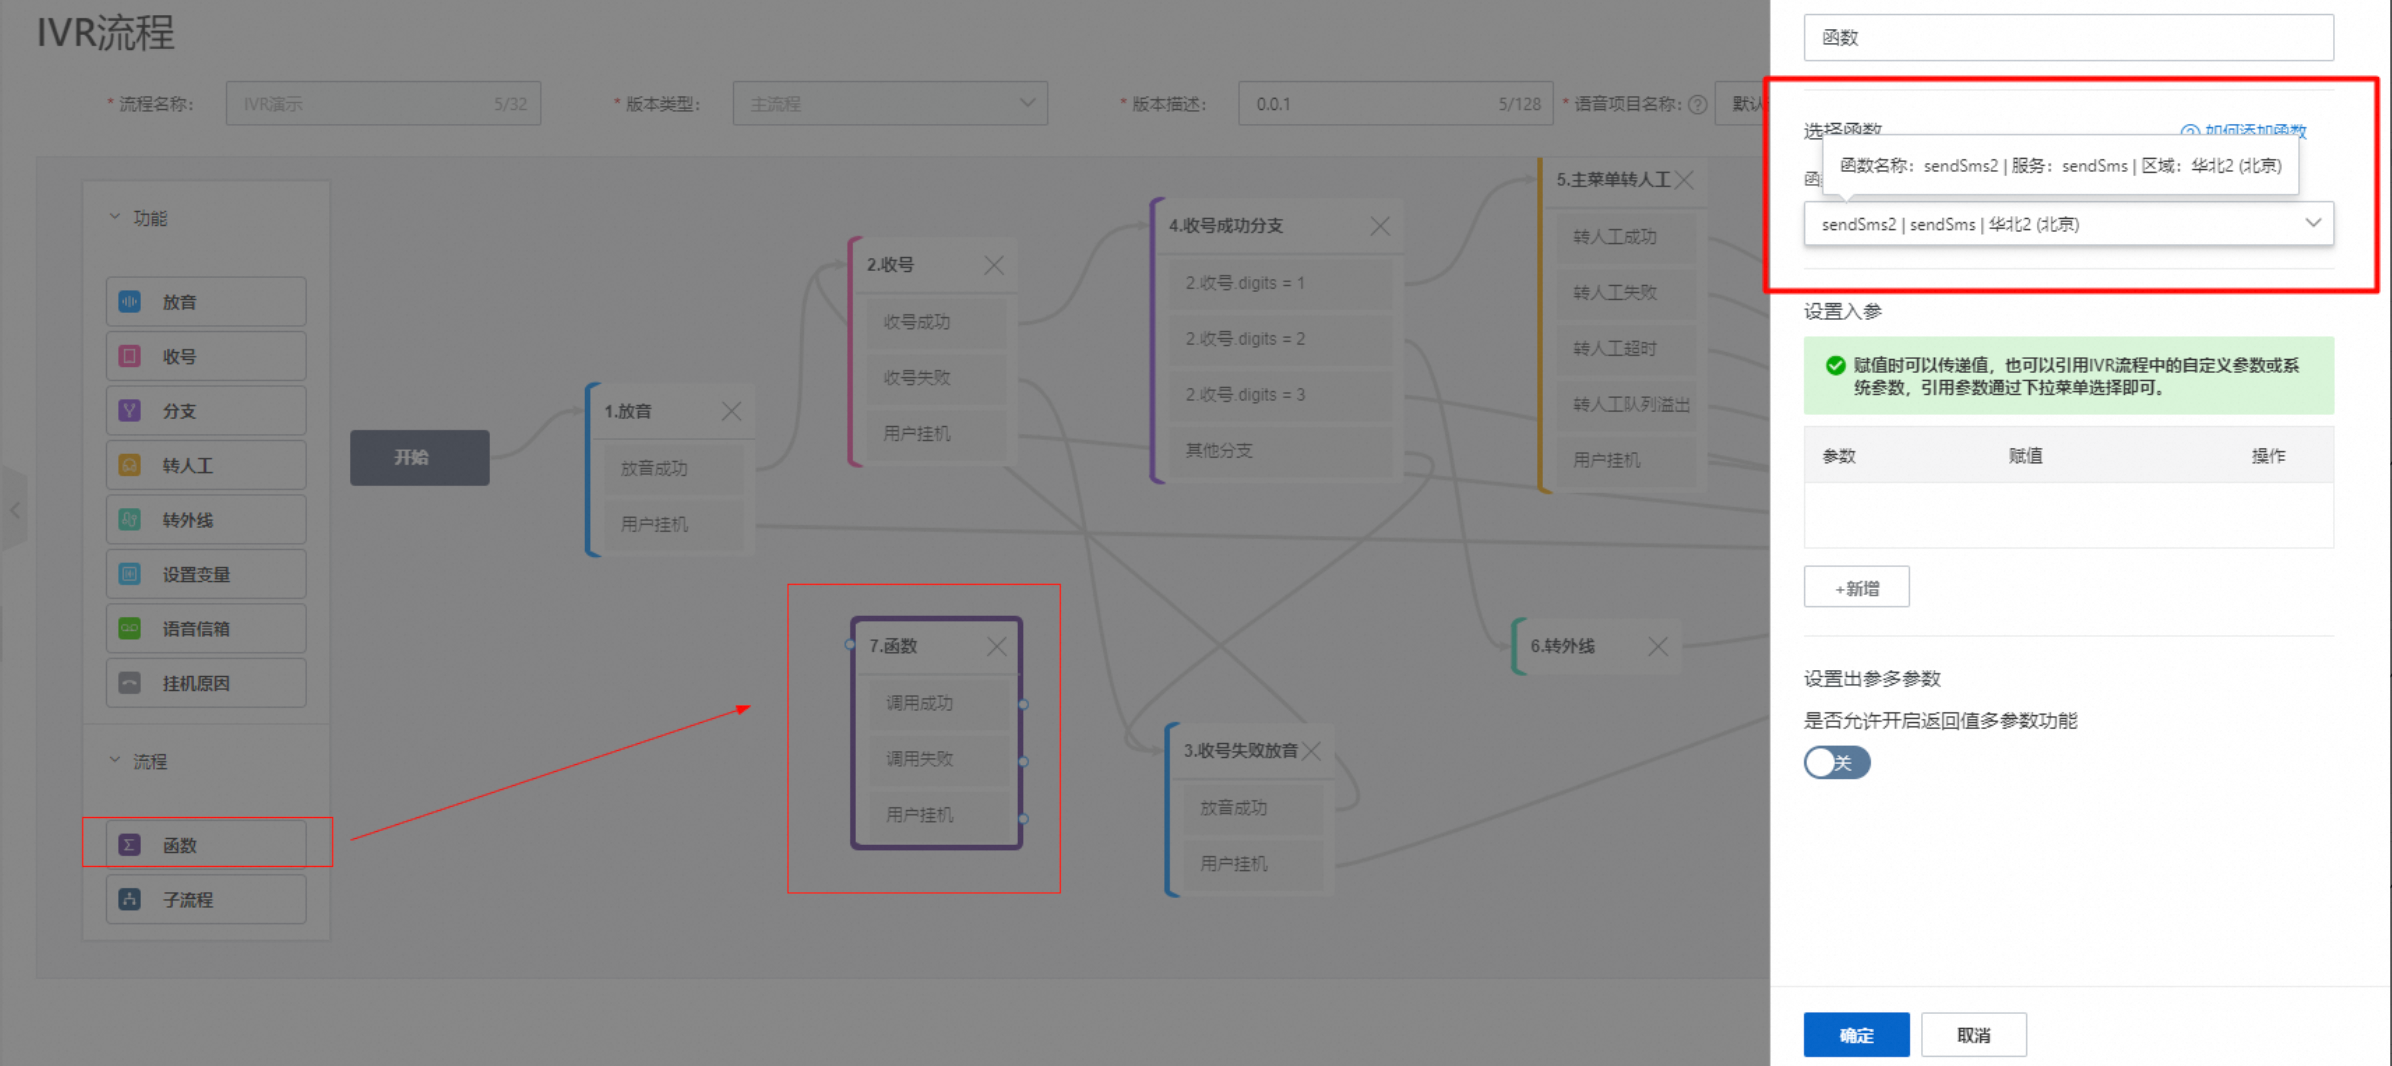
Module name: A custom name for the module.
Select function: The functions in the drop-down list are added through the Alibaba Cloud Contact Center console. The list shows the function name, its associated service, and region. For more information, click IVR Function Management on the page.
Input parameters: These are the parameters passed when the function is called. You can set up to 10 input parameters.
Parameter: The name of the input parameter.
Value: You can select a system parameter or a custom parameter from the drop-down list. For example, you can select a custom parameter that stores a user's ID number captured by a collect digits module.
Output parameter: When the function is called successfully, its return value is saved to a custom parameter. This parameter can be used in other modules, for example, in a branch module to make decisions or in a play audio module to announce the result.
Multiple output parameters: Assign values from the function's returned object to different custom parameters. The Parameter field corresponds to the custom parameter, and the Value field corresponds to the key in the returned object. The keys must match exactly. You can then access these values in subsequent modules by using the format ${ParameterName}.
We recommend connecting the "Failed" exit of the function module to a transfer to agent module as a fallback. For more information, see IVR Function Management.
Voicemail module
This module is primarily used to record voicemails, for example, during non-business hours. If a customer calls when no agents are available, you can route them to this module to leave a message. Agents can review the voice message the next business day.
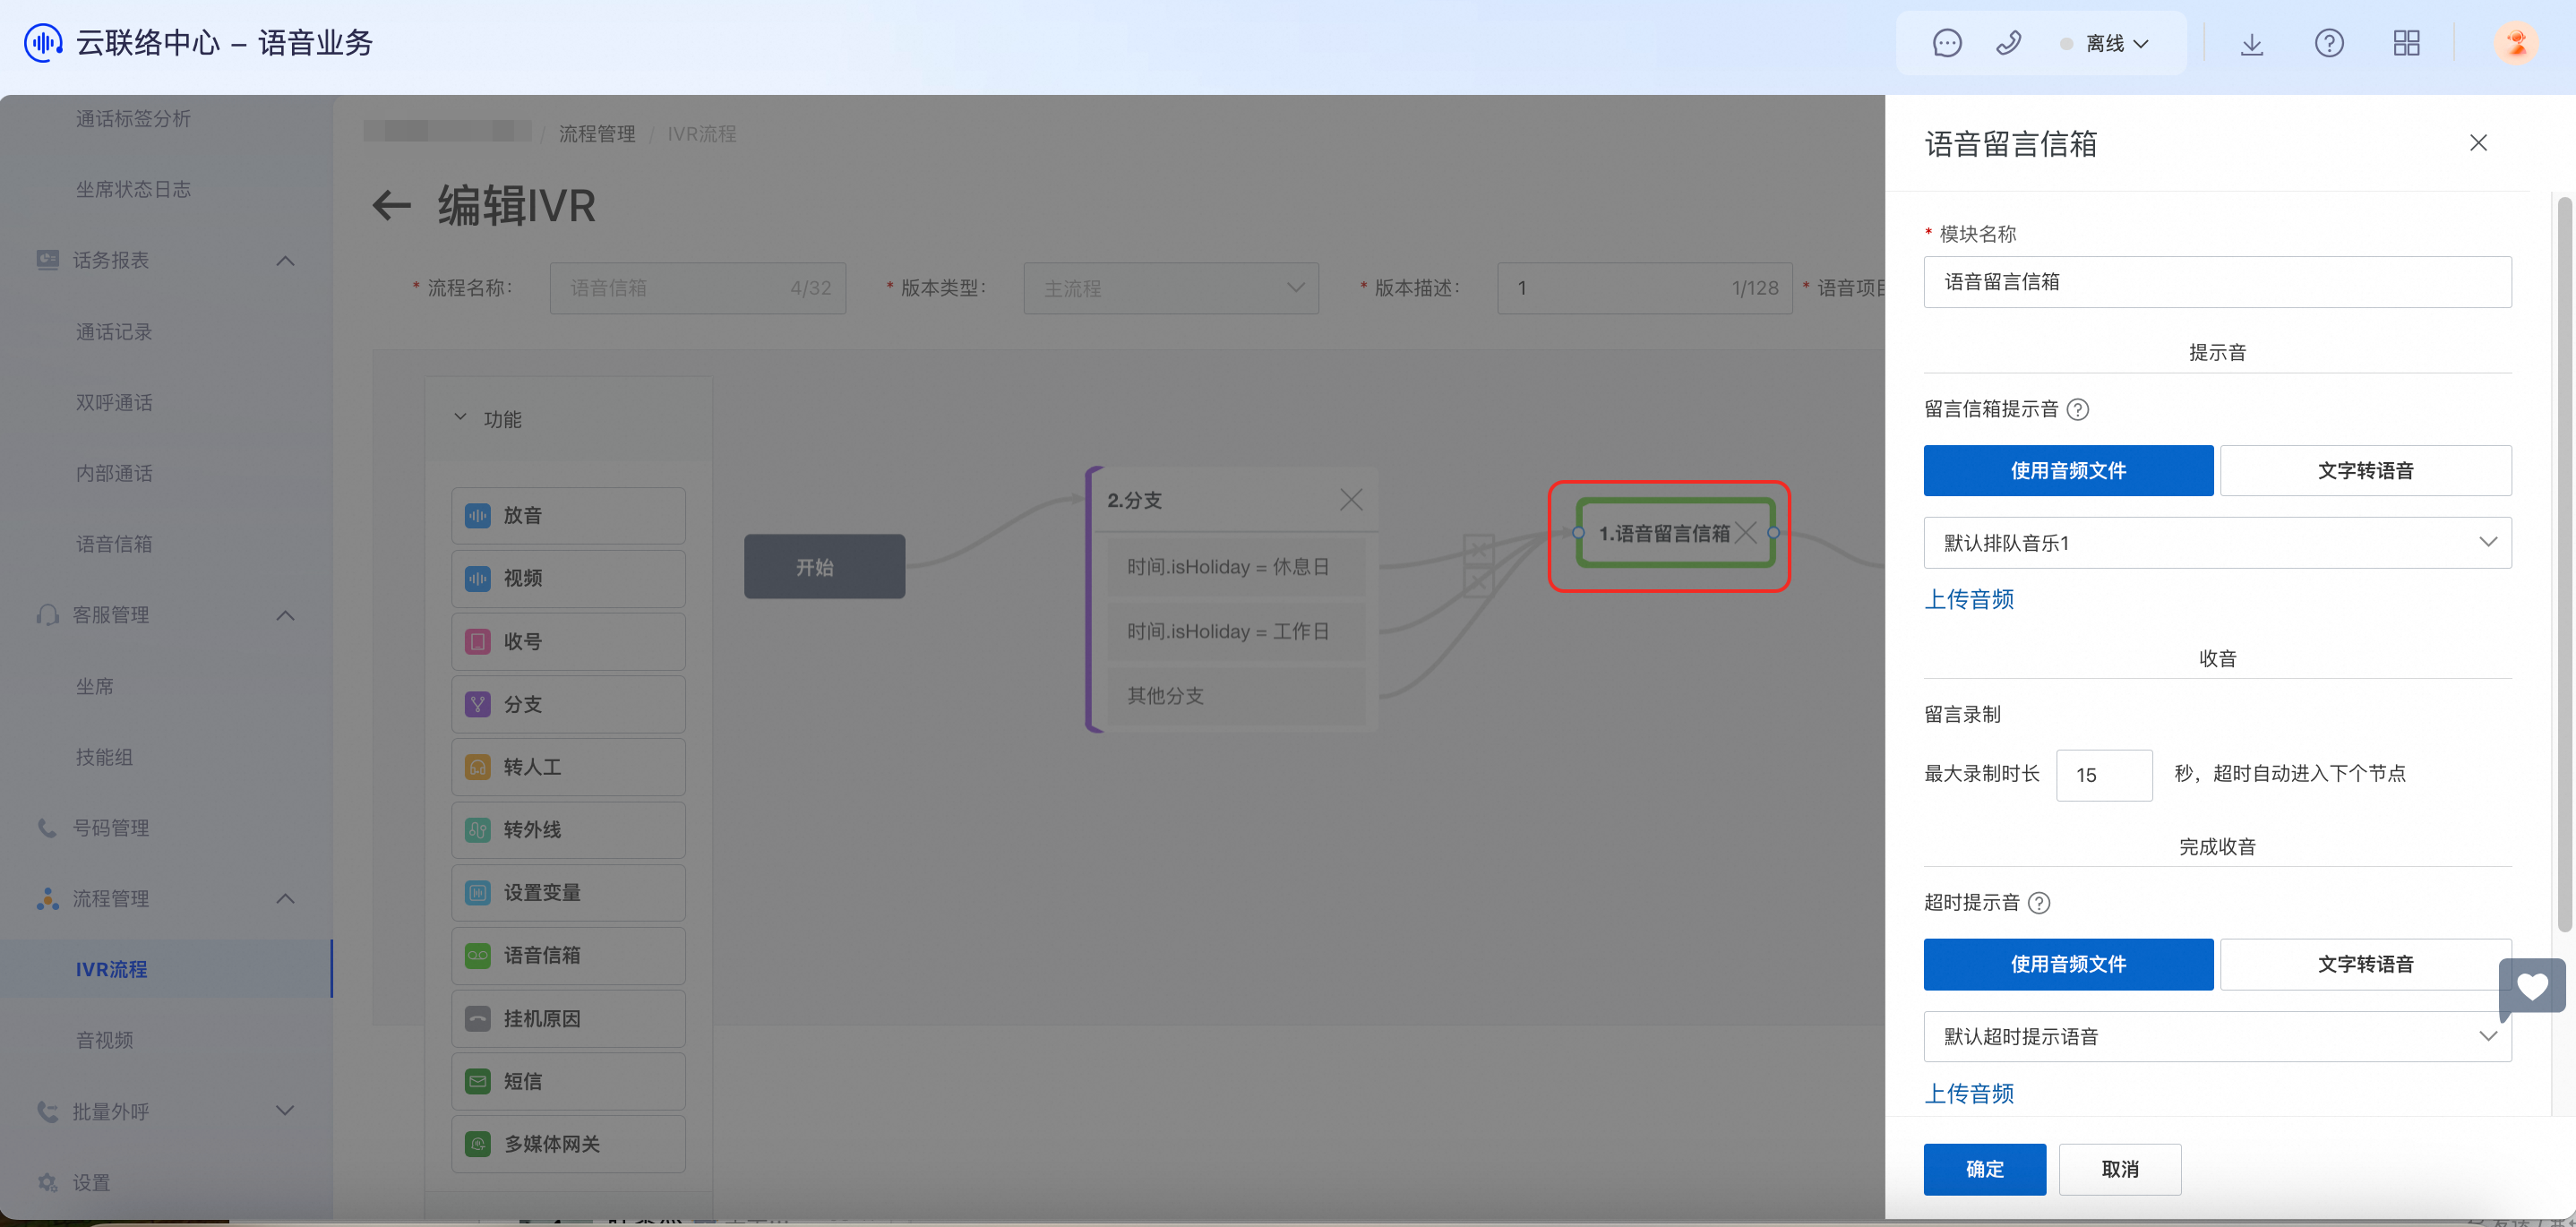
Module name: A custom name for the module.
Voicemail prompt: You can upload an audio file or use text-to-speech.
Message recording: You can specify the maximum recording duration in seconds. The call automatically hangs up when the time limit is reached.
Timeout prompt: If the recording times out, the system stops recording, plays this prompt, and then automatically hangs up.
Hang-up cause module
This module specifies a detailed reason why a call was disconnected. It is intended for users who need to perform hang-up cause analysis.
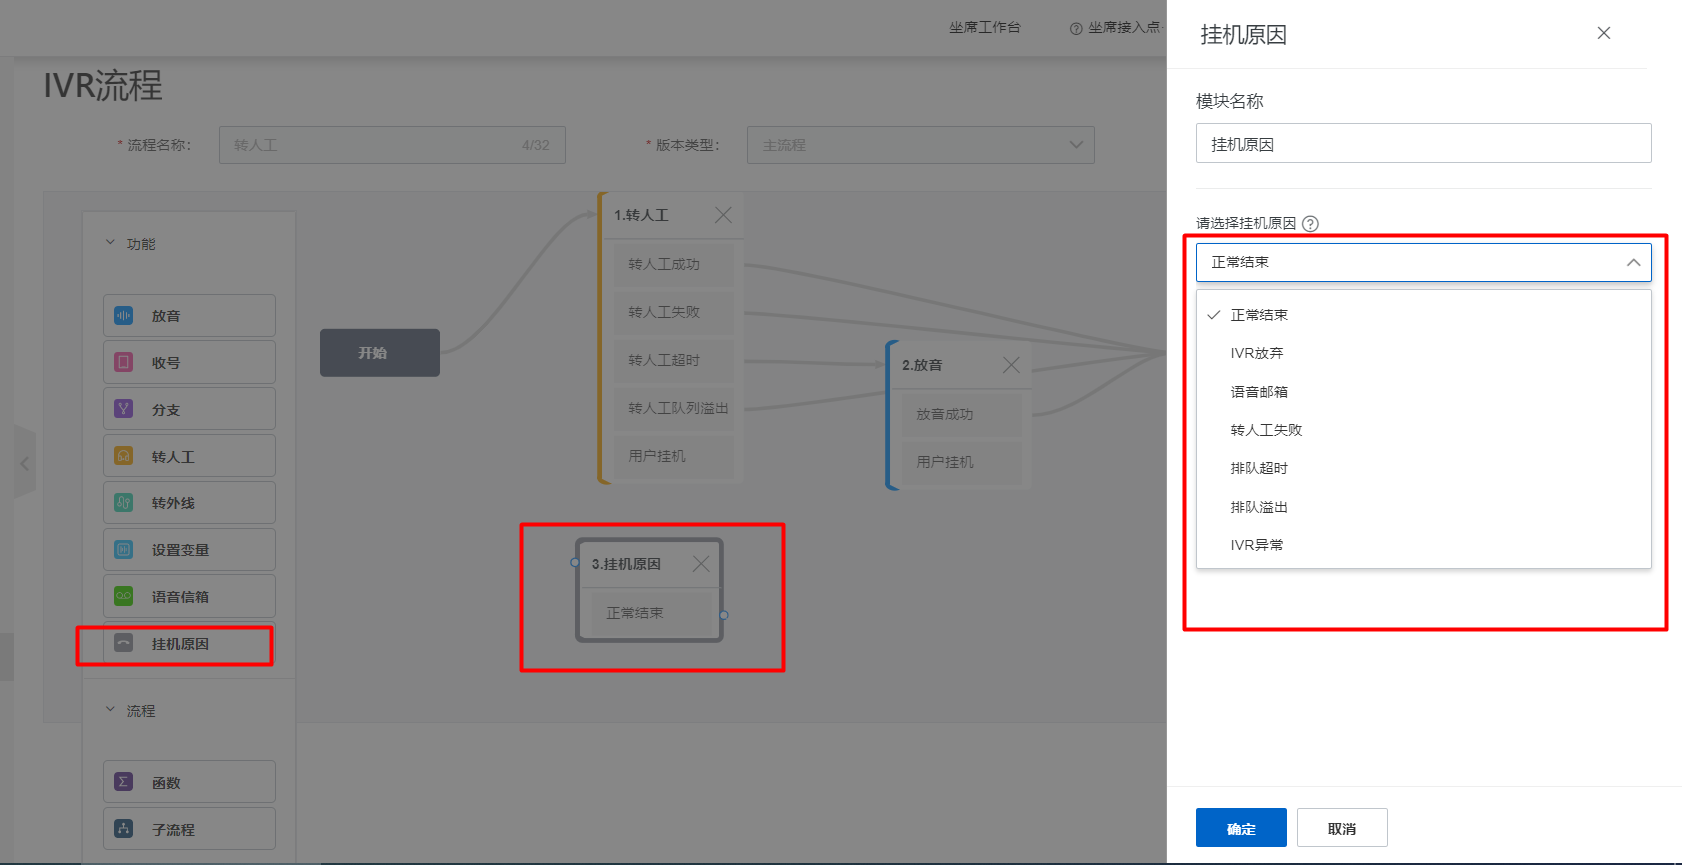
Module name: A custom name for the module.
Hang-up cause: As shown in the figure, seven causes are available. Calls that pass through this module before reaching the end module are tagged with the corresponding hang-up cause.
Subprocess module
This module allows you to call a subprocess from a main process. When the subprocess completes, the call returns to the main process. This enables you to build more powerful and complex IVR processes.
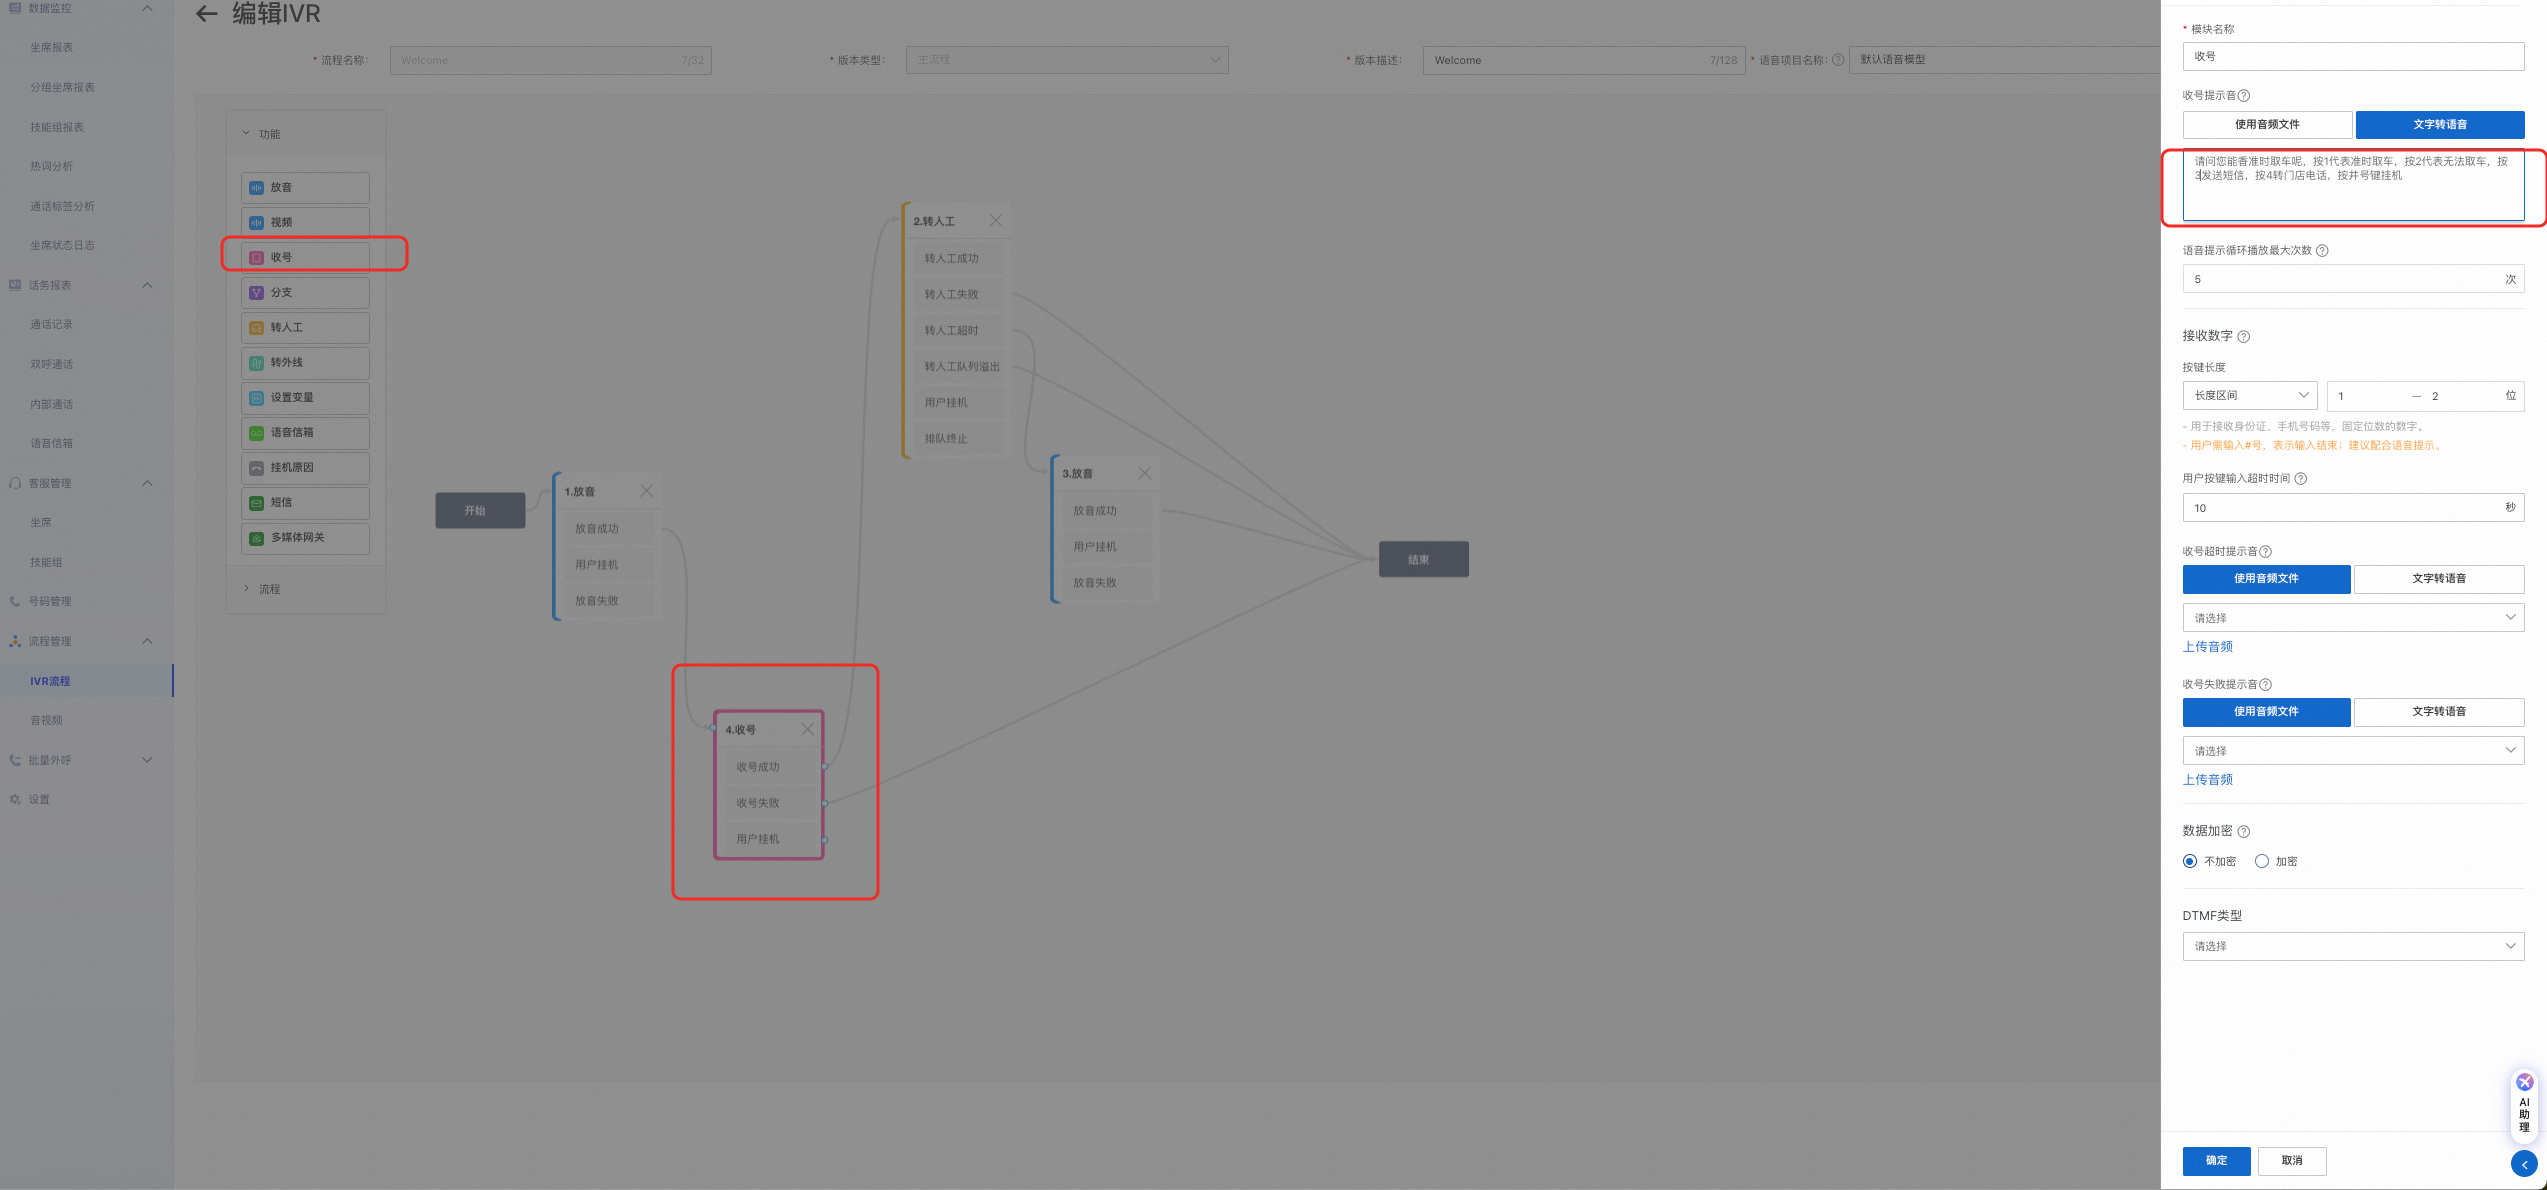
Module name: A custom name for the module.
Subprocess settings: Link a subprocess to the main process by selecting a previously created subprocess. The list displays only subprocesses with a status of Published with updates or Unpublished.
Set parameter passing: You can pass custom and system parameters from the main process to the subprocess, either one-way or two-way. Exchanging information enables more advanced functionality. The parameter lists for both the main process and the subprocess are populated automatically and cannot be manually entered. You can select the parameters from the drop-down lists, which helps reduce the chance of publishing failures.
After a subprocess is updated and published, you must republish the main process that calls it for the changes to take effect. You cannot use a subprocess module within another subprocess. An IVR process that contains a nested subprocess module cannot be published. A main process and its subprocess cannot both contain a transfer to agent module, as this can cause call anomalies such as a single call being queued multiple times.
Subprocess module
This module allows you to call a subprocess from a main process. When the subprocess completes, the call returns to the main process. This enables you to build more powerful and complex IVR processes.
Module name: A custom name for the module.
Subprocess settings: Link a subprocess to the main process by selecting a previously created subprocess. The list displays only subprocesses with a status of Published with updates or Unpublished.
Set parameter passing: You can pass custom and system parameters from the main process to the subprocess, either one-way or two-way. Exchanging information enables more advanced functionality. The parameter lists for both the main process and the subprocess are populated automatically and cannot be manually entered. You can select the parameters from the drop-down lists, which helps reduce the chance of publishing failures.
After a subprocess is updated and published, you must republish the main process that calls it for the changes to take effect. You cannot use a subprocess module within another subprocess. An IVR process that contains a nested subprocess module cannot be published. A main process and its subprocess cannot both contain a transfer to agent module, as this can cause call anomalies such as a single call being queued multiple times.
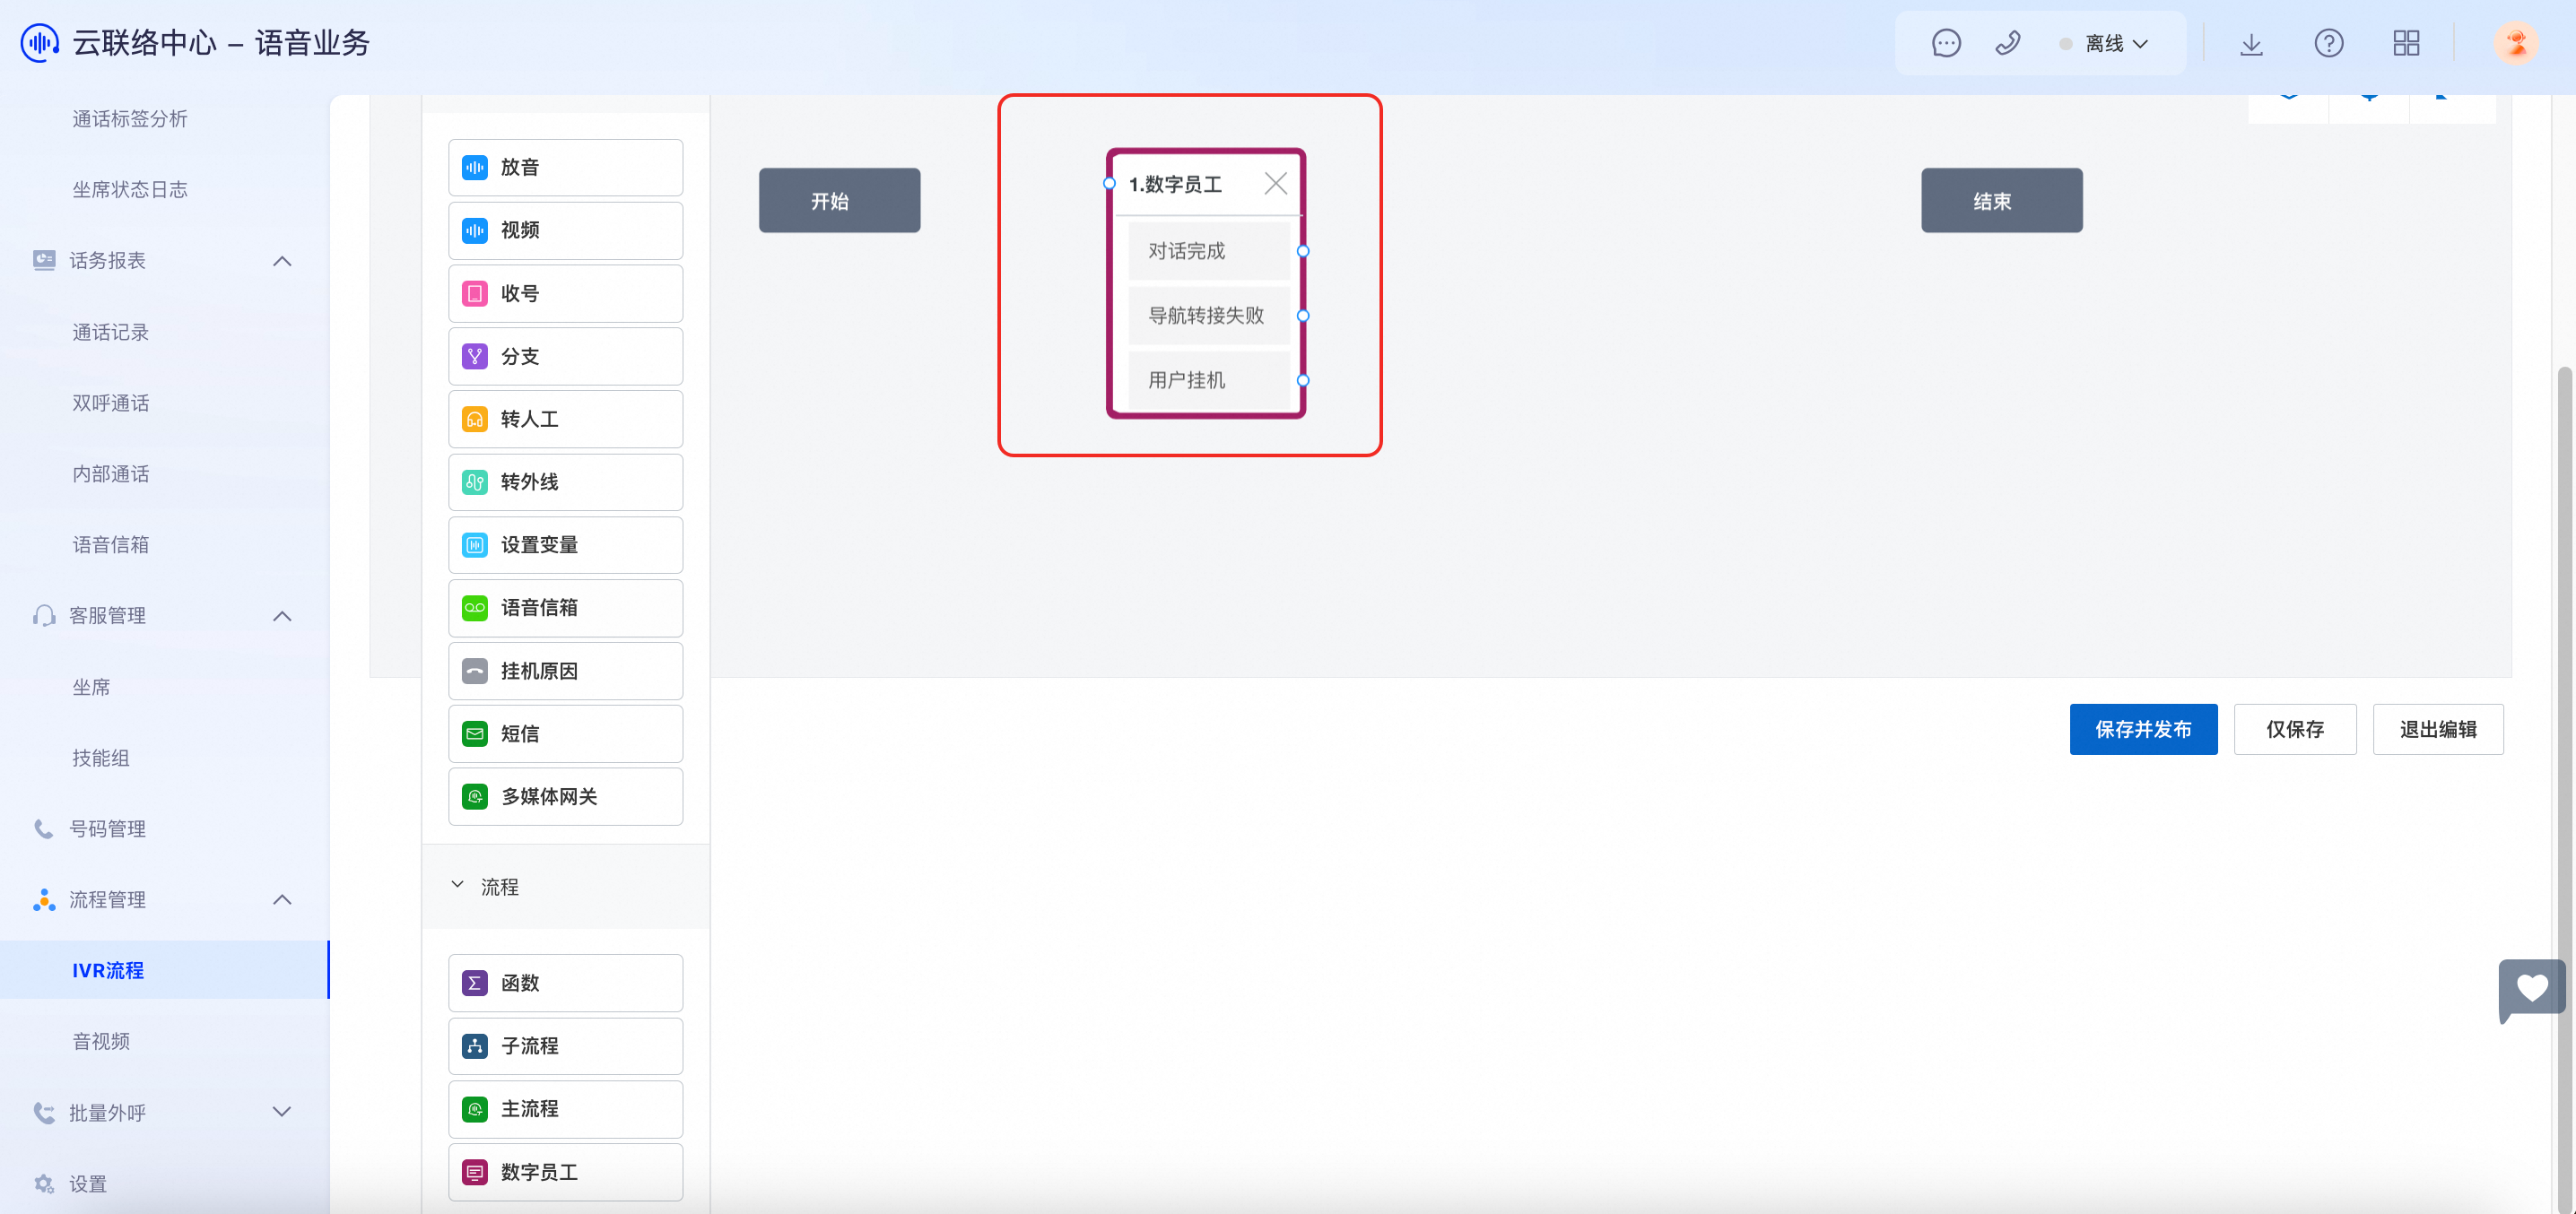
Digital Employee module
This module integrates the functionality of the Digital Employee product. It allows you to connect to a Digital Employee with simple configurations to build richer business scenarios. For detailed configuration instructions, see Instructions for using the IVR Digital Employee module (2.0).
Note: The Digital Employee module cannot be invoked in a loop within the same call.
End module
This is a fixed module that automatically appears on the canvas and serves as the endpoint for an IVR process. It cannot be edited. Connect other modules to it to terminate a branch of the flow.