Import SQL Server database data using SSMS
SQL Server Management Studio (SSMS) is an integrated development environment (IDE) for accessing, configuring, and managing SQL Server databases. For data migration, backup, or recovery, you can use SSMS to import data from a source Web Hosting database to a destination Web Hosting database to maintain data integrity.
Prerequisites
SSMS is installed. You can download the installation package from the official Microsoft website.
NoteThis topic uses SSMS version 18.10 as an example. The user interface may vary in other versions.
The source Web Hosting database contains data, such as data tables, views, and functions.
Background information
This topic uses a SQL Server 2008 database on a Windows-based Web Hosting instance as an example for both the source and destination databases. In this example, data is migrated by exporting an SQL script from a data table in the source database.
Before you import data, familiarize yourself with the following basic concepts of SQL Server databases:
A database can contain multiple objects, such as data tables, stored procedures, views, and functions.
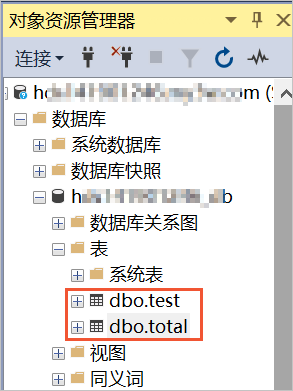
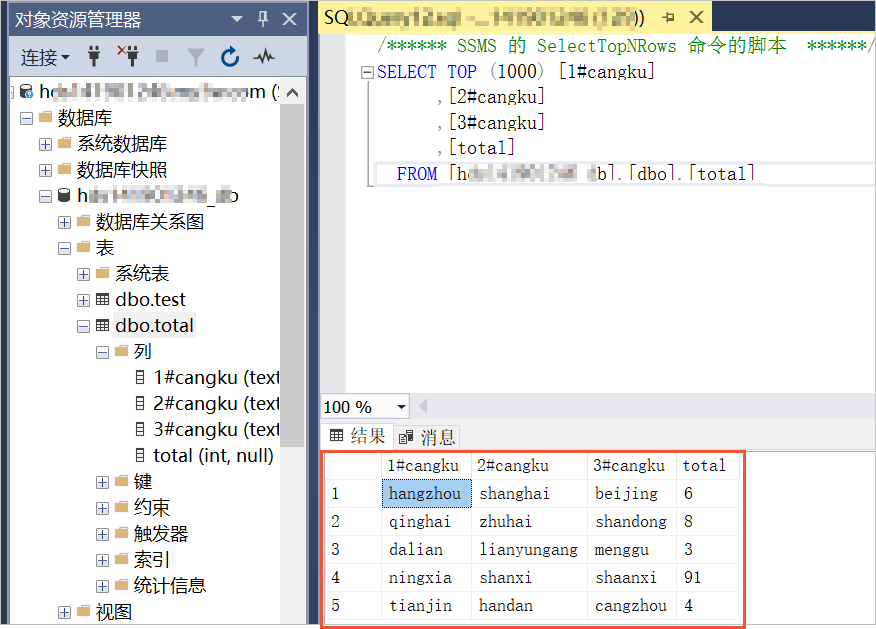
A data table consists of rows of data. For example, article content is stored in a data table.
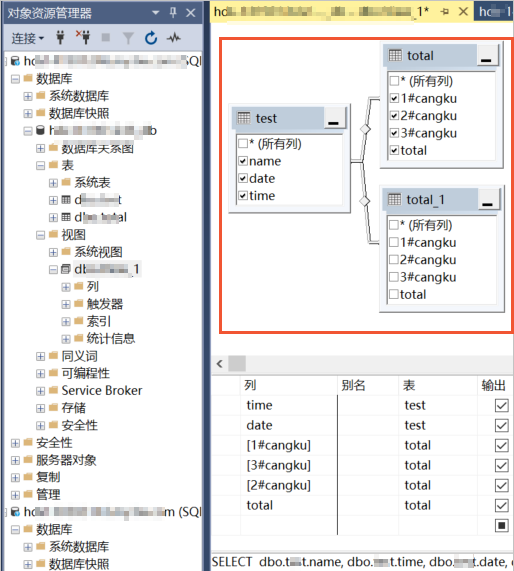
A view is a virtual data table whose data is derived from one or more physical data tables. For example, you can combine three tables into a single view to simplify queries.
A stored procedure or a function is a reusable set of SQL statements that extends the capabilities of the SQL language.
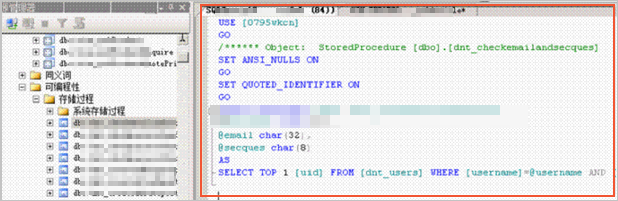
The following script is an example of a stored procedure:
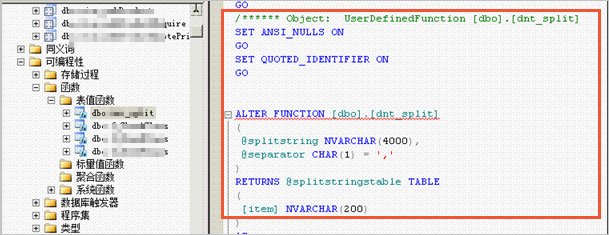
The following script is an example of a function:
Procedure
- Obtain the database information.
- Log on to the Web Hosting console.
- Find the target Web Hosting instance and click Manage in the Actions column.
- In the left-side navigation pane, click Database Information.
- On the Database Information page, record the connection details.Note If you forget the database password, you can reset it. For more information, see Reset the password of a Web Hosting database.

Remotely connect to the destination Web Hosting database using SSMS.
On your local host, open SQL Server Management Studio.
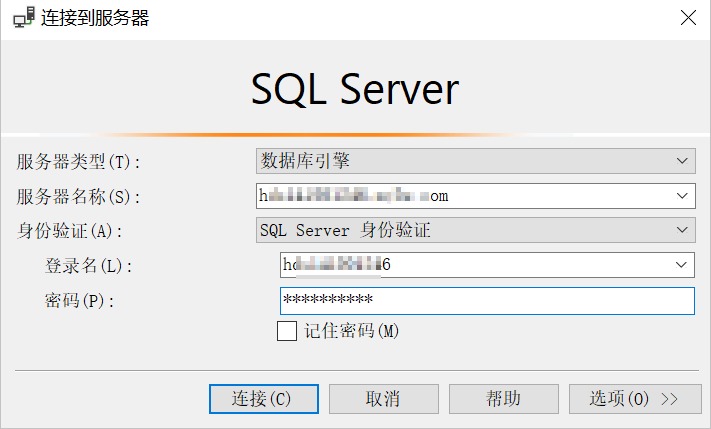
In the Connect to Server dialog box, configure the connection settings and click Connect.
The following table describes the parameters.
Parameter
Description
Server type
Keep the default value, Database Engine.
Server name
Enter the database address of your Web Hosting instance.
Authentication
Keep the default value, SQL Server Authentication.
Username
Enter the username for your Web Hosting database.
Password
Enter the password for your Web Hosting database.
After you connect, the database node appears in the left navigation pane.
Use SSMS to export the data table from the source Web Hosting database as an SQL script and save it locally.
This example covers exporting a data table script; the method is similar for other database objects.
For detailed instructions, see Export SQL Server database data by using SSMS.
Execute the exported SQL script on the destination database.
Use SQL Server Management Studio to open the exported data table script from the source Web Hosting.
In the left-side navigation pane of SSMS, select the destination Web Hosting database node.
On the SSMS toolbar, click New Query.
A new query editor window opens.
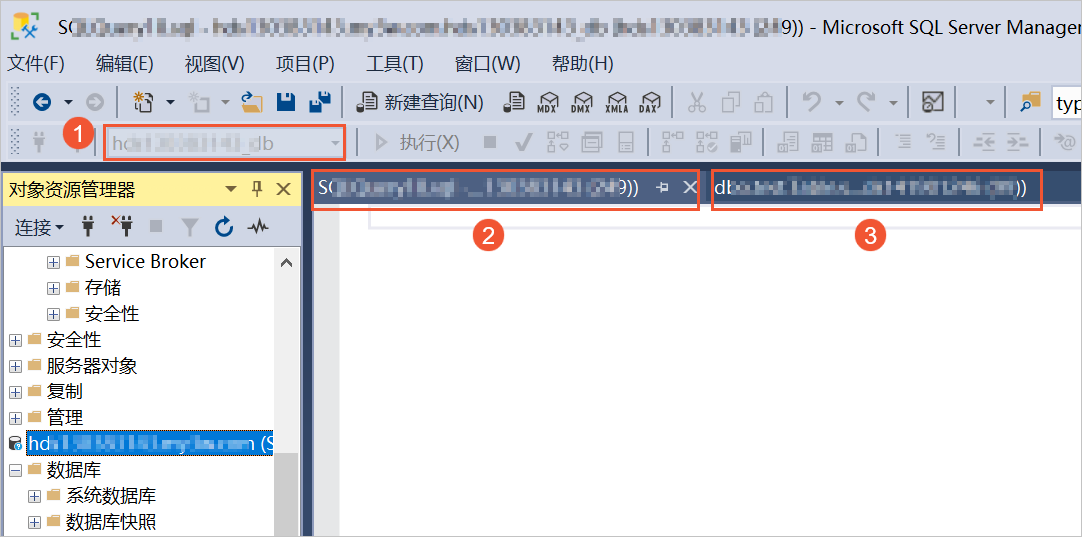
The following table describes the areas in the figure.
Area
Description
①
The name of the destination database node for which you are editing the script.
②
The query editor for the destination Web Hosting database node.
③
The query editor for the source database data.
Copy the contents of the exported script and paste them into the new query editor window. Then, delete the first line of the script (the
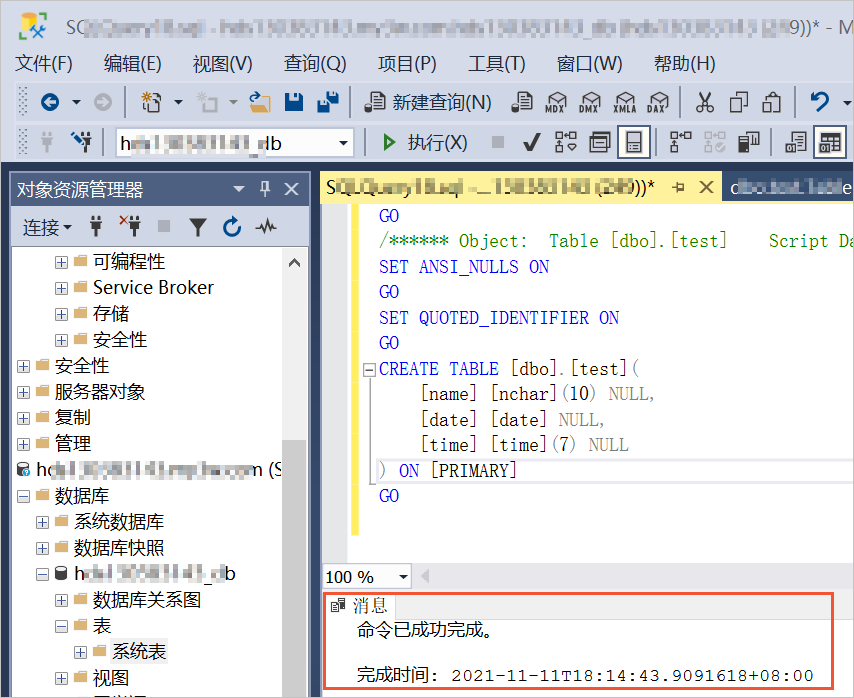
USE [database_name]statement).On the SSMS toolbar, click Execute.
After the script executes, a success message appears in the Messages tab.
In the left-side navigation pane, the imported data table schema now appears under the destination Web Hosting database node.
Import the data from the source database tables into the destination Web Hosting database.
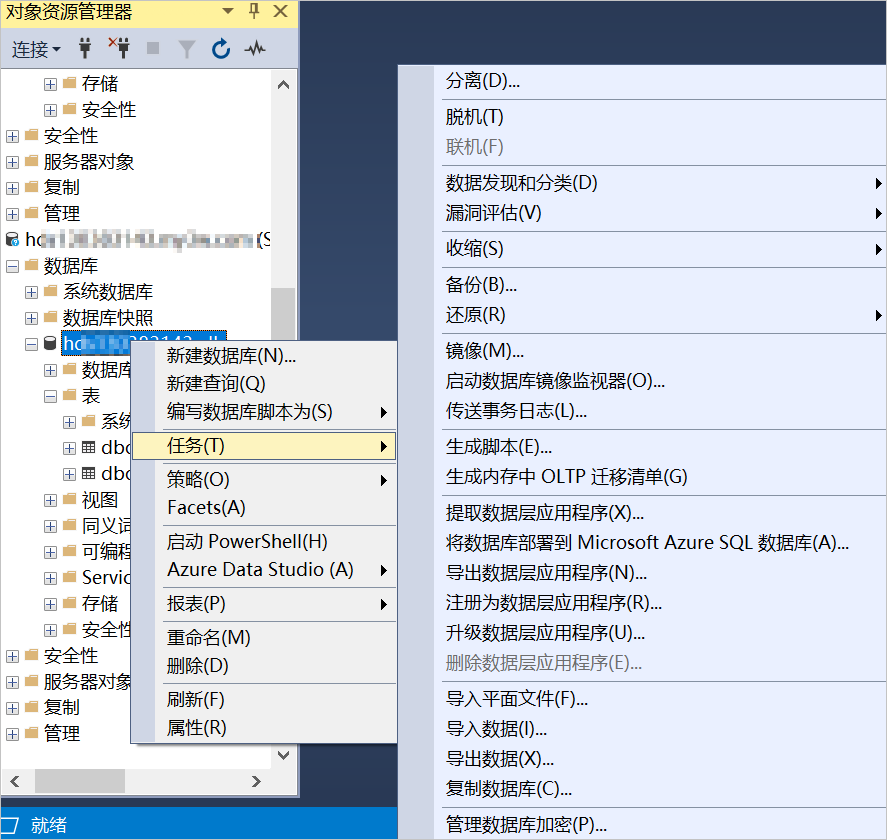
In the navigation pane on the left of SSMS, right-click the destination Web Hosting database node and select .
On the welcome page of the SQL Server Import and Export Wizard, click Next.
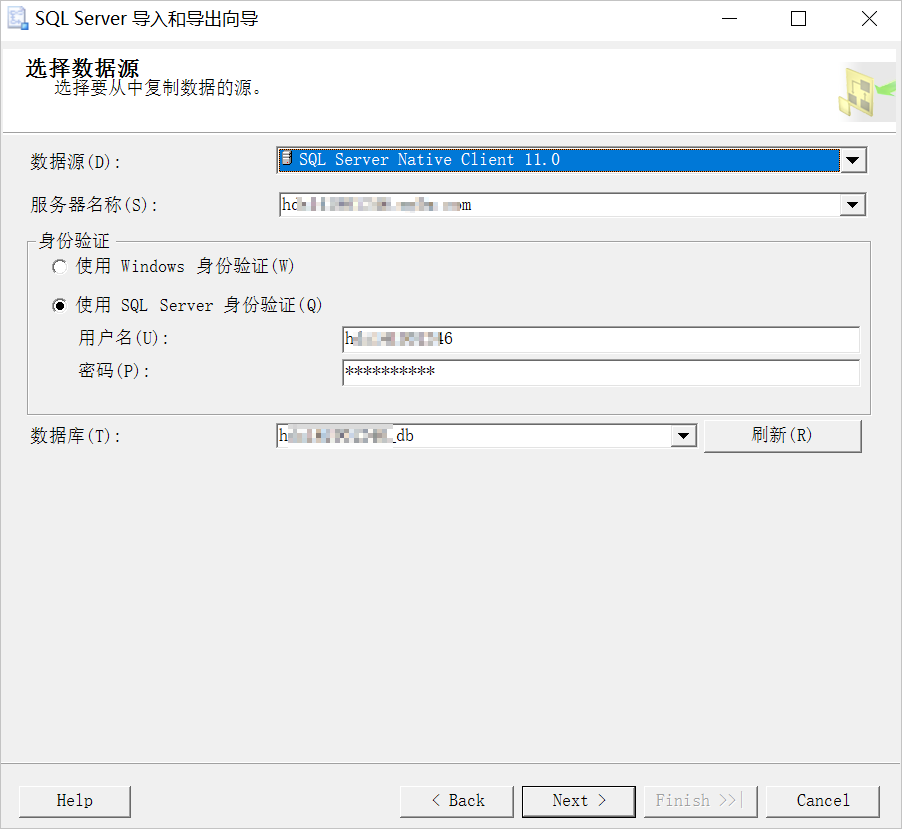
On the Choose a Data Source page, configure the data source parameters and click Next.
The following table describes the key parameters.
Parameter
Description
Data source
Select SQL Server Native Client 11.0.
Server name
Enter the endpoint of the source Web Hosting database. For information about how to obtain the database endpoint, see Step 1.
Authentication
Select Use SQL Server Authentication.
User name: Enter the username of the source Web Hosting database. For information about how to obtain the database username, see Step 1.
Password: Enter the password for the source Web Hosting database. If you forget the password, you can reset it. For more information, see Reset the password of a Web Hosting database.
Database
Enter the name of the source Web Hosting database. For information about how to obtain the database name, see Step 1.
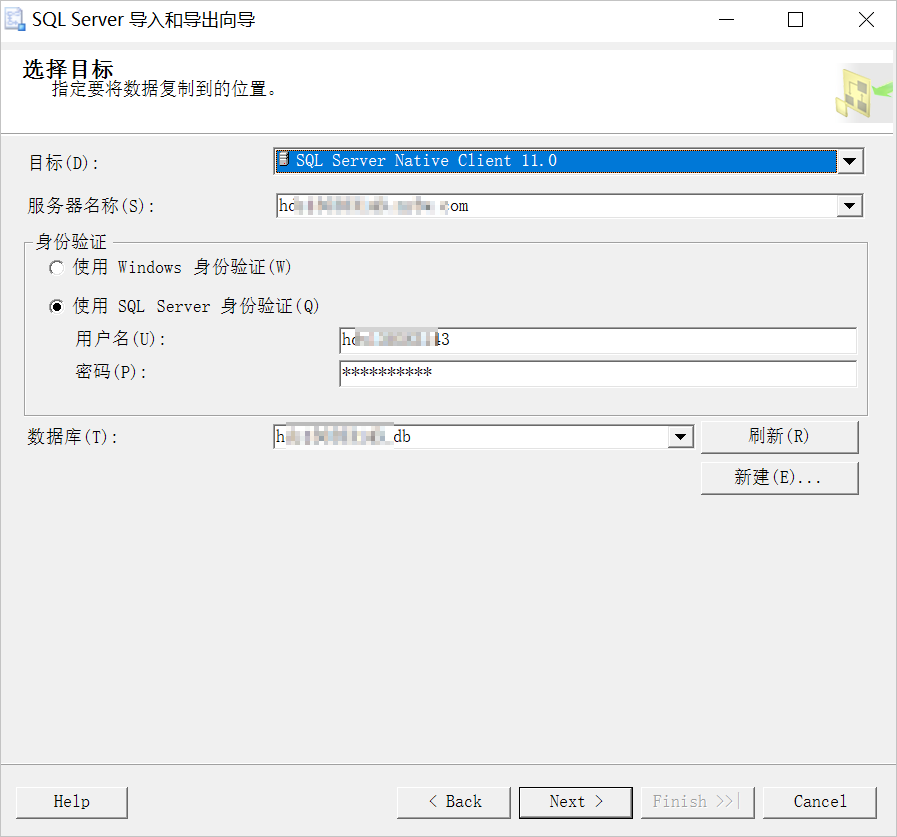
On the Choose a Destination page, configure the destination database information and click Next.
The following table describes the key parameters.
Parameter
Description
Destination
Select SQL Server Native Client 11.0.
Server name
Enter the endpoint of the destination Web Hosting database. For information about how to obtain the database endpoint, see Step 1.
Authentication
Select Use SQL Server Authentication.
User name: Enter the username of the destination Web Hosting database. For information about how to obtain the database username, see Step 1.
Password: Enter the password for the destination Web Hosting database. If you forget the password, you can reset it. For more information, see Reset the password of a Web Hosting database.
Database
Enter the name of the destination Web Hosting database. For information about how to obtain the database name, see Step 1.
On the Specify Table Copy or Query page, select Copy data from one or more tables or views and click Next.
On the Select Source Tables and Views page, in the Source column, select the checkboxes
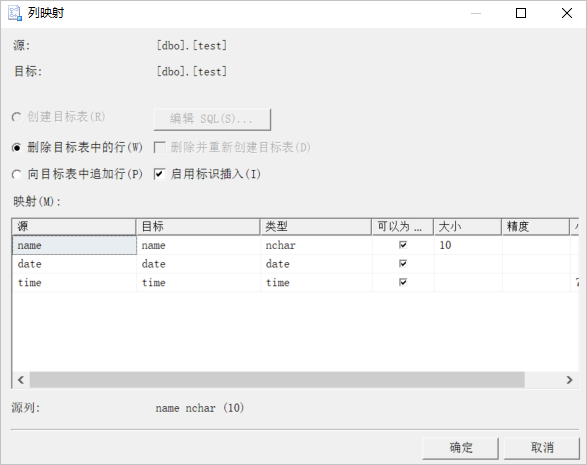
for the data tables to import. Verify that the corresponding table names appear in the Destination column, and then click Next.Click Edit Mappings.... In the Column Mappings dialog box, select Delete rows in destination table and Enable identity insert, and then click OK.
On the Select Source Tables and Views page, click Next.
On the Save and Run Package page, click Next. On the Complete the Wizard page, click Finish.

 for the data tables to import. Verify that the corresponding table names appear in the Destination column, and then click Next.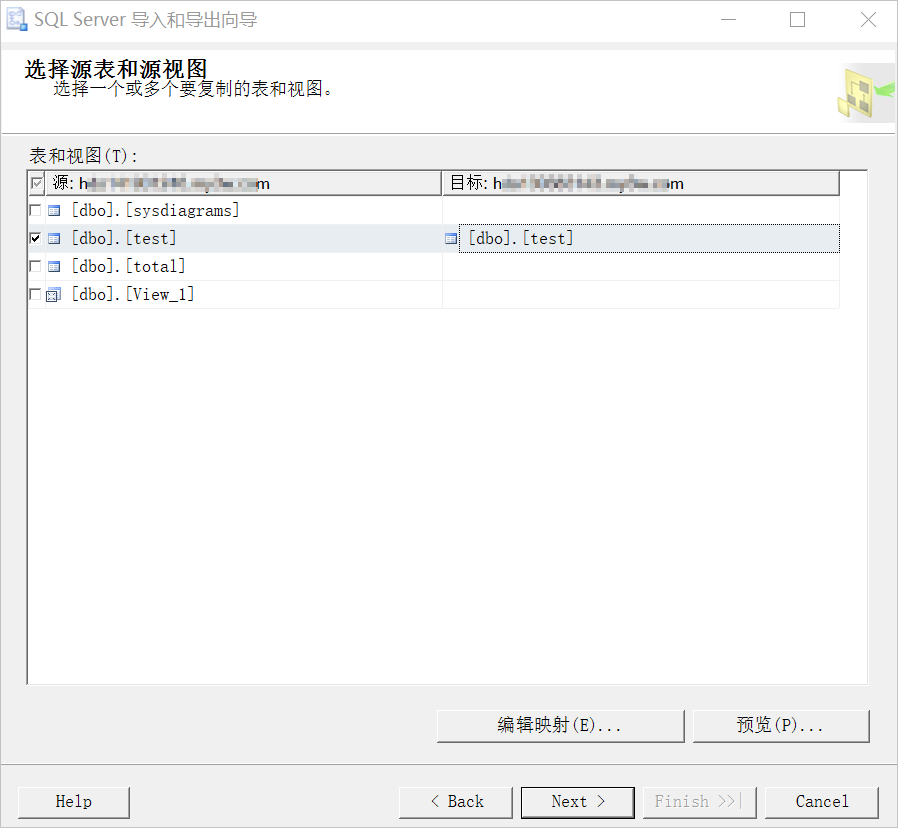
Results
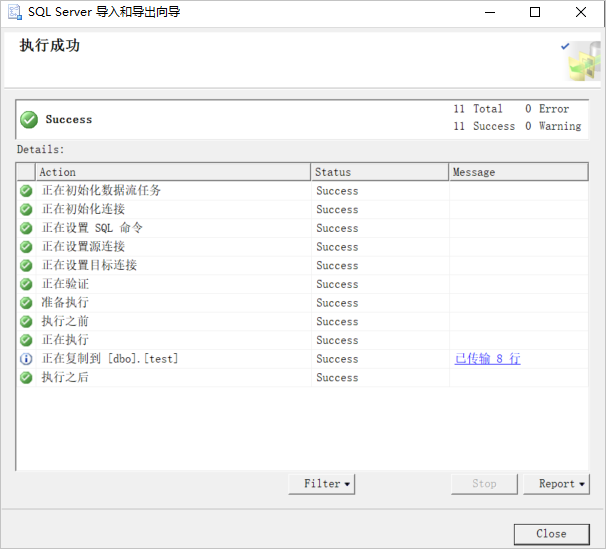
When the import process is complete and the status shows Execution was successful, click Close, as shown in the following figure. You can then view the content of the imported data tables under the destination Web Hosting database node.