Create and manage cross-platform migrations
This topic describes how to migrate real-time tasks from the Ververica Flink platform to Dataphin.
Overview of the process
The cross-platform migration tool facilitates the transfer of real-time tasks from the Ververica Flink platform to Dataphin. The migration process is tailored to the specific type of Dataphin project, detailed as follows:
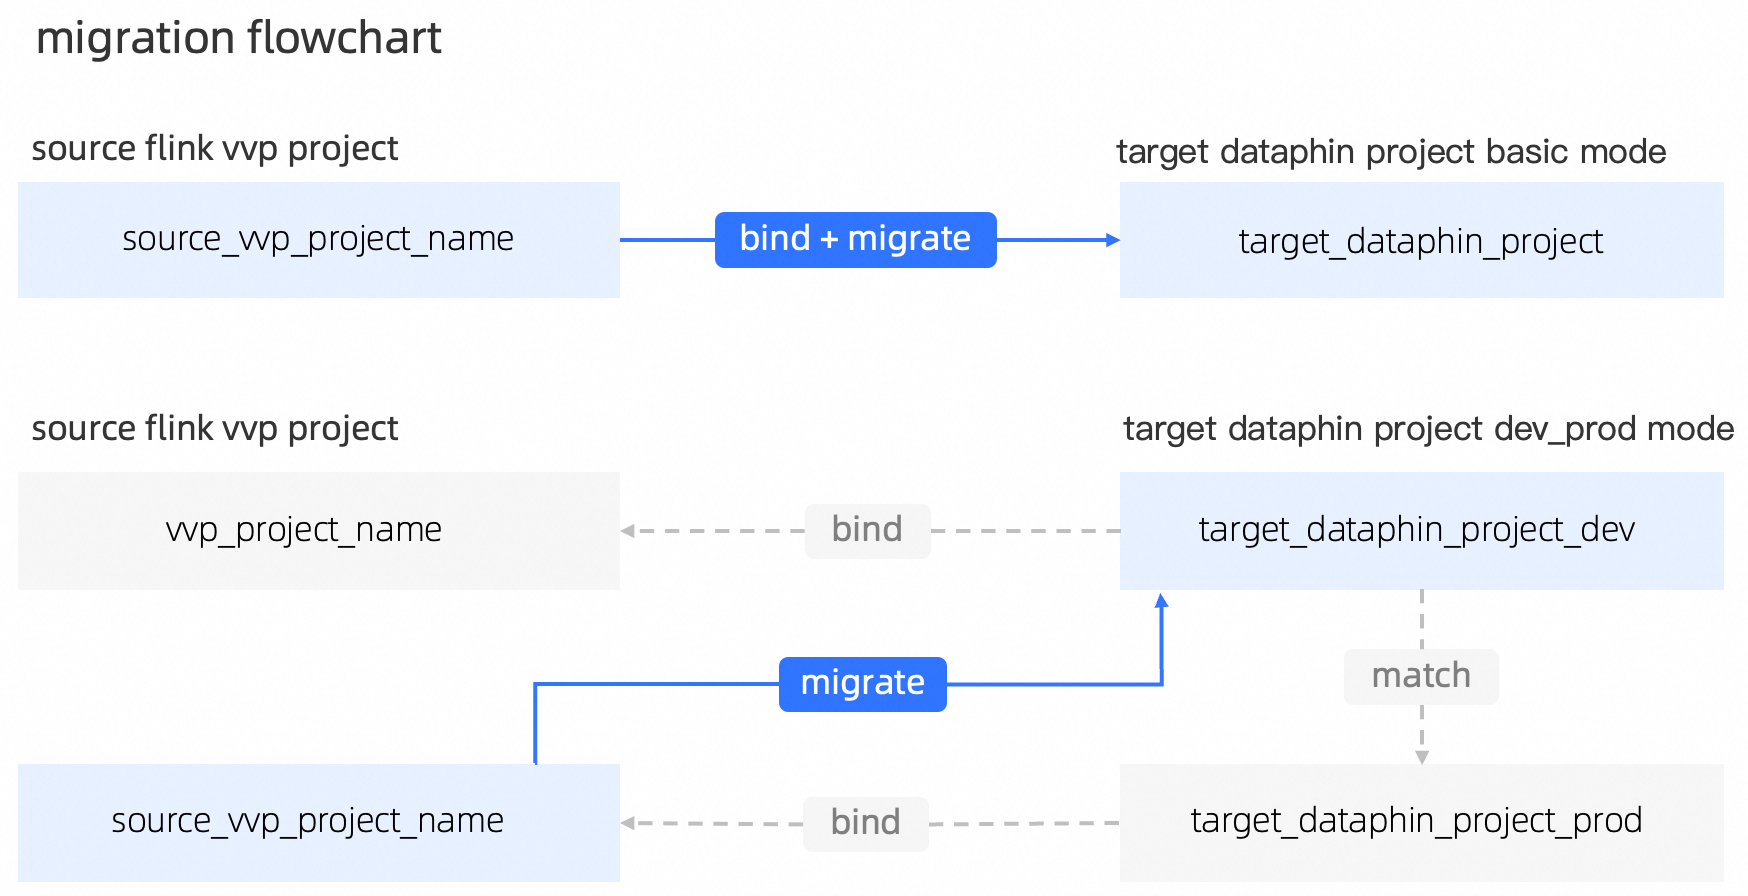
Basic pattern project
If the Dataphin project you wish to migrate is of the Basic pattern type, you must first create a corresponding Ververica Flink compute source within the Dataphin instance for the source Ververica Flink project. For detailed instructions, see Create Ververica Flink compute source.
Once you have created the Ververica Flink compute source, it must be attached to your Dataphin project. For detailed instructions, see Create a general project.
Once the source Ververica Flink project is attached to the target Dataphin project using the Basic pattern, you can utilize Dataphin's migration tool to carry out the migration process. For detailed instructions, see Batch migration of tasks.
Dev-Prod pattern project
If the Dataphin project you are migrating follows a Dev-Prod pattern, you must establish a corresponding Ververica Flink compute source within the Dataphin instance for the source Ververica Flink project. For detailed instructions, see Create Ververica Flink compute source.
Once you have created the necessary Ververica Flink computing resources for migration, attach them to the Prod project within the Dev-Prod pattern. Attach additional Ververica Flink computing resources to the Dev project as dictated by your business plan. For detailed instructions, see create a general project.
ImportantNote: During migration, only the jobs in the Ververica Flink compute source attached to the Prod environment are migrated to the Dev environment.
Once you have attached compute resources to both the Prod and Dev projects in the Dev-Prod pattern, you can utilize Dataphin's migration tool for the migration process. For detailed instructions, see Batch migration of tasks.
ImportantAfter successfully migrating Ververica Flink real-time tasks, to move tasks from the Dev environment to the Prod environment for ongoing operation and maintenance, you can publish these tasks directly from the Dev environment. For detailed instructions, see Manage published tasks.
Migration instructions
The tool supports the migration of all submitted (deployed) tasks on Ververica Flink.
Batch task migration is not currently supported.
The directory structure of the original Ververica Flink platform cannot be migrated. Post-migration, tasks will be automatically stored in the default Dataphin folder.
The owner of the task defaults to the individual who initiated the migration.
If the original Ververica Flink job is running, it will maintain its running status after migration and subsequent publishing in Dataphin.
Jobs with dependencies or user-defined functions (UDFs) are migratable, though submission errors due to missing dependencies may occur. In such cases, upload the required files to Dataphin and retry the submission.
The Dev environment corresponds to Ververica Flink project A, and the Prod environment to project B. During migration, only tasks from the Ververica Flink project associated with the Prod environment (project B) are synchronized to the Dev environment.
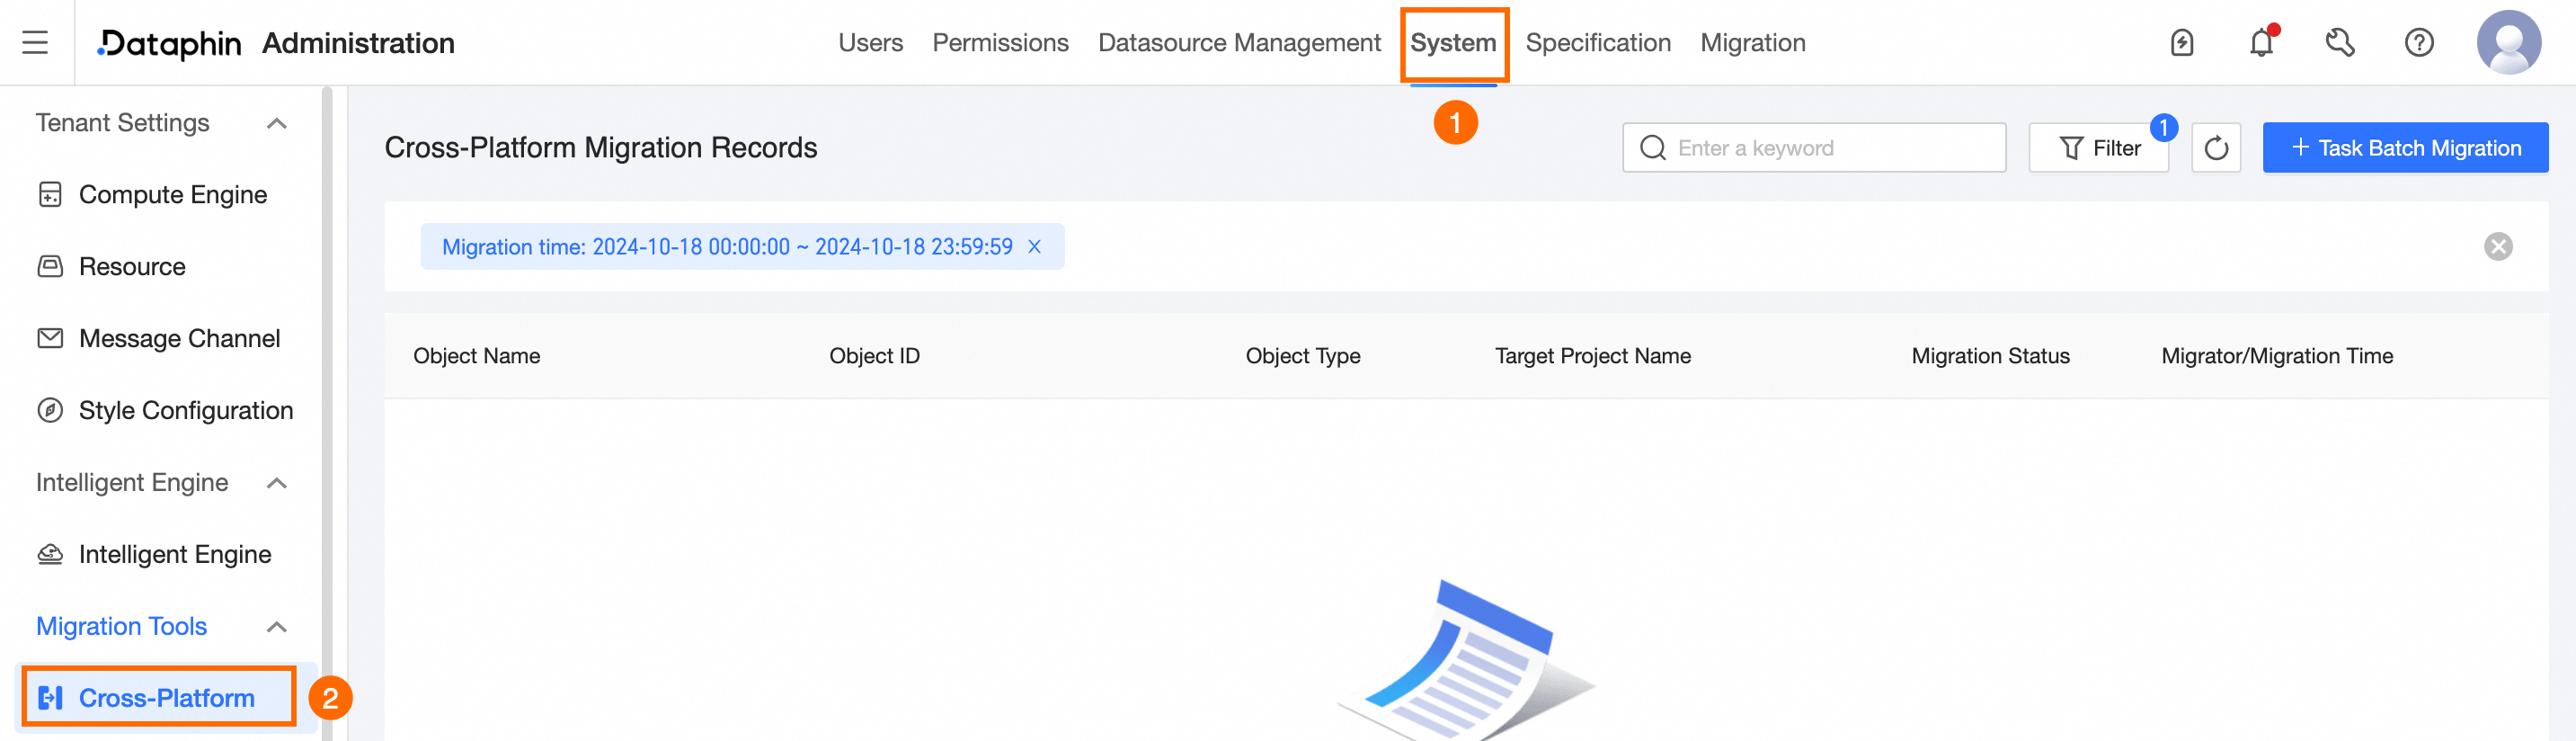
Cross-platform migration entry
On the Dataphin home page, select the Management Center from the top menu bar.
Follow the visual guide below to navigate to the Cross-platform Migration page.
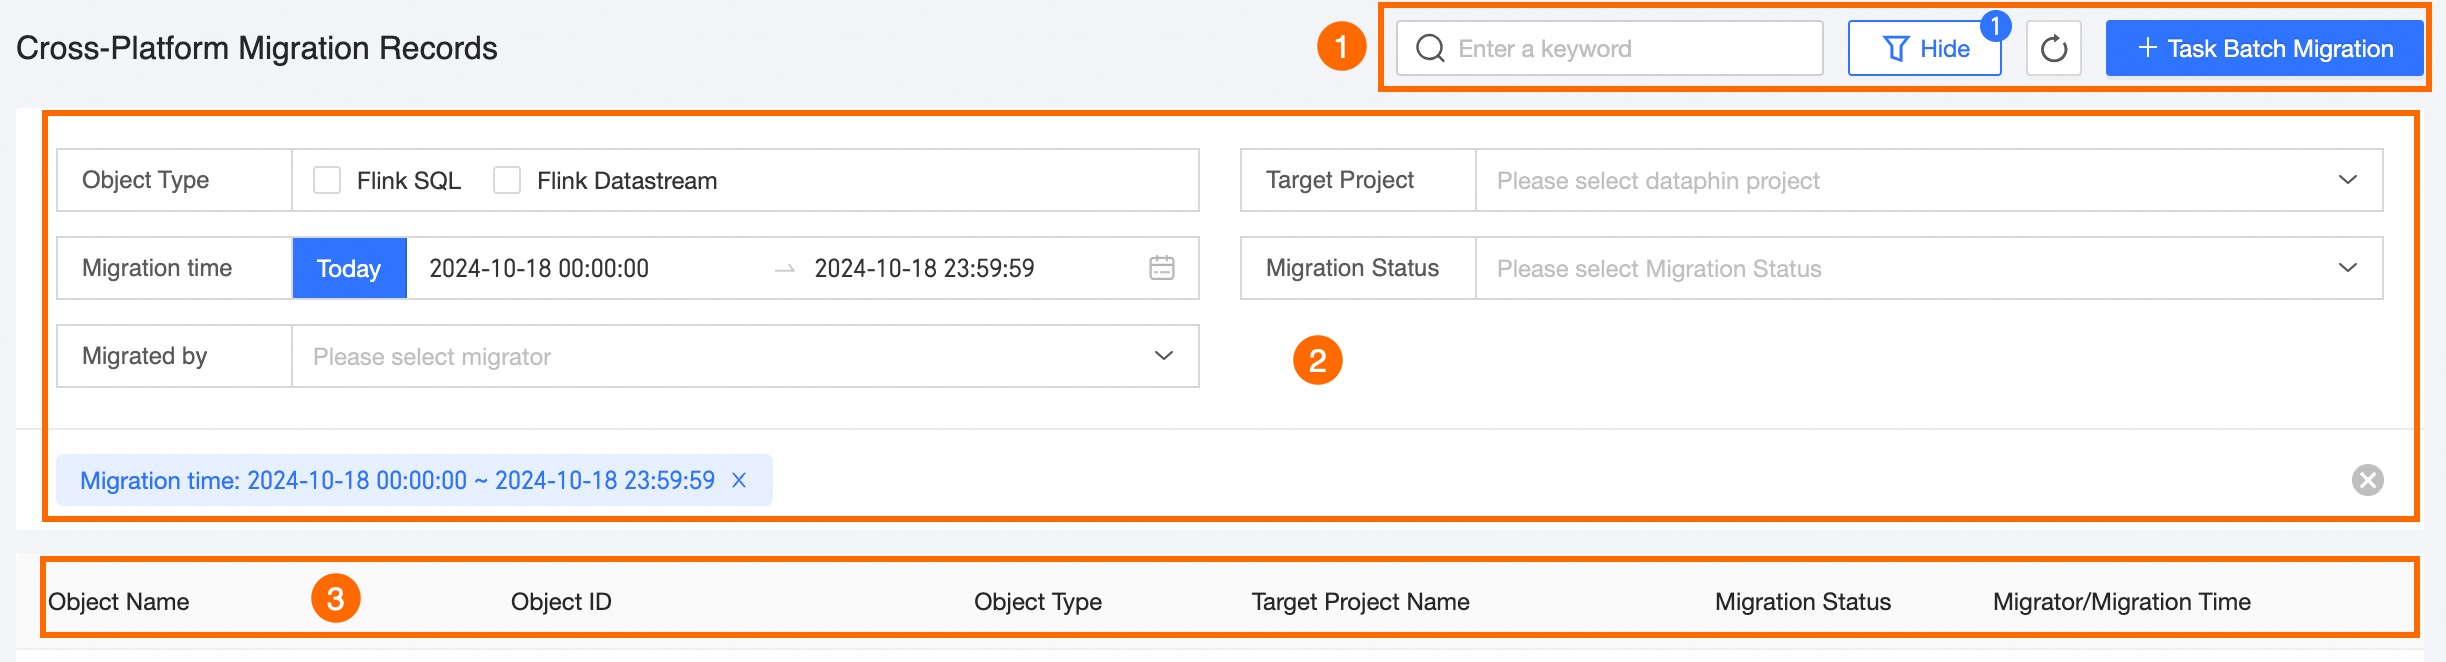
Introduction to the cross-platform migration record page
The cross-platform migration record page features an operation area, filter area, and task migration list for managing batch migrations. Here, you can conduct various management operations.
Area | Description |
①Operation area | Filter migration objects by entering keywords or use the expanded filter options by clicking To initiate real-time task migration, click +batch Migration Of Tasks. This action will direct you to the Batch Migration Of Tasks page. For detailed instructions, refer to Batch migration of tasks. |
②Filter area | The filter area offers several options:
|
③Task Migration List | The migration list displays records including Migration Object Name, Object ID, File Format, Target Project Name, Migration Status, and Migrator/migration Time. Note For failed migrations, click |
Batch migration of tasks
From the Cross-platform Migration Record page, select +batch Migration Of Tasks to access the Batch Migration Of Tasks page.
In the Select Source And Target Project step, configure the Target Dataphin Project and Same-name Object HandlingPolicy.
Select the Target Dataphin Project for migrating tasks. Only Basic pattern projects or Dev projects within the Dev-Prod pattern are eligible.
ImportantNote: If the Dataphin project post-migration is part of a Dev-Prod pattern, the Dev and Prod environments must each be linked to a separate Ververica Flink compute source. During migration, only jobs from the Ververica Flink compute source connected to the Prod environment will be migrated to the Dev environment.
Choose a Same-name Object Handling Policy, with options to either overwrite or skip.
The Overwrite policy allows objects from the source Ververica Flink project to replace those with the same name in the target Dataphin project.
The Skip policy will ignore objects from the source project that have the same name as those in the target project during migration.
Click Next to proceed.
At the Select Tasks To Migrate step, choose the tasks you wish to migrate.
NoteYou can search for tasks using keywords or filter them by clicking
 . Filters include object type, recent migration time, and status.
Tasks in the statuses of waiting, migrating, or submitting are not eligible for migration.
A maximum of 40 tasks can be selected for migration at a time.
Tasks that have already been migrated can be re-migrated. If a task with the same name exists in the target project, it will be handled according to the chosen Same-name Object Handling Policy.
Select Start Migration to initiate the migration process.
Upon selecting Start migration, the migration task will commence. Monitor the task's progress in the Task migration record list, which displays stages such as waiting, migrating, and submitting.
What to do next
Once tasks have been migrated to the target Dataphin project, the system will automatically attempt to submit them. To learn more about task submission, visit the corresponding compute task page.