This tutorial demonstrates how to use DataWorks to synchronize public data to Hologres and perform real-time analysis. You will learn about the data synchronization capabilities of DataWorks and the real-time analytics features of Hologres. This guide uses free trial resources, but the process is similar for paid resources.
Tutorial overview
This tutorial uses the public GitHub Archive dataset. You will learn how to use DataWorks to collect more than 20 types of event data from GitHub, such as project and user activity, and synchronize them to Hologres in real time for analysis. You will also use a built-in DataV template to quickly create a real-time data visualization dashboard to monitor changes in GitHub data across various dimensions, including developers, projects, and programming languages.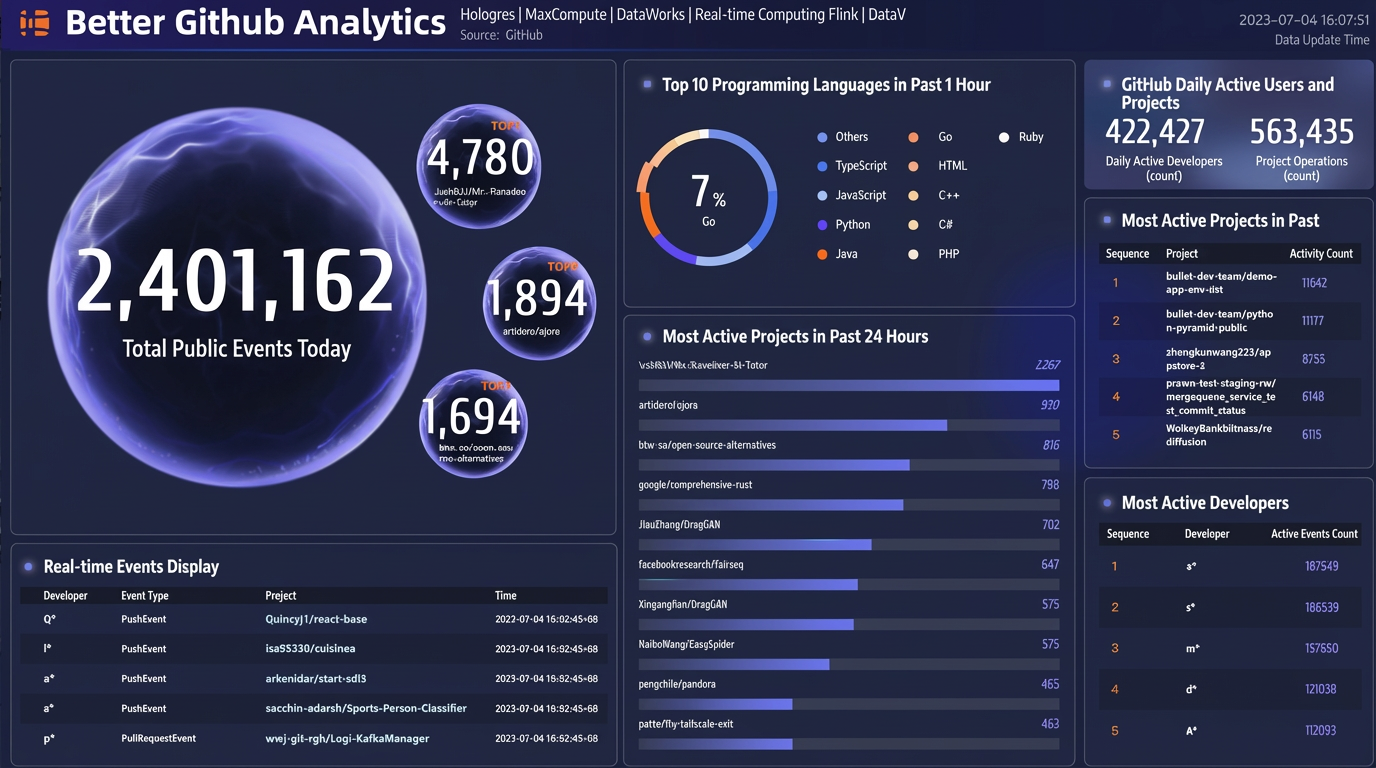
What you'll learn
How to synchronize data in real time using DataWorks.
How to create data visualizations using DataV dashboards.
Difficulty | Easy |
Time required | 55 minutes |
Alibaba Cloud products used | |
Costs |
|
Prepare the environment and resources
Prepare an Alibaba Cloud account
Go to the Alibaba Cloud official website and click Free Account to create an Alibaba Cloud account.
Complete real-name verification for your Alibaba Cloud account.
Create an access key.
After creating the access key, return to the AccessKey page to view its status.
For more information, see Prepare an Alibaba Cloud account.
Create a VPC and VSwitch
To ensure network connectivity for later tasks, verify that the DataWorks resource group and Hologres instance use the same VPC. Follow these steps to create a VPC and a VSwitch:
Log on to the VPC console. In the top navigation bar, switch the region to China (Shanghai).
In the left-side navigation pane, click VPCs.
On the VPCs page, click Create VPC.
On the Create VPC page, configure a VPC and a VSwitch. For the VSwitch, select Shanghai Zone E as the availability zone. Then, click OK. For more information, see Create a VPC and a VSwitch.
Click the ID of the VPC instance you created and add a security group on the Resource Management tab. For more information, see Create a security group.
Associate an EIP
This tutorial uses the public GitHub Archive dataset. By default, general-purpose resource groups in DataWorks cannot access the internet. Therefore, you must configure a public NAT gateway for the resource group's associated VPC to access the public dataset.
Log on to the public NAT gateway console. In the top navigation bar, switch the region to China (Shanghai).
Click Create NAT Gateway. Configure the following parameters:
Parameter
Value
Region
China (Shanghai).
VPC
Select the VPC and VSwitch you created.
Associate VSwitch
Access Mode
VPC SNAT.
Elastic IP Address
Create EIP.
NoteKeep the default values for parameters not listed in the table.
Click Buy Now, select the terms of service, and then click Confirm Order to complete the purchase.
Hologres free trial
Log on to the Hologres Free Trial page and click Try Now. In the Hologres dialog box that appears, configure the parameters. This tutorial uses the example values in the following table. You can keep the default values for any parameters not mentioned.
Parameter
Example value
Region
China (Shanghai)
Instance type
General-purpose
Availability zone
Zone E
Compute resources
32 Cores, 128 GB (Compute Nodes: 2)
VPC
Select the VPC you created.
VSwitch
Select the VSwitch you created.
Instance name
hologres_test
Service-linked role
Create the role as prompted on the page.
Role name:
AliyunServiceRoleForHologresIdentityMgmtPermissions: Hologres uses this role to access your resources in other Alibaba Cloud services.
Resource group
Default Resource Group
Select the terms of service, click Try Now, and follow the on-screen instructions to complete the application.
Click Go to Console to start your trial.
MaxCompute free trial
To complete this tutorial, you must activate DataWorks and MaxCompute. For MaxCompute, you can choose one of the following options:
Free trial: You can apply for a free trial of MaxCompute. After the trial period ends, you are charged for continued use. For more information, see Free trial quota for new users.
Pay-as-you-go: When you activate DataWorks, a pay-as-you-go MaxCompute service is activated by default.
To use the MaxCompute free trial, you must apply for it before you activate DataWorks.
Log on to the MaxCompute Free Trial page.
On the MaxCompute card, click Try Now.
In the trial panel for the MaxCompute product, set Activation region to China (Shanghai). Keep the default values for other parameters.
Select the terms of service, click Try Now, and follow the on-screen instructions to complete the application.
Activate DataWorks
To complete this tutorial, you need to activate the Basic Edition of DataWorks, a resource group, and MaxCompute. Follow these steps to activate the services:
For MaxCompute, you can choose one of the following options:
Free trial: You can apply for a free trial of MaxCompute. After the trial period ends, you are charged for continued use. For more information, see Free trial quota for new users.
Pay-as-you-go: After you activate DataWorks, a pay-as-you-go MaxCompute service is enabled by default to help you try the core features.
To use the MaxCompute free trial, you must apply for it before you activate DataWorks.
Go to the DataWorks activation page.
Go to the Alibaba Cloud DataWorks official website and click Activate Now to go to the activation page.
Purchase the product with the following settings.
Parameter
Configuration
Region
China (Shanghai)
DataWorks edition
Basic Edition
Resource group
Name: Enter a custom name.
Network: Select the VPC and VSwitch you created.
NoteThe VPC and VSwitch are automatically bound to the resource group you create, allowing you to use them directly for data integration.
Service-linked role: Create the role as prompted on the page.
Role name:
AliyunServiceRoleForDataWorksRole permission policy:
AliyunServiceRolePolicyForDataWorks
Select the terms of service and follow the on-screen instructions to complete the payment. For more information about purchasing the product, see Purchase guide.
NoteAfter you activate DataWorks, a default workspace is created for you. The new resource group belongs to this workspace by default and is ready to use.
After you activate DataWorks, go to the authorization page to grant DataWorks permissions to access your cloud resources.
DataV free trial
Log on to the DataV official website and click Buy Now.
In the Product edition section, click Free Trial under .
Click Buy Now and follow the on-screen instructions to activate the service.
Create a Hologres table
Initialize the Hologres environment.
Go to the Hologres console - Instance List page, click the name of your target instance to go to the Instance Details page.
On the Instance Details page, click Log On to Instance to open HoloWeb.
On the Metadata Management page, click Databases.
In the Create Database dialog box, configure the following parameters and click OK.
Parameter
Description
Instance
Select the Hologres instance for the new database. The current instance is selected by default, but you can choose another from the drop-down list.
Database
For this tutorial, name the database
holo_tutorial.Permission model
Select the default SPM. For more information about permission models, see:
SPM: Simple Permission Model. This model grants permissions at the database level and defines four roles: admin, developer, writer, and viewer. You can manage permissions for database objects easily and securely by using a small number of permission management functions.
SLPM: Schema-level Simple Permission Model. This model grants permissions at the schema level and defines roles with more granularity: <db>.admin, <db>.<schema>.developer, <db>.<schema>.writer, and <db>.<schema>.viewer.
Expert: Hologres is compatible with PostgreSQL and uses an identical permission system.
Log on now
Select Yes.
Go to the SQL Editor page from the top menu bar. Click the
 icon in the upper-left corner to open an Ad-hoc Query page.
Create a Hologres internal table.
On the Ad-hoc Query page, run the following command to create the Hologres internal table
hologres_dataset_github_event.hologres_github_event. Data will be written to this table in real time.-- Create a schema to create an internal table and import data CREATE SCHEMA IF NOT EXISTS hologres_dataset_github_event; DROP TABLE IF EXISTS hologres_dataset_github_event.hologres_github_event; BEGIN; CREATE TABLE hologres_dataset_github_event.hologres_github_event ( id bigint PRIMARY KEY, actor_id bigint, actor_login text, repo_id bigint, repo_name text, org_id bigint, org_login text, type text, created_at timestamp with time zone NOT NULL, action text, commit_id text, member_id bigint, language text ); CALL set_table_property ('hologres_dataset_github_event.hologres_github_event', 'distribution_key', 'id'); CALL set_table_property ('hologres_dataset_github_event.hologres_github_event', 'event_time_column', 'created_at'); CALL set_table_property ('hologres_dataset_github_event.hologres_github_event', 'clustering_key', 'created_at'); COMMENT ON COLUMN hologres_dataset_github_event.hologres_github_event.id IS 'Event ID'; COMMENT ON COLUMN hologres_dataset_github_event.hologres_github_event.actor_id IS 'Actor ID'; COMMENT ON COLUMN hologres_dataset_github_event.hologres_github_event.actor_login IS 'Actor login name'; COMMENT ON COLUMN hologres_dataset_github_event.hologres_github_event.repo_id IS 'Repo ID'; COMMENT ON COLUMN hologres_dataset_github_event.hologres_github_event.repo_name IS 'Repo name'; COMMENT ON COLUMN hologres_dataset_github_event.hologres_github_event.org_id IS 'Repo organization ID'; COMMENT ON COLUMN hologres_dataset_github_event.hologres_github_event.org_login IS 'Repo organization name'; COMMENT ON COLUMN hologres_dataset_github_event.hologres_github_event.type IS 'Event type'; COMMENT ON COLUMN hologres_dataset_github_event.hologres_github_event.created_at IS 'Event time'; COMMENT ON COLUMN hologres_dataset_github_event.hologres_github_event.action IS 'Event action'; COMMENT ON COLUMN hologres_dataset_github_event.hologres_github_event.commit_id IS 'Commit ID'; COMMENT ON COLUMN hologres_dataset_github_event.hologres_github_event.member_id IS 'Member ID'; COMMENT ON COLUMN hologres_dataset_github_event.hologres_github_event.language IS 'Programming language'; COMMIT;
Synchronize real-time data to Hologres
This data source is read-only and supported only for data synchronization tasks, not in other modules.
Create the data sources required for the synchronization task.
Log on to the DataWorks console. After you switch the region to China (Shanghai), in the left-side navigation pane, click . Select your workspace from the drop-down list and click Go to Workspace Management.
In the left-side navigation pane, click .
On the Data Source page, click Add Data Source.
Follow the on-screen instructions to create a MySQL data source and a Hologres data source. The key parameters are described below.
MySQL data source: The source data source.
Parameter
Description
Data source name
Enter a custom name. This tutorial uses mysqlData as an example.
Configuration mode
Select JDBC.
JDBC URL
Click Add an address and configure the following information:
Host:
rm-bp1z69dodhh85z9qa.mysql.rds.aliyuncs.comPort:
3306
After you enter the database name, the full JDBC URL is
jdbc:mysql://rm-bp1z69dodhh85z9qa.mysql.rds.aliyuncs.com:3306/github_events_share.Database
github_events_share
Username
workshop
Password
workshop#2017
This password is for tutorial purposes only. Do not use it in production environments.
Authentication options
No Authentication.
Hologres data source: The destination data source.
Parameter
Description
Data source name
Enter a custom name. This tutorial uses
hologresDataas an example.Authentication method
The default is Alibaba Cloud Account & RAM Role.
Alibaba Cloud Account
Your current Alibaba Cloud primary account.
Region
China (Shanghai).
Hologres instance
Select the instance you created.
Database
Enter the name of the Hologres database you created,
holo_tutorial.Default access identity
Select Alibaba Cloud primary account.
Authentication options
No Authentication.
Create a real-time synchronization task.
Go to the Data Integration page in DataWorks.
In the Create Sync Task section, select the source and destination data sources, and then click Create Sync Task.
Source: Select MySQL.
Destination: Select Hologres.
Configure basic task information.
New task name: data_test.
Synchronization type: Real-time synchronization for the entire database.
Configure network connectivity.
In the Network and resource settings area, select the data sources and resource group.
Data source: Select mysqlData.
Data destination: Select hologresData.
Resource group: Select the resource group you created when activating DataWorks, and set the consumed CUs to 2 CU.
NoteTo maintain a stable connection to the public data source, the connection between the resource group and the public MySQL data source will be released after 7 days. This does not affect connections between the resource group and your own MySQL data source.
A minimum of 2 CUs is required to run a full database synchronization task using the new version of resource groups. For more information, see Billing of Serverless resource groups.
Click Test Connectivity of All Resources to ensure network connectivity between the data sources and the resource group. For more information about network connectivity, see Network connectivity solutions.
After the test is successful, click Next.
Configure the real-time synchronization task.
In the Select source tables and databases area, select the github table from MySQL and add it to Selected Tables.
In the Map source and destination tables area, select the corresponding table and click Refresh Mappings in Batches.
Based on the Hologres internal table you created, change the destination table name to
hologres_github_eventand the destination schema name tohologres_dataset_github_event. Click Complete.On the Task list page, start the task and view its execution details.
The public MySQL data source stores data from the last 7 days. A full synchronization process copies this offline data, after which real-time data is continuously written to Hologres.
After the data is synchronized, go to Hologres to perform real-time data analysis.
Analyze and visualize real-time data
Analyze real-time data.
Go to the HoloWeb SQL Editor and query the most active GitHub projects in the last 24 hours.
SELECT
    repo_name,
    COUNT(*) AS events
FROM
    hologres_dataset_github_event.hologres_github_event
WHERE
    created_at >= now() - interval '1 day'
GROUP BY
    repo_name
ORDER BY
    events DESC
LIMIT 5;
You can perform custom real-time queries and analysis on the last 7 days of data in Hologres from the metadata management page. The results of other real-time analysis queries will be connected to the DataV dashboard. For sample SQL queries, see the appendix.
Visualize real-time data.
Use a built-in DataV template to quickly build a data visualization dashboard.
Go to the DataV console. In the left-side navigation pane, choose Prepare Data > Data Source.
On the Data Source page, click Add Data Source.
In the Add Data Source dialog box, add a Hologres data source with the parameters in the following table, and then click OK.
Parameter
Description
Type
Hologres
Network
VPC
China (Shanghai)
VPC ID
Go to the Hologres console - Instance List page, click your target instance name, and find the VPC ID in the Network Information section of the Instance Details page.
VPC instance ID
Go to the Hologres console - Instance List page, click your target instance name, and find the VPC Instance ID in the Network Information section of the Instance Details page.
Name
Enter a custom name.
Endpoint
Go to the Hologres console - Instance List page, click your target instance name, and find the endpoint in the Network Information section of the Instance Details page.
Username
Go to the AccessKey Management page to get the AccessKey ID.
Password
Go to the AccessKey Management page to get the AccessKey Secret.
Port
Go to the Hologres console - Instance List page, click your target instance name, and in the Network Information section of the Instance Details page, find the port number corresponding to the Endpoint for the VPC. For example: 80.
Database
Select the name of the Hologres database you created.
Go to the DataV console, click Create PC Dashboard on the Ungrouped page, and select the Use Hologres to analyze real-time GitHub event data template to create a dashboard.
In the Create Dashboard dialog box, enter a Dashboard Name and click Create Dashboard.
On the created dashboard page, click a number component. In the Data Source tab on the right, select the Hologres data source you added. Repeat this for all 15 number components.
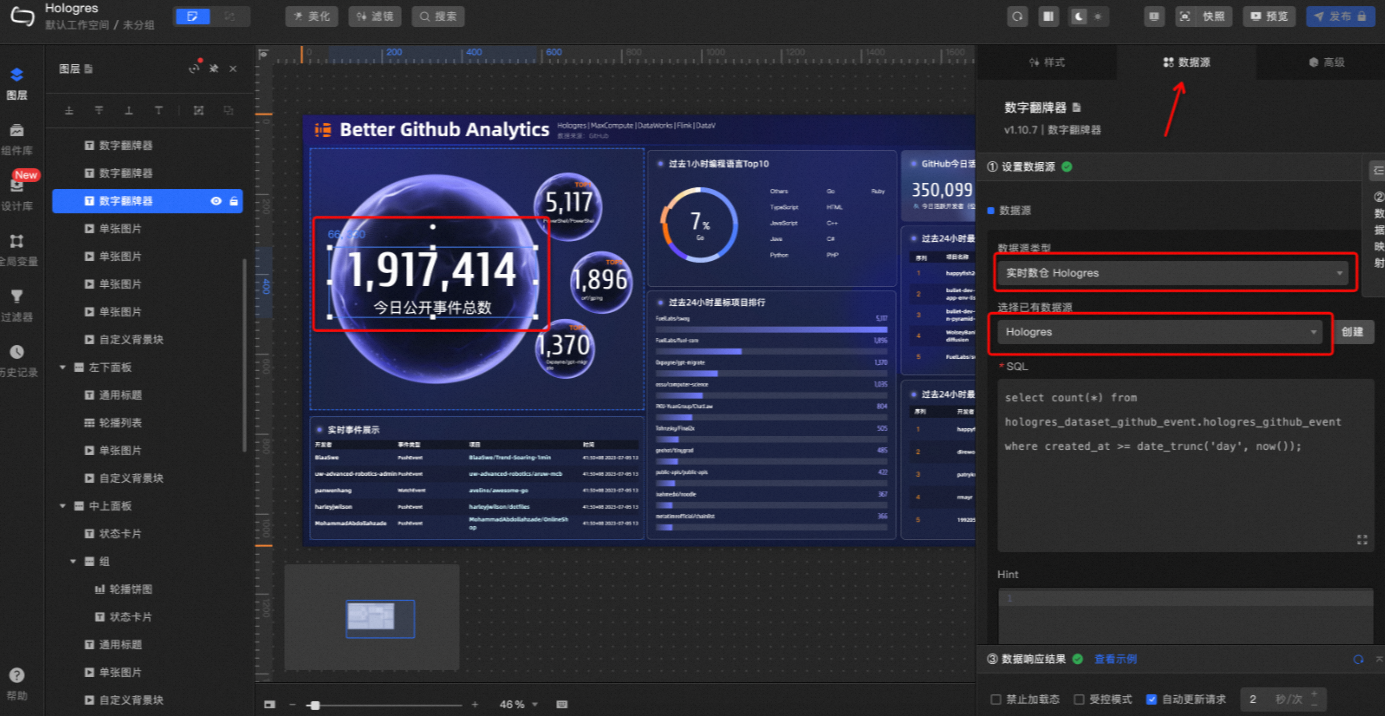
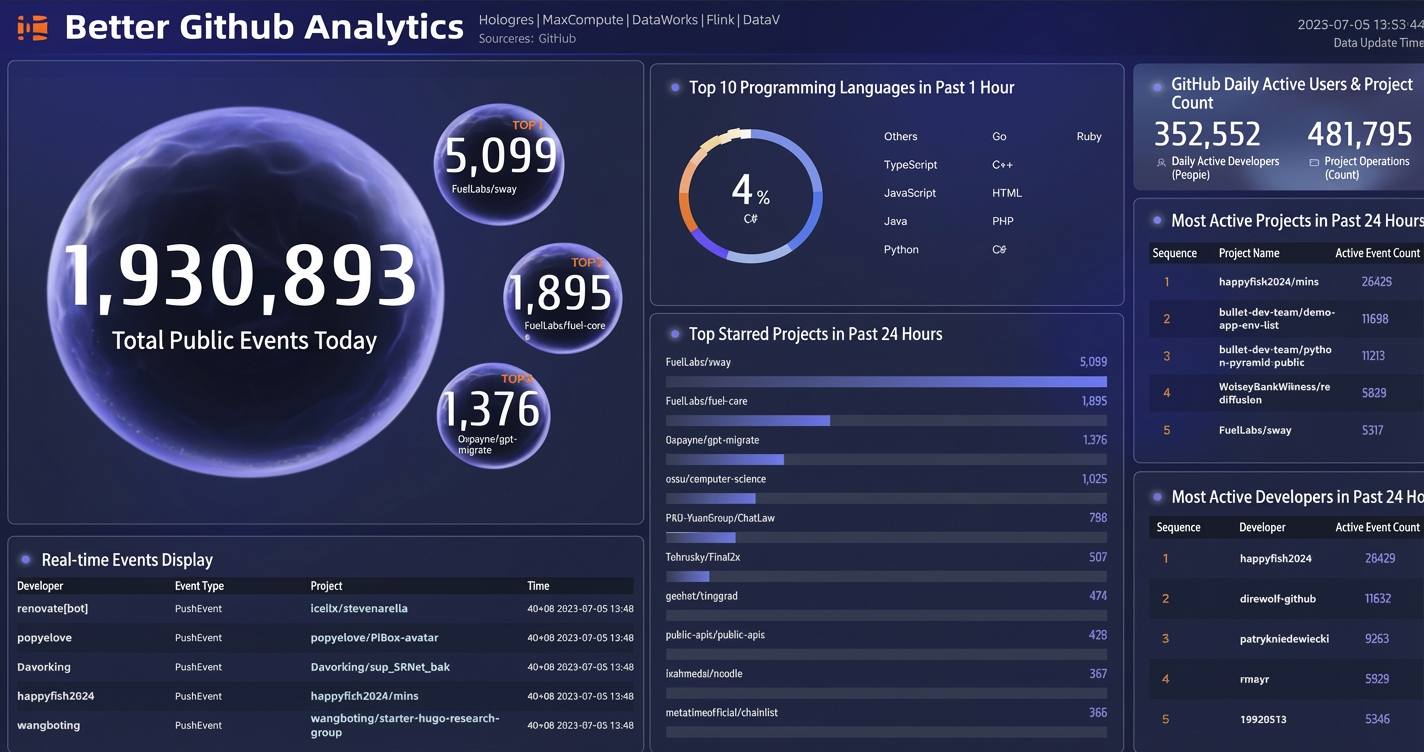
After you have selected the data source for all number-related components, click Preview in the upper-right corner of the dashboard to get a preview link for the real-time dashboard. To publish the dashboard, you need to upgrade to a premium edition of DataV. The final result looks like this:
(Optional) Analyze historical data
Hologres is tightly integrated with MaxCompute, creating a unified architecture for big data queries and analysis. The full historical GitHub dataset is stored in a public MaxCompute dataset. To analyze data over a longer period, you have two options:
Query data using an external table: Directly query MaxCompute data from Hologres without importing it.
Query data using an internal table: Import historical data into Hologres with zero ETL for faster query performance.
The daily data volume of GitHub is approximately 300 MB. The free trial of Hologres provides 20 GB of storage. If you import too much historical data, you may incur additional charges. This does not affect queries on external tables.
Query MaxCompute data using an external table.
Create a MaxCompute external table.
DROP FOREIGN TABLE IF EXISTS dwd_github_events_odps;

IMPORT FOREIGN SCHEMA "bigdata_public_dataset#github_events" LIMIT to
(
    dwd_github_events_odps
)
FROM SERVER odps_server INTO public OPTIONS(if_table_exist 'error',if_unsupported_type 'error');
Directly query MaxCompute data through the external table. For example, to query the most active projects since yesterday:
SELECT
    repo_name,
    COUNT(*) AS events
FROM
    dwd_github_events_odps
WHERE
    ds >= (CURRENT_DATE - interval '1 day')::text
GROUP BY
    repo_name
ORDER BY
    events DESC
LIMIT 5;
Import MaxCompute data with zero ETL.
Create a Hologres internal table.
DROP TABLE IF EXISTS gh_event_data;

BEGIN;
CREATE TABLE gh_event_data (
    id bigint,
    actor_id bigint,
    actor_login text,
    repo_id bigint,
    repo_name text,
    org_id bigint,
    org_login text,
    type text,
    created_at timestamp with time zone NOT NULL,
    action text,
    iss_or_pr_id bigint,
    number bigint,
    comment_id bigint,
    commit_id text,
    member_id bigint,
    rev_or_push_or_rel_id bigint,
    ref text,
    ref_type text,
    state text,
    author_association text,
    language text,
    merged boolean,
    merged_at timestamp with time zone,
    additions bigint,
    deletions bigint,
    changed_files bigint,
    push_size bigint,
    push_distinct_size bigint,
    hr text,
    month text,
    year text,
    ds text
);
CALL set_table_property('public.gh_event_data', 'distribution_key', 'id');
CALL set_table_property('public.gh_event_data', 'event_time_column', 'created_at');
CALL set_table_property('public.gh_event_data', 'clustering_key', 'created_at');
COMMIT;
Import data from the external table into the internal table.
INSERT INTO gh_event_data
SELECT
    *
FROM
    dwd_github_events_odps
WHERE
    ds >= (CURRENT_DATE - interval '1 day')::text;

-- Update table statistics
ANALYZE gh_event_data;
Query the most active projects since yesterday using the internal table.
SELECT
    repo_name,
    COUNT(*) AS events
FROM
    gh_event_data
WHERE
    ds >= (CURRENT_DATE - interval '1 day')::text
GROUP BY
    repo_name
ORDER BY
    events DESC
LIMIT 5;
Appendix
The following are all the SQL queries used in the data dashboard for this tutorial. Replace <table_name> with your actual table name in each query.
Total number of developers and projects today.
SELECT
    uniq (actor_id) actor_num,
    uniq (repo_id) repo_num
FROM
    <table_name>
WHERE
    created_at > date_trunc('day', now());
Most active projects in the last 24 hours.
SELECT
    repo_name,
    COUNT(*) AS events
FROM
    <table_name>
WHERE
    created_at >= now() - interval '1 day'
GROUP BY
    repo_name
ORDER BY
    events DESC
LIMIT 5;
Most active developers in the last 24 hours.
SELECT
    actor_login,
    COUNT(*) AS events
FROM
    <table_name>
WHERE
    created_at >= now() - interval '1 day'
    and actor_login not like '%[bot]'
GROUP BY
    actor_login
ORDER BY
    events DESC
LIMIT 5;
Total number of public events today.
select count(*) from <table_name> where created_at >= date_trunc('day', now());Ranking of starred projects in the last 24 hours.
SELECT
    repo_id,
    repo_name,
    COUNT(actor_login) total
FROM
    <table_name>
WHERE
    type = 'WatchEvent'
    AND created_at > now() - interval '1 day'
GROUP BY
    repo_id,
    repo_name
ORDER BY
    total DESC
LIMIT 10;

WITH agg_language AS (
    SELECT
        CASE
        LANGUAGE
        WHEN 'TypeScript' THEN
            'TypeScript'
        WHEN 'JavaScript' THEN
            'JavaScript'
        WHEN 'Python' THEN
            'Python'
        WHEN 'Go' THEN
            'Go'
        WHEN 'Java' THEN
            'Java'
        WHEN 'HTML' THEN
            'HTML'
        WHEN 'C++' THEN
            'C++'
        WHEN 'C#' THEN
            'C#'
        WHEN 'PHP' THEN
            'PHP'
        WHEN 'Ruby' THEN
            'Ruby'
        ELSE
            'Others'
        END AS
        LANGUAGE,
        count(*) total
    FROM
        <table_name>
    WHERE
        created_at > now() - interval '1 hour'
        AND
        LANGUAGE IS
        NOT NULL
    GROUP BY
        LANGUAGE
    ORDER BY
        total DESC
)
SELECT
    LANGUAGE,
    sum(total) AS sum
FROM
    agg_language
GROUP BY
    LANGUAGE
ORDER BY
    sum DESC;
Real-time event display.
SELECT
    cast(created_at as text),
    actor_login,
    type,
    repo_name
FROM
    <table_name>
ORDER BY
    created_at DESC
LIMIT 5;
Verify the results
After completing the steps, a successful query in Hologres displays the results in a Result tab on the Ad-hoc Query page, as shown below.
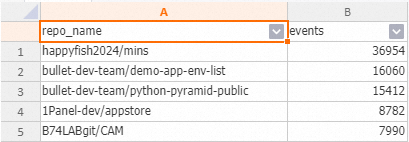
Example result for querying the most active GitHub projects in the last 24 hours:

Example result for directly querying MaxCompute data using an external table (most active projects since yesterday):

Example result for querying the most active projects since yesterday using an internal table.

Clean up and next steps
After completing this tutorial, release the resources to avoid further charges.
To ask questions or share feedback, join the Hologres user group on DingTalk (Group ID: 32314975).
Delete the DataV data source
Log on to the DataV console. On the Data Sources page, find the target data source and delete it.
Delete the synchronization task and data sources in DataWorks
Log on to the DataWorks console - Synchronization Task page. Find the target task, and in the Actions column, click More > Delete. Follow the on-screen instructions to delete the synchronization task.
Log on to the DataWorks console - Data Source page. Find the target data source, and in the Actions column, click the
icon. Follow the on-screen instructions to delete the data source.
Release the Hologres instance
Log on to the Hologres console. On the instance list page, release the target Hologres instance. For more information, see Delete an instance.
Release the public NAT gateway
Log on to the public NAT gateway console. Find the NAT gateway, and in the Actions column, click
> Delete. Follow the on-screen instructions to release the instance.Release the EIP
Log on to the EIP console. Find the EIP, and in the Actions column, click
> Release. Follow the on-screen instructions to release the instance.Release the VSwitch
Log on to the VPC console. On the VSwitches page, find the VSwitch, and in the Actions column, click Delete. Follow the on-screen instructions to release the instance.
Release the VPC
Log on to the VPC console. On the VPCs page, find the VPC, and in the Actions column, click Delete. Follow the on-screen instructions to release the instance.
 icon. Follow the on-screen instructions to delete the data source.