Demo project
This article takes Java over TCP as an example to help you build a MSMQ test project from scratch. Spring and pure Java are provided. The demo project contains the configuration and test code for normal messages, ordered messages, transactional messages, scheduled messages, and delayed messages.
Prerequisites
Install the IDE.
You can use IntelliJ IDEA or Eclipse. In this example, IntelliJ IDEA is used. Download the IntelliJ IDEA Ultimate version in the https://www.jetbrains.com/idea/ and install it by referring to IntelliJ IDEA.
Download the demo project.
In the https://github.com/sofastack-guides/sofamq-demo, download the demo project to your local computer, and then decompress it to see that sofamq-demo folders are added to your local computer.
Download and install the JDK.
Configure a demo project
Import the demo project file to IntelliJ IDEA.
On the IntelliJ IDEA page, choose New > Project From Existing Sources… and select the sofamq-demo folder.
Select Maven as the Import type.
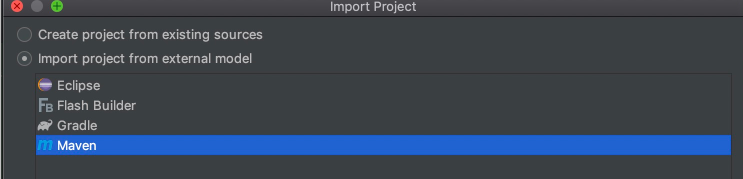
By default, click Finish until the import is complete. The demo project needs to load dependent JAR packages. Therefore, the import process takes 2-3 minutes.
Create a resource.
You must first create the required resources in the console, including the MSMQ workspace, topic, group ID(GID), and AccessKey pair (AK) required for authentication.
Configure the access credential.
When connecting to middleware, you must properly authenticate your application to avoid unauthorized access due to security risk considerations. Therefore, you must configure the AccessKey pair and AccessSecret of your account in the environment variables of the machine where your application resides.
The procedure is as follows:
Linux and macOS system configuration methods
Run the following command:
export SOFA_AK_ENV=<access_key_id>
export SOFA_SK_ENV=<access_key_secret>
Replace
<access_key_id>with the prepared AccessKey ID and<access_key_secret>with the AccessKey secret.Windows system configuration method
Create an environment variable file, add the environment variable
SOFA_AK_ENVandSOFA_SK_ENV, and then write the prepared AccessKey ID and AccessKey secret.Restart the Windows system.
ImportantDo not use the AccessKey of an Alibaba Cloud account because the leakage of the AccessKey of an Alibaba Cloud account will threaten the security of all your resources. Use the AccessKey pair of a RAM user to reduce the risk of AccessKey disclosure.
In the production environment, we recommend that you create a RAM user for middleware. This allows you to control permissions and facilitate management.
You must configure the resource information created in Step 2 to the
MqConfigclass.public static final String TOPIC ="The topic created in Step 2"; public static final String GROUP_ID ="Group ID created in Step 2"; // The AccessKey pair of an Alibaba Cloud account has permissions to access all API operations. This is a high risk. We strongly recommend that you create and use a RAM user for API access or routine O&M. Log on to the RAM console to create a RAM user. // Save the AccessKey pair and AccessKeySecret in environment variables. // We strongly recommend that you do not save the AccessKey and AccessKeySecret in the code. This may cause key leakage. public static final String ACCESS_KEY = System.getenv("SOFA_AK_ENV"); public static final String SECRECT_KEY = System.getenv("SOFA_SK_ENV"); public static final String INSTANCE ="The ID of your instance. You can access the configuration at the bottom of the Overview page in the console to obtain the instance ID"; public static final String TAG ="TAG used when you publish and subscribe. If not, it can be empty"; public static final String ENDPOINT ="Your TCP endpoint. You can access the configuration at the bottom of the Overview page to obtain the TCP endpoint";
Run the demo in Main mode
Sends a message.
Send normal messages:
Send normal messages in pure Java: Run the
SimpleProducerclass.Send normal messages in Spring mode: Run the
ProducerClientclass.
Send transactional messages: Run the
SimpleTransactionProducerclass. The LocalTransactionCheckerImpl class is a local transaction check interface class that is used to check transactions. For more information, see Send and receive transactional messages.Send ordered messages: Run
SimpleOrderProducerclass. In this mode, messages are published and consumed in sequence. For more information, see Send and receive ordered messages.Send scheduled (delayed) messages: Run the
SimpleDelayProducerclass to send messages. Delay delivery after 3 seconds. You can also specify a precise delivery time.
To check that the method message is sent successfully, perform the following steps:
Log on to the SOFAStack console.
In the left-side navigation pane, choose Middleware > MSMQ > Message Query.
On the Message Query page, click Query by Topic.
Click the name of the target topic to query. You can see that the message has been sent to the topic.
Receive messages.
Receive normal messages:
Receive normal messages in pure Java: Run the
SimpleConsumerclass.Spring to receive normal messages: Run the
ConsumerClientclass.
Receive transactional messages: Run the
SimpleConsumerclass.Receive ordered messages: Run
SimpleOrderConsumerclass.Receive timed (delayed) messages: Run
SimpleConsumerclass. You can see the log of the message being received and printed. Because there is initialization, you must wait a few seconds. In the production environment, initialization is not frequent.
To check that the method message is sent successfully, perform the following steps:
Log on to the SOFAStack console.
In the left-side navigation pane, choose Middleware > MSMQ > Group Management.
Click the group ID to go to the details page.
Click Consumer Status. You can see that the started consumer is online and the subscriptions are consistent.