This topic describes how to integrate vivo Push into an mPaaS application. The process has three steps: register for vivo Push, connect to vivo Push, and test the integration.
Register for vivo Push
Before writing any client-side code, create a vivo developer account and get the push credentials you need later.
Read the vivo Push Platform User Guide to understand vivo Push requirements.
Go to the vivo Open Platform, create an account, and request access to the push service.
After access is granted, record the AppID, AppKey, and AppSecret from your vivo application. You will enter these values in the mPaaS console and in
AndroidManifest.xml.
Connect to vivo Push
Add the Push - vivo component to your project using the same process as adding the push SDK — see Add an SDK. Note that the Push - vivo component contains only adaptation code; it does not include the vivo Push SDK itself.
Go to the vivo SDK documentation to download the SDK and integrate it into your main project. The currently supported version is v2.3.4. Later versions may require modifications — vendor SDKs are usually backward compatible. If you encounter compatibility issues, join DingTalk group 145930007362 to request support for the new version.
-
Configure the
AndroidManifest.xmlfile. If you are using a component-based approach, add the configuration in the Portal project. Replace the placeholder values forcom.vivo.push.api_keyandcom.vivo.push.app_idwith the actual values from the vivo Open Platform.<application> <service android:name="com.vivo.push.sdk.service.CommandClientService" android:process=":push" android:exported="true" /> <activity android:name="com.vivo.push.sdk.LinkProxyClientActivity" android:exported="false" android:process=":push" android:screenOrientation="portrait" android:theme="@android:style/Theme.Translucent.NoTitleBar" /> <meta-data android:name="com.vivo.push.api_key" android:value="Provided by vivo Open Platform" /> <meta-data android:name="com.vivo.push.app_id" android:value="Provided by vivo Open Platform" /> </application> -
If your build uses obfuscation, add the following rules:
All connection types: add the vivo Push obfuscation rules.
AAR connection type only: also add mPaaS obfuscation rules.
Test vivo Push
Start your application on a vivo phone. Confirm that the initialization method is called — see Message Push Service Initialization. The push SDK automatically retrieves and reports the vivo Push vendor token.
-
Terminate the application process and send a test message:
If you receive the message, the integration is complete.
If you do not receive the message, follow the steps below to troubleshoot.
Troubleshooting
Verify that the
AndroidManifest.xmlconfiguration has been added. Confirm that the values forcom.vivo.push.api_keyandcom.vivo.push.app_idmatch those on the vivo Open Platform.In the mPaaS console, verify that the vivo channel is enabled. For more information, see Channel Configuration. Confirm that the configurations match those on the vivo Open Platform.
-
To troubleshoot further, check the logcat logs:
-
Select the push process, filter for
mPush.PushProxyFactory, and check for the following log entry:D/mPush.PushProxyFactory: found proxy com.mpaas.push.external.vivo.CreatorIf this log entry is missing, there may be an issue with how the Push - vivo component was added. Verify that it was added correctly.
Select the push process and filter for
mVIVO. Check whether the vivo Push vendor token was retrieved. If the log entry"fail to turn on vivo push"appears, vivo Push registration failed. For more information about the error code (state), see vivo Push error codes.-
Select the main process and filter for
report channel token. Check whether the vivo vendor token was reported successfully. If the following log entry appears:report channel token error: xxxxThe vendor token was not reported. Check whether
base64Codein the mPaaS configuration file has a value. Also verify that the APK signature uploaded when you retrieved the configuration file matches the signature of the current application.
-
If you cannot resolve the issue after following these steps, submit a ticket (China site) or (international site), or contact mPaaS support.
FAQ
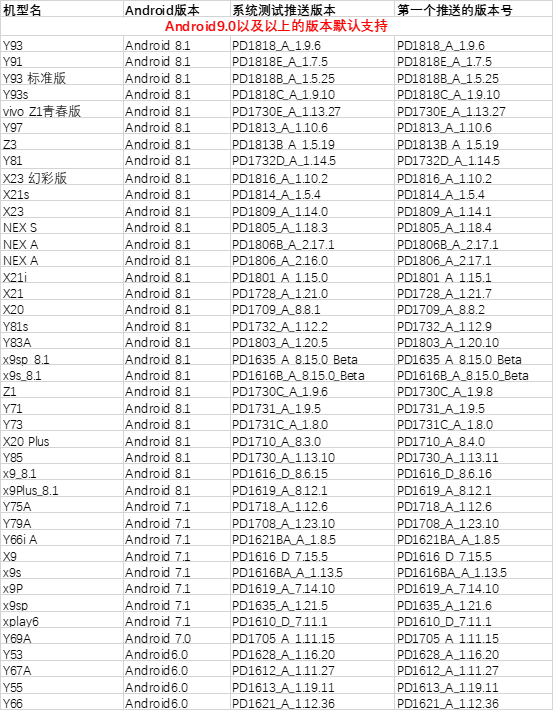
What models and system versions does vivo Push support?
The table below lists the models and minimum system versions supported by the SDK. For other questions about vivo Push, see vivo Push FAQ.