Lockless schema evolution
Changing a database table schema can lock the table and interrupt your business operations. To avoid this issue, OceanBase Developer Center (ODC) V4.2.0 and later provides a lockless schema evolution feature. This topic describes how to perform lockless schema evolution by submitting a lockless change ticket.
Background information
How it works
The lockless schema evolution process is as follows:
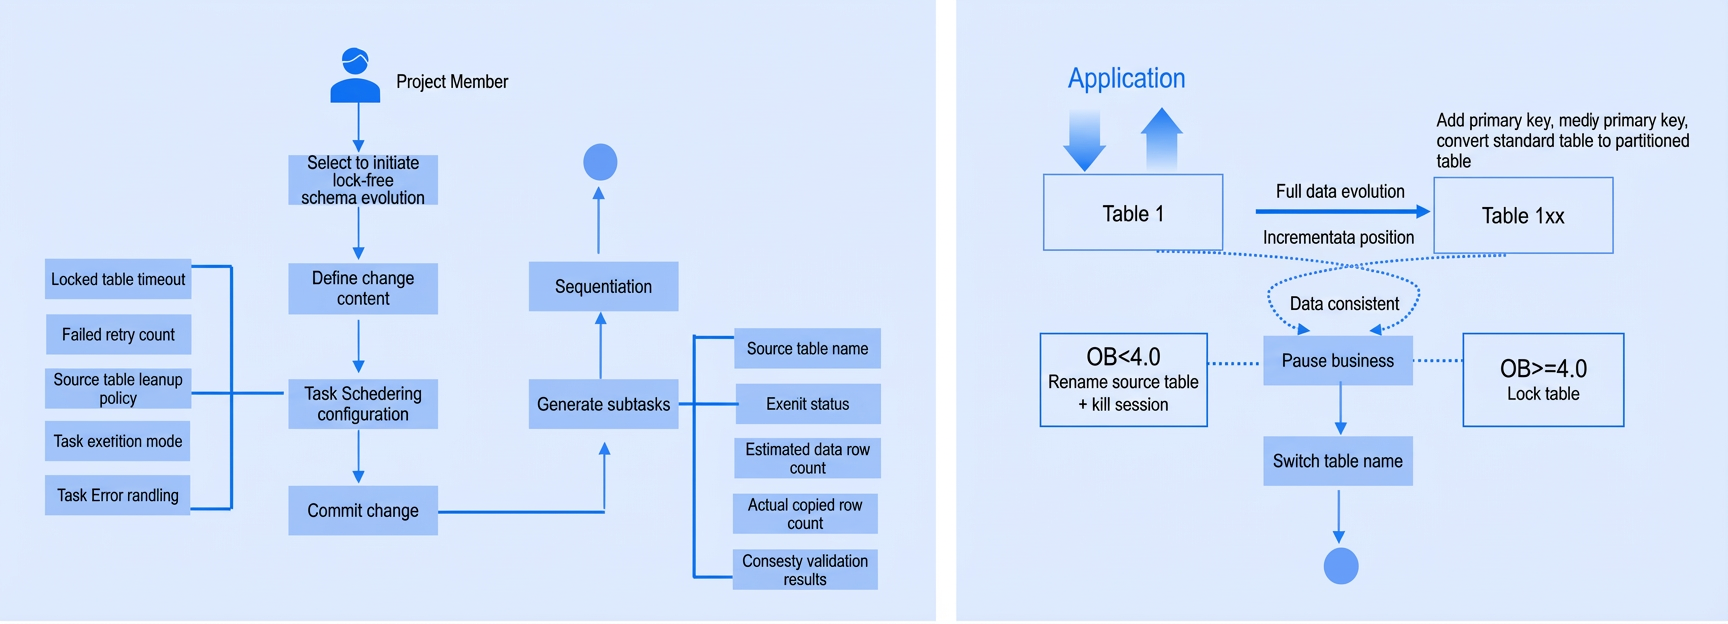
Create a temporary table.
Modify the schema of the temporary table.
Copy all existing data.
Perform incremental data synchronization.
Perform data consistency verification.
Terminate the session.
Switch the original and new tables.
Lockless schema evolution ticket workflow
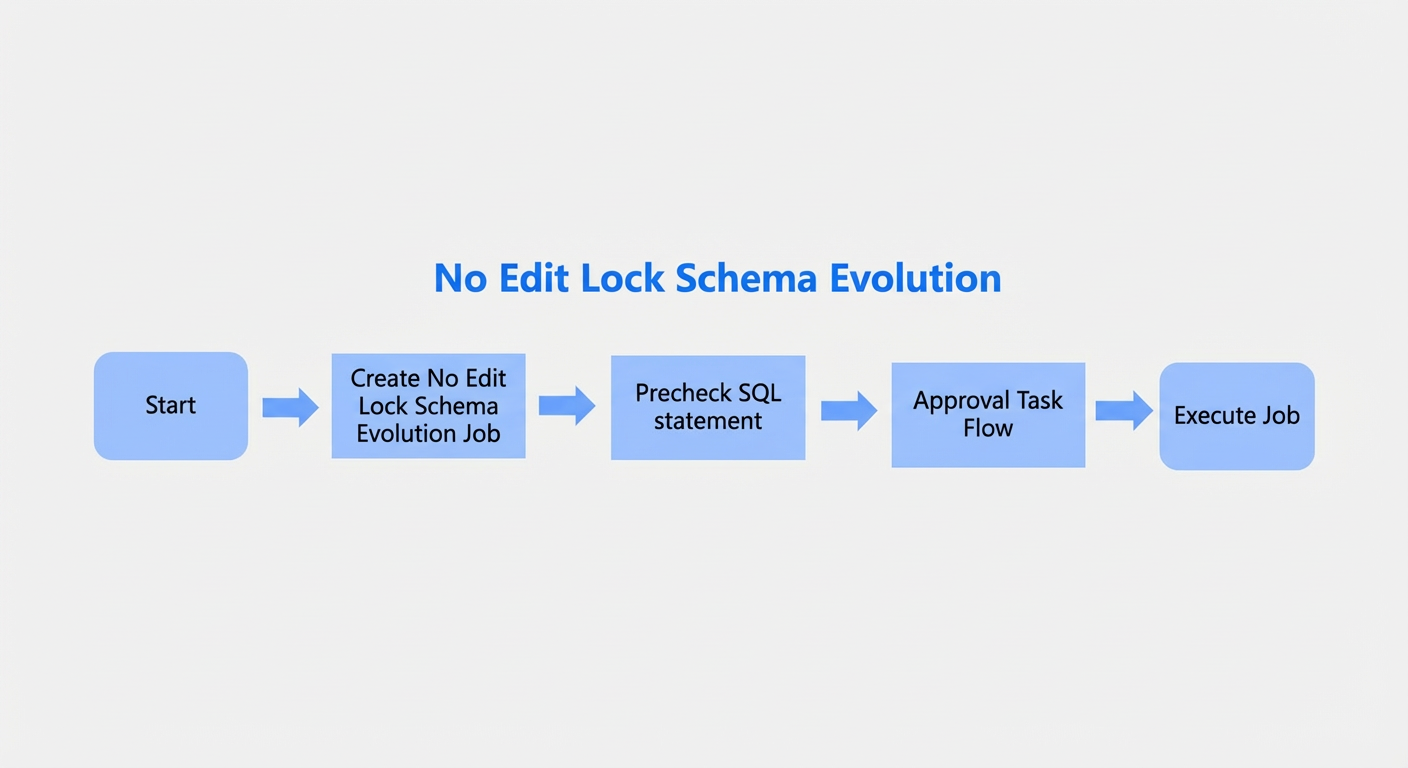
A user submits a lockless schema evolution ticket.
The system runs a precheck on the SQL statements.
The task goes through an approval workflow.
The system executes the lockless schema evolution task.
Supported changescope
Category |
Operation |
Support |
Notes |
Column operations |
Modify column type |
Yes |
|
Reorder columns (before/after/first) |
Yes |
||
Convert character set |
Yes |
||
Rename column |
No |
||
Add column |
Yes |
||
Drop column |
No |
||
Add primary key column |
No |
||
Primary key |
Add primary key |
Yes |
The table has a non-null unique key. |
Modify primary key |
Yes |
The table has a non-null unique key. |
|
Drop primary key |
Yes |
The table has a non-null unique key. |
|
Partition |
Drop partition |
Yes |
|
Truncate partition |
Yes |
||
Re-partition |
Yes |
||
Change a non-partitioned table to a partitioned table |
Yes |
Precautions
Ensure that the database has sufficient disk space.
The table must have a primary key or a non-null unique key. The table must not have foreign keys.
Performing other Data Definition Language (DDL) operations on the table while a lockless schema evolution task is running will cause the task to fail.
In OceanBase MySQL mode, table names cannot exceed 54 characters.
When ODC connects to an OceanBase Community Edition database, the data source configuration must include the cluster name and the SYS tenant account.
For OceanBase MySQL mode versions earlier than V4.3.0, ODC prevents data writes during the table name switch by locking the user and closing the session.
During lockless schema evolution, initiating other DDL changes for the table will cause the task to fail.
Create a lockless schema evolution task
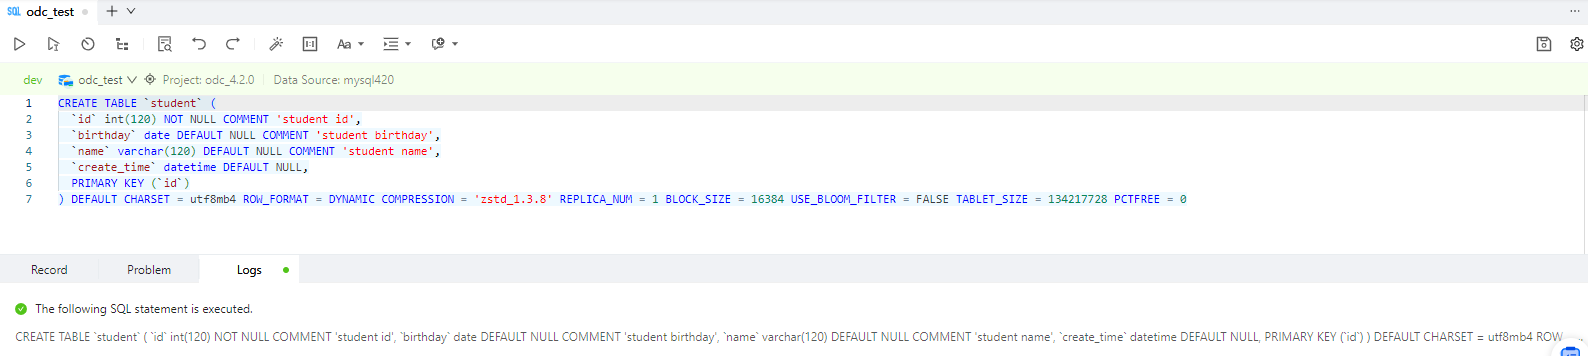
This topic uses OceanBase Community Edition and Enterprise Edition as an example. The scenario demonstrates how to change the data type of the birth column in the student table to datetime. In this example, the project is named odc_4.2.0, the database is odc_test, and the table is student.
In the SQL window, edit the SQL statement to create the student table in the odc_test database.
On the Tickets tab, click Lockless Schema Evolution > Create Lockless Schema Evolution Task.
On the Create Lockless Schema Evolution Task page, enter the following information.
Item
Description
Database
Select the database to change.
Lock User
If you specify users to lock, ODC locks the specified database accounts and closes all their sessions before the table name switch. This ensures data consistency and minimizes the impact on your business.
If you do not specify any accounts, ODC does not lock any accounts or close any sessions. You must ensure data consistency during the switch.
ImportantThe user who executes the lockless schema evolution task cannot perform change operations on the related tables during task execution.
Change Definition
CREATE TABLE: For syntax that is not supported in OceanBase, you must use the CREATE statement.
ALTER TABLE: For OceanBase V4.0.0 and later, you can use the ALTER TABLE statement in OFFLINE mode.
SQL Content
Enter the SQL script in the editor.
Table Switch Settings
After the data is consistent, switch the source table with the destination table.
Lock Table Timeout: The table is locked during the switch. If the switch is not completed within the timeout period, the task may fail.
Retry Attempts on Failure: If the switch is not completed within the lock timeout period, the task can be automatically retried.
Source Table Cleanup Policy After Completion: Select Rename and Keep to rename the source table but not delete it. Select Delete Immediately to delete the source table after the lockless schema evolution is complete.
Task Settings
Select Execute Immediately or Scheduled Execution to set the execution mode.
The lockless schema evolution tool provides two ways to handle task errors:
Stop Task: This is the default option. If an error occurs while the script is running, the task stops.
Ignore Errors and Continue: If you select this option, the task skips the failed statement and continues to run.
Select Automatic Switchover or Manual Switchover for the table name.
Configure throttling policies:
Row limit: The maximum number of data rows to process per second.
Data size limit: The maximum size of data to process per second.
Description
In the Description text box, you can enter a description of up to 200 characters. This is optional.
Click Create to create the lockless schema evolution task.
After the task is created, you can view its information in the list on the Tickets > Lockless Schema Evolution page.
View a lockless schema evolution task
View task information
In the lockless schema evolution list in the Task Hub, click the View button in the Actions column.
In the task details panel that appears, click the Task Information tab to view information such as the database, task type, threat level, SQL content, and rollback content.
Click Rerun to start the lockless schema evolution task again.
View the task workflow
In the task details panel, click the Task Workflow tab to view information such as the task submission status, approval status, execution status, and execution result.
View execution records
In the task details panel, click the Execution Records tab to view the DDL of the new table and the source table.
View task logs
In the task details panel, click the Task Logs tab to view all logs and alert logs for the task.
Item |
Description |
All Logs |
All Logs displays all log information for the task, such as INFO, ERROR, and WARN logs. Click the Find, Download, and Copy buttons to search for, download, or copy all log information. |
Alert Logs |
Alert Logs displays only the ERROR and WARN logs for the task. When a task fails, you can view the error message in the alert logs. Click the Find, Download, and Copy buttons to search for, download, or copy the alert log information. |