Centrally manage fixed AccessKeys by using KMS
Solution overview
Identity and permission management is a top priority for cloud security. Credential management is one of the most critical aspects of cloud security. If credentials are not managed properly, they can be leaked, which can cause serious security incidents such as data breaches and asset loss.
This topic describes a solution for enterprises to centrally manage fixed AccessKeys. This solution provides unified management, encrypted storage, and automatic rotation for fixed AccessKeys to reduce the risk of credential leaks, improve security, and meet compliance requirements.
Benefits
Centralized management
Enterprise O&M engineers can use the credential management feature of Key Management Service (KMS) to host and centrally manage AccessKeys. You can also use features such as resource shares and VPC network connections to access KMS and use hosted AccessKeys across accounts and regions. This approach reduces IT procurement and management costs for your enterprise.
Automatic periodic rotation
KMS credential management lets you automatically and periodically rotate AccessKeys without manual intervention. The rotation process is transparent to your developers. Automatic rotation simplifies implementation, reduces labor costs, and significantly improves security. KMS also provides emergency response capabilities. If a security issue such as an AccessKey leak occurs, you can immediately rotate the credential to update it without affecting your applications.
Encrypted storage
KMS credential management enhances security by hosting AccessKeys and storing them in an encrypted format. This prevents credential leaks caused by insecure practices, such as using hard-coded or plaintext credentials.
Continuous compliance auditing
Cloud Config continuously audits for unused AccessKeys and AccessKeys that have not been rotated for an extended period. This process lets you promptly identify and handle non-compliant AccessKeys, reducing the risk of leaks and improving security.
Scenarios
Centralized and secure management of fixed AccessKeys
Scenario description
Enterprise applications use fixed AccessKeys to access Alibaba Cloud. Operations and maintenance (O&M) and security teams must centrally and securely manage these AccessKeys to reduce management costs and prevent serious security incidents that result from leaks.
Applicable customers
Applications use fixed AccessKeys to access Alibaba Cloud resources.
AccessKey configurations are scattered across multiple business applications and cannot be centrally managed.
AccessKeys are hard-coded in the application code, which makes it difficult to rotate the AccessKey pair.
AccessKeys are stored in plaintext, which makes them vulnerable to leaks and creates security risks.
Solution architecture
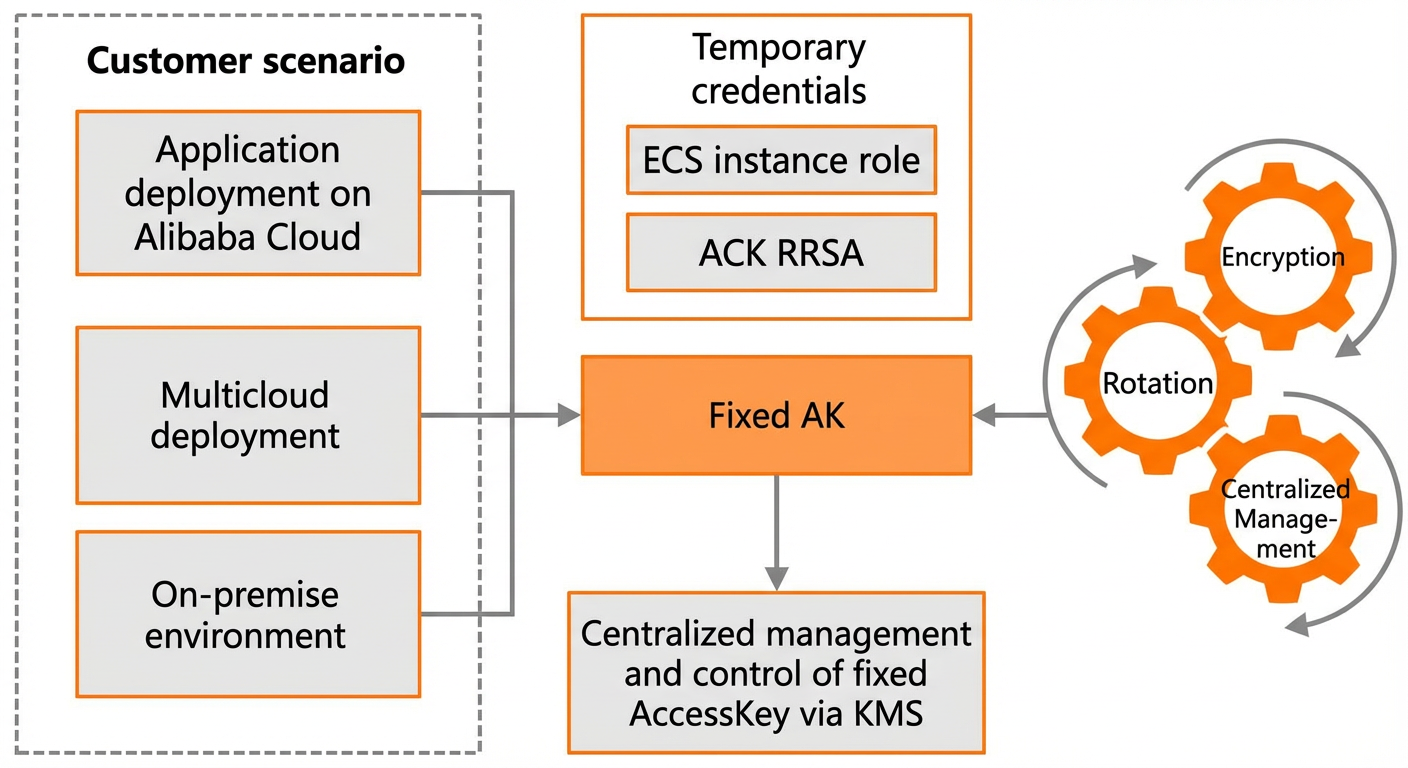
Enterprise applications can access Alibaba Cloud in the following scenarios:
Your application is deployed on Alibaba Cloud and does not require a multicloud setup. In this scenario, you can use temporary credentials, such as Security Token Service tokens, to reduce the risk of credential leaks and minimize the exposure period.
Your application requires a multicloud deployment, an on-premises data center deployment, or your enterprise has its own credential management solution. In this scenario, you must use fixed AccessKeys to access Alibaba Cloud resources. This solution addresses this scenario using KMS to encrypt, rotate, and centrally manage fixed AccessKeys.
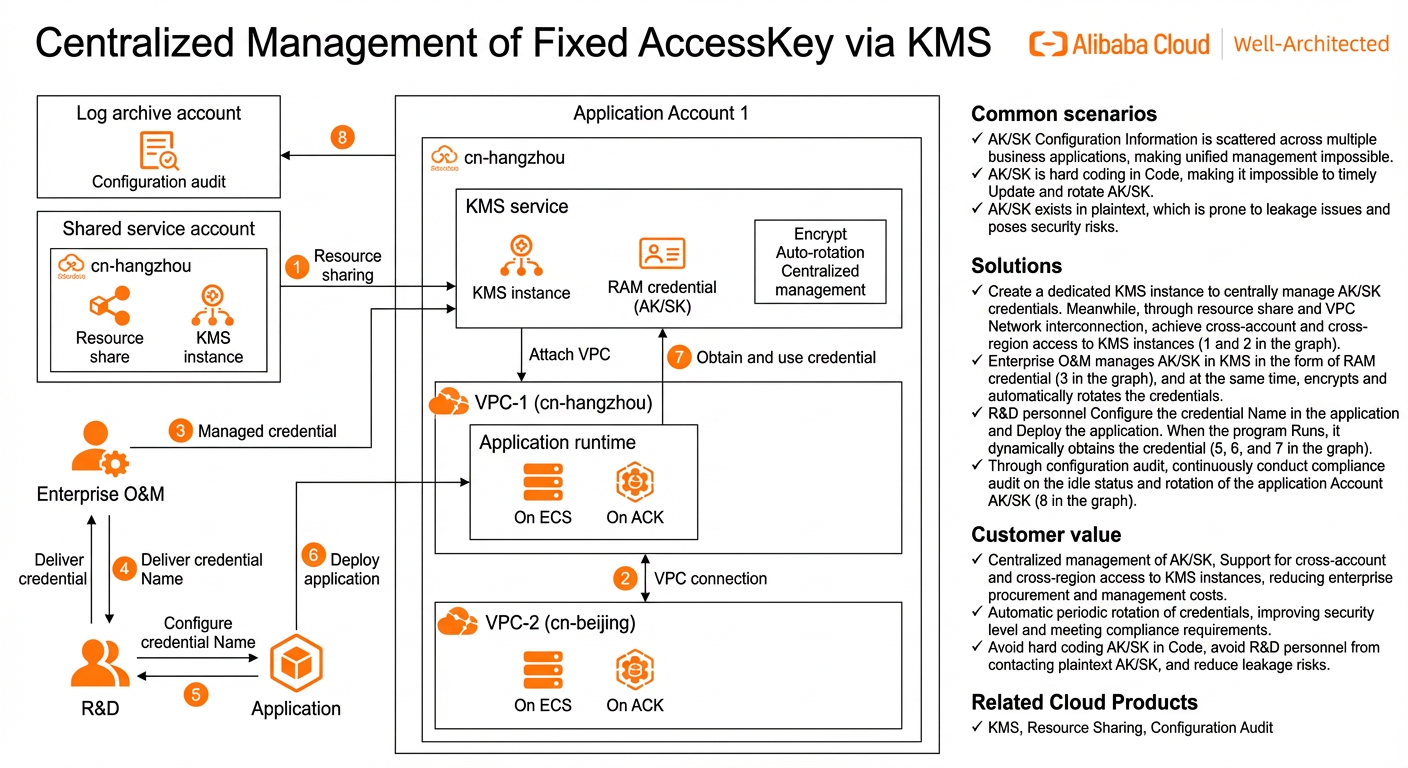
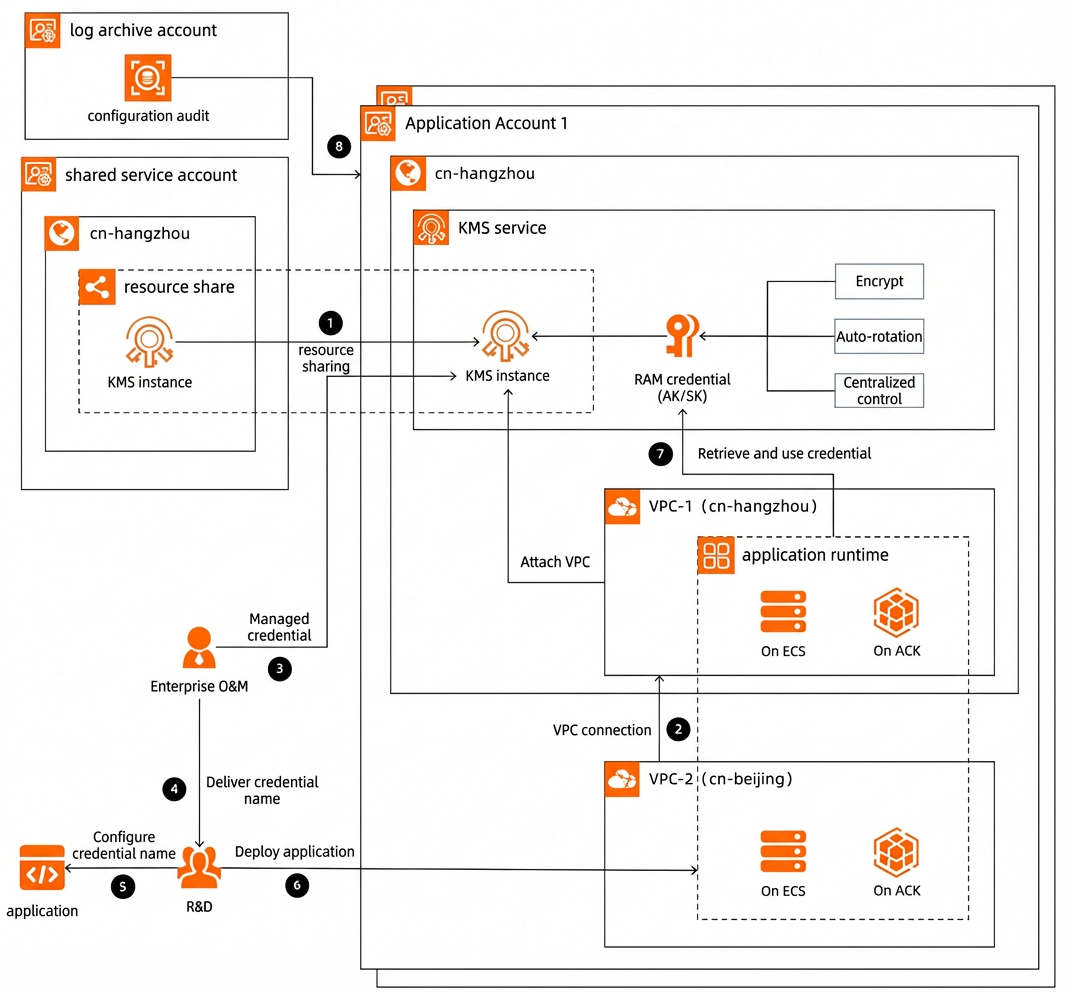
This solution uses Key Management Service (KMS) to centrally manage fixed AccessKeys. First, create a KMS instance in a shared service account. Then, share the KMS instance with other application accounts using a resource share (1 in the figure). If your application is deployed in virtual private clouds (VPCs) across multiple Alibaba Cloud regions, you can establish cross-region VPC connections and use Alibaba Cloud DNS PrivateZone to enable cross-region access to the KMS instance (2 in the figure). This approach reduces management and IT procurement costs in a multi-account system. If your enterprise has higher security requirements, you can create a separate KMS instance for each application to host AccessKeys and encrypt data. This ensures strong isolation between applications. Next, Operations and Maintenance (O&M) engineers can host AccessKeys as Resource Access Management (RAM) credentials in KMS (3 in the figure). The AccessKeys are then encrypted and automatically rotated. Developers can use the secure and convenient client connection method provided by KMS to configure the credential name in the application and then deploy it (5 and 6 in the figure). When the program runs, it dynamically retrieves and uses the AccessKey with a no-code or low-code approach (7 in the figure).
Product billing and terms
Product billing
Product Name |
Description |
Billing |
Resource Directory (RD) |
Resource Directory (RD) is a service that helps enterprises manage hierarchical relationships between accounts and resources. |
Free of charge. For more information, see Pricing. |
Elastic Compute Service (ECS) |
Elastic Compute Service (ECS) is a computing service that provides elastic scaling capabilities. You can use ECS to build stable and secure applications, improve operations and maintenance (O&M) efficiency, and reduce IT costs. This lets you focus on your core business. |
This is a paid service. For more information, see Product Billing. |
Key Management Service (KMS) |
Key Management Service (KMS) is a one-stop platform for key management, data encryption, and secrets management. It provides simple, reliable, secure, and compliant capabilities to help you reduce procurement, operations and maintenance (O&M), and research and development (R&D) costs for cryptographic infrastructure. This lets you focus on your business development. |
This is a paid service. For more information, see Product Billing. |
VPC |
A virtual private cloud (VPC) is a custom private network that you can create on Alibaba Cloud. VPCs are logically isolated from each other at Layer 2. You can create and manage cloud product instances, such as ECS, SLB, and RDS, within a VPC. |
Free of charge. For more information, see Product Billing. |
Container Service for Kubernetes (ACK) |
Container Service for Kubernetes (ACK) is one of the first service platforms in the world to be certified for Kubernetes conformance. It provides high-performance management services for the entire lifecycle of enterprise-grade containerized applications. ACK lets you easily and efficiently run Kubernetes applications in the cloud. |
This is a paid service. For more information, see Product Billing. |
Cloud Config |
Cloud Config is a resource auditing service that lets you track resource configuration history and audit configuration compliance. This service helps you automate infrastructure monitoring and ensure continuous compliance. |
Free of charge. For more information, see Product Billing. |
Terms
Name |
Description |
Management account |
When an enterprise has multiple Alibaba Cloud accounts, this refers to the administrator account that has permissions to manage the resources of other accounts. It is used to manage multiple accounts, uniformly configure identity and permissions for multiple accounts, view bills for each cloud account, and uniformly configure and apply audit rules to member accounts. |
Shared service account |
Enterprise shared services, such as network deployments, are deployed in this account. We recommend that the costs for this account be borne by a unified team, such as the infrastructure team. |
AccessKey |
An AccessKey pair (AK) is a permanent access credential provided by Alibaba Cloud to users. It consists of an AccessKey ID and an AccessKey secret. When you use development tools (such as APIs, CLIs, SDKs, and Terraform) to access Alibaba Cloud, requests carry the AccessKey ID and a signature generated by encrypting the request content with the AccessKey secret for identity authentication and request validity verification. |
Resource share |
A resource share is an instance of resource sharing. A resource share includes a resource owner, principals, and shared resources. |
RAM credential |
A RAM credential is a fully managed credential type supported by KMS. You can use RAM credentials to host the AccessKey pairs of RAM users. |
Application access point (AAP) |
An application access point (AAP) is an identity authentication and access control mechanism provided by KMS. It authenticates the identity and authorizes the behavior of self-built applications when they use keys or credentials. |
Customer master key (CMK) |
A customer master key (CMK) is a key that you create and host in KMS. It is also called a master key. A master key consists of a key ID, basic metadata, and key material. |
Security
Service-linked role for Cloud Config
Cloud Config requires a RAM role to obtain access permissions to other Alibaba Cloud services. For more information, see Service-linked role for Cloud Config.
KMS security and compliance
KMS is designed and audited to meet strict security standards, ensuring the highest level of protection for your keys on Alibaba Cloud.
KMS provides secure access channels that use SSL/TLS and employs secure encryption in transit suites, which complies with security standards such as PCI DSS.
KMS supports cryptographic hardware that is verified and certified by regulators. Alibaba Cloud Hardware Security Module (HSM) provides hardware security modules that are tested and certified by the State Cryptography Administration, and the service has obtained GM/T 0028 Level 2 certification. You can integrate KMS with Alibaba Cloud Hardware Security Module. After the integration, you can use the HSM clusters managed in Alibaba Cloud Hardware Security Module to manage keys and perform cryptographic operations. For more information about Cloud Hardware Security Module, see What is Cloud Hardware Security Module?.
VPC security
VPCs provide a network environment that is secure, reliable, flexible, controllable, and highly scalable. For more information, see Benefits and Access control.
Notes
KMS limits
You can host the AccessKeys of RAM users (sub-accounts) in KMS, but not the AccessKeys of Alibaba Cloud accounts (main accounts).
Cross-region access to a dedicated KMS instance is supported only when custom applications are integrated with the instance. This feature is not supported when Alibaba Cloud services are integrated with KMS for server-side encryption.
Notes on sharing KMS instances
After you purchase a KMS instance, you must enable it before you can share it with other application accounts using resource sharing.
Sharing a KMS instance consumes the instance's access management count quota. Before you share an instance, you must ensure that its available access management count is greater than or equal to the number of principals. If the access management count is insufficient, you must upgrade the instance. Otherwise, the sharing operation fails. Note that the access management count includes not only the number of principals with which the instance is shared but also the number of VPCs associated with the instance. For example, if your KMS instance must be associated with 3 VPCs and shared with 2 principals, the access management count quota must be at least 5 to meet your business requirements. For more information about how to increase the quota, see Upgrade a KMS instance.
Automation templates
Template description
This solution provides an automated deployment template based on Terraform. The structure of the template is as follows.
├── step1-share-vswitch					// To use a KMS instance across accounts, share the VPC that needs to access the KMS instance with the shared service account (the KMS instance will be created in the shared account) using resource sharing.
├── step2-create-kms-instance		// Create a KMS instance in the shared service account.
├── step3-share-kms-instance		// To use a KMS instance across accounts, share the KMS instance under the shared service account with other application accounts using resource sharing.
└── step4-create-kms-aap				// Create an application access point for the KMS instance in the application account.
Template location
You can find the template in the code repository.
Procedure
Preparations
In the shared service account, ensure that a VPC and a vSwitch are available in the region where your application is located. We recommend that you first log on to the VPC Management Console to view the existing VPCs, vSwitches, and the zones where the vSwitches are located, and then enable the KMS instance. You can also create a VPC and a vSwitch. For more information, see Create a VPC and a vSwitch or Create a vSwitch.
To share a KMS instance with an application account, you must enable resource sharing in Resource Directory. Log on to the Resource Sharing console with your management account. In the navigation pane on the left, choose Resource Sharing > Settings. Click Enable. In the Service-Linked Role for Resource Sharing dialog box, click OK. The system automatically creates a service-linked role named AliyunServiceRoleForResourceSharing to obtain the organization information from Resource Directory.
Implementation duration
After you complete the preparations, the implementation takes an estimated 60 minutes.
Procedure
Continuous compliance auditing (Optional)
You can use Cloud Config to continuously audit for idle AccessKeys and those that have not been rotated for an extended period. By promptly identifying and handling these non-compliant keys, you can reduce the risk of leaks and improve your overall security.
Log on to the Resource Management console using your management account. In the navigation pane on the left, choose Resource Directory > Trusted Services. Select Cloud Config and click Manage.
In the Delegated Administrator Account section, click Add to set the log archive account as the delegated administrator for the Cloud Config service.
Log on to the Cloud Config console using your log archive account. In the navigation pane on the left, choose Account Group. Click Create Account Group to centrally manage compliance for member accounts in Resource Directory.
When you create an account group, you can set the Account Group Type to Global. The members of a global account group are automatically synchronized with Resource Directory. The global account group automatically detects new members in Resource Directory and adds them to the group. This ensures that the scope of compliance management is always consistent with Resource Directory. Note that you can create only one global account group. In this example, a global account group named ResourceDirectory is created.
In the navigation pane on the left, switch to the account group that you want to use for compliance management. In this example, the ResourceDirectory account group that was created in the previous step is used.
In the navigation pane on the left, choose Compliance Audit > Rules and click Create Rule. Select compliance rules such as ram-user-unused-access-key-check and ram-user-access-key-rotated-in-specific-time. Then, click Next.
In the Set Parameters section, configure the rule parameters. For example, for the ram-user-access-key-rotated-in-specific-time rule, you can modify the specified rotation period.
Click Next. You can then set the scope of the rule. For example, you can configure the rule to apply only to resources within specific resource groups or resources that have specific tags. This allows for more fine-grained management of the compliance scope.
After the rule is created, you can view all non-compliant resources on the rule details page. These resources are the AccessKeys that do not meet the requirements. By default, the rule runs a check every 24 hours. You can configure the trigger frequency of the rule when you create or modify it.
Finally, you can deliver the non-compliant resource data to other Alibaba Cloud services, such as Simple Log Service and Object Storage Service. This facilitates data archiving, processing, and auditing. For more information, see Deliver resource data.
Purchase and enable a KMS instance
If you have not purchased a KMS instance, you must first purchase one:
Log on to the Key Management Service console with the shared service account.
In the top menu bar, select a region. This region must be the same as the one where your application is located. If your application is deployed across multiple regions, you can select any of those regions to create the KMS instance. You can enable cross-region access for the KMS instance by following the instructions in the Cross-region access to a KMS instance section.
In the navigation pane on the left, click Resources > Instance Management.
On the Instance Management page, click Create Instance, select the specifications for the KMS instance, and then click Buy Now.
Once the purchase is complete:
On the Instance Management page, find the target KMS instance and click Enable in the Actions column.
In the Enable KMS Instance panel, configure the settings and click OK. Note that the access management quota for a KMS instance is the sum of shared principals and associated VPCs. For example, if your KMS instance needs to be associated with three VPCs and shared with two principals, the access management quota must be at least 5 to meet your business needs.
After about 30 minutes, refresh the page. The KMS instance is enabled when its status changes to Enabled.
Cross-account access to a KMS instance (Optional)
In a multi-account enterprise environment, you can use resource sharing to share a KMS instance with other application accounts. This enables unified resource management and reduces management and IT procurement costs. If your enterprise has higher security requirements, you can create a separate KMS instance for each account to host AccessKeys and encrypt data. This ensures strong isolation between accounts.
Plan the access management quota
Before you share a KMS instance, you must plan its access management capacity. This capacity is the sum of the number of principals that share the instance and the number of associated VPCs. For example, to associate your KMS instance with 3 VPCs and share it with 2 principals, the access management capacity quota must be at least 5. To increase the quota, see Upgrade KMS instances.
Share a KMS instance with multiple accounts
You can use a resource share to share the KMS instance with other application accounts.
Log on to the Resource Sharing console with the shared service account (the resource owner of the KMS instance).
In the navigation pane on the left, choose Resource Sharing > My Shares.
In the upper-left corner of the top menu bar, select the region where the KMS instance is located.
Click Create Resource Share.
On the Configure Basic Information and Add Resources page, enter a name for the resource share, select the KMS instance to be shared, and then click Next.
On the Add Permission page, select the AliyunRSDefaultPermissionKMSInstance permission and click Next.
On the Add Principal page, add principals and click Next.
In the Principal Scope section, select Share within Resource Directory only.
In the Principal Type section, select Folder (Organizational Unit).
Enter the ID of the folder that contains the application account and click Add.
On the Confirm and Submit page, click OK. After the resource share is created, members in the folder can access the shared KMS instance.
The sharing status of the resource changes to Associated when the resource is successfully shared.
Access a KMS instance in the same region
To access a KMS instance from a VPC in the same region, you can use one of the following two methods:
We recommend that you first refer to the Access a KMS instance by attaching a VPC section below and use the built-in KMS solution.
If you have already set up your network and enabled connectivity between the VPC in the application account that needs to access the KMS instance and the VPC in the shared service account where the KMS instance is located, you can refer to the Access a KMS instance through a VPC connection (Optional) section below. This method lets you access the KMS instance through the network connection and helps reduce IT service procurement costs.
To access a KMS instance from a VPC in a different region, see the Cross-region access to a KMS instance (Optional) section.
Access a KMS instance by attaching a VPC
After the KMS instance from the shared service account is shared with the application account, you must also attach the application account's VPC to the KMS instance. This enables access to the KMS instance from within the application account's VPC. Note:
The VPC and the KMS instance must be in the same region. If they are in different regions, refer to the Cross-region access to a KMS instance section.
When you attach a VPC, you must select a vSwitch. Ensure that the vSwitch has at least one available IP address.
Each KMS instance uses one access management quota for each attached VPC. To increase the quota, see Upgrading KMS instances.
First, you must use a resource share to share a vSwitch from the VPC in the application account (the account that uses the KMS instance) with the shared service account (the account that owns the KMS instance).
Log on to the Resource Sharing console using the application account.
In the navigation pane on the left, choose Resource Sharing > My Shares.
In the upper-left corner of the top menu bar, select the region where the VPC is located.
Click Create Resource Share.
On the Configure Basic Information and Add Resources page, enter a name for the resource share, select the vSwitch to share, and then click Next.
On the Add Permission page, select the AliyunRSDefaultPermissionVSwitch permission and click Next.
On the Add Principal page, add a principal and click Next.
In the Principal Scope section, select Share within Resource Directory only.
In the Principal Type section, select Alibaba Cloud Account.
Enter the ID of the shared service account and click Add.
On the Confirm and Submit page, click OK.
When the sharing status of the resource changes to Associated, the resource is shared. You can then attach the VPC to the KMS instance.
Log on to the Key Management Service console with the shared service account (the account that owns the KMS instance). In the top menu bar, select a region. In the navigation pane on the left, click Resources > Instance Management.
On the Instance Management page, click the Software Key Management or Hardware Key Management tab based on your KMS instance type.
Find the target KMS instance and click Manage in the Actions column. At the bottom of the page, click the Multi-VPC tab.
Click Configure VPC. In the Configure VPC panel, select the VPC shared by the application account from the Available VPCs list and click the icon.
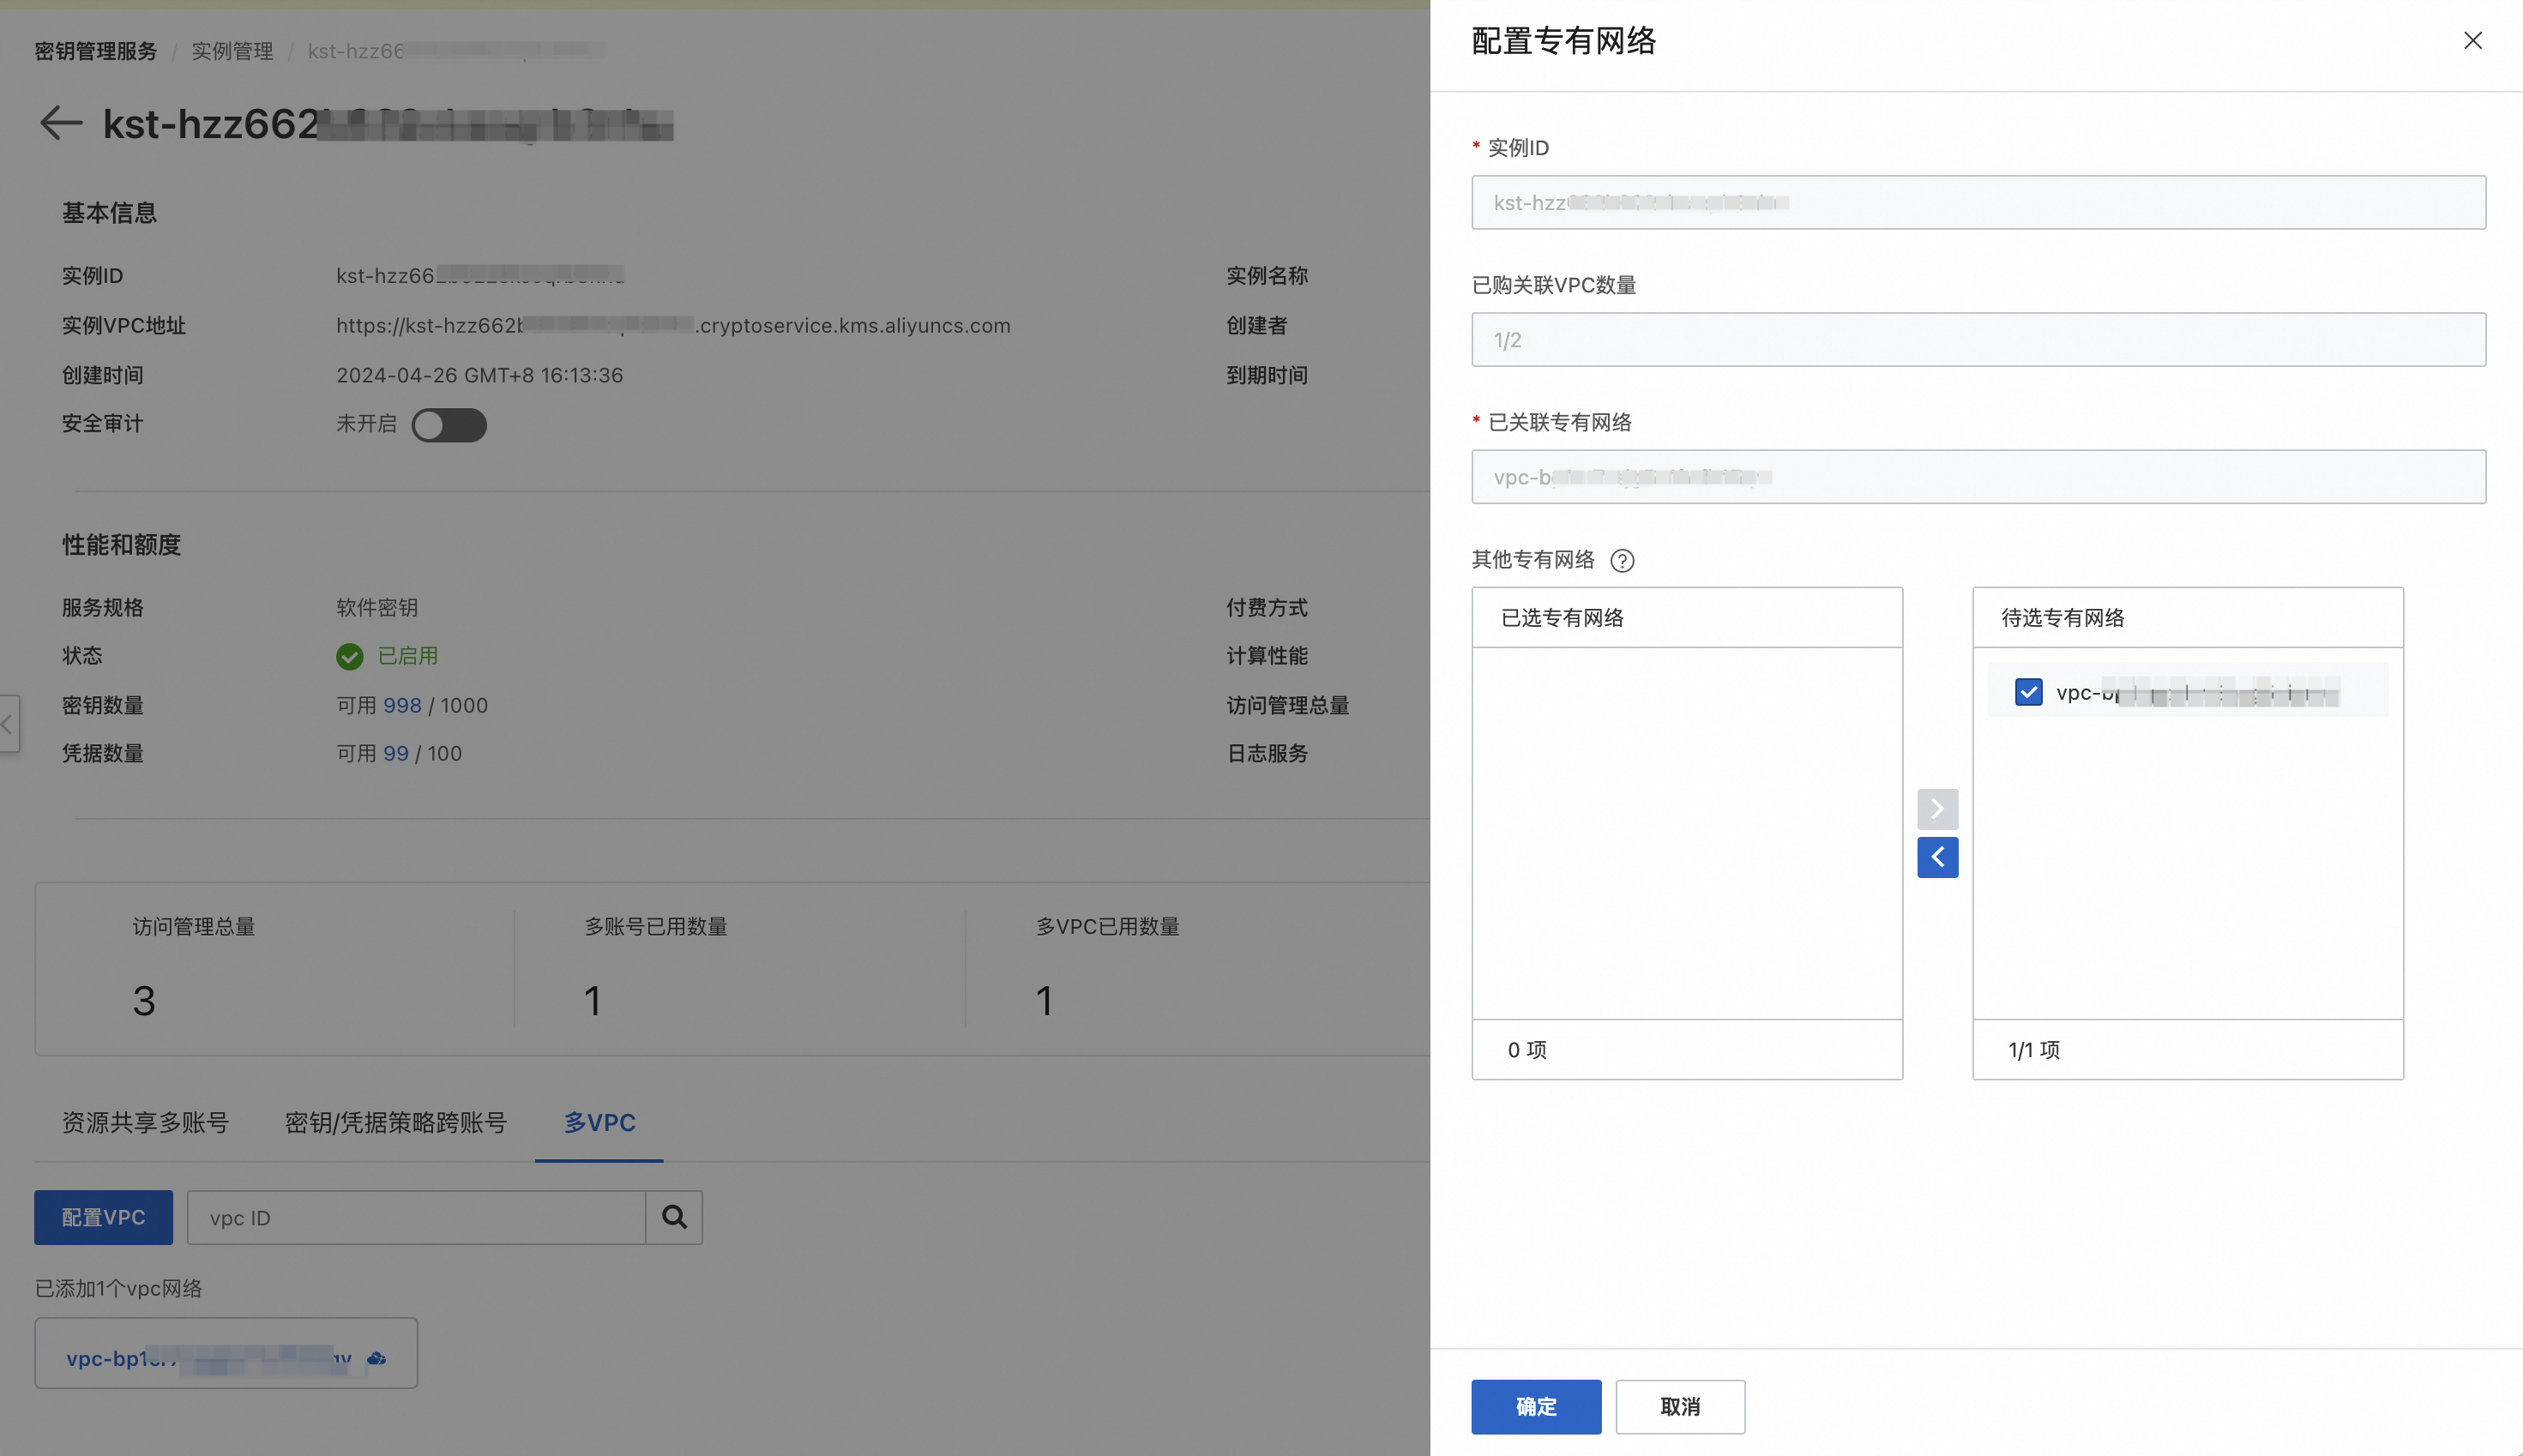
In the Select a vSwitch to attach to the VPC dialog box, select a vSwitch for each VPC and click OK.
On the Configure VPC page, click OK.
Access a KMS instance through a VPC connection (Optional)
Prerequisite: Network connectivity is enabled between the VPC in the application account and the VPC that contains the KMS instance in the shared service account.
To reduce IT service procurement costs, you can directly access a KMS instance using Alibaba Cloud DNS PrivateZone without purchasing an access management quota. However, we recommend that you prioritize the built-in KMS solution. For more information, see the Access a KMS instance by attaching a VPC section.
First, retrieve the private IP address of the KMS instance:
Log on to the Alibaba Cloud DNS console with the shared service account.
In the navigation pane on the left, click PrivateZone. Follow the instructions in the console to activate PrivateZone. If it is already activated, skip this step.
In the upper-right corner, click Manage Configuration Mode.
Click the Cloud Service Domain Names tab. Select Key Management Service or enter cryptoservice.kms.aliyuncs.com in the Zone Name field to search.
Find the target zone and click View Records in the Actions column.
On the DNS Records page, view and record the Record Value. This value is the private IP address of the KMS instance.
Next, use PrivateZone to map the KMS instance's private domain name to its private IP address in one or more VPCs. This allows your applications deployed in other VPCs to access the KMS instance:
Log on to the Alibaba Cloud DNS console using the application account.
In the navigation pane on the left, click Alibaba Cloud DNS PrivateZone. In the upper-right corner, select Configuration Management Mode. Then, click Built-in Authoritative and then click the Custom Domain Names tab.
On the Custom Domain Names tab, click Add Zone. In the dialog box that appears, enter the built-in authoritative domain name (cryptoservice.kms.aliyuncs.com), select Built-in Authoritative Acceleration Zone for Domain Name Type, and then click OK.
On the Custom Domain Names page, find the zone that you created and click DNS Records in the Actions column.
On the DNS Records page, click Add Record, set the following parameters, and then click OK.
Record Type: Select A.
Host: Enter the KMS instance ID.
Record Value: Enter the private IP address of the KMS instance.
TTL: This parameter specifies the Time to Live (TTL), which is the cache duration. A smaller value allows record modifications to take effect faster. The default value is 1 minute. You can modify this value as needed.
Associate the PrivateZone DNS record with the VPC that requires access to the KMS instance.
Return to the Custom Domain Names tab, find the zone that you created, and click Effective Scope Settings in the Actions column.
On the Domain Name Settings tab, select the VPC that you want to associate and click OK.
After you complete the configuration, run the ping ${kms_id}.cryptoservice.kms.aliyuncs.com command on an ECS instance in the VPC associated with the PrivateZone DNS record to verify the configuration. The configuration is successful if the resolved private IP address matches the private IP address of the KMS instance.

Cross-region access to a KMS instance (Optional)
If your application is deployed in VPCs across multiple Alibaba Cloud regions, you can establish cross-region VPC connections and use Alibaba Cloud DNS PrivateZone to enable cross-region access to a KMS instance. This reduces management and IT procurement costs for your enterprise. For example, your KMS instance is created in the cn-hangzhou region under a shared service account. Your application is deployed under an application account in vpc-cn-hangzhou in the cn-hangzhou region and vpc-cn-beijing in the cn-beijing region. First, you need to follow the instructions in the Cross-account access to a KMS instance section to enable access to the KMS instance from vpc-cn-hangzhou in the application account. Then, you need to follow the instructions in this section to establish a network connection between vpc-cn-hangzhou and vpc-cn-beijing in the application account and configure domain name resolution using Alibaba Cloud DNS PrivateZone. This enables cross-region access to the KMS instance from vpc-cn-beijing in the application account.
Query the private IP address of the KMS instance
Log on to the Alibaba Cloud DNS console using the account of the target application.
In the navigation pane on the left, click PrivateZone. Follow the on-screen instructions to activate the PrivateZone service. If the service is already activated, skip this step.
In the upper-right corner, click Manage Configuration Mode.
Click the Cloud Service Domain Names tab. Select Key Management Service or enter cryptoservice.kms.aliyuncs.com in the Zone Name field to search for the zone.
Find the target zone and click View Records in the Actions column.
On the DNS Records page, view and record the Record Value. This value is the private IP address of the KMS instance.
Configure network connectivity between VPCs
By default, VPCs are not interconnected. You must establish a connection between the VPC associated with the KMS instance in the application account and the VPCs in other regions.
Alibaba Cloud VPC offers several solutions for VPC-to-VPC connections. For example, you can use Cloud Enterprise Network (CEN) or VPC peering connections to connect VPCs that are in different regions, or that belong to the same or different accounts. For more information, see the following topics:
Connect cross-region and cross-account VPCs using Cloud Enterprise Network (Basic Edition)
Connect cross-region and cross-account VPCs using Cloud Enterprise Network (Enterprise Edition)
Configure domain name resolution using PrivateZone
You can use PrivateZone to map the private domain name of a KMS instance to an IP address in one or more VPCs. This allows your applications in other regions to access the KMS instance. The following steps describe how to configure domain name resolution in an application account to access a KMS instance in a shared service account:
Log on to the Alibaba Cloud DNS console using the account for the target application.
In the navigation pane on the left, click Alibaba Cloud DNS PrivateZone. In the upper-right corner, select Configuration Management Mode. Then, click Built-in Authoritative and then click the Custom Domain Names tab.
On the Custom Domain Names tab, click Add Zone. In the dialog box that appears, enter the built-in authoritative domain name (cryptoservice.kms.aliyuncs.com), set Domain Name Type to Built-in Authoritative Acceleration Zone, and click OK.
On the Custom Domain Names page, find the zone that you created and click DNS Records in the Actions column.
On the DNS Records page, click Add Record. In the dialog box that appears, configure the following parameters and click OK.
Record Type: Select A.
Host: Enter the KMS instance ID.
Record Value: Enter the private IP address of the KMS instance.
TTL: Specifies the cache time. The smaller the value, the faster modifications to the record take effect. The default value is 1 minute. You can modify this value as required.
Associate the PrivateZone DNS record with a VPC.
Return to the Custom Domain Names tab, find the zone that you created, and click Effective Scope Settings in the Actions column.
On the Domain Name Settings tab, select the VPC that you want to associate and click OK.
Verify the configuration
On an ECS instance in the VPC that you associated in the Configure domain name resolution using PrivateZone section, run the ping ${kms_id}.cryptoservice.kms.aliyuncs.com command. If the resolved private IP address is the same as the private IP address that you retrieved in the Query the private IP address of the KMS instance section, the configuration is successful.

Host a RAM credential
A RAM credential is the AccessKey pair of a RAM user, which consists of an AccessKey ID and an AccessKey secret. This credential is used for identity authentication when a RAM user calls Alibaba Cloud APIs. When you host a RAM credential in KMS, you do not need to configure the AccessKey pair in your application. Instead, you only need to configure the credential name to obtain a valid AccessKey pair for calling Alibaba Cloud APIs. This practice prevents security leaks caused by hard-coded AccessKey pairs. RAM credentials also support rotation to further reduce the risk of AccessKey pair leaks. The following steps describe how to host a RAM user's AccessKey pair for an application.
Grant KMS the permissions to manage the AccessKey pair of a RAM user
Log on to the RAM console using your application account.
In the navigation pane on the left, choose Permission Management > Policies.
On the Policies page, click Create Policy.
Select Script Editor and enter the following script.
{
  "Version": "1",
  "Statement": [
    {
      "Effect": "Allow",
      "Action": [
        "ram:ListAccessKeys",
        "ram:CreateAccessKey",
        "ram:DeleteAccessKey",
        "ram:UpdateAccessKey"
      ],
      "Resource": "*"
    }
  ]
}
Click Continue to Edit Basic Information. Set the Name to AliyunKMSManagedRAMCrendentialsRolePolicy and add a note.
Click OK.
In the navigation pane on the left, choose Identity Management > Roles.
On the Roles page, click Create Role.
On the Create Role page, select Alibaba Cloud Service as the trusted entity type and then click Next.
For the role type, select service role.
Set the Role Name to AliyunKMSManagedRAMCrendentialsRole and add a description in the Note field.
Select Key Management Service as the trusted service and then click Done.
Click Grant Permission to Role. The principal is automatically populated.
In the Add Permissions panel, select Custom Policy. Then, select the AliyunKMSManagedRAMCrendentialsRolePolicy policy, click OK, and then click Done.
Create an AccessKey pair for a RAM user
Next, create a key pair. You can skip this step if you already have an AccessKey ID and an AccessKey secret:
Log in to the RAM console with the application account.
In the navigation pane on the left, choose Identity Management > Users.
On the Users page, click the name of the target RAM user.
In the AccessKey section, click Create AccessKey.
Complete the security authentication as prompted.
In the Create AccessKey dialog box, view the AccessKey ID and AccessKey secret. Click Download CSV File to download the AccessKey information, or click Copy to copy the information.
Create a customer master key
You can create a symmetric key in the KMS instance to encrypt the credential. If you already have an available customer master key, you can skip this step:
Log on to the Key Management Service console. In the top menu bar, select a region. Then, in the navigation pane, click Resources > Key Management.
On the Key Management page, click the Customer Master Keys tab, select a software key management instance for Instance ID, and click Create Key.
In the Create Key panel, set the configuration items and click OK.
Create a RAM credential
Log on to the Key Management Service console and select a region from the top menu bar. In the navigation pane on the left, click Resources > Credential Management.
On the RAM Credentials tab, select an Instance ID and click Create Credential. Complete the configurations and click OK.
Create a KMS application access point
An application access point (AAP) is an identity authentication and access control mechanism provided by KMS to authenticate the identity and authorize the behavior of self-built applications when they use keys or credentials. For security reasons, we recommend that you use the access policies and network rules of the access point to reduce the attack surface.
If you are part of a central Operations and Maintenance (O&M) team and need to centrally manage KMS application access points, you can log on to the Alibaba Cloud Management Console with the shared service account to complete the configurations in this section. If you want each application account to be autonomous, you can log on to the Alibaba Cloud Management Console with each application account to complete the configurations.
Create a network rule
For enhanced security, we recommend that you set network rules to restrict access based on source IPs. If you access KMS from on-premises over the Internet, you must set a rule to allow access only from specific public source IPs.
Log on to the Key Management Service console. In the top menu bar, select a region. In the navigation pane on the left, click Application Access > Access Points.
Click Network Rules and then click Create Network Rule.
Select a Network Type:
If you are accessing from on-premises over the Internet, select Public.
If you are accessing from within a VPC, select Private.
Enter the Allowed Source IP Addresses and click OK.
Create an access policy
If multiple applications share the same KMS instance, we recommend creating a separate access policy for each application to isolate permissions and enforce the principle of least privilege. You also need to create a separate access policy for on-premises access to KMS over the Internet. The procedure is as follows:
Log on to the Key Management Service console. In the top menu bar, select a region. In the navigation pane on the left, click Application Access > Access Points.
Click Access Policies, and then click Create Access Policy.
In the Create Access Policy panel, select a Scope:
To access from an on-premises environment over the Internet, select KMS Shared Gateway.
If you are accessing from a VPC, select a specific KMS instance.
Select RBAC Permissions:
For access from an on-premises environment over the Internet (if you selected KMS Shared Gateway as the scope), select SecretUser.
For access from a VPC (if you selected a specific KMS instance as the scope), select CryptoServiceKeyUser and CryptoServiceSecretUser.
Select the keys and credentials that the application requires. If you selected KMS Shared Gateway as the scope, you only need to select the credentials for the application.
Select Network Control Rules. You can configure up to three network rules:
For access from an on-premises environment over the Internet (if you selected KMS Shared Gateway as the scope), select the rule with the Public network type that you created in the Create a network rule section.
For access from a VPC (if you selected a specific KMS instance as the scope), select the rule with the Private network type that you created in the Create a network rule section.
Click OK to complete the creation.
Create an application access point
If you have multiple applications that share the same KMS instance, we recommend creating a separate application access point for each one. This isolates access policies and network rules, reduces the attack surface, and upholds the single-responsibility principle.
Log on to the Key Management Service console. In the top menu bar, select a region. Then, in the navigation pane on the left, click Application Access > Access Points.
On the Application Access tab, click Create Application Access Point.
In the Create Application Access Point panel, select Standard Creation as the Creation Mode and enter an Application Access Point Name.
Select ClientKey as the Authentication Method and enter a Client Key Encryption Password.
Select Access Policies. You can add up to three policies. If you add multiple policies, access is granted if a request meets the conditions of any of the policies. This lets you attach policies for both on-premises public network access and VPC access to the same access point. As a result, you can use a single access point configuration for both on-premises and in-cloud environments.
Click OK. The browser automatically downloads the ClientKey. The ClientKey is used to authenticate clients and authorize their access to KMS resources. It contains the ClientKeyContent and the ClientKeyPassword. By default, the file for the ClientKeyContent is named clientKey_****.json, and the file for the ClientKeyPassword is named clientKey_****_Password.txt. Keep the ClientKey secure.
Integrate the RAM credential into your application
Code example
This solution includes a Java code example that demonstrates how to use the SDK to obtain and use an AccessKey pair hosted in KMS. The code is available in the code repository and has the following structure.
├── README.md
├── pom.xml
└── src
    ├── config
    │   └── prod-aliyun																					// Cloud configuration
    │       └── resources
    │           ├── application.properties
    │           └── managed_credentials_providers.properties		// KMS RAM credential SDK configuration file
    └── main
        ├── java
        │   └── org
        │       └── example
        │           ├── AliyunSdkAKExpireHandler.java
        │           └── Main.java																// Main entry point
        └── resources																						// Local configuration
            ├── application.properties
            └── managed_credentials_providers.properties				// KMS RAM credential SDK configuration file
You can use Maven to add the KMS RAM credential SDK to your project. We recommend that you install the latest version of the SDK.
<dependency>
  <groupId>com.aliyun</groupId>
  <artifactId>aliyun-java-sdk-core</artifactId>
  <version>4.6.4</version>
</dependency>

<dependency>
  <groupId>com.aliyun</groupId>
  <artifactId>aliyun-java-sdk-core-managed-credentials-provider</artifactId>
  <version>1.3.3</version>
</dependency>
The RAM credential SDK configures runtime parameters using a configuration file. You must add a configuration file named managed_credentials_providers.properties to the application's running directory. The required configuration differs depending on whether you access KMS on-premises or in the cloud. The provided code example uses different profiles to manage these configurations. When packaging the application, you can build the corresponding JAR package by specifying a profile:
On-premises:
src/main/resources/managed_credentials_providers.propertiesCloud environment:
src/config/prod-aliyun/resources/managed_credentials_providers.properties
For more details about the code and running instructions, see the code example.
On-premises integration configuration
Inject the ClientKey file
Copy the ClientKey file for the access point to your local project. You obtained this file by following the instructions in the Create a KMS application access point section. For the code example above, you can place the ClientKey file in the src/main/resources directory. Handle the ClientKey file with caution. To prevent security leaks, do not upload the file with your project code to a public repository. We also strongly recommend that you configure network rules for this application access point to restrict access from public IP addresses. For more information, see Create a network rule.
Configure the SDK configuration file
To obtain on-premises credentials, retrieve the credential value from the KMS service endpoint over the Internet. The following is an example of the managed_credentials_providers.properties configuration file:
# Access credential type
credentials_type=client_key

# Read the decryption password for the client key: example of reading from a file
client_key_password_from_file_path=#your client key private key password file path#

# Client Key private key file path
client_key_private_key_path=#your client key private key file path#

# Associated KMS service region
cache_client_region_id=[{"regionId":"#regionId#"}]
The configurations are as follows:
Configuration Item |
Description |
cache_client_region_id |
The region ID where the KMS instance is located. |
credentials_type |
The access credential type. |
client_key_password_from_file_path |
The absolute or relative path of the ClientKey file (in JSON format). |
client_key_private_key_path |
The absolute or relative path of the ClientKeyPassword file (in TXT format). |
Cloud integration configuration
Download the CA certificate file
KMS instances use the SSL/TLS protocol with built-in SSL certificates for identity authentication and encrypted communication.
Log on to the Key Management Service console. In the top menu bar, select a region. In the navigation pane on the left, click Resources > Instance Management.
In the Application Access Guide, click Download in the Get Instance CA Certificate section.
The KMS instance CA certificate is downloaded.
Inject the ClientKey and CA certificate files
You need to save the ClientKey and CA certificate files to the ECS instance or container cluster where your application is deployed. This may require integrating with your application deployment or resource provisioning pipeline to automate file injection.
If your application is deployed in a container cluster, this topic describes a method for injecting files using secrets and volume mounting. The procedure is as follows.
Log on to the Container Service for Kubernetes console. In the navigation pane on the left, choose Clusters.
On the Clusters page, click the name of the target cluster. In the navigation pane on the left, choose Workloads > Deployments.
On the stateless page, click Create Resource from YAML.
Select a sample template or a custom template, copy the YAML content, and then click Create. The following sample YAML template shows how to create a secret. We strongly recommend that you enable encryption at rest for container secrets to ensure that sensitive data is stored in an encrypted format. For more information, see Use Alibaba Cloud KMS to encrypt Secrets at rest.
apiVersion: v1
kind: Secret
metadata:
  name: kms-client-key
type: Opaque
data:
  PrivateKmsCA.pem: LS0t****==      # CA certificate file content, needs to be Base64 encoded
  clientKey.json: ewog****0=        # ClientKey identity credential content, needs to be Base64 encoded
  clientKey_Password.txt: RWx****E= # ClientKey credential password, needs to be Base64 encoded
Next, you can use the secret to configure a pod volume to mount the ClientKey and CA certificate files in a container. As shown in the following example, the
PrivateKmsCA.pem,clientKey.json, and `clientKey_Password.txt` files from the kms-client-key secret are mounted in the/root/resourcesdirectory.apiVersion: v1 kind: Pod metadata: name: kms-ram-secret spec: containers: - name: nginx image: nginx:1.7.9 volumeMounts: - name: clientkey mountPath: "/root/resources" readOnly: true volumes: - name: clientkey secret: secretName: kms-client-key
Configure the SDK configuration file
To obtain credentials in the cloud, you need to retrieve the credential value from the KMS instance endpoint through the VPC private network. The following is an example of the managed_credentials_providers.properties configuration file:
cache_client_dkms_config_info=[{"regionId":"<your dkms region>","endpoint":"<your dkms endpoint>","passwordFromFilePath":"< your password file path >","clientKeyFile":"<your Client Key file path>","ignoreSslCerts":false,"caFilePath":"<your CA certificate file path>"}]The related configurations are as follows:
Configuration Item |
Description |
regionId |
The region ID where the KMS instance is located. |
endpoint |
The domain name of the KMS instance, in the format {Instance ID}.cryptoservice.kms.aliyuncs.com. |
clientKeyFile |
The absolute or relative path of the ClientKey file (in JSON format). |
passwordFromFilePath |
The absolute or relative path of the ClientKeyPassword file (in TXT format). |
ignoreSslCerts |
Specifies whether to ignore the validity check of the KMS instance's SSL certificate. KMS instances have built-in SSL certificates and use the SSL/TLS protocol for identity authentication and encrypted communication. Valid values:
In a production environment, set this value to false. |
caFilePath |
The absolute or relative path of the KMS instance's CA certificate file. On the Instance Management page, click Download in the Get Instance CA Certificate section to download the CA certificate of the KMS instance. |
Replace an expiring ClientKey
Alibaba Cloud sends reminder notifications by text message, email, and internal message six months, three months, one month, and seven days before your client key expires. You can also configure CloudMonitor alerts to send alert notifications 180, 90, 30, and 7 days before your client key expires. For more information, see Alert Settings. If your client key is about to expire, you must change it as soon as possible. If your client key expires, your application cannot use it to access Key Management Service (KMS). To learn how to change a client key, see Change a ClientKey.
Troubleshooting
Why can't I see the shared KMS instance in the application account?
If you have shared a KMS instance with other application accounts through a resource share, but the instance is not visible in one of the accounts, perform the following steps:
Check whether your KMS instance has a sufficient access management quota. This quota is the total number of principals that share the instance and VPCs that are associated with it. For example, if your KMS instance needs to be associated with 3 VPCs and shared with 2 principals, the access management quota must be at least 5. To increase the quota, see Upgrade a KMS instance.
After you upgrade the KMS instance to ensure that it has a sufficient access management quota, you need to recreate the resource share and share the KMS instance with the required application accounts.
Why does an error occur when my application accesses KMS?
For FAQs about accessing applications with an SDK, see Application Access FAQ.