View and modify synchronization objects and their filter conditions
This topic describes how to view and modify synchronization objects for a data synchronization task that was configured by specifying objects. It also describes how to modify the SQL filter conditions for these objects.
Background information
During a data synchronization task, you can add or remove synchronization objects and modify their filter conditions if the limits are met. Each modification is recorded. After an add-object task is complete, it merges with the original task. After a successful merge, the original task runs normally, and the add-object task is automatically released.
To modify synchronization objects and their SQL filter conditions for a task configured with matching rules, see Configure and modify matching rules.
Limits
You can add or remove synchronization objects when the data synchronization task is in the Not Started, Running, or Paused state.
ImportantYou cannot add synchronization objects to a Paused data synchronization task if its Incremental Synchronization step is also Paused.
You cannot add synchronization objects when the data synchronization task is in the Failed state.
You cannot modify synchronization objects again when the data synchronization task is in the Modifying or Merging state.
You cannot add synchronization objects if the Incremental Synchronization step of the task is in the Paused or Failed state.
You can modify row filtering conditions when the data synchronization task is in the Paused, Failed, Not Started, or Running state.
View synchronization objects
Log on to the OceanBase console .
In the navigation pane on the left, click Data Transmission > Data Synchronization.
On the Data Synchronization page, click the name of the target task to open its details page.

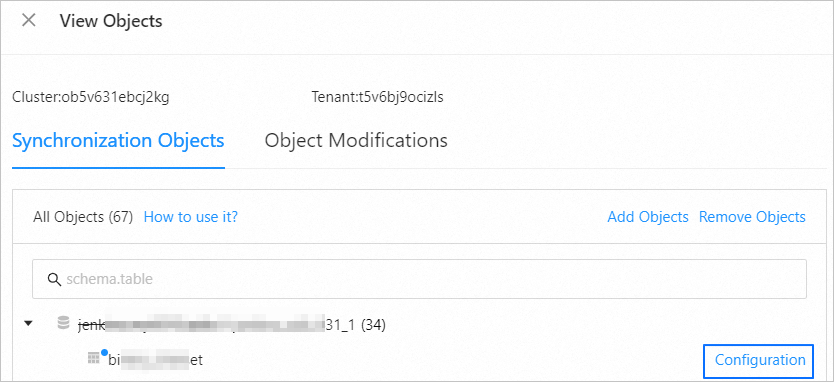
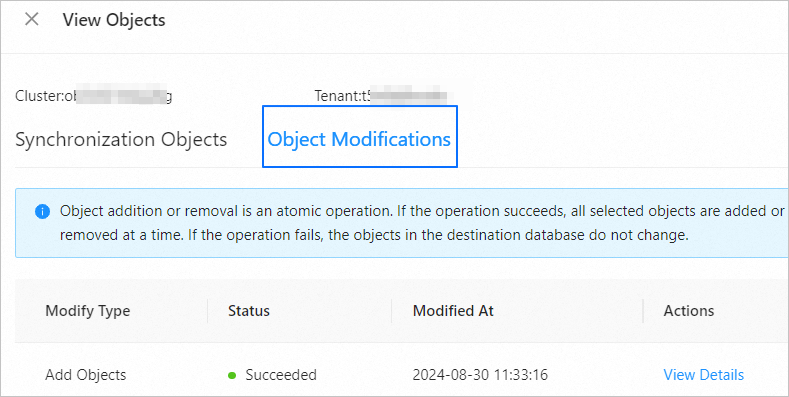
To view the Synchronization Objects and Object Modification Records, click View Objects in the upper-right corner of the page.
The Synchronization Objects tab shows the objects that are included in the synchronization task. You can also click Modify Objects to add or remove objects, or modify the row filtering conditions.
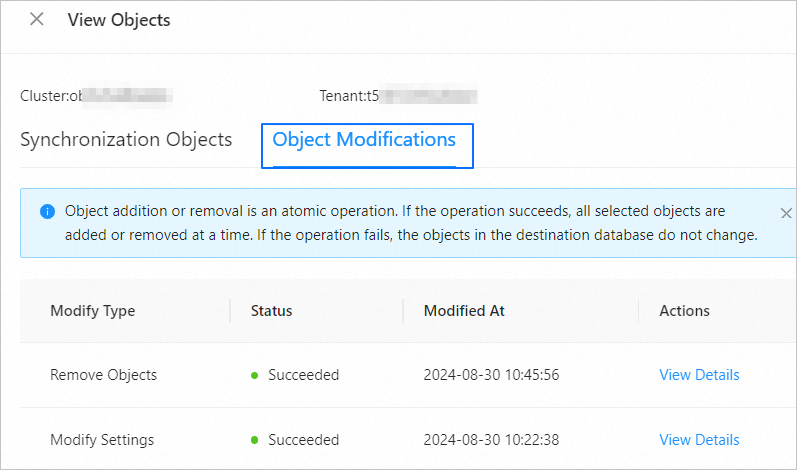
The Object Modification Records tab shows a history of all object modifications, including the modification type, status, and time.
Add synchronization objects
On the details page of the target task, click View Objects in the upper-right corner.

In the View Objects dialog box, click Synchronization Objects > Add Objects.

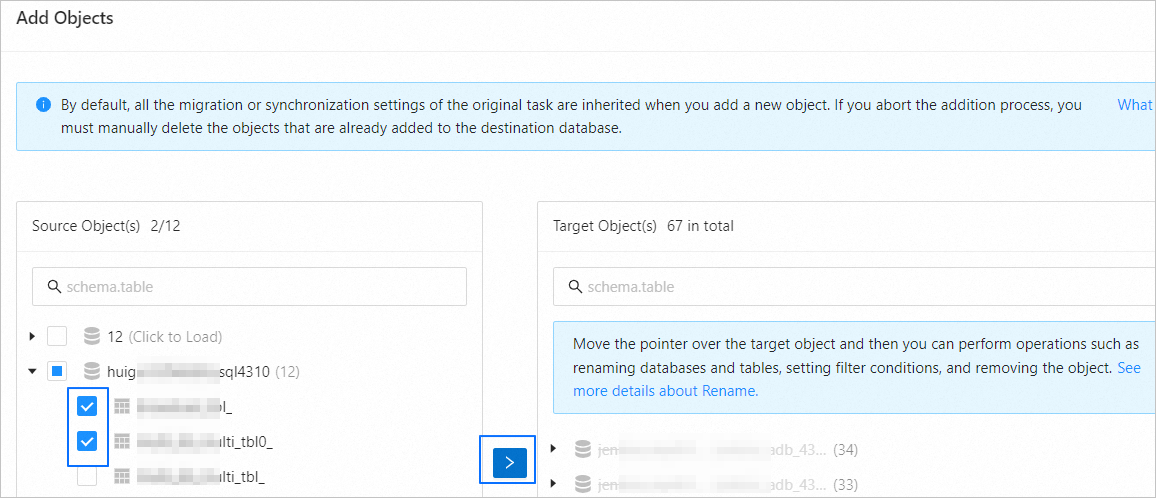
In the Add Objects dialog box, select the synchronization objects to add.
ImportantBy default, new objects inherit all configuration options from the original data synchronization task. If you stop the operation while adding objects, you must manually delete the added objects from the destination database.
If a Schema Name or DB Name is configured for the source, you can only add synchronization objects under that specific Schema Name or DB Name.
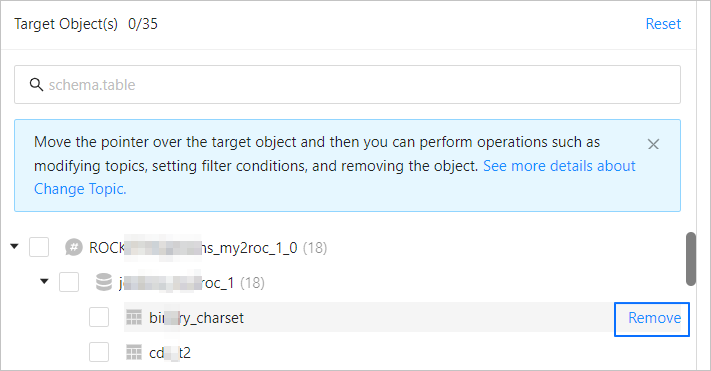
If the destination is a message queue, in the Add Objects dialog box, select the objects to synchronize from the Source Objects area on the left and click >. In the Map Objects to Topic dialog box that appears, select and configure the mapping method.

After you add the synchronization objects, you can change the topic, set row filtering, or remove objects.
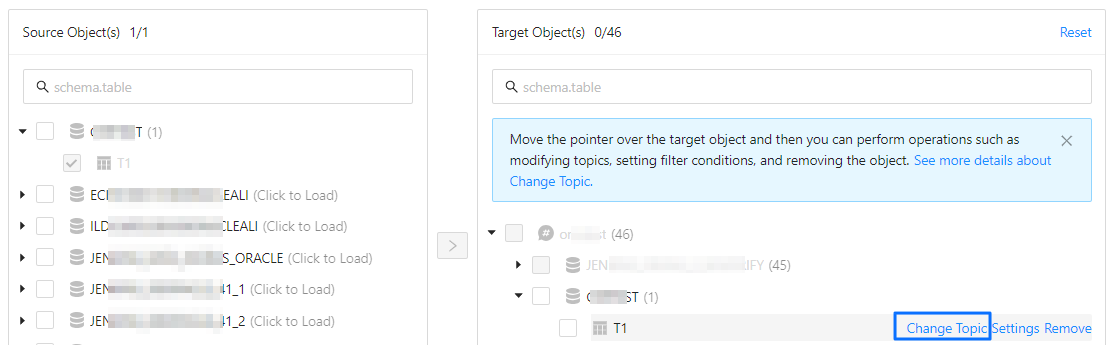
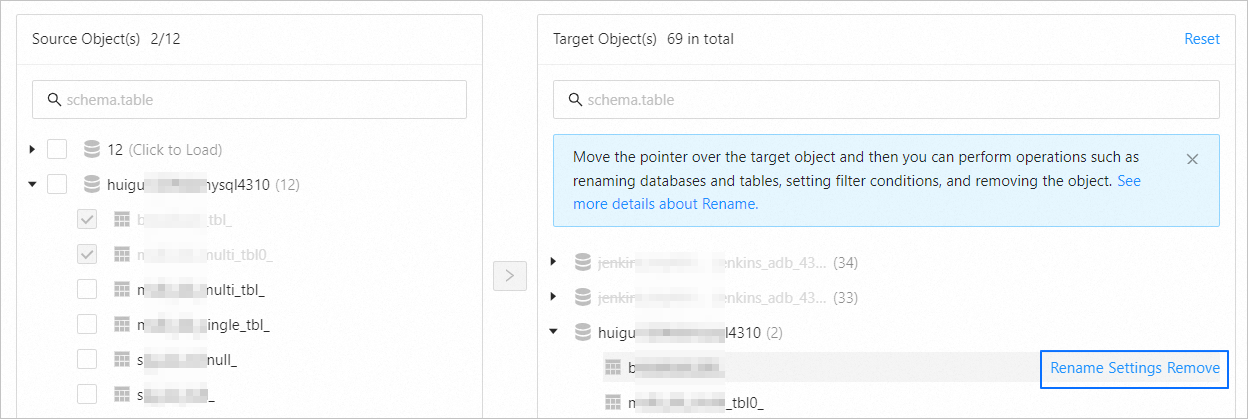
If the destination is a database, in the Add Objects dialog box, select the objects to synchronize from the Source Objects area on the left and click > to add them to the list on the right.

After you add the synchronization objects, you can rename the destination objects, set row filtering, or remove objects.
After you make your selections, click Next.
The system automatically runs a precheck on the added objects. After the precheck is passed, click Save.
After you confirm the settings, click OK in the dialog box that appears.
If the task is in the Paused or Failed state, you can cancel the operation and modify the settings again. After modification, you must resume the data synchronization task before you can add objects.
If the task is in the Running state, the add-object operation starts immediately after you click Save.
After the add-object operation starts, a record is generated on the View Objects > Object Modification Records tab. You can go to this tab to view the details of the record.
The status of an add-object record can be Pending, Canceled, Modifying, Running, Terminated, Merging, Successful, or Failed. The supported operations and the corresponding status of the original task vary based on the status of the add-object record.
NoteIf the original task is in the Not Started state, adding an object generates a modification record with the Successful status. If the original task is in the Paused state, adding an object generates a modification record with the Pending status.
The status of the add-object record progresses only when the original task is running. As the status of the add-object record progresses, the status of the original task is also updated. For more information, see the following table.
Status of add-object record
Supported operations
Corresponding status of original task
Pending
View Details, Cancel
Running
Canceled
None
Running
Modifying
None
Modifying
Running
View Details, Stop
Modifying
Terminated
View Details
Running
Merging
View Details
Merging
Successful
View Details
Running
Failed
View Details, Retry
You can also click View Reason to go to the task details page and view the reason for the failure.
Modifying/Merging
Remove synchronization objects
On the details page of the target task, click View Objects in the upper-right corner.
In the View Objects dialog box, click Synchronization Objects > Remove Objects.
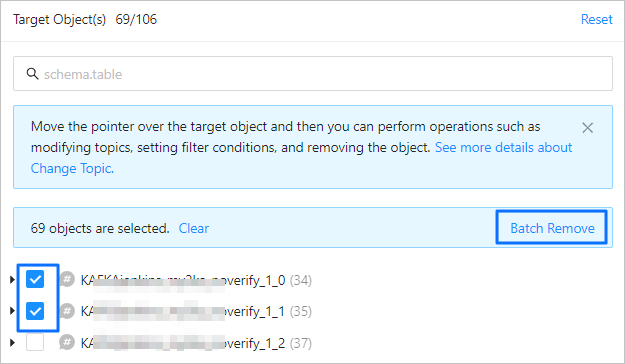
In the Remove Objects dialog box, in the Destination Objects area on the right, hover over the synchronization object that you want to remove and click Remove.
If the destination is a message queue, you can also select the check boxes of multiple objects to remove and click Batch Remove. In the dialog box that appears, click OK.
At the bottom of the Remove Objects dialog box, click Remove.
In the dialog box that appears, confirm the objects to remove and click OK.
If the task is in the Paused, Failed, or Running state, the remove-object operation starts immediately after you click OK.
ImportantRemoved objects cannot be recovered. Proceed with caution.
The remove-object operation either succeeds for all selected objects or fails for all of them.
After the remove-object operation starts, a record is generated on the View Objects > Object Modification Records tab. You can go to this tab to view the details of the record.
The status of a remove-object record can be Pending, Canceled, Modifying, Successful, or Failed. The supported operations and the corresponding status of the original task vary based on the status of the modification record.
Reducing the state of object records
Supported operations
Corresponding status of original task
Pending
View Details, Cancel
Running
Canceled
None
Running
Modifying
View Details
Modifying
Successful
View Details
Running
Failed
View Details, Retry
You can also click View Reason to go to the task details page and view the reason for the failure.
Modifying


Modify the filter conditions of synchronization objects
This section describes how to modify SQL conditions to filter data for synchronization objects that were selected by specifying objects.
On the details page of the target task, click View Objects in the upper-right corner.
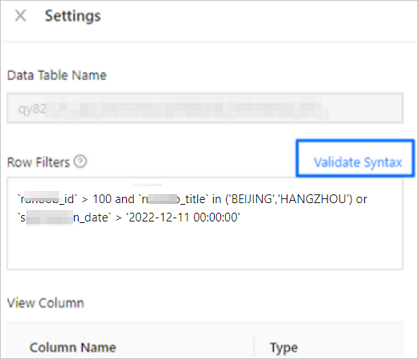
On the View Objects > Sync Objects page, expand the target schema, hover over the target object, and click Settings.
In the Settings > Row Filtering text box, you can enter a standard SQL WHERE clause to configure or modify row filtering. For more information, see Filter data using SQL conditions.
After you finish the configuration, click Validate Syntax.
After the validation passes, click OK in the Settings dialog box.
In the dialog box, click Apply to confirm the modified settings for the object.
On the Modification Records page, you can view the progress of the modification to the filter condition.
You can also click View Details next to a modification record. On the Modification Details page, hover over the target data table and click View Settings to view the modified row filtering condition.