This topic explains how developers can develop product features for Tmall Genie-certified Inside+IoT modules and connect devices to the Tmall Genie AI Platform and the IoT Platform. If your device needs to support both Inside voice control for other devices and its own IoT control capabilities, referred to as Inside + IoT, use this document for development guidance. The platform currently supports only the TG6000A chip.
Create a product
Create a product on the IoT Platform
- Create a product.
For more information, see Create a product. Set the parameters as follows.
- Set Node Type to Device
- Set Connect to Gateway to No
- Set Network Connection Method to Wi-Fi
- Set Data Format to ICA standard data format (Alink JSON)
- Define product features.
Define the features for your product. For more information, see Function Overview.
- Debug the device.
- Select a module. Because the supported voice chip is not listed, select Other.
- Add a test device and obtain its device certificate.
For more information, see Add a test device.
- On the Human-Machine Interaction page of the product, you can enable the Use Public App to Control Product option to control the device using the Cloud Intelligence App provided by the IoT Platform. For information about how to configure app parameters, see Configure human-machine interaction. For the provisioning solution, select "Bluetooth-assisted provisioning". For the provisioning entry point, select "Scan QR code/Local auto-discovery".
- On the Batch Production page, confirm the device information.
Note Production begins only after device development is complete. Do not click Complete Development during the development phase.
Create a product on the Tmall Genie AI Platform
To create and define an Inside voice product, see the Tmall Genie AI Platform Quick Start.
Product association
Device-side development
Get and compile the SDK code
To set up the chip development environment and download and compile the code, see Set up the chip development environment (TG6000A).
To save ROM and RAM space, enable the AIOT_LIVING_SDK module at compile-time.
To configure this, set the value of the export CONFIG_AIOT_LIVING_SDK=0 macro to 1 in the build.sh file in the code's root directory. The `build.sh` script is copied from `aligenieSDK/scripts/build_TG6000A.sh` when you run `repo sync`. You can modify this file directly and commit it to your code repository. You must manually copy the file to the root directory because `repo sync` does not automatically overwrite it.
export CONFIG_AIOT_LIVING_SDK=1After you enable this macro, the AIOT Living SDK is included in the compilation. The code in the AIoTSDK and thirdparty_app folders is compiled. This gives the device its own IoT control capabilities, allowing you to use the Cloud Intelligence App or your own brand's app to control the device and view its status.
The AIoTSDK folder contains the adaptation layer code for the chip platform and the related static libraries for the AIoT Living SDK. The thirdparty_app folder contains your device's application layer code, including some business logic for the Inside + IoT provisioning process. Carefully handle this code when merging.
Flash firmware to the module
For firmware flashing instructions, see Set up the chip development environment (TG6000A).
Product feature development
- Configure device IoT identity information.
You must write the device activation credentials, which is the IoT device identity information, to the device's storage medium. Then, you must implement the related code to read this information and pass it to the AIoT Living SDK.
The sample application code in thirdparty_app/vendor.c provides an example of how to read device information.
The
vendor_set_dev_meta_info( )function calls functions such asvendor_get_product_id,vendor_get_product_key,vendor_get_product_secret,vendor_get_device_name, andvendor_get_device_secretto retrieve the IoT identity information. Implement these functions to retrieve the device identity.After you set the device identity information in the program, compile the code and use the tool provided by the module vendor to flash the firmware to the module. Then, power on the module.
If the module connects to the IoT Platform successfully, the device appears as activated and online on the device debugging page in the IoT Platform console. The page also shows the time the device connected to the platform.
- Configure device voice capability identity information.
To write the Inside identity information, see the Device Product Network Access Guide.
- Report product properties.
When a product property changes, report the new value to the IoT Platform. You must define and implement the detection and reporting of property changes.
The following example code corresponds to a product that has a
LightSwitchproperty of thebooltype and anRGBColorproperty of a complex type. You can use this code as a reference for reporting product property changes.void user_post_property(void) { static int example_index = 0; int res = 0; user_example_ctx_t *user_example_ctx = user_example_get_ctx(); char *property_payload = "NULL"; if (example_index == 0) { /* Normal Example */ property_payload = "{\"LightSwitch\":1}"; example_index++; } else if (example_index == 1) { /* Wrong Property ID */ property_payload = "{\"LightSwitchxxxx\":1}"; example_index++; } else if (example_index == 2) { /* Wrong Value Format */ property_payload = "{\"LightSwitch\":\"test\"}"; example_index++; } else if (example_index == 3) { /* Wrong Value Range */ property_payload = "{\"LightSwitch\":10}"; example_index++; } else if (example_index == 4) { /* Missing Property Item */ property_payload = "{\"RGBColor\":{\"Red\":45,\"Green\":30}}"; example_index++; } else if (example_index == 5) { /* Wrong Params Format */ property_payload = "\"hello world\""; example_index++; } else if (example_index == 6) { /* Wrong Json Format */ property_payload = "hello world"; example_index = 0; } res = IOT_Linkkit_Report(user_example_ctx->master_devid, ITM_MSG_POST_PROPERTY, (unsigned char *)property_payload, strlen(property_payload)); EXAMPLE_TRACE("Post Property Message ID: %d", res); } - Report product events.
If the product has defined events, send the event to the cloud when it occurs. You must implement the detection and reporting of events.
For example, a product defines an event with the identifier
Error. This event has an output parameter with the identifierErrorCode. The following example code shows how to send an event to the IoT Platform.void user_post_event(void) { static int example_index = 0; int res = 0; user_example_ctx_t *user_example_ctx = user_example_get_ctx(); char *event_id = "Error"; char *event_payload = "NULL"; if (example_index == 0) { /* Normal Example */ event_payload = "{\"ErrorCode\":0}"; example_index++; } else if (example_index == 1) { /* Wrong Property ID */ event_payload = "{\"ErrorCodexxx\":0}"; example_index++; } else if (example_index == 2) { /* Wrong Value Format */ event_payload = "{\"ErrorCode\":\"test\"}"; example_index++; } else if (example_index == 3) { /* Wrong Value Range */ event_payload = "{\"ErrorCode\":10}"; example_index++; } else if (example_index == 4) { /* Wrong Value Range */ event_payload = "\"hello world\""; example_index++; } else if (example_index == 5) { /* Wrong Json Format */ event_payload = "hello world"; example_index = 0; } res = IOT_Linkkit_TriggerEvent(user_example_ctx->master_devid, event_id, strlen(event_id), event_payload, strlen(event_payload)); EXAMPLE_TRACE("Post Event Message ID: %d", res); }The sample code defines various event handler functions that the system uses to process product callback functions.
    /* Register Callback */
    IOT_RegisterCallback(ITE_CONNECT_SUCC, user_connected_event_handler);
    IOT_RegisterCallback(ITE_DISCONNECTED, user_disconnected_event_handler);
    IOT_RegisterCallback(ITE_RAWDATA_ARRIVED, user_down_raw_data_arrived_event_handler);
    IOT_RegisterCallback(ITE_SERVICE_REQUST, user_service_request_event_handler);
    IOT_RegisterCallback(ITE_PROPERTY_SET, user_property_set_event_handler);
    IOT_RegisterCallback(ITE_PROPERTY_GET, user_property_get_event_handler);
    IOT_RegisterCallback(ITE_REPORT_REPLY, user_report_reply_event_handler);
    IOT_RegisterCallback(ITE_TRIGGER_EVENT_REPLY, user_trigger_event_reply_event_handler);
    IOT_RegisterCallback(ITE_TIMESTAMP_REPLY, user_timestamp_reply_event_handler);
    IOT_RegisterCallback(ITE_INITIALIZE_COMPLETED, user_initialized);
    IOT_RegisterCallback(ITE_FOTA, user_fota_event_handler);
    IOT_RegisterCallback(ITE_COTA, user_cota_event_handler);
The following section describes the callback function.
Event Callback function prototype Event trigger condition ITE_CONNECT_SUCC int callback(void);When the device successfully connects to the cloud. ITE_DISCONNECTED int callback(void);When the device disconnects from the cloud. ITE_RAWDATA_ARRIVED int callback(const int devid, const unsigned char *payload, const int payload_len);When Linkkit receives raw data. ITE_SERVICE_REQUEST int callback(const int devid, const char _serviceid, const int serviceid_len, const char request, const int request_len, char _response, int *response_len);When Linkkit receives a service call request (synchronous or asynchronous). ITE_PROPERTY_SET int callback(const int devid, const char *request, const int request_len);When Linkkit receives a property set request. ITE_PROPERTY_GET int callback(const int devid, const char _request, const int request_len, char _response, int response_len);When Linkkit receives a property get request. ITE_REPORT_REPLY int callback(const int devid, const int msgid, const int code, const char *reply, const int reply_len);When Linkkit receives an acknowledgement for a reported message. ITE_TRIGGER_EVENT_REPLY int callback(const int devid, const int msgid, const int code, const char eventid, const int eventid_len, const char message, const int message_len);When Linkkit receives an acknowledgement for a reported event. ITE_TIMESTAMP_REPLY int callback(const char *timestamp);When Linkkit receives an acknowledgement for a timestamp query request. ITE_TOPOLIST_REPLY int callback(const int devid, const int msgid, const int code, const char * payload, const int payload_len);When Linkkit receives an acknowledgement for a topology query request. ITE_PERMIT_JOIN int callback(const char * product_key, const int time);When Linkkit receives a request to allow a sub-device to join the network. ITE_INITIALIZE_COMPLETED int callback(const int devid);When device initialization is complete. ITE_FOTA int callback(int type, const char *version);When Linkkit receives a notification about available firmware. ITE_COTA int callback(int type, const char config_id, int config_size, const char get_type, const char sign, const char sign_method, const char *url);When Linkkit receives a notification about an available remote configuration file. - Main loop processing.
IOT_Linkkit_Yieldfunction must be called periodically to process Linkkit services. The following code shows an example. This sample code is for reporting all properties and events. In actual product development, replace it with your own logic.time_begin_sec = user_update_sec(); while (1) { IOT_Linkkit_Yield(USER_EXAMPLE_YIELD_TIMEOUT_MS); time_now_sec = user_update_sec(); if (time_prev_sec == time_now_sec) { continue; } if (max_running_seconds && (time_now_sec - time_begin_sec > max_running_seconds)) { EXAMPLE_TRACE("Example Run for Over %d Seconds, Break Loop!\n", max_running_seconds); break; } /* Post Property Example */ if (time_now_sec % 11 == 0 && user_master_dev_available()) { user_post_property(); } /* Post Event Example */ if (time_now_sec % 17 == 0 && user_master_dev_available()) { user_post_event(); } /* Device Info Update Example */ if (time_now_sec % 23 == 0 && user_master_dev_available()) { user_deviceinfo_update(); } /* Device Info Delete Example */ if (time_now_sec % 29 == 0 && user_master_dev_available()) { user_deviceinfo_delete(); } /* Post Raw Example */ if (time_now_sec % 37 == 0 && user_master_dev_available()) { user_post_raw_data(); } time_prev_sec = time_now_sec; }After you finish writing the code for your Thing Specification Language model features, compile the firmware. Then, flash the firmware to the module using the module-specific method to verify and debug the features.
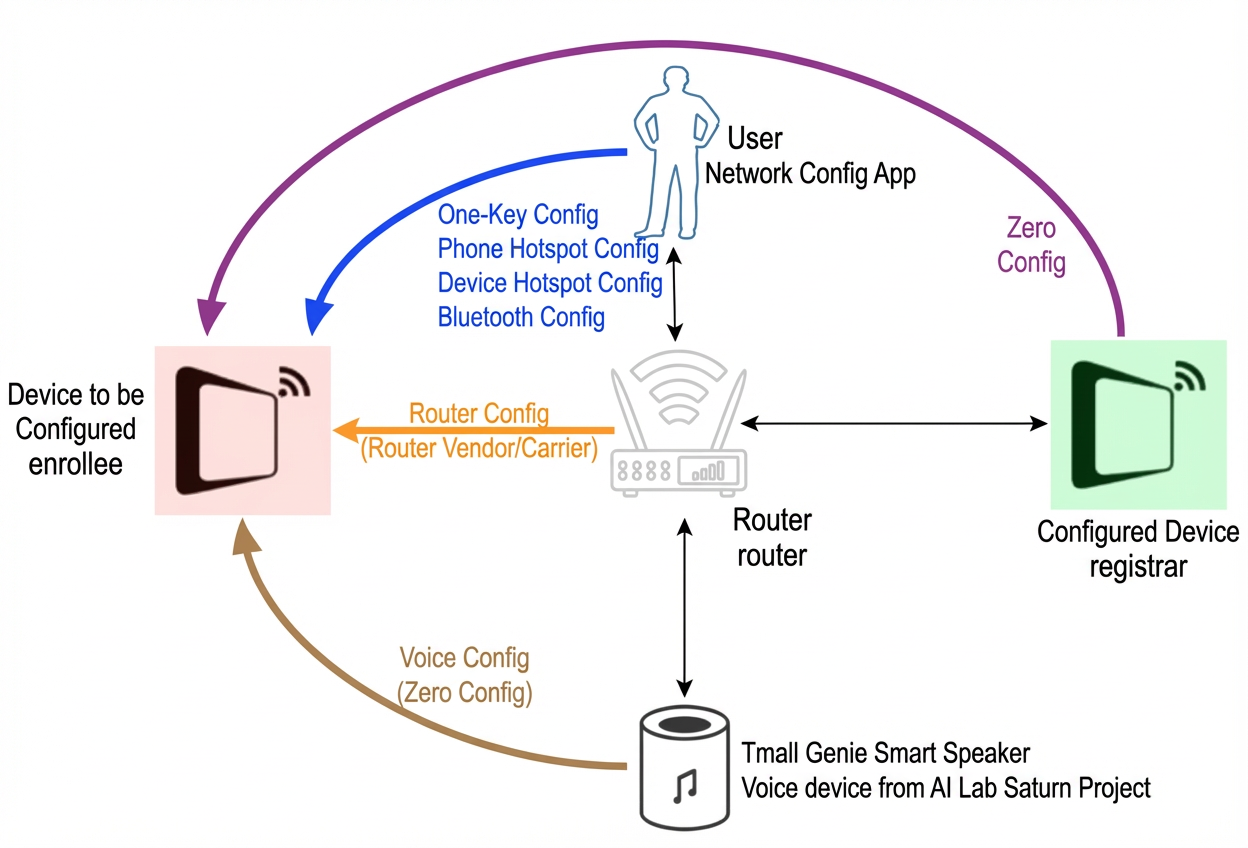
Wi-Fi provisioning
The supported network provisioning methods are as follows.
- Bluetooth provisioning (ble-config): Use BT/BLE to provision the device.
Currently, the Inside+IoT solution only supports Bluetooth-assisted network provisioning. Do not use other provisioning methods because the code is configured by default to use this method. With Bluetooth-assisted network provisioning, you can provision and bind a device to both the Tmall Genie AI Platform and the IoT Platform in a single operation. This allows the device to have both Tmall Genie voice capabilities and an IoT device identity.
static void start_netmgr(void *p)
{

    /*
     * register event callback to detect event of AWSS
     */
    iotx_event_regist_cb(linkkit_event_monitor);
    netmgr_start(true);
    aos_task_exit(0);
}
The detailed development process is as follows.
- Use the public APIs for provisioning.
#ifndef __IOT_EXPORT_AWSS_H__ #define __IOT_EXPORT_AWSS_H__ #if defined(__cplusplus) /* If this is a C++ compiler, use C linkage */ extern "C" { #endif /** * @brief start Wi-Fi setup service * * @retval -1 : Wi-Fi setup fail * @retval 0 : sucess * @note: awss_config_press must been called to enable Wi-Fi setup service */ int awss_start(); /** * @brief stop wifi setup service * * @retval -1 : failure * @retval 0 : sucess * @note * if awss_stop is called before exit of awss_start, awss and notify will stop. * it may cause failutre of awss and device bind. */ int awss_stop(); /** * @brief make sure user touches device belong to themselves * * @retval -1 : failure * @retval 0 : sucess * @note: AWSS dosen't parse awss packet until user touch device using this api. */ int awss_config_press(); /** * @brief start Wi-Fi setup service with device ap * * @retval -1 : failure * @retval 0 : sucess * @note * 1. if awss_stop or awss_dev_ap_stop is called before exit of awss_dev_ap_start * awss with device ap and notify will stop, it may cause failutre of device ap * and device bind. * 2. awss_dev_ap_start doesn't need to call awss_config_press to been enabled. */ int awss_dev_ap_start(); /** * @brief stop Wi-Fi setup service with device ap * * @retval -1 : failure * @retval 0 : sucess * @note * if awss_dev_ap_stop is called before exit of awss_dev_ap_start * awss with device ap and notify will stop, it may cause failutre of device ap */ int awss_dev_ap_stop(); /** * @brief report token to cloud after Wi-Fi setup success * * @retval -1 : failure * @retval 0 : sucess */ int awss_report_cloud(); /** * @brief report reset to cloud. * * @retval -1 : failure * @retval 0 : sucess * @note * device will save reset flag if device dosen't connect cloud, device will fails to send reset to cloud. * when connection between device and cloud is ready, device will retry to report reset to cloud. */ int awss_report_reset(); enum awss_event_t { AWSS_START = 0x1000, // AWSS start without enbale, just supports device discover AWSS_ENABLE, // AWSS enable AWSS_LOCK_CHAN, // AWSS lock channel(Got AWSS sync packet) AWSS_CS_ERR, // AWSS AWSS checksum is error AWSS_PASSWD_ERR, // AWSS decrypt passwd error AWSS_GOT_SSID_PASSWD, // AWSS parse ssid and passwd successfully AWSS_CONNECT_ADHA, // AWSS try to connnect adha (device discover, router solution) AWSS_CONNECT_ADHA_FAIL, // AWSS fails to connect adha AWSS_CONNECT_AHA, // AWSS try to connect aha (AP solution) AWSS_CONNECT_AHA_FAIL, // AWSS fails to connect aha AWSS_SETUP_NOTIFY, // AWSS sends out device setup information (AP and router solution) AWSS_CONNECT_ROUTER, // AWSS try to connect destination router AWSS_CONNECT_ROUTER_FAIL, // AWSS fails to connect destination router. AWSS_GOT_IP, // AWSS connects destination successfully and got ip address AWSS_SUC_NOTIFY, // AWSS sends out success notify (AWSS sucess) AWSS_BIND_NOTIFY, // AWSS sends out bind notify information to support bind between user and device AWSS_ENABLE_TIMEOUT, // AWSS enable timeout(user needs to call awss_config_press again to enable awss) AWSS_RESET = 0x3000, // Linkkit reset success (just got reset response from cloud without any other operation) }; #if defined(__cplusplus) /* If this is a C++ compiler, use C linkage */ } #endif #endif - Call the provisioning function in the application code. Bluetooth-assisted provisioning is already configured.
- Use the Cloud Intelligence App or a brand app integrated with the Cloud Intelligence App software development kit (SDK) for device discovery and provisioning.
Cloud unbinding and factory reset notifications
After the device is unbound, the cloud sends an unbinding event notification: {"identifier":"awss.BindNotify","value":{"Operation":"Unbind"}}. When the device receives this message, it can perform operations such as resetting provisioning or clearing local data.
If you restore the device to factory settings through the app, the cloud sends a Reset event notification: {"identifier":"awss.BindNotify","value":{"Operation":"Reset"}}. When the device receives this message, it can perform operations such as resetting provisioning or clearing local data. Depending on the specific product type, you can decide which clear operations to perform after receiving unbinding and factory reset notifications.
You can refer to the notify_msg_handle function in the sample code example/smart_outlet/smart_outlet_main.c and make the following changes.
static int notify_msg_handle(const char *request, const int request_len)
{
    ....

    if (!strcmp(item->valuestring, "awss.BindNotify")) {
        cJSON *value = cJSON_GetObjectItem(request_root, "value");
        if (item == NULL || !cJSON_IsObject(value)) {
            cJSON_Delete(request_root);
            return -1;
        }
        cJSON *op = cJSON_GetObjectItem(value, "Operation");
        if (op != NULL && cJSON_IsString(op)) {
            if (!strcmp(op->valuestring, "Bind")) {
                EXAMPLE_TRACE("Device Bind");
                vendor_device_bind();
            }
            if (!strcmp(op->valuestring, "Unbind")) {
                EXAMPLE_TRACE("Device unBind");
                vendor_device_unbind();
            }
            if (!strcmp(op->valuestring, "Reset")) {
                EXAMPLE_TRACE("Device Reset");
                vendor_device_reset();
            }
        }
    }

    ....
}
Device reset
Design a reset button for the product to clear device configurations and restore the device to its factory state. The sample application code also includes a `reset` command-line interface (CLI) command to restore factory settings and re-enter provisioning mode. For more information, see the implementation of do_awss_cmd_reset().
When resetting, you must reset the identities for both the Tmall Genie AI Platform device and the IoT Platform device. The linkkit_reset() function contains the unbinding and reset code for both platforms.
Develop OTA
If the over-the-air (OTA) feature is enabled, see the OTA Development Tutorial for development instructions.