In artificial intelligence (AI) applications that use large language models (LLMs), retrieval-augmented generation (RAG) technology retrieves information from external knowledge bases. This technology significantly improves the accuracy and timeliness of the model's output. It solves problems in LLMs, such as slow knowledge updates and hallucinations, which are inaccurate answers. Compared to traditional keyword retrieval, vector retrieval provides semantic similarity search capabilities. It also supports the retrieval of unstructured and multimodal data. The pgvector extension for PostgreSQL adds vector search capabilities while retaining the original structured data management features of PostgreSQL. The data synchronization feature of Data Transmission Service (DTS) can quickly update vector data from a PostgreSQL database to other databases in different regions. This feature helps you implement cross-region disaster recovery, low-latency queries, real-time decision-making, and multi-region data analytics in data-intensive scenarios.
Prerequisites
You are familiar with the source and destination database versions that are supported by DTS data synchronization instances. For more information, see Synchronization solution overview.
You are familiar with the limits, billing methods, and supported SQL operations for one-way synchronization between PostgreSQL databases in DTS. For more information, see Appendix.
You have connected your self-managed PostgreSQL database to Alibaba Cloud. For more information, see Connect an on-premises data center to Alibaba Cloud, Connect a database from AWS to Alibaba Cloud, and Connect a database from Azure to Alibaba Cloud.
You have created an account with superuser permissions in your self-managed PostgreSQL database for data synchronization. For more information, see CREATE USER and GRANT.
Overview
Create a database instance
Create a destination ApsaraDB RDS for PostgreSQL instance.
Create an account
Create an account for data synchronization in the destination ApsaraDB RDS for PostgreSQL instance.
Create a database
In the destination ApsaraDB RDS for PostgreSQL instance, create a database to receive data.
Install the extension
In the destination ApsaraDB RDS for PostgreSQL instance, install the pgvector extension for the destination database to support writing vector data.
Create a data synchronization instance
Use DTS to perform data synchronization.
Preparations
In this example, a self-managed PostgreSQL database that runs on a server of the Linux operating system is used.
Log on to the server on which the self-managed PostgreSQL database resides.
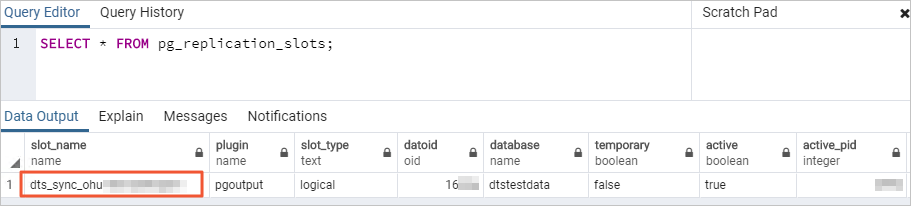
Run the following command to query the number of used replication slots in the self-managed PostgreSQL database:
select count(1) from pg_replication_slots;Modify the
postgresql.confconfiguration file. Set thewal_levelparameter tological, and make sure that the values of themax_wal_sendersandmax_replication_slotsparameters are greater than the sum of the number of used replication slots in the self-managed PostgreSQL database and the number of DTS instances whose source database is the self-managed PostgreSQL database.# - Settings - wal_level = logical # minimal, replica, or logical # (change requires restart) ...... # - Sending Server(s) - # Set these on the master and on any standby that will send replication data. max_wal_senders = 10 # max number of walsender processes # (change requires restart) #wal_keep_segments = 0 # in logfile segments, 16MB each; 0 disables #wal_sender_timeout = 60s # in milliseconds; 0 disables max_replication_slots = 10 # max number of replication slots # (change requires restart)NoteAfter you modify the configuration file, restart the self-managed PostgreSQL database for the parameter settings to take effect.
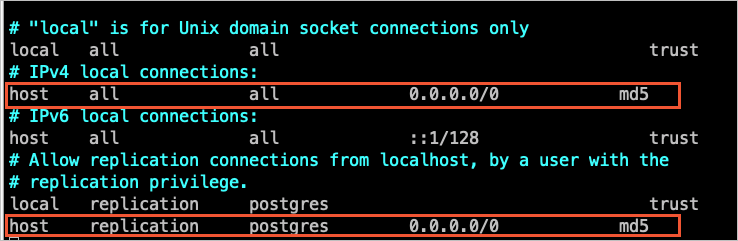
Add the CIDR blocks of DTS servers to the pg_hba.conf configuration file of the self-managed PostgreSQL database. Add only the CIDR blocks of the DTS servers that reside in the same region as the destination database. For more information, see DTS server IP whitelist.
NoteAfter you modify the configuration file, execute the
SELECTpg_reload_conf();statement or restart the self-managed PostgreSQL database for the parameter to take effect.For more information about the pg_hba.conf configuration file, see The pg_hba.conf File. Skip this step if the IP address in the pg_hba.conf file is set to
0.0.0.0/0. The following figure shows the configurations.
Create a database and schema in the RDS instance based on the database and schema information of the objects to be synchronized. The schema names in the source and destination databases must be the same. For more information, see Create a database and Manage accounts by using schemas.
Step 1: Create a database instance
Go to the RDS instance purchase page.
Select the configuration parameters for the instance.
Set Engine to PostgreSQL version 14, 15, or 16. You can select other parameters as needed. For more information, see Create an ApsaraDB RDS for PostgreSQL instance.
Review the order information, quantity, and subscription duration (for subscription instances only). Click Confirm Order, and then complete the payment. A message is displayed in the console indicating that the instance is successfully created.
NoteFor subscription instances, we recommend that you Enable Auto-renewal to prevent business interruptions caused by an expired subscription.
Auto-renewal aligns with the subscription term (monthly or yearly) and can be disabled at any time. For details, see Renew an expired resource and Auto-renewal.
View the instance.
Go to the Instances page. In the top navigation bar, select the region where the instance is located. Find the instance that you created based on its Creation Time.
NoteIt takes 1 to 10 minutes to create the instance. You may need to refresh the page to view the instance.
View the minor engine version of the destination ApsaraDB RDS for PostgreSQL instance.
After the instance is created, click the ID of the destination instance.
On the Basic Information page of the destination instance, view the Minor Version Information in the Configuration Information section.
Ensure that the minor engine version of the destination instance is 20230430 or later.
NoteIf the minor engine version of the destination ApsaraDB RDS for PostgreSQL instance does not meet the requirement, you must upgrade the version. For more information, see Upgrade the minor engine version.
Step 2: Create an account
Go to the Instances page. In the top navigation bar, select the region in which the RDS instance resides. Then, find the RDS instance and click the ID of the instance.
In the left-side navigation pane, click Accounts.
Click Create Account.
Set the account parameters.
Enter a Database Account. Set Account Type to Privileged Account. Set and confirm the account password in the New Password and Confirm Password fields. For more information, see Create an account.
Click OK.
Step 3: Create a database
Go to the Instances page. In the top navigation bar, select the region in which the RDS instance resides. Then, find the RDS instance and click the ID of the instance.
In the left-side navigation pane, click Databases.
Click Create Database.
Set the database parameters.
Enter a Database Name. For Authorized Account, select the account that you created in Step 2: Create an account. You can select other parameters as needed. For more information, see Create a database.
Click Create.
Step 4: Install the extension
Go to the Instances page. In the top navigation bar, select the region in which the RDS instance resides. Then, find the RDS instance and click the ID of the instance.
In the left-side navigation pane, click Plug-ins.
On the Plugin Marketplace tab, click AIGC, and then click Install on the vector card.
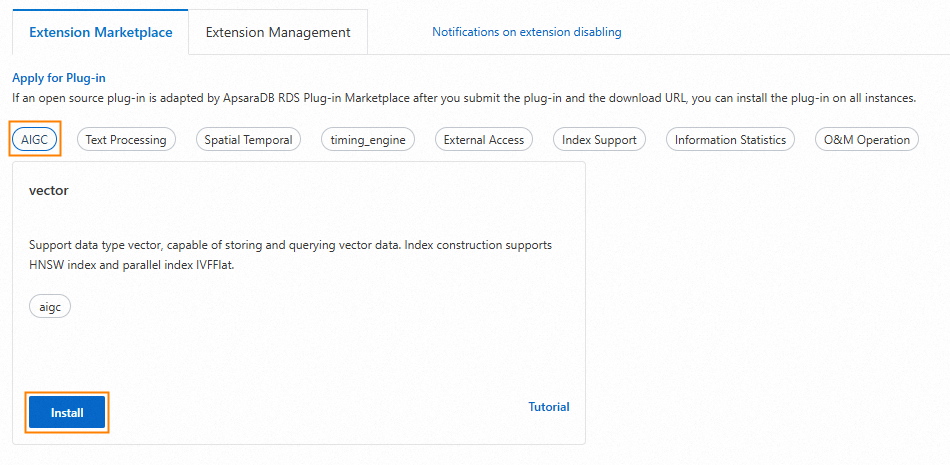
In the dialog box that appears, select a Database Name and a Database Account.
NoteFor Database Name, select the database that you created in Step 3: Create a database. For Database Account, select the account that you created in Step 2: Create an account.
Click Install.
You can view the plugin installation status on the page.

Step 5: Create a data synchronization instance
This section uses the simple mode as an example to describe how to create a data synchronization instance. For more information, see Synchronize data from a self-managed PostgreSQL database to an ApsaraDB RDS for PostgreSQL instance.
Go to the data synchronization task list page in the destination region. You can do this in one of two ways.
DTS console
Log on to the DTS console.
In the navigation pane on the left, click Data Synchronization.
In the upper-left corner of the page, select the region where the synchronization instance is located.
DMS console
NoteThe actual steps may vary depending on the mode and layout of the DMS console. For more information, see Simple mode console and Customize the layout and style of the DMS console.
Log on to the DMS console.
In the top menu bar, choose .
To the right of Data Synchronization Tasks, select the region of the synchronization instance.
Click Create Task to open the task configuration page.
Optional: In the upper-right corner of the page, click New Configuration Page.
NoteIf you are already on the new configuration page (the button in the upper-right corner is Back to Previous Version), you can skip this step.
Some parameters differ between the new and old configuration pages. We recommend using the new version.
Configure the source and destination databases.
Category
Configuration
Description
Source Database
Database Type
Select PostgreSQL.
Access Method
Select a connection type based on the deployment location of the source database. This example uses Express Connect, VPN Gateway, or Smart Access Gateway.
NoteIf the source database is self-managed, perform the required preparations. For more information, see Preparations overview.
Instance Region
Select the region of the VPC where the self-managed PostgreSQL database is located.
Replicate Data Across Alibaba Cloud Accounts
For this example, select No, as the database instance belongs to the current Alibaba Cloud account.
Connected VPC
Select the VPC connected to the self-managed PostgreSQL database.
Domain Name or IP
Enter the IP address of the server for the self-managed PostgreSQL database.
Port Number
Enter the port used by the self-managed PostgreSQL database. The default port is 3433.
Database Name
Enter the name of the database that contains the objects to be synchronized in the self-managed PostgreSQL database.
Database Account
Enter an account with superuser permissions for the self-managed PostgreSQL database.
Database Password
Enter the password for the specified database account.
Encryption
Select a method as needed. This example uses the default Non-encrypted connection.
Destination Database
Database Type
Select PostgreSQL.
Access Method
Select Alibaba Cloud Instance.
Instance Region
Select the region of the ApsaraDB RDS for PostgreSQL instance that you created in Step 1: Create a database instance.
Instance ID
Select the ID of the ApsaraDB RDS for PostgreSQL instance that you created in Step 1: Create a database instance.
Database Name
Enter the name of the database that you created in Step 3: Create a database.
Database Account
Enter the name of the account that you created in Step 2: Create an account.
Database Password
Enter the password for the specified database account.
Encryption
Select a method as needed. This example uses the default Non-encrypted connection.
After completing the configuration, click Test Connectivity and Proceed at the bottom of the page.
NoteEnsure that you add the CIDR blocks of the DTS servers (either automatically or manually) to the security settings of both the source and destination databases to allow access. For more information, see Add the IP address whitelist of DTS servers.
If the source or destination is a self-managed database (i.e., the Access Method is not Alibaba Cloud Instance), you must also click Test Connectivity in the CIDR Blocks of DTS Servers dialog box.
Configure the task objects.
On the Configure Objects page, specify the objects to synchronize.
Configuration
Description
Synchronization Types
Incremental Data Synchronization is selected by default. This example also selects Schema Synchronization and Full Data Synchronization.
Synchronization Topology
This example uses one-way synchronization. Select One-way Synchronization.
Processing Mode of Conflicting Tables
Keep the default value, Precheck and Report Errors.
Source Objects
In the Source Objects box, select the objects to be synchronized and click
 to move them to the Selected Objects box.Important
If a table to be synchronized has a dependent sequence and no sequence with the same name exists in the destination schema, you must also select the sequence in the Source Objects box.
Selected Objects
No additional configuration is required for this example. Keep the default settings.
Click Next: Advanced Settings.
This example does not require any changes. You can keep the default configuration.
Click Next: Data Validation to configure a data validation task.
This example does not use the data validation feature. You can keep the default configuration.
At the bottom of the page, click Next: Save Task Settings and Precheck.
When the Success Rate reaches 100%, click Next: Purchase Instance.
Purchase the instance.
On the Purchase page, select the billing method and link specification for the data synchronization instance. The following table describes the parameters.
This example does not require any changes. You can keep the default configuration.
Select Data Transmission Service (Pay-As-You-Go) Terms of Service.
Click Buy and Start, and then click OK in the OK dialog box.
You can monitor the task progress on the data synchronization page.
Appendix
Notes
Type | Description |
Source database limits |
|
Other limits |
|
Billing
Synchronization type | Pricing |
Schema synchronization and full data synchronization | Free of charge. |
Incremental data synchronization | Charged. For more information, see Billing overview. |
SQL operations supported by incremental synchronization
DML: INSERT, UPDATE, DELETE
DDL: Supported only for tasks created after May 12, 2023 (UTC+8).
For tasks created before May 12, 2023 (UTC+8), you must create triggers and functions in the source database to capture DDL changes before configuring the task. See Use triggers and functions to implement incremental DDL migration for PostgreSQL databases.
Supported DDL statements (requires a privileged account and self-managed PostgreSQL minor version 20210228 or later):
CREATE TABLE,DROP TABLEALTER TABLE(includingRENAME TABLE,ADD COLUMN,ADD COLUMN DEFAULT,ALTER COLUMN TYPE,DROP COLUMN,ADD CONSTRAINT,ADD CONSTRAINT CHECK,ALTER COLUMN DROP DEFAULT)TRUNCATE TABLE(source PostgreSQL 11 or later)CREATE INDEX ON TABLE
The following DDL statements and scenarios are not supported:
CASCADEorRESTRICTclauses in DDL statementsDDL from sessions that run
SET session_replication_role = replicaDDL executed by calling a
FUNCTIONMixed commits containing both DML and DDL statements — the DDL is not synchronized
DDL for objects that are not selected for synchronization
DDL executed through the Server Programming Interface (SPI)
BITtype data during incremental data synchronization