Data Transmission Service (DTS) allows you to synchronize data from an ApsaraDB RDS for PostgreSQL instance to an AnalyticDB for PostgreSQL instance. Use this feature to easily transfer data for centralized analysis.
Prerequisites
The tables that you want to synchronize in the ApsaraDB RDS for PostgreSQL instance must have a primary key.
Create a destination AnalyticDB for PostgreSQL instance. For instructions, see Create an AnalyticDB for PostgreSQL instance.
Usage notes
To synchronize data from multiple databases, you must create a separate data synchronization task for each database.
If you create a new table in the source database during data synchronization and want to synchronize it, run the following command on the table to maintain data consistency:
ALTER TABLE schema.table REPLICA IDENTITY FULL;To ensure that the task runs as expected, primary/secondary switchover is supported only for ApsaraDB RDS for PostgreSQL 11 instances. You must also set the
rds_failover_slot_modeparameter tosync. For more information, see Logical Replication Slot Failover.WarningIf you perform a primary/secondary switchover on a self-managed PostgreSQL database or an ApsaraDB RDS for PostgreSQL instance of a different version, the data synchronization task fails.
If long-running transactions exist in the source database and the task includes incremental data synchronization, the write-ahead logging (WAL) records generated before these transactions are committed may accumulate. This can fill the disk space of the source database.
Billing
Synchronization type | Pricing |
Schema synchronization and full data synchronization | Free of charge. |
Incremental data synchronization | Charged. For more information, see Billing overview. |
Limitations
Schema synchronization is not supported. DTS does not synchronize the definitions of objects, such as table schemas, from the source database to the destination database.
You can synchronize only data tables. Append-optimized (AO) tables are not supported as destination tables.
Data of the following types cannot be synchronized: BIT, VARBIT, GEOMETRY, UUID, TSQUERY, TSVECTOR, and TXID_SNAPSHOT.
If you run a DDL statement on a synchronized object in the source database, you must manually run the same statement in the destination database and then restart the task.
Supported DML operations
Only the INSERT, UPDATE, and DELETE operations are supported.
Before you begin
Change the
wal_levelparameter of the source ApsaraDB RDS for PostgreSQL instance.WarningAfter you change the
wal_levelparameter, you must restart the instance for the change to take effect. Evaluate the impact on your services and perform this operation during off-peak hours.Log on to the ApsaraDB RDS console.
In the navigation pane on the left, click Instances.
In the upper-left corner of the page, select the region where your instance is located.
Find the target instance and click its ID.
In the navigation pane on the left, click Parameter Settings.
On the Parameter Settings page, find the
wal_levelparameter and change its value tological.NoteFor more information, see Set instance parameters.
Create the required databases, schemas, and tables in the destination AnalyticDB for PostgreSQL instance based on the source instance's object schema. For more information, see SQL Syntax.
Procedure
Purchase a data synchronization instance. For more information, see Purchase a DTS instance.
NoteWhen you purchase the instance, set Source Database to PostgreSQL, Destination Database to AnalyticDB for PostgreSQL, and Synchronization Topology to One-way Synchronization.
Log on to the DTS console.
NoteIf you are redirected to the Data Management (DMS) console, you can click the
 icon in the lower-right corner and click the
  icon to return to the previous version of the DTS console.
If you are using the new DTS console, you can click the
 icon in the lower-right corner to return to the previous version.
-
In the left-side navigation pane, click Data Synchronization.
-
At the top of the Synchronization Tasks page, select the region where your destination instance is located.
-
Find the data synchronization task that you purchased and click Configure Task.
Configure the source and destination instances.
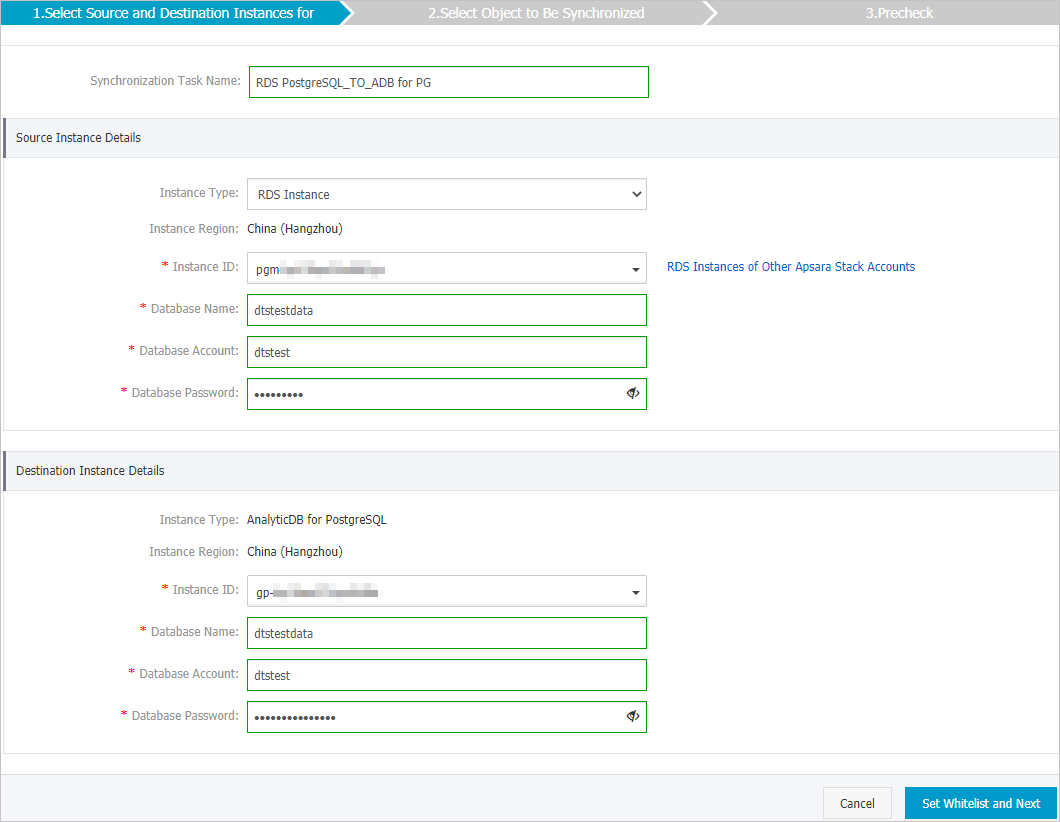
Section
Parameter
Description
N/A
Synchronization Task Name
DTS automatically generates a task name. We recommend that you specify a descriptive name for easy identification. The name does not have to be unique.
Source Instance Details
Instance Type
Select RDS Instance.
Instance Region
The region of the source instance that you selected on the purchase page. This parameter cannot be changed.
Instance ID
Select the ID of the ApsaraDB RDS for PostgreSQL instance.
Database Name
Enter the name of the database that contains the tables you want to synchronize.
Database Account
Enter a privileged database account for the ApsaraDB RDS for PostgreSQL instance. The account must be the owner of the selected database.
NoteIf the source is an ApsaraDB RDS for PostgreSQL 9.4 instance and you are synchronizing only DML operations, the account only needs the replication permission.
Database Password
Enter the password for the database account.
Destination Instance Details
Instance Type
This is fixed to AnalyticDB for PostgreSQL and cannot be changed.
Instance Region
The region of the destination instance that you selected on the purchase page. This parameter cannot be changed.
Instance ID
Select the ID of the AnalyticDB for PostgreSQL instance.
Database Name
Enter the name of the destination database.
NoteThis database must exist in the AnalyticDB for PostgreSQL instance. If it does not exist, create a database.
Database Account
Enter the initial account for the AnalyticDB for PostgreSQL instance. For more information, see Create and manage database accounts.
NoteYou can also enter an account that has RDS_SUPERUSER permissions. For more information, see Manage user permissions.
Database Password
Enter the password for the database account.
-
In the lower-right corner of the page, click Set Whitelist and Next.
If the source or destination database is an Alibaba Cloud database instance, such as an ApsaraDB RDS for MySQL or ApsaraDB for MongoDB instance, DTS automatically adds the CIDR blocks of DTS servers to the IP address whitelist of the instance. If the source or destination database is a self-managed database hosted on an Elastic Compute Service (ECS) instance, DTS automatically adds the CIDR blocks of DTS servers to the security group rules of the ECS instance, and you must make sure that the ECS instance can access the database. If the self-managed database is hosted on multiple ECS instances, you must manually add the CIDR blocks of DTS servers to the security group rules of each ECS instance. If the source or destination database is a self-managed database that is deployed in a data center or provided by a third-party cloud service provider, you must manually add the CIDR blocks of DTS servers to the IP address whitelist of the database to allow DTS to access the database. For more information, see Whitelist DTS server IP addresses.
WarningAdding the public IP address blocks of the DTS service, either automatically or manually, may pose security risks. Using this product, you acknowledge that you understand and accept the potential security risks and that you must implement basic security measures. These measures include, but are not limited to, strengthening password security, limiting the ports open to each CIDR block, using authentication for internal API calls, and regularly checking and restricting unnecessary CIDR blocks. Alternatively, you can connect through a private network using a leased line, VPN Gateway, or Smart Access Gateway.
Set the synchronization policy and select the objects to synchronize.
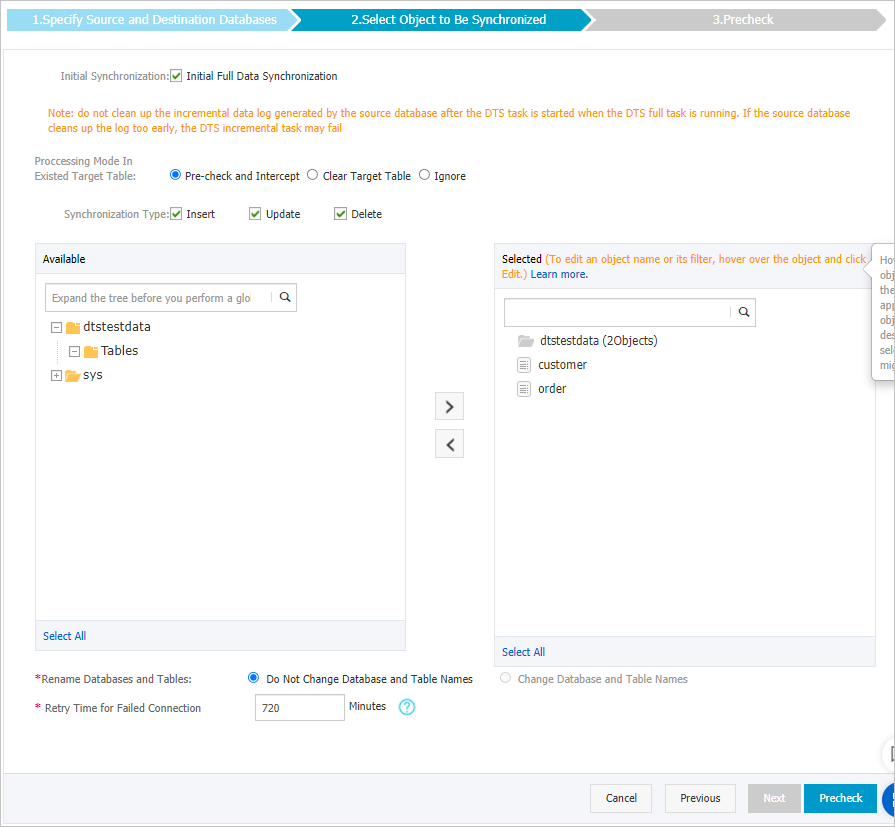
Section
Parameter
Description
Synchronization Policy
Initialize Synchronization
By default, Initial Full Data Synchronization is selected. After the precheck, DTS synchronizes the existing data of the selected objects from the source instance to the destination instance. This data serves as the baseline for subsequent incremental data synchronization.
Processing Mode for Existing Tables
Clear Data
Skips the "Destination table is empty" check during the precheck phase. Clears data from the destination tables before full data synchronization. This mode is suitable for production synchronization after testing is complete.
Ignore Errors and Proceed
Skips the "Destination table is empty" check during the precheck phase. Appends data directly during full data synchronization. This mode is suitable for scenarios where data from multiple tables is aggregated into a single table.
Synchronization Operation Type
Select the operation types to synchronize based on your business needs:
NoteAlterTable is not supported.
Insert
Update
Delete
AlterTable
Select Objects to Synchronize
N/A
In the Source Objects box, select the tables to synchronize and click the
 icon to move them to the Selected Objects box.Note
You can select objects only at the table level.
If you need the column names in the destination table to be different from the source table, use the column mapping feature of DTS. For more information, see Set object names in the destination instance.
Map Object Names
N/A
Change the names of synchronized objects in the destination instance. For more information, see Map databases, tables, and columns.
ImportantIf you use column mapping and do not synchronize the entire table, or if the source and destination table schemas do not match, data in columns that exist only in the source table is lost on the destination side.
Connection Retry Duration
N/A
If DTS cannot connect to the source or destination instance, it retries for 720 minutes (12 hours) by default. You can also specify a custom retry duration. If DTS reconnects to the source or destination instance within the specified duration, the synchronization task automatically resumes. Otherwise, the task fails.
NoteYou are billed for task run time during connection retries. Customize the retry duration based on your business needs, or release the DTS instance as soon as the source and destination instances are released.
-
After completing the preceding configurations, click Precheck and Start in the lower-right corner of the page.
Note-
A precheck runs before the synchronization task starts, and you can only start the task after it passes.
-
If the precheck fails, click the
icon next to the failed item to view the details.-
You can fix the issues based on the cause and run the precheck again.
-
If you do not need to fix the items that triggered warnings, you can click Ignore or Ignore Warnings and Rerun Precheck to skip the warnings and run the precheck again.
-
-
-
After the Precheck dialog box displays Precheck Passed, close the Precheck dialog box. The synchronization task starts automatically.
-
Wait for the task to finish initialization and enter the Synchronizing state.
You can view the status of the data synchronization task on the Data Synchronization page.
 icon to move them to the Selected Objects box.
 icon next to the failed item to view the details.