Cloud-to-on-premises interconnection supports proxies based on Kubernetes clusters and proxies that use the Secure Shell (SSH) or SOCKS protocols as the underlying channel. This topic describes common scenarios for configuring a proxy.
Prerequisites
If you use the Kubernetes agent, you need the following:
Prepare a local environment where you can use kubectl and a kubeconfig file to access the Kubernetes cluster.
If you use an SSH or SOCKS proxy, perform the following steps:
Important- The ECS instance and the application to be interconnected must be in the same VPC.
- The SSH channel requires password-based logon. Logon using a key pair is not supported.
Configure a Kubernetes proxy
- Start IntelliJ IDEA.
- In the top menu bar, choose
- In the Settings dialog box, choose .
- On the Proxy page, click AddProfile to create an empty proxy.
- In the Profile Detail section, click Add on the right.
- In the Proxy Configuration dialog box, configure the Kubernetes proxy settings, and then click OK.
Parameter Description Proxy Type Select the Kubernetes proxy type. Configuration File Select the local kubeconfig file. Namespace Select a namespace in the Kubernetes cluster. The default namespace is `default`.
When you run your application using cloud-to-on-premises interconnection (in local process mode or local container mode), the Alibaba Cloud Toolkit plugin creates a temporary proxy container in this namespace. The proxy container requires 64 MB to 128 MB of memory. When you stop the local application, the Alibaba Cloud Toolkit plugin automatically deletes the proxy container.
Note The name of the proxy container deployed by the Alibaba Cloud Toolkit plugin starts with `etrans-`.
Configure an SSH or SOCKS proxy
For SSH or SOCKS proxies, you can configure a single SSH proxy as the underlying channel. In complex scenarios, you can also configure a cascade of multiple SSH or SOCKS proxy nodes. The plugin automatically connects the configured nodes in a cascade. However, the last proxy in the cascade must be an SSH proxy.
Configure a single-level SSH proxy
- Start IntelliJ IDEA.
- In the top menu bar, choose
- In the Settings dialog box, choose .
- On the Proxy page, click AddProfile to create an empty proxy.
- In the Profile Detail section, click Add on the right.
- In the Proxy Configuration dialog box, set the account and password for the SSH proxy, and then click OK.
Parameter Description Proxy Type Select the SSH proxy type. Proxy IP and Port Enter the IP address and port of the proxy server. Account Enter the account for the proxy server. Password Enter the password for the proxy server.
Configure a multi-level proxy
For projects with high security requirements, external SSH logon may be restricted. In this scenario, you can use the multi-level proxy feature of the cloud-to-on-premises interconnection to build a proxy that meets security and compliance requirements.
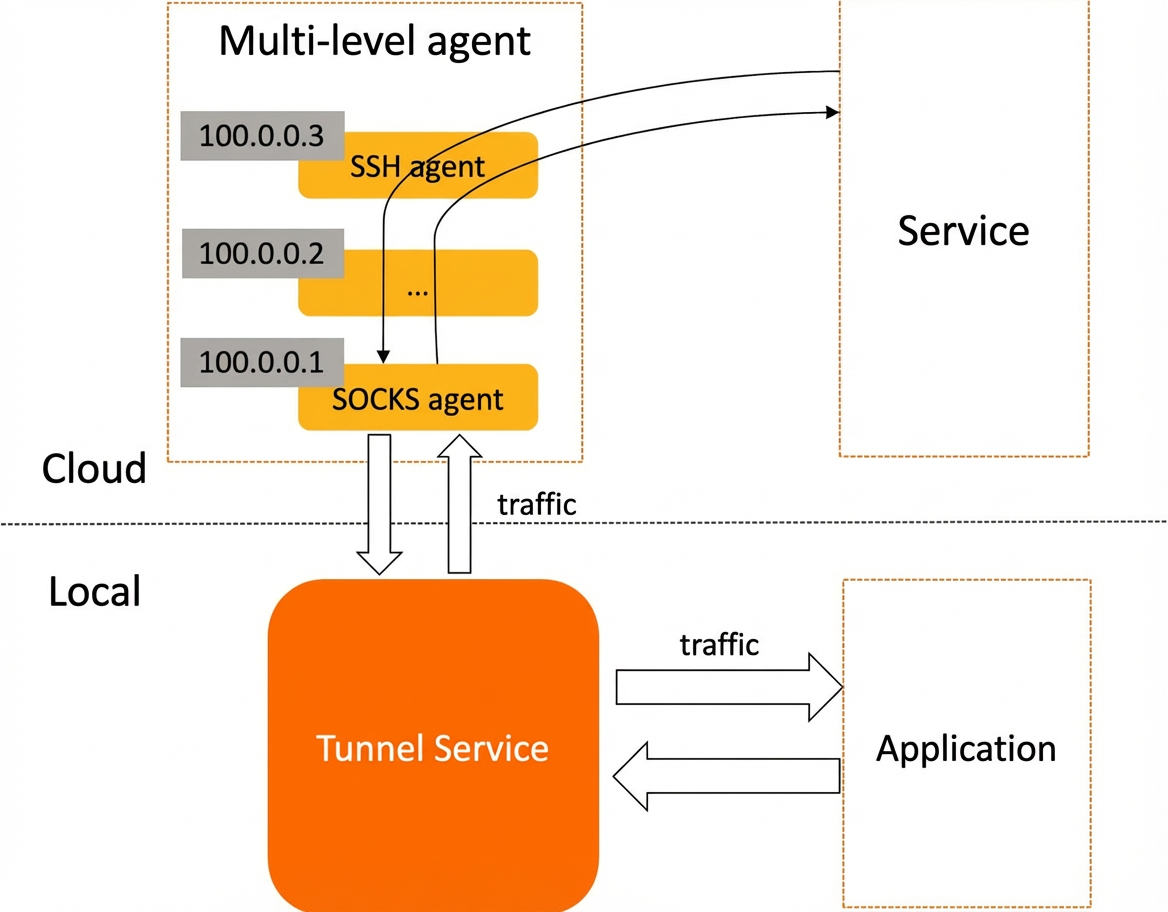
- Start IntelliJ IDEA.
- In the top menu bar, choose
- In the Settings dialog box, choose .
- On the Proxy page, click AddProfile to create an empty proxy.
Note Multi-level proxies are configured based on the same profile. The configurations for proxies under the same profile take effect simultaneously to form a cascade.
- Configure the SSH proxy.
- In the Profile Detail section, click Add on the right.
- In the Proxy Configuration dialog box, set the account and password for the SSH proxy, and then click OK.
Parameter Description Proxy Type Select the SSH proxy type. Proxy IP and Port Enter the IP address and port of the proxy server. Account Enter the account for the proxy server. Password Enter the password for the proxy server.
- Configure the SOCKS proxy.
- In the Profile Detail section, click Add on the right.
- In the Proxy Configuration dialog box, set the IP address and port for the SOCKS proxy, and then click OK.
Parameter Description Proxy Type Select the SOCKS proxy type. Proxy IP and Port Enter the IP address and port of the proxy server. Account Enter the account for the proxy server. This parameter is optional if the SOCKS proxy does not require authentication. Password Enter the password for the proxy server. This parameter is optional if the SOCKS proxy does not require authentication.
(Optional) Manually initialize a proxy
Typically, you can use the plugin for one-click proxy initialization. This process requires temporary root permissions on the host of the SSH proxy. After the configuration is complete, the proxy is ready to use, and the account configuration can be reused without re-initialization. The plugin does not save the root key or use it for any other purpose. If you cannot provide root permissions, you can initialize the proxy by following these steps:
- Edit the sshd_config configuration file.
sudo vi /etc/ssh/sshd_config - Add the following configuration to allow the SSH account to forward requests.
ClientAliveInterval 60 # The SSH proxy host sends a keepalive request to the local client every 60 seconds to maintain the connection. Set this value as needed. Match User <yourSSHAccount> # The name of the SSH account. GatewayPorts yes - Restart the SSH service.
- For Debian or Ubuntu systems:
sudo systemctl restart ssh - For CentOS, Red Hat Enterprise Linux (RHEL), or Fedora systems:
sudo systemctl restart sshd
- For Debian or Ubuntu systems: