In local container mode, the Cloud Toolkit plugin starts a container on your local machine to run your microservice application. This topic describes how to configure the local container mode.
Prerequisites
Before you use the local container mode, complete the following steps:Background information
Using local containers to start applications has the following advantages:
- It supports languages other than Java.
- Local microservice applications can run in a container that closely matches the production environment.
For example, if you develop on a Windows system but your production environment is Linux-based, you can use this mode to run a Linux container on your local system and run your microservice application inside it.
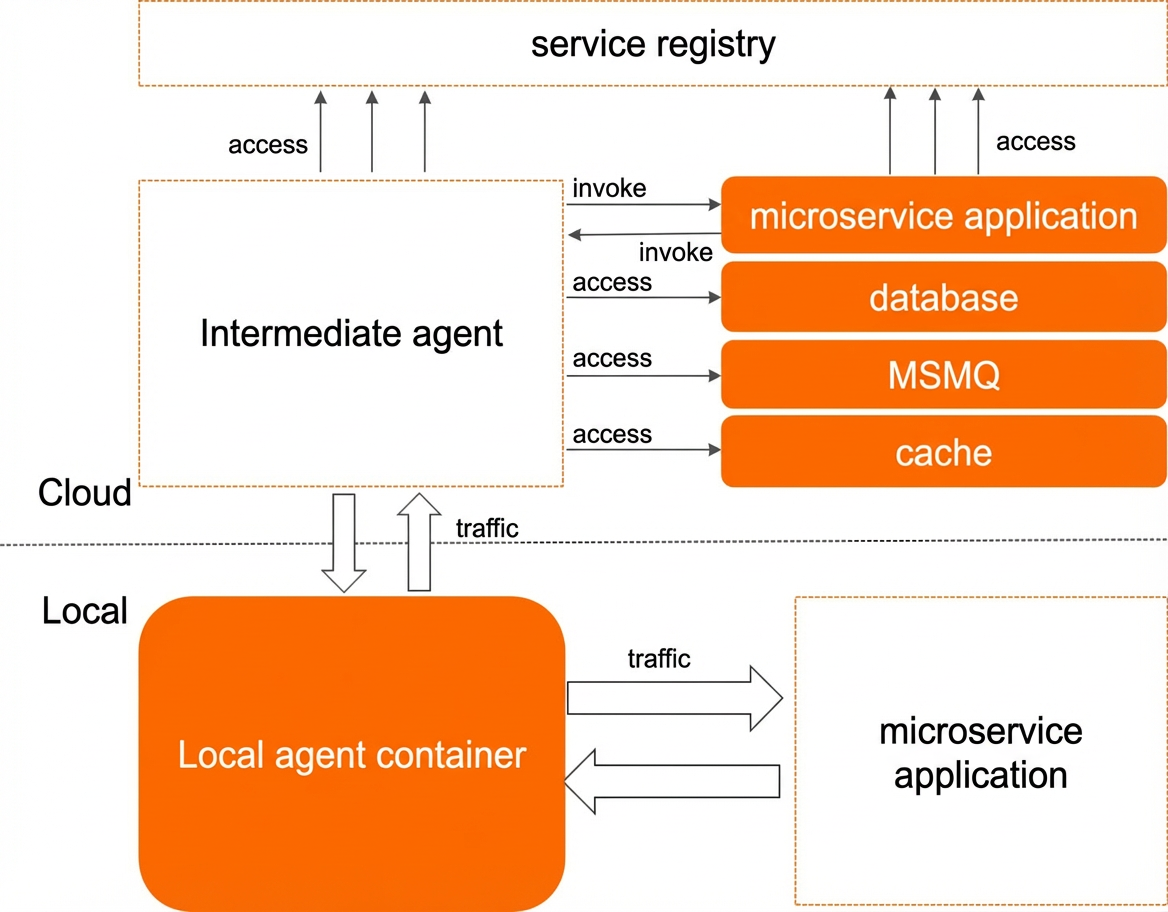
The following illustrates the overall architecture:
Step 1: Configure the local container
- Start IntelliJ IDEA.
- In the menu bar, select .
- On the Run/Debug Configurations page, click the + icon on the left. In the Add New Configuration window, select Alibaba Microservice Container. Then, configure the local container parameters on the right.
Parameter Description Name A custom name for the local container. Server The Docker Daemon background process. The Cloud Toolkit plugin currently supports only a local Docker instance. This parameter defaults to Local Docker Server and cannot be changed. Application Type The type of your application. If you select Image, the Cloud Toolkit plugin uses your defined local container image to run the microservice container. If you select another type, the plugin uses the default container to run your microservice application. - Java (generic JAR package): Select this type if your application is written in Java, uses the Spring Cloud or Dubbo microservice framework, and is packaged as a JAR file.
- Tomcat (generic WAR package): Select this type if your application is written in Java, uses the Dubbo or Spring Cloud microservice framework, and is packaged as a WAR file.
- HSF-Container (HSF JAR/WAR package): Select this type if your application is written in Java, uses the HSF microservice framework, and is packaged as a JAR or WAR file.
- Image: Run a custom microservice container.
Artifact The source of the microservice application package. This parameter is available only when the application type is not Image. The following options are supported: - Maven Build: Builds the corresponding service module locally using Maven and runs the application using the resulting package. This method requires you to manually add a Maven build task. For more information, see Maven Build task description.
- Use File: Uses a specified local file as the application package.
Image ID or name The ID or name of the custom container image. This parameter is available only when the application type is Image. Entrypoint The entrypoint of the container image. This parameter is available only when the application type is Image. If set, this value overwrites the entrypoint in the custom container image. Command The command for the container image. This parameter is available only when the application type is Image. If set, this value overwrites the command in the custom container image. Bind ports Maps host ports to container ports. The format is <host port>:<container port>. Use spaces to separate multiple port mappings. This lets you access container ports from outside the container through the host ports. Note By default, the Cloud Toolkit plugin exposes the Spring Cloud service port and the debug port. You do not need to set them here again. For more information, see Port mapping description.Bind mounts Maps host directories to container directories. The format is <host path>:<container path>. Use spaces to separate multiple path mappings. This allows the host and the container to share the same directories for reading and writing. Environment variable Environment variables for the container. The format is <Key>=<Value>. Use semicolons to separate multiple environment variables. Note By default, the Cloud Toolkit plugin injects some microservice-related parameters into the container. For more information, see Microservice environment variable description. - After you complete the configuration, click OK to save it.
Step 2: Run the container
Click the run configuration for the container. The first time you run the configuration, the Cloud Toolkit plugin automatically pulls the required container image and related tools. This process may take some time. After the environment is initialized, the application startup log is displayed as follows:
(Optional) Step 3: Debug the Java application
The Cloud Toolkit plugin uses the JAVA_TOOL_OPTIONS environment variable to enable Java application debugging and exposes the debug port to the host. The default debug port is 5005. If port 5005 is occupied, the plugin uses the next available port.
Port mapping description
The Cloud Toolkit plugin maps the debug port and the Spring Cloud service port of the Java application to the host. The details are as follows:
- Java debug port: The default port is 5005. If this port is occupied, the plugin uses the next available port. The plugin injects debug information through the JAVA_TOOL_OPTIONS environment variable. If you start the container without using a custom image, the default container image uses this debug information to run your microservice application. If you use a custom image, you must use this parameter in your startup script to start the application.
- Spring Cloud service port: The default port is 8080. If this port is occupied, the plugin uses the next available port. You can overwrite this port by setting the local Spring Cloud service port in the cloud-to-local connection configuration.
Microservice environment variable description
When the Cloud Toolkit plugin starts, it injects the following environment variables into the local microservice container. If you do not use a custom image, the startup script of the default container image automatically detects and uses these environment variables. If you use a custom image, you can use these environment variables as needed.
| Environment variable name | Environment variable value |
| PRODUCT | This environment variable identifies the cloud product type of the current runtime environment. Valid values are EDAS, SAE, and MSE. |
| JAVA_TOOL_OPTIONS | -agentlib:jdwp=transport=dt_socket,server=y,suspend=n,address=<debug port>. The default debug port is 5005. If port 5005 is occupied, the next available port is used. |
| ADDRESS_SERVER_HOST | The address of the address server. |
| ADDRESS_SERVER_PORT | The port of the address server. |
| ACCESS_KEY | The AccessKey ID of the namespace. |
| SECRET_KEY | The AccessKey secret of the namespace. |
| TENANT_ID | The ID of the namespace. |
| SUB_ONLY | This parameter is set to true if Subscribe Only is selected in the cloud-to-local connection configuration. |
| PROJECT_NAME | The ID of the application to which the local microservice belongs. |
| REMOTE_IP | The internal IP address of the remote intermediate proxy. By default, the IP address of the eth0 network interface card is used. |
Maven Build task description
If you select Maven Build to build the microservice application package, you must add a corresponding Maven build task in the container configuration. Perform the following steps:
- In the local container configuration, click the + icon in the Before launch section, and then select Run Maven Goal from the list.
- In the Select Maven Goal dialog box, set the module and command for the Maven build task.
If your project contains multiple modules, add the following build tasks in order:
- Add a clean install build task for the parent Maven project.
- Add a clean package build task for the target submodule. The Cloud Toolkit plugin uses the package built from this submodule to run the application.