When your website is connected to ESA by using the NS or CNAME method, you must add DNS records to ensure that your domain name resolves correctly and to accelerate access.ESA provides two methods to add DNS records: batch import and manual input. This topic describes how to quickly add DNS records.
Prerequisites
Before adding DNS records, ensure you meet the following requirements:
You have connected your website to ESA using the NS or CNAME method.
You have permission from your DNS provider to add or modify DNS records.
You understand the basic concepts and uses of common DNS record types, such as A, CNAME, MX, and TXT.
Usage notes
When you add or modify a DNS record, check the values for the hostname and the origin:
The hostname cannot match the hostname or origin of an existing DNS record, and it cannot be an origin in an origin pool.
The origin cannot match the hostname of an existing DNS record.
CNAME record value specification — The Record Value field for a CNAME record must contain the actual origin address, for example, an OSS external domain name or an ECS public IP address. Do not enter the acceleration domain name itself or a value that is the same as the hostname. Entering an incorrect value causes a configuration error or a DNS resolution loop.
Record type conflicts — If an A record already exists for the same hostname, adding a CNAME record for that hostname results in a conflict error. You must delete the existing A record before adding the CNAME record.
NoteESA proxy acceleration operates at the hostname level. You cannot configure direct access or traffic splitting for specific URLs, IP addresses, or clients (such as mobile apps) under the same domain name. If you need some traffic to bypass the proxy and connect directly to the origin, configure a separate domain name and point it to the origin IP address by using an A record.
Origin configuration save failure — If you cannot save the origin configuration in the ESA console, verify that you selected the correct Record Type. For example, if your origin is an IP address, select the A record type instead of CNAME.
Method 1: Bulk import DNS records
To add multiple records, you can import them in bulk by using a template. This method is ideal if you are migrating existing DNS records from another DNS provider to ESA. If you need to add a single record, see Manually add a DNS record.
In the ESA console, select Websites, and in the Website column, click the target site.
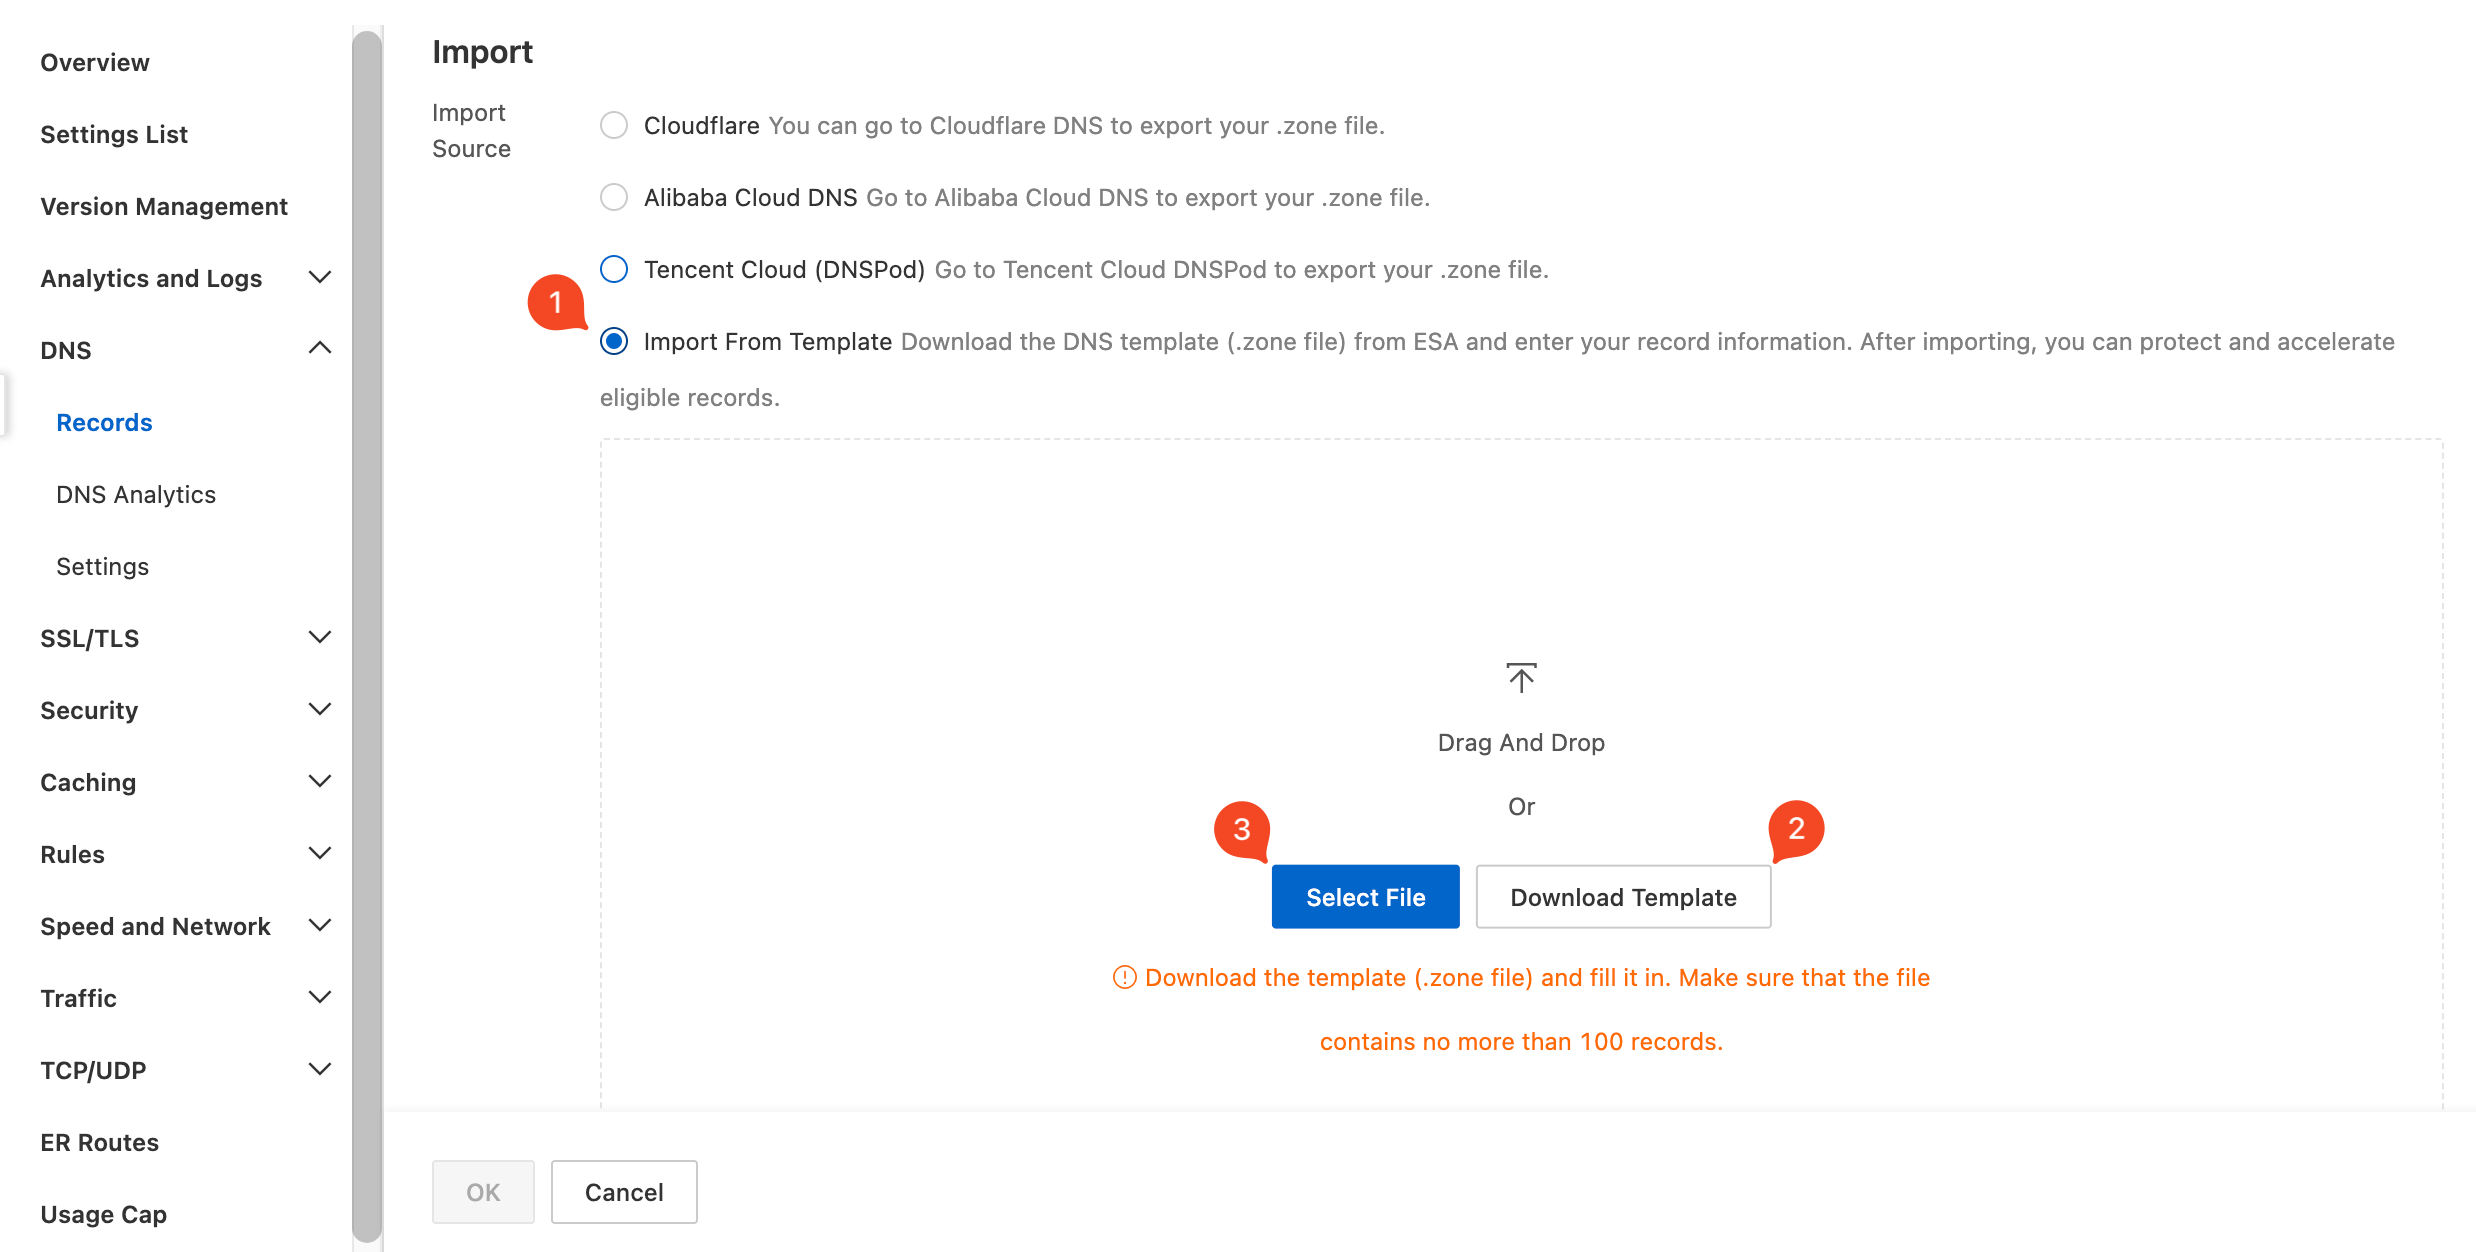
Select and click Import.
Select Import From Template and click Download Template. Edit the DNS record information in the template and save the file. Then, click Select File and choose the saved template.
On the Import page, review and adjust the record configurations.
By default, ESA provides only DNS resolution services. To enable ESA acceleration, turn on the proxy switch in the Proxy Status column.
NoteFor websites connected using the CNAME method, the proxy is enabled by default and the Proxy Status cannot be changed.
For websites connected using the NS method, proxying can only be enabled or disabled for A, AAAA, and CNAME records.

For information about different use cases, see Use case descriptions.
After adjusting the DNS records, click OK.
(Optional) For websites connected using the CNAME method, follow the on-screen instructions to configure the CNAME record with your DNS provider after adding the record.
Method 2: Manually add a DNS record
To add a single record, enter its details manually. This method is ideal for new setups or for adding only a few records.
Example scenario
Assume your origin domain is example.com, and you want to accelerate web pages for the subdomain www.example.com by using a CNAME record. This example shows how to add the DNS record for this scenario.
Procedure
In the ESA console, go to Websites and click the target website in the Website column.
Select and click Add Record.
Enter the required parameters and click Next. For more information about record types and parameters, see Parameter descriptions for adding records.
Parameter
Description
Example value
Record Type
Select the record type.
CNAMEHostname
The prefix of the subdomain. Supports lowercase letters, numbers, wildcards
*(for wildcard domain records only), hyphens-(cannot be the first or last character),@(for root domain records only), and underscores_(supported at the start of TXT, CAA, CNAME, NS, and SRV records only when proxy acceleration is disabled). The maximum length is 63 characters.wwwProxy Status
Turn on the toggle switch to enable proxy acceleration.
Enabled
Record Value
Select the type of record value.
Domain Name
Domain Name
Enter the origin domain name.
example.comOrigin Host
The default setting is Match Requested Domain Name, which is typically sufficient. If no origin rule is configured, ESA applies the following defaults: the origin host is determined by the HOST policy in the DNS record, the origin SNI matches the origin host value, and the origin protocol and port match the client's request.
Match Requested Domain Name
HTTP/HTTPS Ports
When proxy acceleration is enabled for the DNS record, the port configuration takes effect and ESA acceleration nodes only allow requests on the ports you configure.
HTTPprotocol supports ports80,8080,8880,2052,2082,2086, and2095by default.HTTPSprotocol supports ports443,8443,2053,2083,2096, and2087by default. Except for ports80and443, you can disable the remaining default ports. If you need other ports, please upgrade to the Enterprise edition to enable the custom ports feature (note: the custom ports feature is mutually exclusive with mainland China network optimization and fixed IP features, and cannot be enabled simultaneously).8080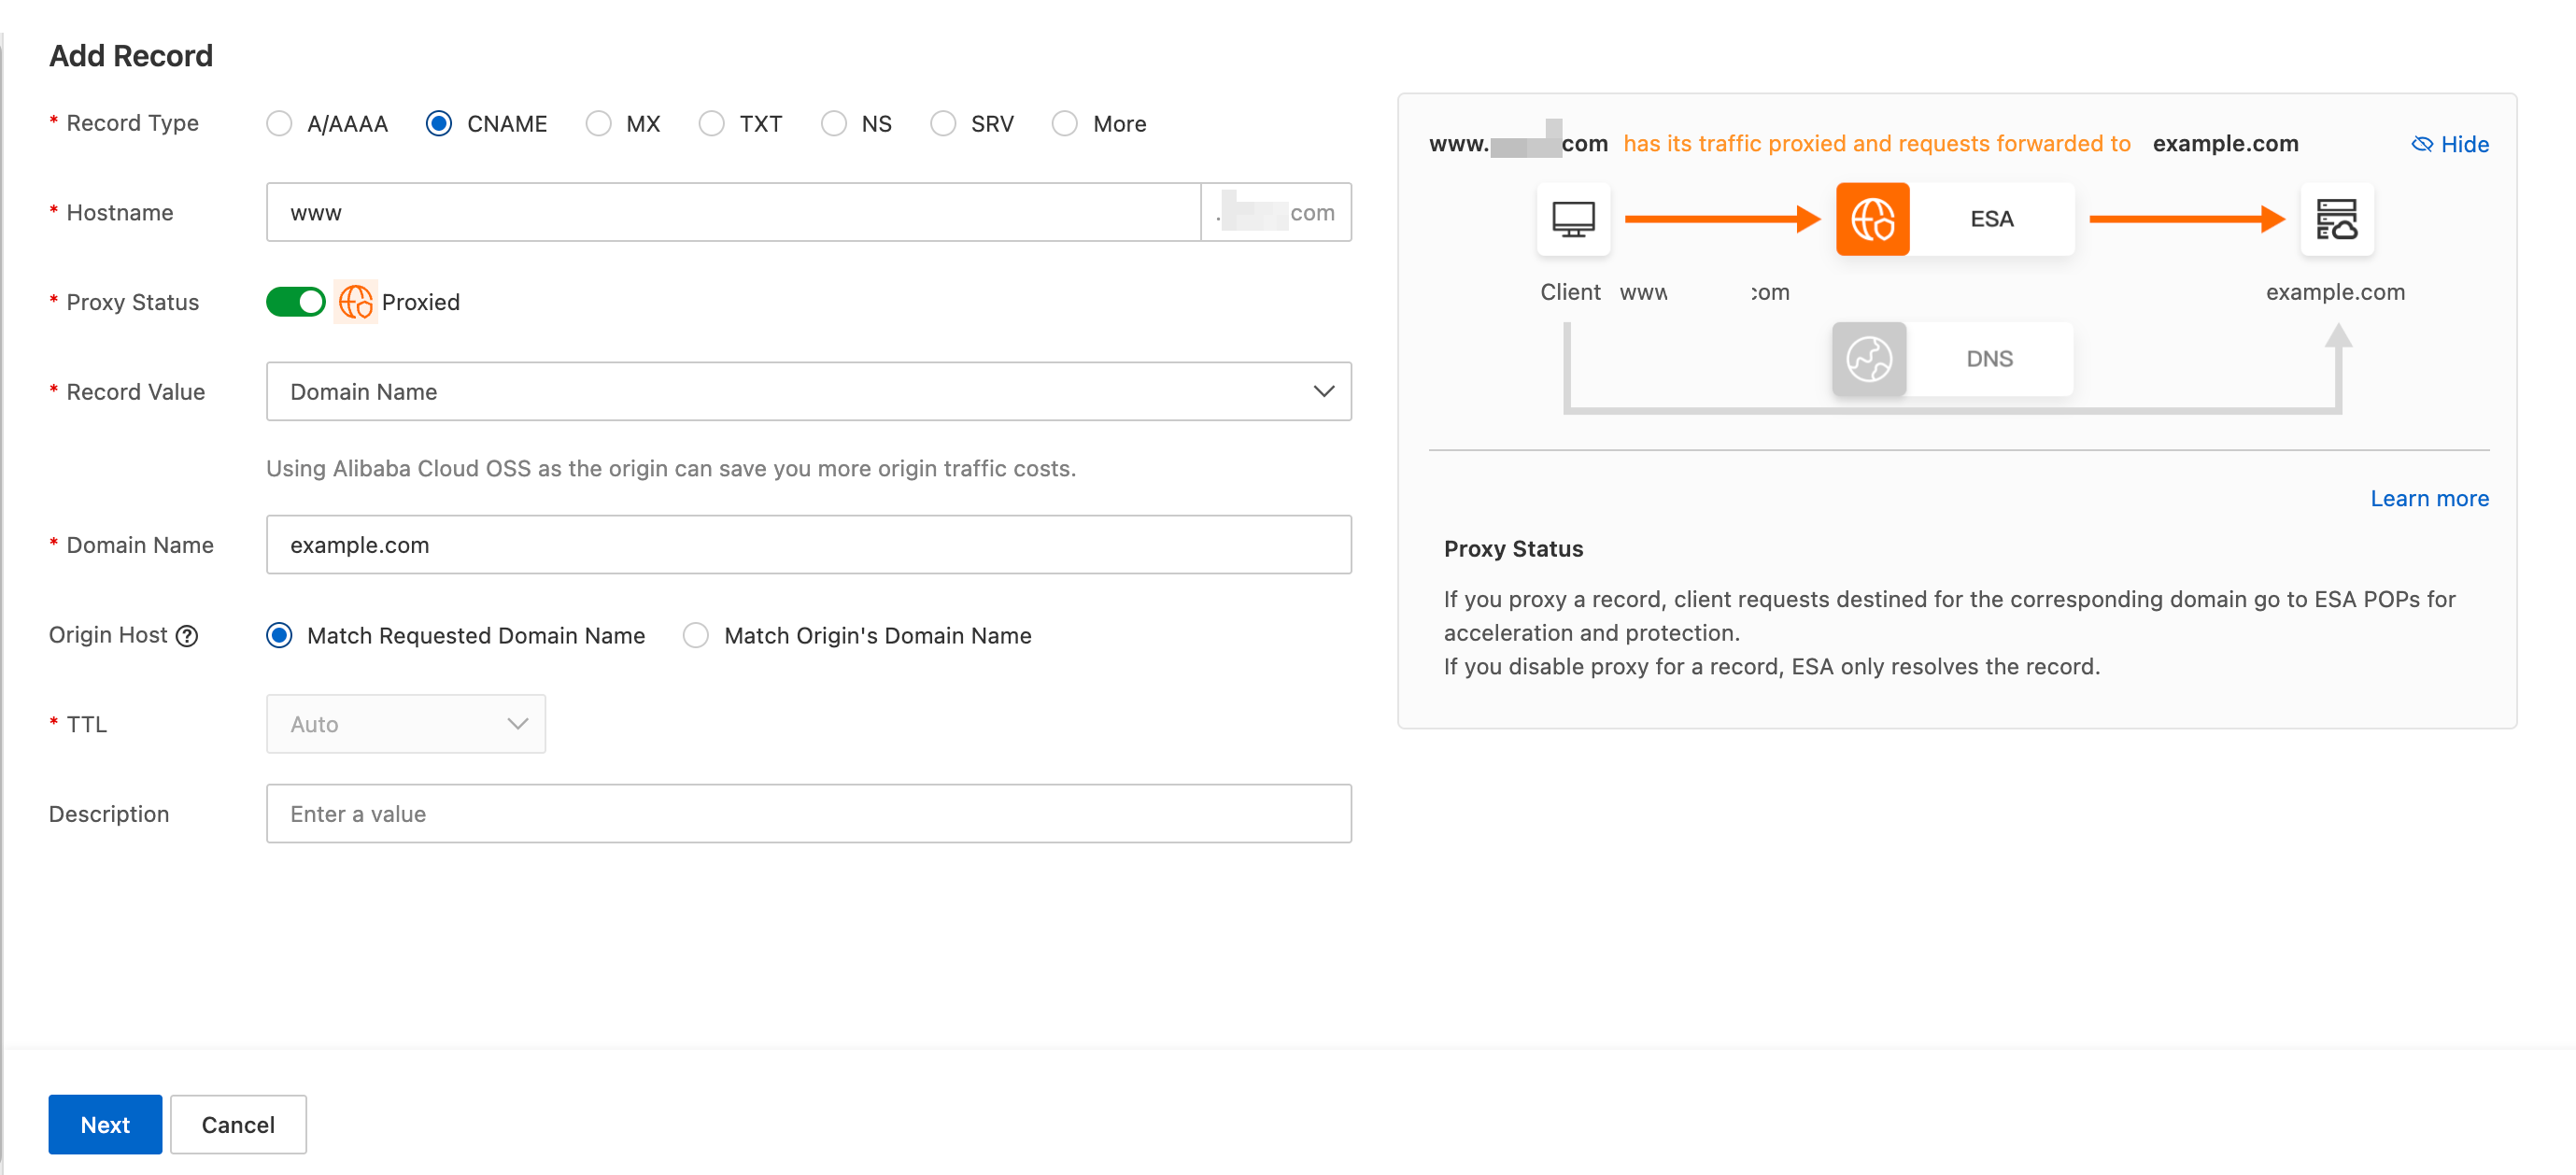
Select the Web use case and click OK. For information about different use cases, see Use case descriptions.
(Optional) For websites connected using the CNAME method, follow the on-screen instructions to configure the CNAME record with your DNS provider after adding the record.
Connection verification and activation
After adding DNS records, verify that your connection is active and understand the expected propagation time.
CNAME connection verification
Adding a DNS record in the ESA console alone does not affect access to your original domain. For a CNAME connection to take effect, you must also configure your DNS provider to resolve the domain to the dedicated CNAME address provided by ESA. Use an exact-match record, not a wildcard record. You can use the dig or ping command to verify that the domain resolves to an ESA node. If the resolution is not correctly configured, you may encounter the following issues:
530 errors when accessing the domain
Missing certificate binding entry in the ESA console
No traffic data displayed in the ESA console
NS connection propagation time
If you connected your website to ESA by using the NS method, you must update the NS records at your domain registrar to point to the name servers provided by ESA. Global propagation can take up to 48 hours. During this period, the console may temporarily show no traffic data, which is expected.
Configuration status anomaly troubleshooting
If your DNS records were previously configured correctly but the ESA console now shows a Pending status, the domain resolution has likely been modified to point to another service, such as WAF, preventing ESA from detecting your configuration. If you have configured DNS resolution only for overseas regions and the console shows Pending, but the resolution correctly points to an ESA overseas node, acceleration is working normally and performance is not affected.
Use cases
In the scenario configuration for DNS records, ESA provides 5 business scenarios. By selecting the scenario type that corresponds to your business scenario, you can dynamically assign a more suitable security acceleration policy to your domain name. You can edit records and adjust business types at any time in the console.
Use case | Description |
Web | Suitable for accelerating websites with a mix of static content (small files) and dynamic content (API requests). Examples: personal blogs, small user-generated content (UGC) communities, and small independent e-commerce sites. |
Large File Download | Ideal for large file distribution scenarios. Examples: software installation packages (apps, games, clients), patch updates, and firmware upgrades. Caching large files at the edge reduces origin load and improves download speeds. |
Audio/Video On-Demand | Suitable for accelerating the distribution of on-demand audio and video content. Examples: short video playback and live stream replays. |
API Acceleration | Designed for accelerating purely dynamic, API-based services that generally do not require caching. Examples: account password verification, order payment processing, log uploads, and real-time data synchronization. |
AI Tokens | Optimized for AI model inference scenarios, accelerating high-frequency, small requests at the token level. Examples: streaming inference APIs for Large Language Models (LLMs), real-time token-level translation, and intelligent chatbot conversations. Edge acceleration reduces end-to-end latency for token requests. |
When using the Audio/Video On-Demand or Large File Download use cases, we recommend enabling resource abuse protection to prevent malicious resource consumption and avoid unnecessary costs.
When using the API Acceleration or AI Tokens use cases, the system automatically creates optimized configuration rule templates, which you can manually disable. These templates configure cache eligibility and enable smart routing. Note that smart routing is a separately billed feature.
FAQ
Can I import DNS records exported from another CDN?
No. ESA does not support importing CSV files exported from other CDN services because the record value formats differ. You must manually add records and update the CNAME values to the addresses provided by ESA.
Do I need to manually re-add DNS records that are already managed by ESA?
No. DNS records managed by ESA are automatically synchronized. You do not need to manually add these records again in your ESA DNS configuration.
How do I check the current connection configuration for my domain?
In the ESA console, go to . This page displays the current connection mode, business scenario (for example, API acceleration), and CNAME target for your domain. You can use this information to determine whether advanced features such as smart routing are enabled.
Why does my domain return a DNS_PROBE_FINISHED_NXDOMAIN error?
This error indicates a DNS resolution failure. Take the following steps:
Check that the domain name is spelled correctly.
Use the
pingcommand to test network connectivity.