Overview
LoRA is an efficient model fine-tuning technique. It adds new capabilities to pre-trained models such as Stable Diffusion and FLUX without changing the main parameters of the Large Language Model (LLM). FunArt provides a dedicated LoRA training project type (powered by ModelScope).
Advantages of LoRA over full fine-tuning:
Dimension | LoRA training | Full fine-tuning |
Model file size | Typically tens to hundreds of MB | Hundreds of GB |
Training speed | Updates only a small set of adapter parameters. Faster. | Updates all parameters. |
GPU memory usage | Significantly lower. Works on consumer-grade GPUs. | Requires large GPU memory. |
Core principle: LoRA uses low-rank decomposition. It injects two small matrices into a weight matrix to approximate parameter changes. This keeps performance high while reducing trainable parameters for efficient fine-tuning.
Note: You are not charged for GPU usage when no training job runs in a LoRA training project. Costs are lower.
Prerequisites
Log on to the FunArt console.
Enable related services and complete account authorization.
(Optional) If you plan to upload a dataset as a compressed package, configure CORS rules for your OSS bucket first.
1. Create a LoRA training project
In the FunArt console, go to the Projects page. Click Create Project.
Step 1: Select project type
Select LoRA Training (powered by ModelScope).
Step 2: Select GPU type and specifications
In the table, select a GPU specification (such as Ada series 48 GB or Blackwell series 32 GB). After confirming vCPUs, memory, disk, and estimated cost, click Next.
Step 3: Configure other project properties
Project name: Required. Enter a name.
Region: Default is China (Hangzhou). Change as needed.
Storage configuration: Default is Auto-configure. When selected, FunArt creates an OSS bucket under your account. The bucket name starts with serverless, for example
serverless-cn-hangzhou-56ec******5cc076a. This bucket stores your dataset and training data.
Click Next. In Step 4: Confirm and create, review your configuration and deployed resources (Function Compute FC, Object Storage Service OSS, Simple Log Service SLS). Then click Confirm Deployment.
Wait for project setup to complete (about 3–5 minutes). No GPU charges apply during deployment.
2. Prepare your dataset
Data preparation is critical to LoRA model performance.
2.1 Labeled dataset
Image requirements:
Dimension | Requirement |
Quantity | At least 10 images. For best results, use 15–30. |
Quality | Clear subject and balanced composition. Avoid blur, overexposure, or underexposure. |
Consistency | Use uniform image dimensions and aspect ratios. |
Focus | Focus each image on your training goal. Minimize background distractions. |
Labeling note: After uploading images, label them. Labels tell the model what each image contains. LoRA training teaches the model to match image content with your text prompts.
2.2 Upload your dataset
In your project, select Workstation. Use one of these methods to prepare data:
Method 1 (Start training page): On the right side of Start Training, click Drag and drop or click to upload images or Select existing dataset. Upload local images or choose a saved dataset.
Method 2 (Data Management): In Data Management, select a type (Image Dataset or Image Editing Dataset). Click Create Dataset to build and manage it. Then select it when starting training.
If you upload a compressed package, configure CORS for OSS first. For more information, see 5. Configure OSS CORS (optional).
3. Start training and configure parameters
3.1 Go to the training page
In the project list, click your LoRA project name to open project details.
Select Workstation, then go to Start Training.
3.2 Select a model
Select Image Model or Image Editing Model.
Under Base Model, choose a built-in model (such as Qwen Image, FLUX.1-dev, FLUX.1-Ultra HD, Maiju Chaoran, or FLUX.1 Krea) or Custom.
3.3 Set parameters
Parameter | Description | Required |
Using the Base Template | The pre-trained model used for training, such as Note You must use the same base model for inference as you used for training. LoRA models store only the difference from the base model. They must load onto the original base model to work. A mismatched base model causes structural errors, failed loading, or incorrect output. | Yes |
Repeat per image | How many times each image repeats during training. Default is 10. If your dataset is small, increase this value to help the model learn better and avoid overfitting. | No |
Training epochs | How many times the entire dataset passes through the model. After one epoch, the model restarts from the beginning of the dataset. Recommended range is 16–41. Default in the UI is 20. | No |
LoRA model name | Name of the final LoRA model file. | Yes |
Trigger word | A special word used during training to link concepts in your dataset. Use this word to activate the model during inference. | No |
3.4 Advanced parameters (optional)
Click Advanced Parameters to configure these options:
Category | Parameter |
Sample image settings |
|
Save settings |
|
Learning rate & optimizer |
|
Dataset settings |
|
Network settings |
|
Special features | LoRA+, LoRA+ Lambda |
3.5 Submit training
After uploading your dataset and setting parameters, click Start Training. Wait for training to finish.
4. Training and Model Management
4.1 View training jobs
In Training Management, view the list and status of training jobs (e.g., Running, Completed, Failed).
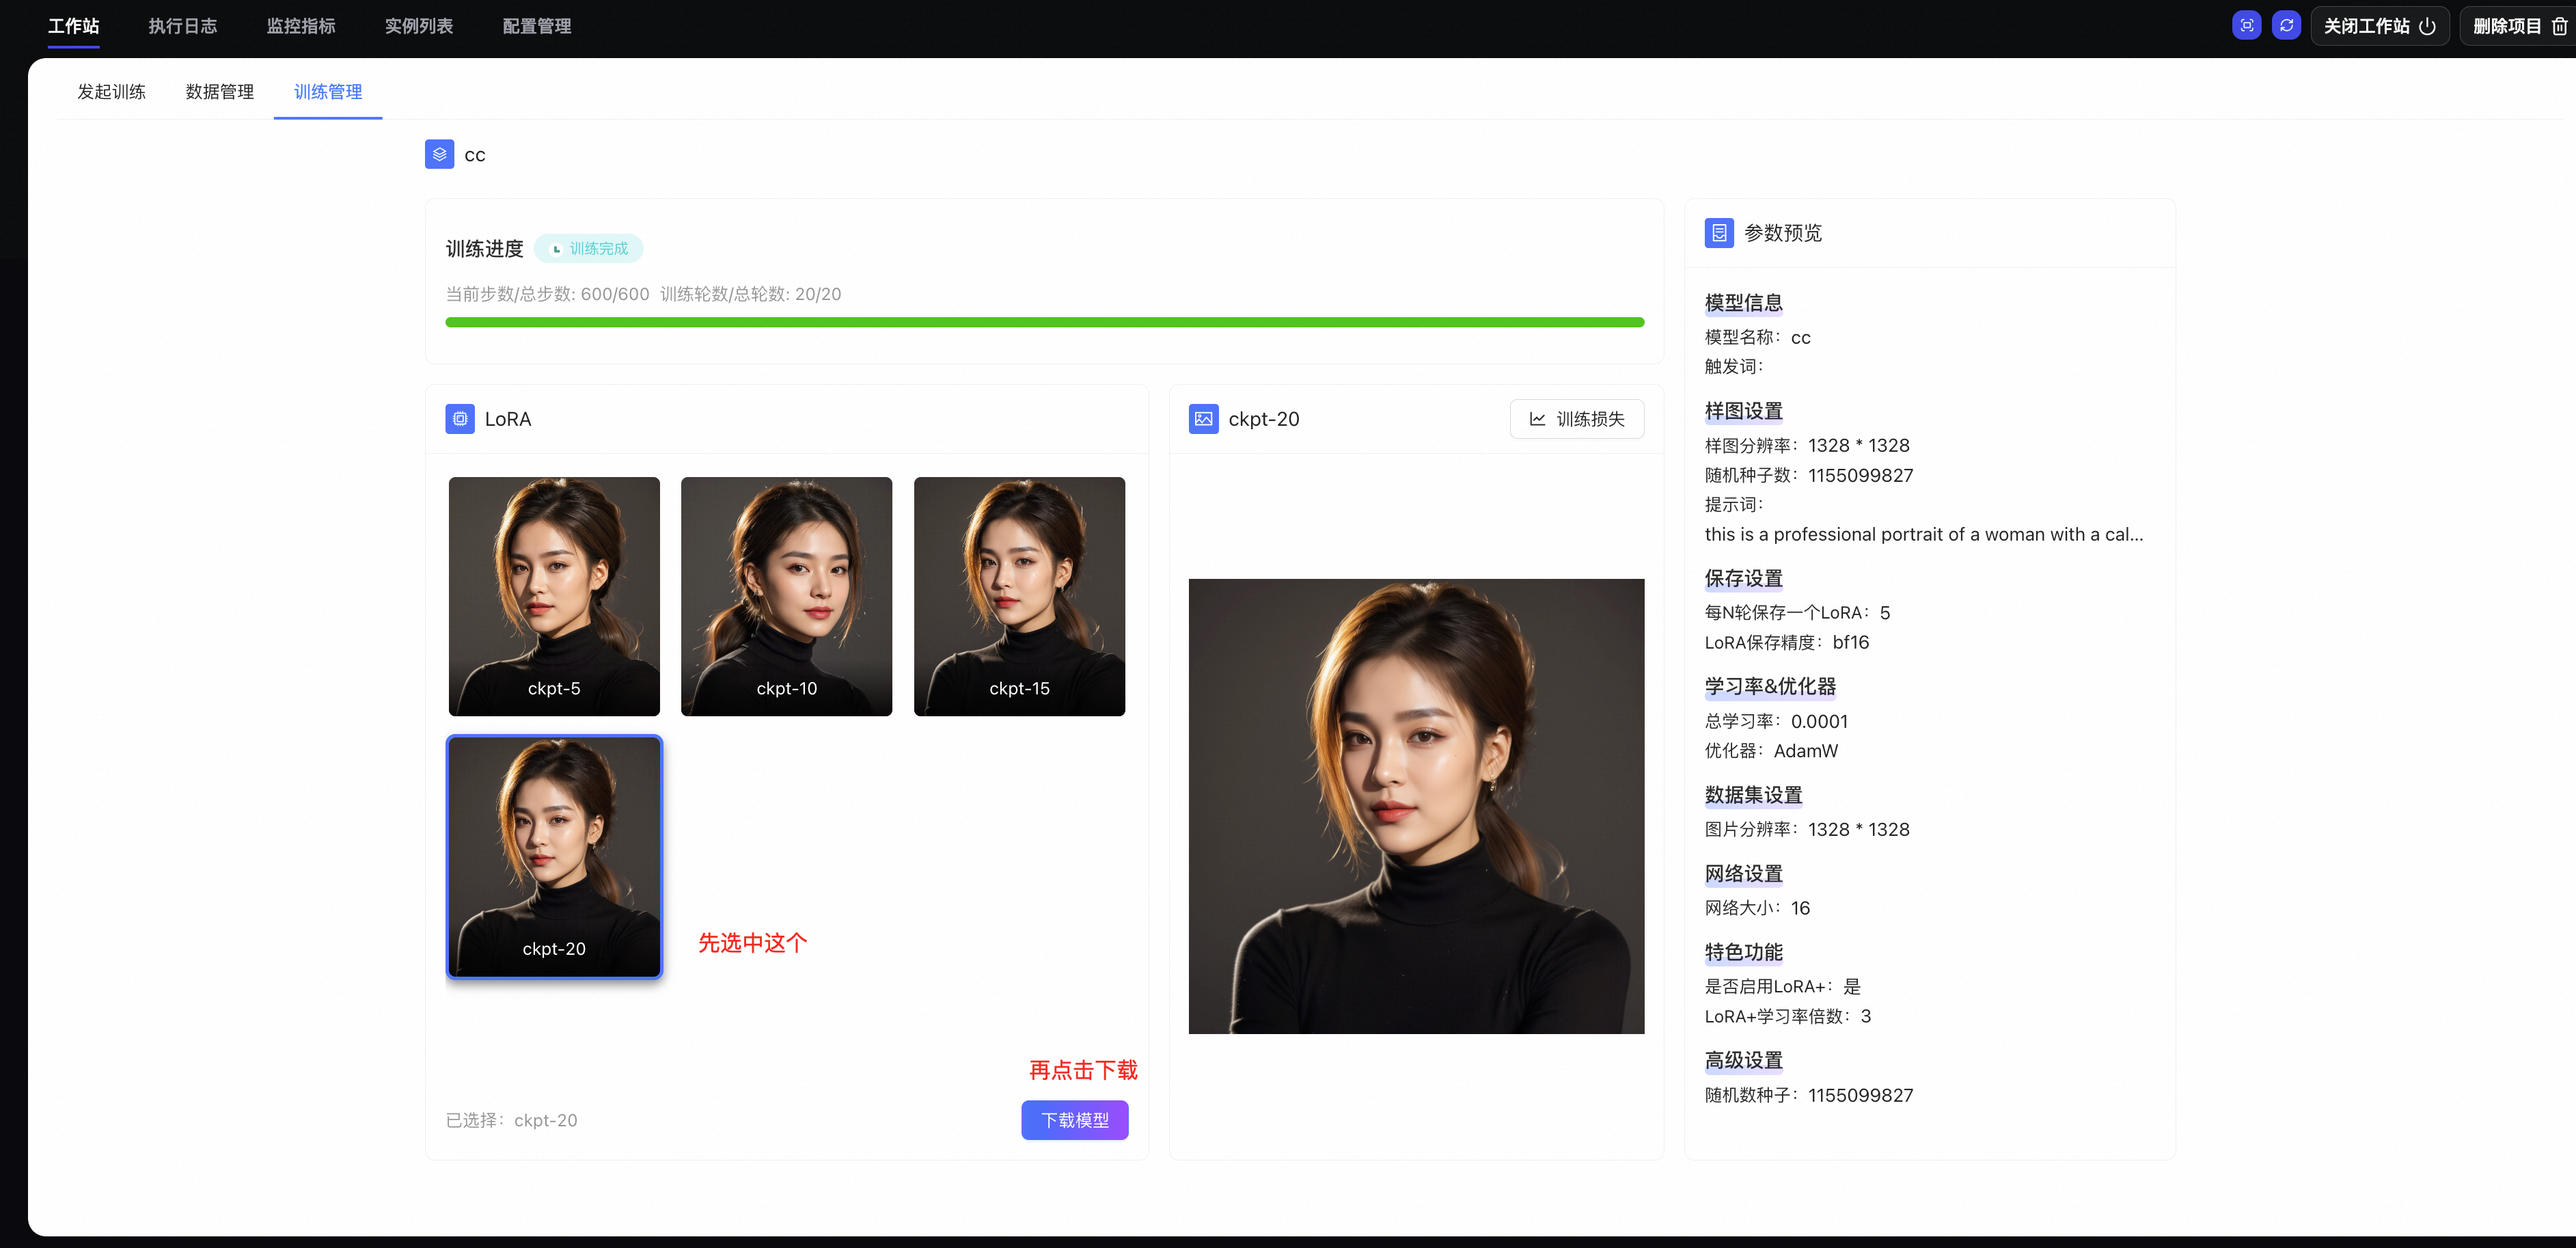
4.2 View and download your LoRA model
After training completes, go to Training Management. Open the corresponding training job to see LoRA model details:
Model name
Model type (LoRA model or foundation model)
Model status (e.g., Completed, Running)
Actions: Download or delete the model
Click Download Model in the model list to save the LoRA model file locally. Load it later in ComfyUI.
4.3 Use your LoRA model in a ComfyUI project
Place the downloaded LoRA model file in the directory of the ComfyUI project (such as models/loras), and you can then load the model and run inference in the ComfyUI interface.
5. Configure OSS CORS (optional)
If you upload your dataset as a compressed package, configure CORS rules for your OSS bucket. Without this, uploads may fail.
Procedure:
Log on to the Object Storage Service OSS console.
Select your bucket. Go to .
Click Create Rule. Use these recommended values:
Configuration item
Recommended value
Source
*.devsapp.net(replace with your actual domain)Allowed Methods
GET, POST, PUT, DELETE, HEAD
Allowed Headers
*Exposed Headers
ETagCache time
0
Save the rule.
Summary
A complete LoRA training workflow includes:
Create a project: In the FunArt console, create a LoRA training project. Select GPU specs and complete deployment.
Prepare data: Label your dataset correctly. Use consistent image dimensions and aspect ratios. Use at least 10 images. For best results, use 15–30.
Start training: Choose a base model and set parameters (LoRA model name, trigger word, etc.). Upload or select your dataset. Then start training.
Manage models: In Training Management, check job status. In Model Management, download your LoRA model.
Use in ComfyUI: Place the LoRA file in the ComfyUI
models/lorafolder. Build your workflow using nodes such as Load Checkpoint and LoRA Loader. Use the trigger word in your prompt for inference.