This topic describes how to integrate an audio-video agent into your HarmonyOS Next application using the ApsaraVideo Real-time Communication software development kit (SDK).
Prerequisites
DevEco Studio 5.0.3.900 Release or later.
HarmonyOS NEXT SDK for API Version 12 or later.
A HarmonyOS device running HarmonyOS NEXT 5.0.0.102 (for API Version 12) or later, with the Allow debugging option enabled.
You have registered a Huawei developer account and completed identity verification.
Business flow
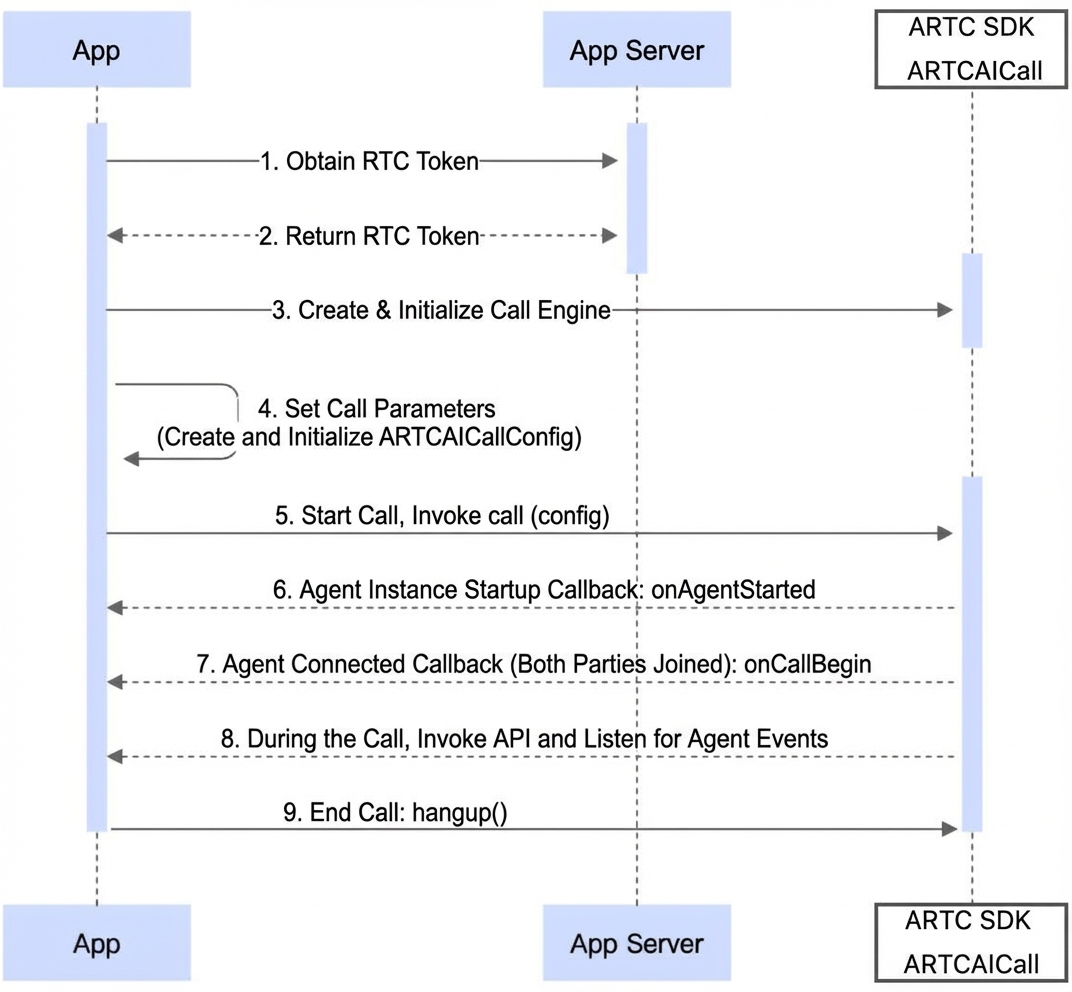
Your application uses your AppServer (your business server) to generate an ApsaraVideo Real-time Communication (ARTC) authentication token. You can then call the callWithConfig(config) method to start a call. During the call, you can also call other ARTCAICall APIs to implement interactive features for the agent, such as real-time captions and interruptions. ARTCAICall is an API for Real-time Conversational AI provided by the ARTC SDK (@aliyun_video_cloud/alivcsdk_artc) and is suitable for agent call scenarios.
Integrate the SDK
We recommend that you automatically integrate @aliyun_video_cloud/alivcsdk_artc by configuring it in the oh-package.json file under entry:
"dependencies": {
    "@aliyun_video_cloud/alivcsdk_artc":"x.y.z",
}
After you add the configuration, click the Sync Now button to install the SDK.
@aliyun_video_cloud/alivcsdk_artc supports manual integration. For more information about the latest version number and manual integration instructions, see Manual SDK Integration.
SDK developer guide
Step 1: Request audio and video permissions for the app
In the module.json file of the entry module, configure the long-term background mode for the application and add permissions for the microphone, camera, and long-term background tasks.
...
"abilities": [
  {
    "name": "xxx",
    "backgroundModes": [
      "audioPlayback",
      "audioRecording",
      "dataTransfer"
    ],
    ...
  }
],
"requestPermissions": [
  {
    "name": "ohos.permission.MICROPHONE",
    "reason": "$string:module_desc",
    "usedScene": {
      "abilities": [
        "EntryAbility"
      ],
      "when": "always"
    }
  },
  {
    "name": "ohos.permission.CAMERA",
    "reason": "$string:reason_camera",
    "usedScene": {
      "abilities": [
        "EntryAbility"
      ],
      "when": "always"
    }
  },
  {
    "name": "ohos.permission.KEEP_BACKGROUND_RUNNING",
    "reason": "$string:keep_background",
    "usedScene": {
      "abilities": [],
      "when": "always"
    }
  }
]
Before starting a call, you must check the authorization status. If the required permissions have not been granted, your application must display a dialog box to prompt the user for authorization.
const permissions: Array<Permissions> = ['ohos.permission.MICROPHONE','ohos.permission.CAMERA','ohos.permission.KEEP_BACKGROUND_RUNNING'];
function reqPermissionsFromUser(permissions: Array<Permissions>, context: common.UIAbilityContext): void {
  let atManager: abilityAccessCtrl.AtManager = abilityAccessCtrl.createAtManager();
  // requestPermissionsFromUser checks the authorization status of permissions to determine whether to display a pop-up window.
  atManager.requestPermissionsFromUser(context, permissions).then((data) => {
    let grantStatus: Array<number> = data.authResults;
    let length: number = grantStatus.length;
    for (let i = 0; i < length; i++) {
      if (grantStatus[i] === 0) {
        // The user grants the permission. You can proceed with the target operation.
      } else {
        // The user denies the permission. Prompt the user that the permission is required to access the feature on the current page and guide the user to the system settings to grant the permission.
        return;
      }
    }
    // Permissions granted.
  }).catch((err: BusinessError) => {
    console.error(`Failed to request permissions from user. Code is ${err.code}, message is ${err.message}`);
  })
}
Step 2: Import ARTCAICall-related classes
Import the required ARTCAICall classes and interfaces from @aliyun_video_cloud/alivcsdk_artc.
import {
  ARTCAICallEngineListener,
  ARTCAICallEngineInterface,
  ARTCAICallEngineFactory,
  ARTCAICallAgentType,
  ARTCAICallConfig,
  ARTCAICallUtils,
  ARTCAICallRTCTokenHelper,
  ARTCAICallLog,
  ARTCAICallLogType,
  ARTCAICallErrorCode,
  ARTCAICallConnectionStatus,
  ARTCAICallAgentState,
  ARTCAICallNetworkQuality,
  ARTCAICallAgentSubtitleResult,
  ARTCAICallUserSubtitleResult,
  ARTCAICallSpeakingInterruptedReason,
  RecordValueType,
  ARTCAICallAgentVcrResult,
  ARTCAICallAudioAccompanyState,
  ARTCAICallAudioAccompanyErrorCode,
  ARTCAICallViewConfig,
  ARTCAICallVideoConfig,
  ARTCAICallAgentInfo,
} from '@aliyun_video_cloud/alivcsdk_artc';
Step 3: Create & Initialize the Engine
Create and initialize the ARTCAICallEngine DPI engine. The following code provides an example:
// Define the engine interface.
private aiCallSDK: ARTCAICallEngineInterface | undefined = undefined;

// Create the engine.
this.aiCallSDK = ARTCAICallEngineFactory.createEngine(getContext(this));
Step 4: Implement callback methods
Implement the required DPI engine callback methods. For more information about the DPI engine callback API operations, see API Operation Details.
const listener = new ARTCAICallEngineListener();
listener.onErrorOccursCallback = (code: ARTCAICallErrorCode) => {
  // An error occurred.
  this.handup()
};
listener.onCallBeginCallback = () => {
  // The call starts. You can print the agent instance information here for troubleshooting.
  const agentInfo = this.aiCallSDK?.agentInfo!;
  ARTCAICallLog.writeLog(ARTCAICallLogType.Info, `onCallBeginCallback: AgentInfo {
        instanceId: ${ agentInfo.instanceId },
        agentId: ${ agentInfo.agentId },
        agentType: ${ agentInfo.agentType },
        channelId: ${ agentInfo.channelId },
        uid: ${ agentInfo.uid },
        requestId: ${ agentInfo.requestId },
        region:, ${ agentInfo.region }
      }`);
};
listener.onCallEndCallback = () => {
  // The call ends.
};
listener.onAgentStateChangedCallback = (state: ARTCAICallAgentState) => {
  // The agent state changes.
};
listener.onUserSubtitleNotifyCallback = (data: ARTCAICallUserSubtitleResult) => {
// Notification for the result of the agent detecting the user's question.
};
listener.onVoiceAgentSubtitleNotifyCallback = (data: ARTCAICallAgentSubtitleResult) => {
  // Notification for the agent's answer.
};

listener.onVoiceInterruptedCallback = (enable: boolean) => {
  // Specifies whether voice interruption is enabled for the current call.
};
...

this.aiCallSDK.listener = listener;
Step 5: Create and initialize ARTCAICallConfig
For more information about ARTCAICallConfig, see the ARTCAICallConfig API reference.
private agentType: ARTCAICallAgentType = ARTCAICallAgentType.VoiceAgent

const aiCallConfig = new ARTCAICallConfig();
aiCallConfig.agentId = 'xxx';              // The agent ID.
aiCallConfig.agentType = this.agentType;   // The agent type.
aiCallConfig.region = 'xx-xxx';            // The region where the agent service is located.
aiCallConfig.userId = 'xxx';               // Use the ID of the user who has logged on to your app.
aiCallConfig.userJoinToken = 'xxxxxxxxx';  // The RTC token.

// For visual understanding and video calls, you must set the video configuration.
// Here, frameRate is set to 5. Adjust this value based on the agent's frame sampling rate on the console (usually 2). The maximum recommended value is 15 fps.
// bitrate: If frameRate is greater than 10, you can set bitrate to 512.
if (this.agentType === ARTCAICallAgentType.VisionAgent || this.agentType === ARTCAICallAgentType.VideoAgent) {
  const videoConfig = new ARTCAICallVideoConfig();
  videoConfig.useFrontCameraDefault = true;
  videoConfig.frameRate = 5;
  videoConfig.bitrate = 340;
  this.aiCallSDK.videoConfig = videoConfig;
}
Region Name | Region ID |
China (Hangzhou) | cn-hangzhou |
China (Shanghai) | cn-shanghai |
China (Beijing) | cn-beijing |
China (Shenzhen) | cn-shenzhen |
Singapore | ap-southeast-1 |
Step 6: [Optional] Create and initialize the rendering view
If the agent is not a voice call agent, you need to preview the local camera feed or render the remote digital human.
private localViewConfig = new ARTCAICallViewConfig();
private agentViewConfig = new ARTCAICallViewConfig();

// For digital human and video call agent types, add an XComponent in the Builder for agent preview.
XComponent({
  id: 'Agent_XComponent',
  type: XComponentType.SURFACE,
  controller: this.agentViewConfig.controller
})

// For visual understanding and video call agent types, add an XComponent in the Builder for local capture preview.
XComponent({
  id: 'Local_XComponent',
  type: XComponentType.SURFACE,
  controller: this.localViewConfig.controller
})


// For digital human and video call agent types, set the digital human view for rendering. This must be called after the XComponent is loaded.
if (this.agentType === ARTCAICallAgentType.AvatarAgent || this.agentType === ARTCAICallAgentType.VideoAgent) {
  this.aiCallSDK.setAgentViewConfig(this.agentViewConfig);
}
// For visual understanding and video call agent types, set the local view for rendering. This must be called after the XComponent is loaded.
if (this.agentType === ARTCAICallAgentType.VisionAgent || this.agentType === ARTCAICallAgentType.VideoAgent) {
  this.aiCallSDK.setLocalViewConfig(this.localViewConfig);
}
Step 7: Start an agent call
Call the callWithConfig method to start an agent call.
const result = this.aiCallSDK.callWithConfig(aiCallConfig);
if (result === true) {
  // Success.
}
Step 8: Implement in-call services
After you start a call, you can handle captions, interrupt the agent, and perform other operations based on your business needs.
Step 9: End the call and hang up
Call the handup() method to end the agent call.
handup = () => {
  if (this.aiCallSDK === undefined) {
    return;
  }
  this.aiCallSDK.handup(true);
  this.aiCallSDK = undefined;
}