IoT Edge provides a built-in driver feature that lets you build drivers into gateways. You can manage driver files locally, configure driver information in the cloud, and then deploy the drivers to the edge.
Prerequisites
The built-in driver must comply with the IoT Edge driver specifications. For more information about developing a compliant driver, see Driver development.Background information
IoT Edge provides a built-in driver feature that lets you build drivers into gateways. You can then configure and deploy driver description information, such as the driver name, programming language, runtime environment, and hardware architecture, along with channel and device configurations in the cloud.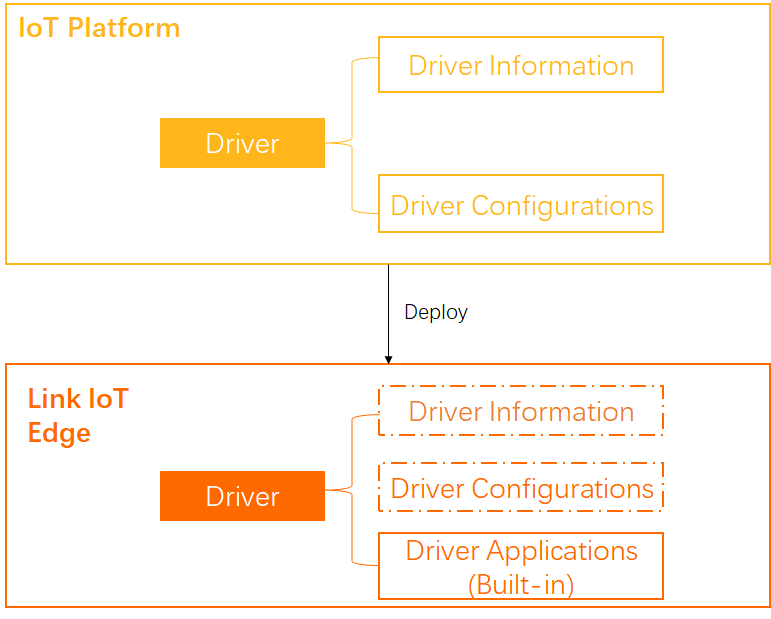
Cloud operations
- Log on to the Link IoT Edge console. In the navigation pane on the left, click Driver Management.
- On the Driver Management page, on the Custom Drivers tab, click Create Driver.
- On the Create Driver page, set the driver parameters.
- Driver information
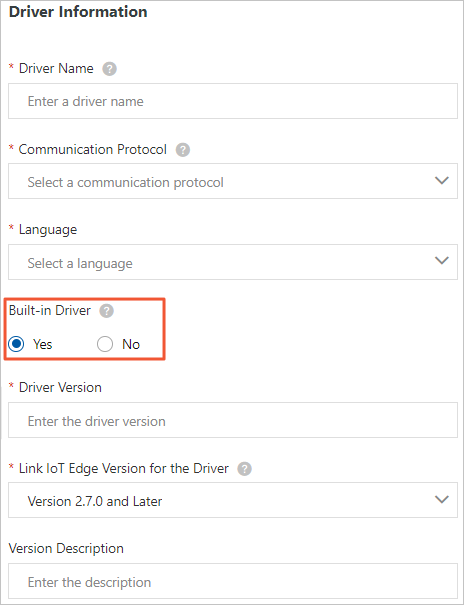
Table 1. Driver information parameters Parameter Description Driver NameA custom name for the driver. The name can contain uppercase letters, lowercase letters, digits, and underscores (_). It must start with a letter and be no more than 20 characters long.Communication Protocol TypeThe industry-standard communication protocol that the driver development depends on. Supported protocol types are Modbus, OPCUALoRa WANand Custom.Language typeThe programming language of the driver. Supported languages are Node.js 8, Python 3.5, C, and Java 8.If you select C, you must also select the CPU Architecture for the driver.
Built-in driver Select whether to build in the driver file. - Yes: You do not need to upload the driver file. The local built-in driver is used.
- No: You need to upload the driver file and deploy the driver directly through the cloud deployment channel. For more information, see Cloud publishing.
For built-in publishing, you must select Yes.
Driver VersionSet the version of the driver. The version number must be unique for the driver. You cannot set the same version number for two versions of the same driver.Compatible Edge VersionSelect the compatible edge version. The driver can run only on gateways of this version or later.Driver Version DescriptionA description of the driver you are creating. This can be left empty. - Driver Configuration
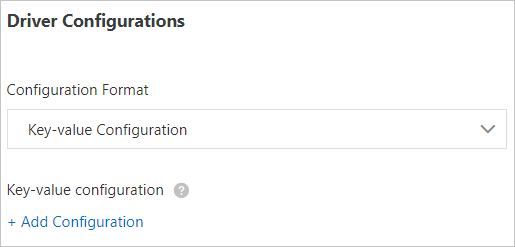
Table 1. Driver configuration parameters Parameter Description Configuration format The configuration format can be one of the following: - Key-value pairs
- JSON format
- Configuration file
Key-value pair table Configuration format is set to Key-value pairs. Click Add Configuration and set Configuration Name, Value, and Comment to configure the driver.
You can add up to 100 key-value pairs.
Configuration content Configuration format is set to JSON format. Enter the configuration content in JSON format. The content size cannot exceed 1 KB. The system automatically validates the format as you type. If the format is incorrect, follow the system prompts to correct it.
Upload configuration file Configuration format is set to Configuration file. You must create a configuration file on your local machine and upload it. For information about how to create a configuration file, see Driver encoding.
- Container Configuration
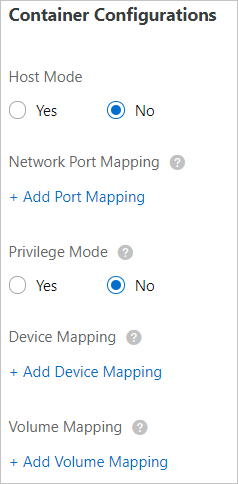
Parameter Description Use Host Network Specifies whether to isolate the container's network and use the host network environment directly. - Yes: The container's network is not isolated. The host network is used directly.
- No: The container's network is isolated. You must configure Port Mapping.
Port Mapping This parameter appears when Use Host Network is set to No. The network environment of the function is completely isolated from the host environment. Through port mapping, you can map the listening port of the function in the container to a port on the host. This allows client programs on different hosts to access the service provided by the function. You can map up to 10 network ports. For example, the
fc-http-serverfunction runs in a container on the host and provides services on port 80. In this case, client programs on other hosts cannot access thefc-http-serverfunction by accessing port 80 of the host. Therefore, you need to map the container port of thefc-http-serverfunction to a port on the host. For example, map port 80 in the container to port 8080 on the host. This allows client programs on other hosts to access thefc-http-serverfunction in the container by accessingHost IP address:8080.Enable Privileged Mode The root user in a container is actually a regular user on the host. To perform operations that require root permissions inside the container, such as modifying the system time or using the mount command, you must grant the container privileged mode.
Note In privileged mode, the container has root permissions on the host. All host devices are mapped to the container by default. You do not need to configure Device Mapping.Device Mapping This parameter appears when Enable Privileged Mode is set to No. The device management system is completely isolated from the host environment. When a function needs to access a host device, such as a serial port, you must map the device to the container where the function runs. You can add up to 10 device mappings. Volume Mapping The file system is completely isolated from the host environment. When a function needs to access a host file, you must map the file to the container where the function runs. You can add up to 10 volume mappings. Memory Limit Set the maximum memory for the container. - If the container's memory usage exceeds the limit, the container is restarted.
- If the memory limit is too small, the application in the container may fail to run.
The default memory is 1024 MB. Increase the memory limit based on the size of the application in the container.
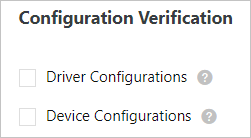
- Configuration Validation

Table 3. Configuration validation parameters Parameter Description Driver Configuration If you select this option, you must set the Driver Configuration after you assign the driver to an edge instance and associate a sub-device. Only then can you deploy the driver to the edge instance. Device Configuration If you select this option, you must set the Device Configuration after you assign the driver to an edge instance and associate a sub-device. Only then can you deploy the driver to the edge instance.
- Driver information
- After you set the parameters, click Confirm. The driver that you created appears in the Custom Drivers list.
Hover over the driver name to view its ID. Click Copy and save the driver ID. You will need this driver ID for a later step.

Edge-side operations
IoT Edge provides the led_driver sample driver. For more information, see the led_driver source code. You can use the sample driver to test the built-in driver feature.
- Create an edge instance and bring the gateway online. For more information, see Set up the environment.
- Log on to the gateway and run the following command to create the main directory for built-in drivers.
sudo -E mkdir -p /linkedge/pre-installed/ - Run the following command to create a folder for the built-in driver. Place the driver and its dependency libraries into this directory.
sudo -E mkdir -p /linkedge/pre-installed/{your_driver_name}/In the command, {your_driver_name} is the name of your driver. For example, if the driver name is led_driver, the command is as follows.
sudo -E mkdir -p /linkedge/pre-installed/led_driver/ - Verify that the following dependency tools for the built-in driver are installed on the gateway.
Tool Name Purpose sed A tool for finding and replacing content in text files. jq A tool for parsing JSON files. base64 A Base64 encoding tool. - (Optional) If the sed, jq, and base64 tools are not installed on the gateway, perform the following steps to ensure that the built-in driver shell script tool runs correctly.
- Go to the IoT Edge default configuration directory.
cd /linkedge/gateway/build/config/config-manager - Open the config_default.json file and find the config entry.
- Under the config entry, add the following
key:valuepair.{ "config": { "gw_drivercode_{your_driver_id}": "{your_driver_path}", } }In the code, {your_driver_id} is the driver ID that you saved in the Cloud operations section, and {your_driver_path} is the Base64-encoded path of the built-in driver folder.
For example, if the driver ID is f16f13322**********3959cf3 and the built-in driver folder path is /linkedge/pre-installed/led_driver/, the Base64-encoded path is L2xpbmtlZGdlL3ByZS1pbnN0YWxsZWQvbGVkX2RyaXZlcg==. The actual
key:valuepair to add is as follows.{ "config": { "gw_drivercode_f16f13322**********3959cf3": "L2xpbmtlZGdlL3ByZS1pbnN0YWxsZWQvbGVkX2RyaXZlcg==", } }
- Go to the IoT Edge default configuration directory.
- In the built-in driver folder, download and decompress the built-in driver shell script tool.The directory structure after you decompress the script tool is as follows.
. └── led_driver |—— pre-installed.sh |—— lib └── main - Go to the built-in driver directory and run the built-in driver shell script tool.
cd /linkedge/pre-installed/{your_driver_name}/
sudo -E ./pre-installed.sh {your_driver_id} --default
In the command, {your_driver_name} is the driver name, and {your_driver_id} is the driver ID that you saved in the Cloud operations section.
For example, if the driver name is led_driver and the driver ID is f16f13322**********3959cf3, the actual commands to run are as follows.
cd /linkedge/pre-installed/led_driver/ sudo -E ./pre-installed.sh f16f13322**********3959cf3 - Assign the built-in driver to an edge instance and deploy the instance. This completes the process of building in the driver on the edge. For more information, see Debug drivers.
FAQ
Q: After the built-in driver shell script runs, why is the device not online?
A: You must configure the driver in the cloud and deploy it to the gateway for the associated sub-device to go online.
Related operations
- Log on to the IoT Edge console.
- In the navigation pane on the left, click Driver Management.
- On the Driver Management page, on the Custom Drivers tab, click Version Management in the Actions column for the desired driver.
- In the Version Management dialog box, click the action buttons to manage the driver's version information.
Action Description Add Version Click Add Version to add a new version for the driver. For detailed instructions and parameter descriptions, see the Cloud operations section in this topic. Publish Click Publish. In the Confirm Publish Driver Version dialog box that appears, confirm the driver information and click Publish. Note After a driver version is successfully published, you cannot delete it. You can only view or download it.Edit This button is available only when the driver version status is Unpublished. Click Edit to modify the information for this driver version. For parameter descriptions, see the Cloud operations section in this topic. Download Click Download to download the driver file for this version. Delete This button is available only when the driver version status is Unpublished. Click Delete to delete this driver version. View This button is available only when the driver version status is Published. Click View to view or modify the information for this driver version. For parameter descriptions, see the Cloud operations section in this topic. - (Optional) Click List in the Actions column for the driver to publish your custom driver as a product in the IoT Marketplace. For more information about how to publish a driver, see Driver marketplace.
- After you publish the driver in the cloud, you can assign it to an edge instance and associate a sub-device. Then, deploy the edge instance to deploy the driver and sub-device to the edge. For more information, see Debug drivers.
