Cloud scene orchestration
Scene orchestration rules provide a visual way to program automated business logic. You can trigger these rules based on device conditions or time. When the conditions are met, the rule executes predefined business logic and can send data to devices or other rules. This lets you orchestrate scenes for multiple devices.
Prerequisites
You have created an edge instance. For more information, see Set up the environment.Create a scene orchestration rule
- Log on to the IoT Platform consolePublic Instance
- In the navigation pane on the left, choose .
- Click Create Rule.
- Set the parameters and click Confirm.
Parameter Description Rule Name The name of the rule. The name can contain Chinese characters, letters, digits, underscores (_), and hyphens (-). The name must be 1 to 30 characters in length. A Chinese character is counted as two characters. Rule Description The description of the rule. This parameter is optional. - After you create the rule, click Go to Edit in the dialog box that appears to configure the scene orchestration rule.You can also click View next to the rule name to configure the scene orchestration rule.
For example, you can create a rule to automate an air conditioner. If a temperature sensor reports an indoor temperature below 16 degrees Celsius between 12:00 and 23:59, the air conditioner turns on and is set to 26 degrees Celsius.
The following figure shows the parameter settings.
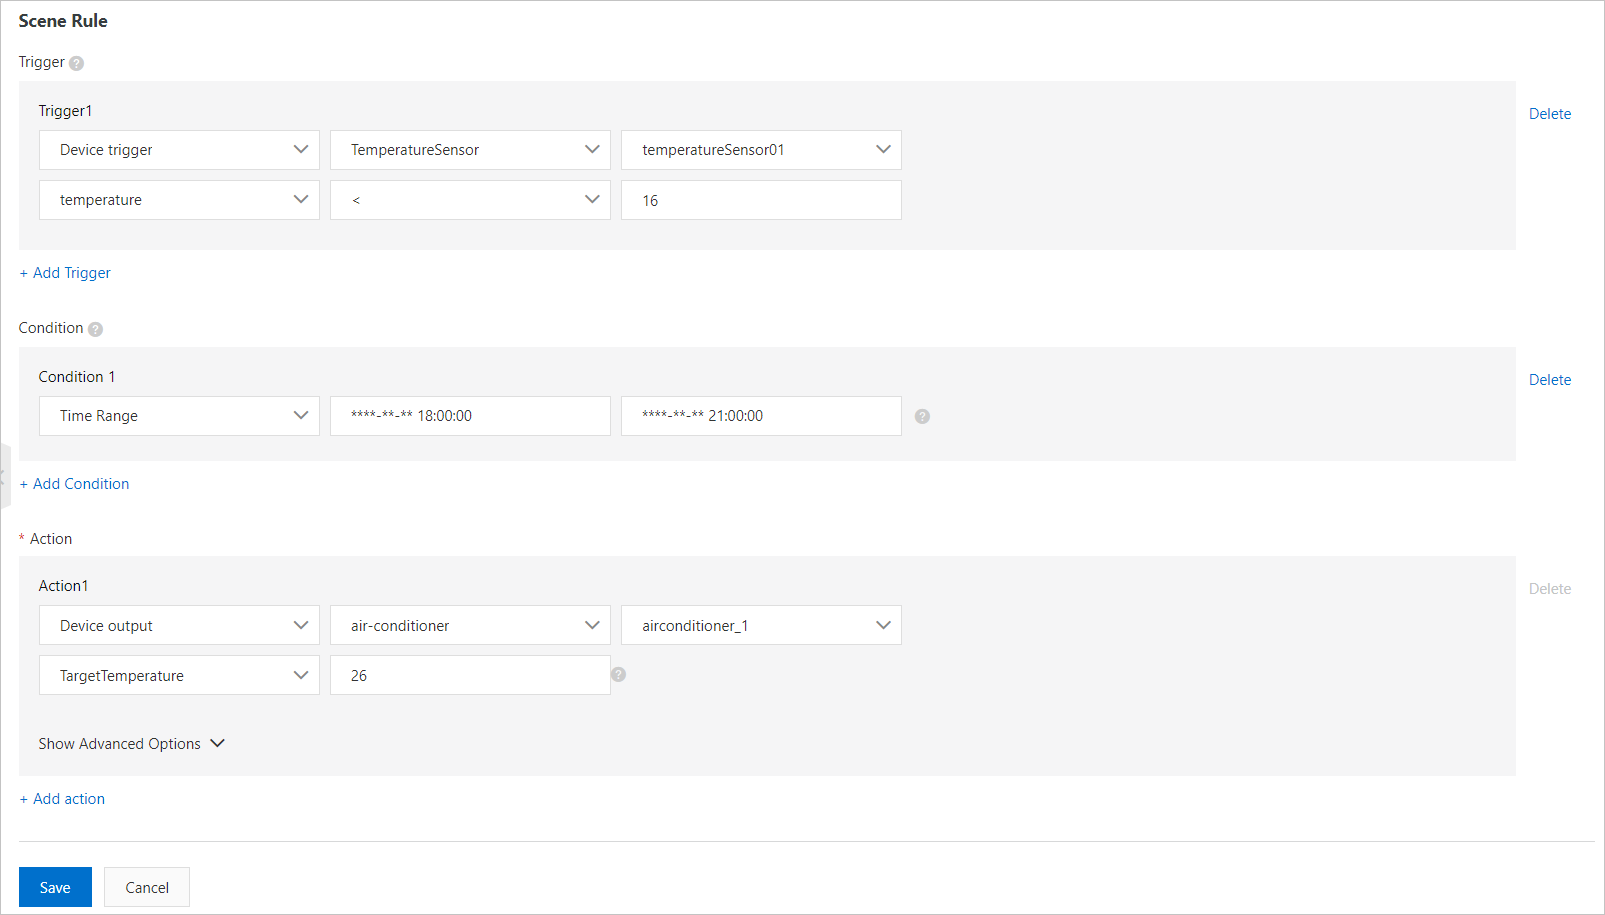
Click Edit in the upper-right corner of the page to change the rule name. The following table describes the other parameters.
Parameter Description Trigger The entry point of the rule. You can set the trigger to Device Trigger or Scheduled Trigger. When the data reported by a device or the current time meets the trigger conditions, the rule checks the execution conditions. You can create multiple triggers for a rule. The triggers are evaluated with a logical OR. - If you select Device Trigger, select a product, a device (one or all), and a property (one or all) or event (one or all).
- If you select Scheduled Trigger, specify a time point. The time point must be in the format of a cron expression. A cron expression consists of Minute, Hour, Day, Month, and Day of week (0 or 7 for Sunday, 1 to 6 for Monday to Saturday). Each field is separated by a space. For example, the cron expression for 18:00 every day is
0 18 * * *. The asterisk (*) is a wildcard character. The cron expression for 18:00 every Friday is0 18 * * 5. For more information about how to write cron expressions, see the CRONTAB website.In the preceding example, the trigger is set to Device Trigger. The trigger is activated when a temperature sensor reports an indoor temperature below 16 degrees Celsius.
Execution Conditions A set of execution conditions. Only data that meets the execution conditions can trigger actions. You can set the condition to Device Status or Time Range. You can create multiple execution conditions for a rule. The conditions are evaluated with a logical AND. - If you select Device Status, select a product, a device of the product, and a property or event of the device.
- If you select Time Range, set a start time and an end time. The format is
yyyy-mm-dd hh24:mi:ss.
In the preceding example, the condition is set to Time Range. The action is triggered if the time is between 12:00 and 23:59.
Actions The actions to perform. You can set multiple actions. If one action fails, the other actions are not affected. - If you select Device Output, select a product, a device of the product, and a property or service of the device. Only writable properties or services can be set as actions. When the trigger and execution conditions are met, the actions defined for the device property or service are performed.
- If you select Rule Output, nest another rule. This calls the other rule. The trigger of the called rule is skipped. The execution conditions of the called rule are checked directly. If the execution conditions are met, the actions defined in the called rule are performed.
For example, if the called rule is Rule A, the trigger of Rule A is skipped. The execution conditions of Rule A are checked. If all execution conditions of Rule A are met (multiple conditions are evaluated with a logical AND), the actions of Rule A are performed.
- If you select Function Output, select a created function. When the trigger and execution conditions are met, the selected function runs. For more information about how to create a function, see Create a function.
- If you select Alert Output, associate the scene orchestration rule with Alert Center. When the trigger and execution conditions are met, an alert is triggered. Click Alert Center to go to Alert Center and set alert rules. For more information, see Alert Center.
In the preceding example, the action is set to Device Output. The specified air conditioner is set to a temperature of 26 degrees Celsius.
Delayed Execution This parameter is available after you expand the advanced options. After you set a delay time, the actions are executed after the delay. The value can be from 0 to 86400 seconds.
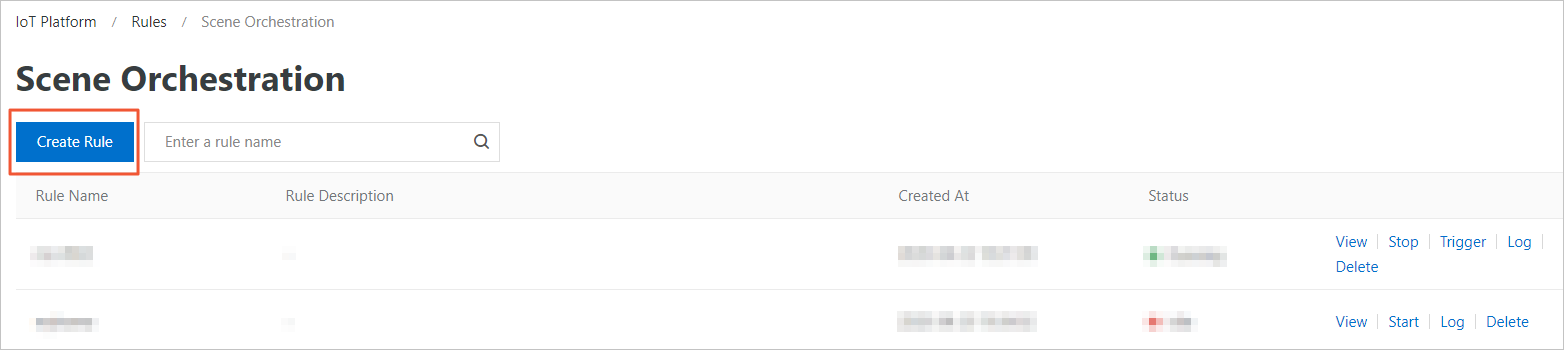
Run a scene orchestration rule
After you create a scene orchestration rule, you can start it on the Scene Orchestration page.
To start a scene orchestration rule:
- In the IoT Platform consolePublic Instance page, in the navigation pane on the left, select .
- Find the rule that you want to start and click Start in the Actions column. The rule status changes to Running.

After you start the rule:
- If the rule runs in the cloud, configure message routing for the devices in the rule. This allows device properties and events to be sent to IoT Hub. For more information, see Configure message routing.
- If the rule runs on the edge, you must first click Stop to stop it from running in the cloud. Then, assign the rule to an edge instance. For more information, see Other operations in this topic.
View logs
You can view the logs of a scene orchestration rule to check the execution results.
- On the Public InstanceIoT Platform console in the navigation pane on the left.
- Find the rule whose logs you want to view and click Log in the Actions column.
- Click Details to view the details of the log entry.
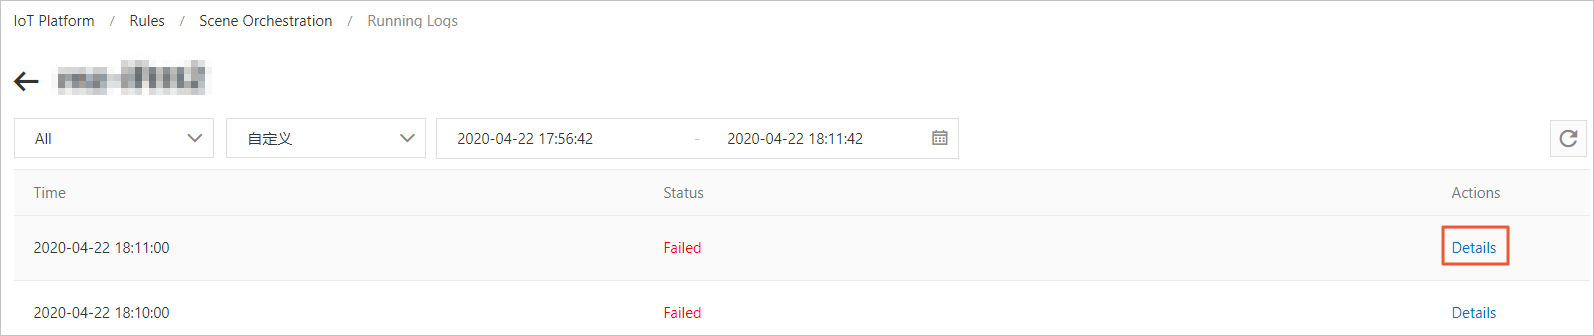 Note If the Execution Status of a log entry is Failed, click Details in the Actions column to view the details about the failure.
Other scene orchestration operations
- Delete a scene orchestration rule:
- On the Scene Orchestration tab, find the rule that you want to delete.
- Click Delete next to the rule name. In the dialog box that appears, click Confirm.
- Trigger a scene orchestration rule manually:
The Trigger button appears only after you click Start for the rule.
- On the Scene Orchestration tab, find the started rule that you want to trigger.
- Click Trigger next to the rule name. This manually triggers the rule once. The configured triggers are ignored, and all execution conditions and actions are performed directly.
- Run a scene orchestration rule in an edge instance: Follow these steps to deploy a scene orchestration rule to an edge instance.Important Make sure that the scene orchestration rule is stopped in the cloud.
- Log on to the Link IoT Edge console. In the navigation pane on the left, click Edge Instances. Find the edge instance that you created in the Prerequisites section and click View.
- On the Instance Details page, choose the Scene Orchestration tab and click Assign Scene.
- In the Assign Scene dialog box, click Assign next to the rule that you want to assign. Then, click Close.
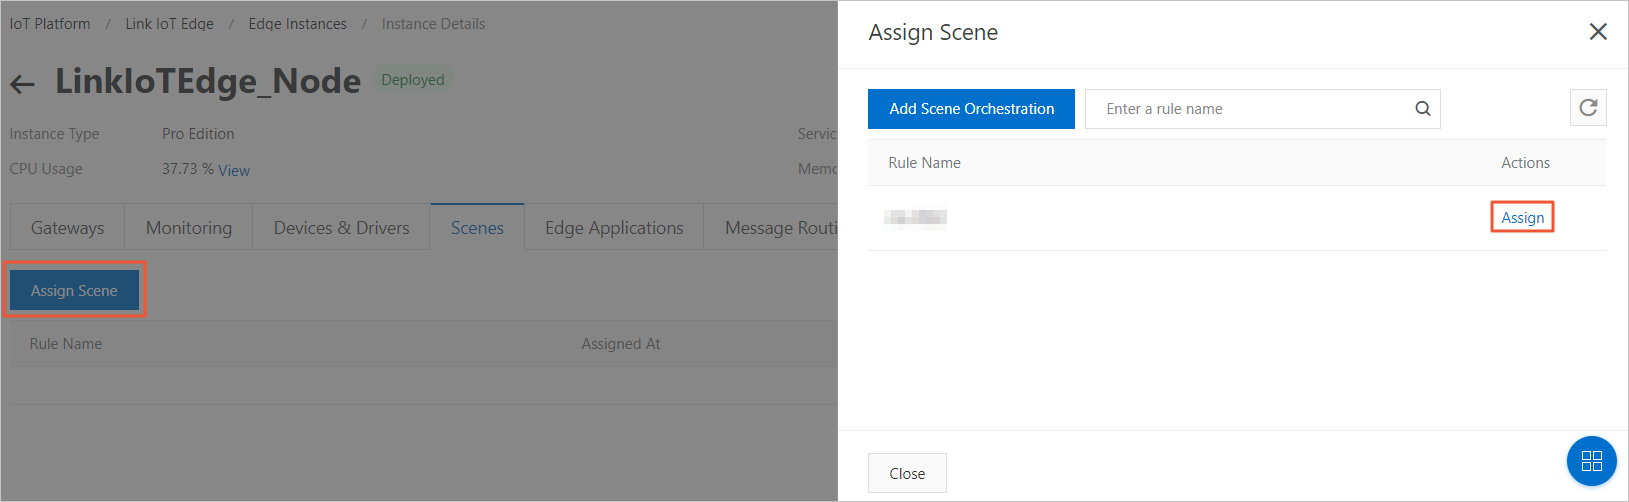
- After you assign the scene orchestration rule, redeploy the edge instance.