Connect to a cloud gateway using Chinese cryptographic algorithms
This topic describes how to use LinkSDK to connect to an MQTT cloud gateway using Chinese cryptographic algorithms.
Background information
Chinese cryptographic algorithms are a set of cryptographic algorithms developed and published by the State Cryptography Administration. Also known as commercial cryptography, these algorithms provide encryption, decryption, and authentication to secure information transmission in fields such as finance and healthcare. Internet of Things (IoT) devices can use Chinese cryptographic algorithms to connect to Alibaba Cloud IoT Platform through an MQTT cloud gateway.
Prerequisites
You have purchased an Enterprise Edition instance.
You have installed the open source Chinese cryptographic library Tongsuo.
You have created an MQTT cloud gateway and deployed an SM certificate.
You have obtained the device credentials (Username, Password, and ClientID).
You have downloaded the C LinkSDK Extended SDK.
Procedure
The following sequence diagram shows the connection process that uses Chinese cryptographic algorithms. This topic uses the demos/device_gmssl_demo.c device application as an example.
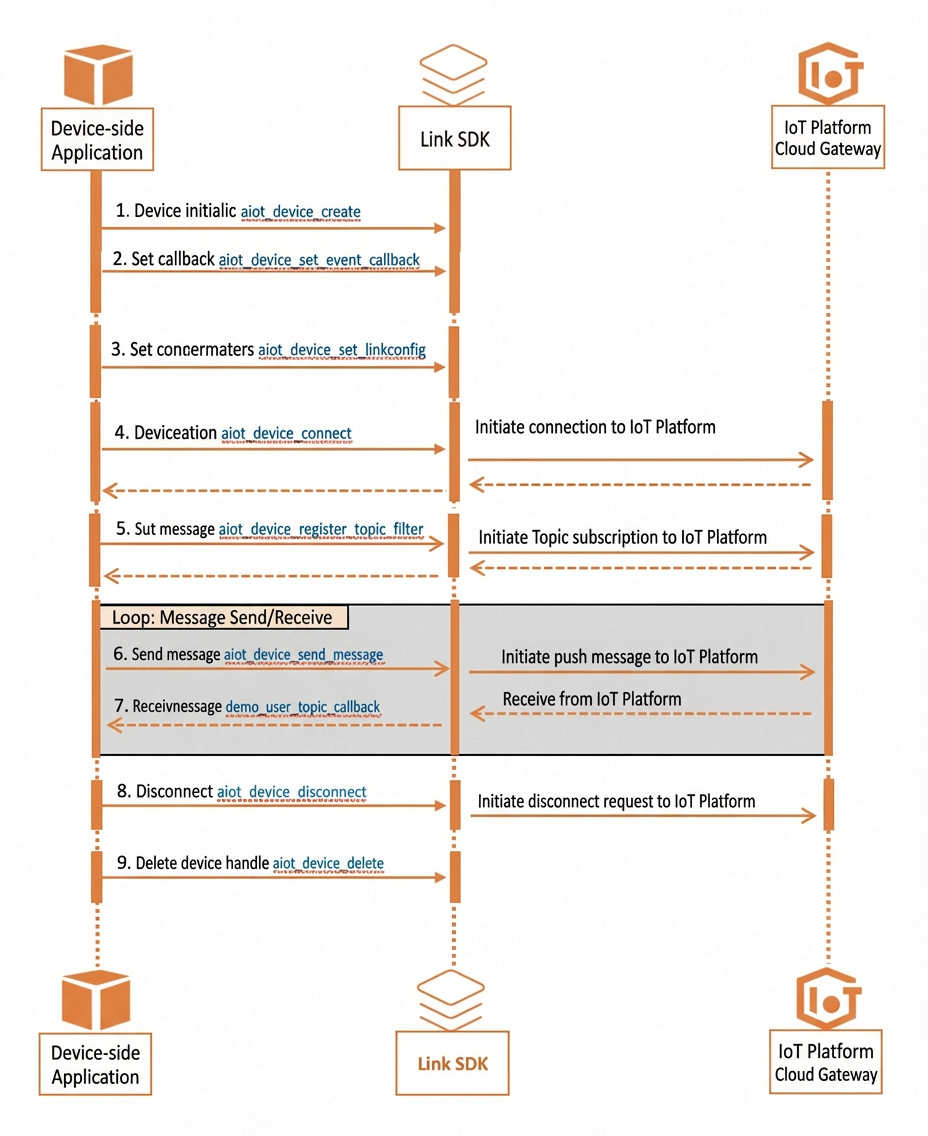
Step 1: Device initialization
Add the header file.
#include "aiot_device_api.h"Create a device handle.
void *device_client = aiot_device_create(product_key, device_name);
if (device_client == NULL) {
    printf("device_client failed\n");
    return -1;
}
Step 2: Configure event callback functions
Write a message callback function.
This callback function is executed when the device receives a message. The function prototype is aiot_device_msg_result_callback_t.
/* Sample message callback for the device. By default, it only prints the message. */
void demo_msg_callback(void *device, const aiot_msg_t *message, void *userdata)
{
    printf("[message] <<, topic: %s\n", message->topic);
    printf("[message] <<, payload: %.*s\n", message->payload_lenth, message->payload);
}
Write a status callback function.
This callback function is executed when the connection status of the device changes. The function prototype is aiot_device_status_callback_t.
void demo_status_callback(void *device, const aiot_device_status_t *status, void *userdata)
{
    switch (status->type) {
    /* The SDK successfully connected to the MQTT server because the user called the aiot_mqtt_connect() function. */
    case AIOT_DEVICE_STATUS_CONNECT: {
        printf("AIOT_DEVICE_STATUS_CONNECT\n");
        /* TODO: Handle the successful SDK connection. Do not call time-consuming blocking functions here. */
    }
    break;

    /* The SDK automatically reconnected after a passive disconnection due to network issues. */
    case AIOT_DEVICE_STATUS_RECONNECT: {
        printf("AIOT_DEVICE_STATUS_CONNECT\n");
        /* TODO: Handle the successful SDK reconnection. Do not call time-consuming blocking functions here. */
    }
    break;

    /* The SDK was passively disconnected due to network issues. 'network' indicates a low-level read/write failure. 'heartbeat' indicates that a heartbeat acknowledgement was not received from the server as expected. */
    case AIOT_DEVICE_STATUS_DISCONNECT: {
        printf("AIOT_DEVICE_STATUS_CONNECT: %d\n", status->error_code);
        /* TODO: Handle the passive SDK disconnection. Do not call time-consuming blocking functions here. */
    }
    break;
    }
}
Write a callback function for message sending results.
This function is executed when the device sends a Quality of Service (QoS) 1 message, subscribes to or unsubscribes from a topic, or receives a response from the cloud. The function prototype is aiot_device_msg_result_callback_t.
/* This callback is triggered after a message is sent, or after a subscribe/unsubscribe request has a result. */
void demo_result_callback(void *device, const aiot_device_msg_result_t *result, void *userdata)
{
    switch(result->type) {
        case AIOT_DEVICE_SEND_MESSAGE_RESULT: {
            printf("send message result, message id: %d, code -0x%04X\n", result->message_id, -result->code);
        }
        break;
        case AIOT_DEVICE_REGISTER_TOPIC_RESULT:{
            printf("register, message id: %d, code code -0x%04X\n", result->message_id, -result->code);
        }
        break;
        default:
            break;
    }
}
Set the event callback functions.
The callback functions that you defined must be set to take effect. For more information about the function for setting event callbacks, see aiot_device_set_event_callback. This function can set listeners for three types of events. If you do not need to listen for an event, you can set the corresponding parameter to NULL.
/* Set the device message callback and status change callback. */
aiot_device_set_event_callback(device_client, demo_msg_callback, demo_status_callback, demo_result_callback, NULL);
Step 3: Configure connection parameters
Configure the connection parameters. In most cases, you can use the default settings. For more information about connection parameters, see the aiot_linkconfig_api.h header file.
Set the domain name and port for cloud gateway access: aiot_linkconfig_host(config, host, port);
Set TLS to use Chinese cryptographic algorithms: aiot_linkconfig_tls_gm(config, 1);
Set the SM root certificate: aiot_linkconfig_root_cert(config, demo_sm2_cert, strlen(demo_sm2_cert));
Configure the MQTT authentication parameters: aiot_linkconfig_mqtt_auth(config, username, password, clientid);
    /* Initialize the connection configuration parameters. */
    aiot_linkconfig_t* config = aiot_linkconfig_init(MQTT_PROTOCOL);
    /* Set connection parameters: server host and port. */
    aiot_linkconfig_host(config, host, port);
    /* Set connection parameters: Use Chinese cryptographic algorithms for TLS. */
    aiot_linkconfig_tls_gm(config, 1);
    /* Set connection parameters: root certificate. */
    aiot_linkconfig_root_cert(config, demo_sm2_cert, strlen(demo_sm2_cert));
    /* Set connection parameters: MQTT authentication parameters. */
    aiot_linkconfig_mqtt_auth(config, username, password, cilentid);
    /* Pass the connection parameter context to the device. */
    aiot_device_set_linkconfig(device_client, config);
Step 4: Establish a device connection
The following example uses a blocking function to establish a connection. The software development kit (SDK) also provides an asynchronous function for this purpose. For more information, see aiot_device_connect_async.
/* Connect the device. */
res = aiot_device_connect(device_client);
if (res < STATE_SUCCESS) {
    /* If the connection attempt fails, destroy the MQTT instance and release the resources. */
    aiot_linkconfig_deinit(&config);
    aiot_device_delete(&device_client);
    printf("aiot_device_connect failed: -0x%04X\n\r\n", -res);
    return -1;
}
Once a device is connected, the SDK automatically reconnects it if the network connection is lost. You do not need to call the aiot_device_connect function again.
Step 5: Subscribe to custom messages
Define a message callback function.
The callback function prototype is aiot_device_msg_result_callback_t.
/* Sample handler for downstream messages from a custom topic. The example only prints the message. */
void demo_user_topic_callback(void *device, const aiot_msg_t *message, void *userdata)
{
    printf("[thing_message] <<, topic: %s\n", message->topic);
    printf("[thing_message] <<, payload: %.*s\n", message->payload_lenth, message->payload);
}
Subscribe to messages from IoT Platform and register a message callback.
The aiot_device_register_topic_filter function registers a custom message callback. This function has two features:
(Optional) Subscribing to messages from IoT Platform.
Registering a callback with the SDK to receive messages.
/* Subscribe to a topic and set the message callback function. */
char sub_topic[128] = { 0 };
snprintf(sub_topic, sizeof(sub_topic), "/%s/%s/user/get", product_key, device_name);
int32_t msg_id = aiot_device_register_topic_filter(device_client, sub_topic, demo_user_topic_callback, 1, NULL);
if(msg_id >= 0){
    printf("aiot_device_register_topic_filter topic %s msg_id %d\r\n", sub_topic, msg_id);
}
To unsubscribe from a topic, call the aiot_device_deregister_topic_filter interface.
Step 6: Send custom messages
Create a message.
The following example shows how to create a message with a topic and a payload. For more information about message configuration, see aiot_message_api.h.
char pub_topic[128] = { 0 };
snprintf(pub_topic, sizeof(pub_topic), "/%s/%s/user/update", product_key, device_name);
char *pub_payload = "{\"id\":\"1\",\"version\":\"1.0\",\"params\":{\"LightSwitch\":0}}";
aiot_msg_t *pub_message = aiot_msg_create_raw(pub_topic, (uint8_t *)pub_payload, strlen(pub_payload));
Send the message.
aiot_device_send_message(device_client, pub_message);Delete the message.
aiot_msg_delete(pub_message);
Step 7: Receive custom messages
After a device subscribes to messages, you can send messages to it using the server-side SDK. During the test phase, you can also send messages using OpenAPI Explorer. To send a custom message to a device using OpenAPI Explorer, follow these steps:
Log on to the console and open the Pub API page.
Enter the required parameters: ProductKey, TopicFullName, and MessageContent. If you are using an Enterprise Edition instance, you must also enter IotInstanceId.
Click Initiate Call. If the call is successful, the received message is printed on the device.
Step 8: Disconnect the device
The device disconnects from the IoT Platform.
res = aiot_device_disconnect(device_client);
if (res < STATE_SUCCESS) {
    printf("aiot_mqtt_disconnect failed: -0x%04X\n", -res);
    return -1;
}
Step 9: Delete the device handle.
The SDK reclaims the resources when the program exits.
/* Destroy the device instance. This part of the code is not typically run. */
aiot_device_delete(&device_client);
aiot_linkconfig_deinit(&config);
Compile and run
Compile with Makefile
Compile:
	make -j GMSSL=ON

Run:
	./output/bin/device_gmssl_demo
Compile with CMake
Compile:
	mkdir build && cd build
  cmake .. -DGMSSL=ON
  make -j
Run:
	./output/bin/device_gmssl_demo