Connect a Ruff development board to IoT Platform
You can use a Ruff development board to develop Internet of Things (IoT) applications and connect to Alibaba Cloud IoT Platform. IoT Platform lets you remotely control your Ruff application server. This topic uses an air quality monitoring application as an example to demonstrate how to connect a Ruff application server to IoT Platform.
Prerequisites
You have completed the following operations:
Activate Alibaba Cloud IoT Platform.
Activate Alibaba Cloud Tablestore.
Obtain a Ruff development board.
Background information
Alibaba Cloud IoT Platform supports connections from various development board servers. This lets you remotely control application servers. After an application server sends device data to IoT Platform, you can use the data forwarding feature of the rules engine to forward the data to other supported Alibaba Cloud services for storage, analysis, or computation. The following figure illustrates this process.
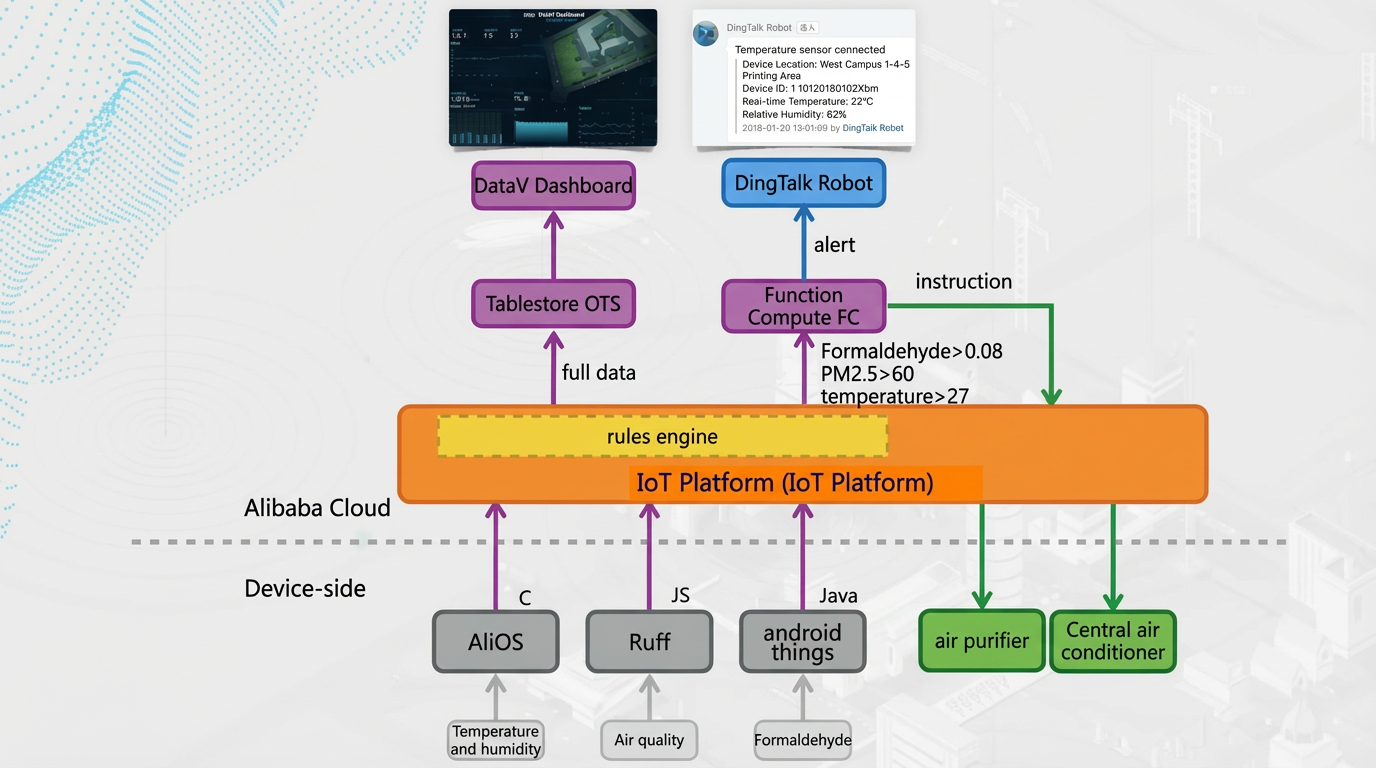
This example demonstrates only how to develop a Ruff application server, connect it to IoT Platform, and set up a data forwarding rule. The rule forwards device data from the server to Tablestore.
For more information about the other procedures shown in the preceding figure, see the following topics:
Procedure
Log on to the IoT Platform console. Create a product and a device in the instance as follows:
On the Product Details page, go to the Topic Category tab and then the Custom Topic tab. Click Define Topic Category to define a custom topic category for the air quality monitoring device to publish data.
The topic category information is as follows:
Topic
Operation permission
Description
/${productKey}/${deviceName}/user/pm25data
Publish
Used by the device to report data.
The payload of the reported data is
{"pm25":23,"pm10":63}.In the left navigation pane, choose . On the Devices page, add a device under the product you created. For more information, see Create a single device.
Log on to the Tablestore console. Create an instance and a data table as follows:
To create a wide table instance, click Create Instance on the Overview page. For more information, see Create an instance.
Click Instance Management for the newly created instance.
On the Instance Details page, click Create Data Table in the Data Table List section. In this example, add two primary keys: deviceName (the device name) and time (the data reporting time).
For more information, see Create a data table.
Return to the IoT Platform console and navigate to your instance. In the navigation pane on the left, choose . Create a rule to forward device data to Tablestore.
Click Create Rule to create a rule for JSON data.
ImportantIf the Data Forwarding page of the latest version appears, click Back to Previous Version in the upper-right corner of the page. When the Data Forwarding page of the previous version appears, click Create Rule.
On the Data Forwarding Rule page, click Write SQL to write an SQL statement that processes data from the air quality monitoring device.
The SQL statement for this example is as follows:
SELECT
deviceName() as deviceName , timestamp('yyyy-MM-dd HH:mm:ss') as time, pm25
FROM "/a1jhoQa****/+/user/pm25data"
The
deviceName()function represents the device name. Thetimestamp('yyyy-MM-dd HH:mm:ss')function represents the time when the data is reported. The data source is the topic/a1jhoQa****/+/user/pm25data. This means that the data is from messages that all devices within this product publish to this topic.Click Add Operation to configure a rule that forwards device data to a Tablestore data table.
Return to the rule list. Click Start to enable the rule.
After the data forwarding rule is set up and enabled, data reported by the device is forwarded to the specified Tablestore data table.
Develop the device-side SDK.
The following example demonstrates the operations on Linux.
Run the mkdir apsarasCampusAir command to create a folder named apsarasCampusAir.
Run the cd apsarasCampusAir command to navigate to the folder.
Run the rap init command to create a project.
Run the rap device add air (SDS011) command to add the hardware driver.
In package.json, add the IoT Platform SDK package
aliyun-iot-device-mqtt.{ "name": "apsarascampusair", "version": "0.1.0", "description": "", "author": "", "main": "src/index.js", "ruff": { "dependencies": { "aliyun-iot-device-mqtt": "^0.0.5", "sds011": "^1.1.0" }, "version": 1 } }Run the
$rap installcommand to install the Alibaba Cloud IoT Platform device SDK. To download the IoT Platform SDK, see Download device-side SDKs.Modify the main program
index.js.NoteTo view the device certificate information, see View device information. To view the MQTT endpoint of the device, see View and configure instance endpoints.
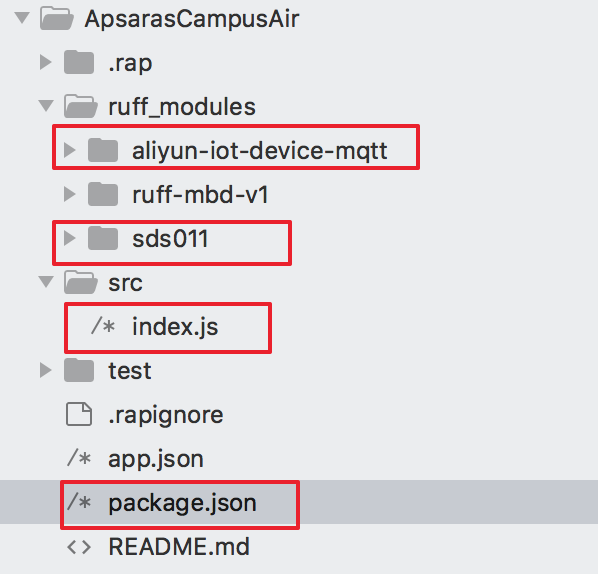
// Import aliyun-iot-sdk
var MQTT = require('aliyun-iot-device-mqtt');

// Device information
var options = {
    productKey: "", // Replace with the ProductKey of your product.
    deviceName: "", // Replace with the DeviceName of your device.
    deviceSecret: "", // Replace with the DeviceSecret of your device.
    host: "", // Replace with the MQTT endpoint of the device.
};

var pm25Data = 0;
var pm10Data = 0;

// Publish/Subscribe topic
var pubTopic = "/" + options.productKey + "/" + options.deviceName + "/user/pm25data";

// Establish a connection
var client = MQTT.createAliyunIotMqttClient(options);

$.ready(function(error) {
    if (error) {
        console.log(error);
        return;
    }
    // Report data every 15 seconds.
    setInterval(publishData, 15 * 1000);

    // Air quality
    $('#air').on('aqi', function(error, pm25, pm10) {
        if (error) {
            console.log(error);
            return;
        }
        pm25Data = pm25;
        pm10Data = pm10;
    });
});


// Report data
function publishData() {
    var data = {
        "pm25": pm25Data,
        "pm10": pm10Data
    };

    console.log(JSON.stringify(data))

    client.publish(pubTopic, JSON.stringify(data));

}
The complete directory structure of the SDK files is shown in the following figure.
Run the
$rap deploy -scommand to publish the SDK to the Ruff development board.
After the Ruff development board is connected to the internet, it starts sending data to IoT Platform.