Forward data to DataHub
Forward device data to DataHub through IoT Platform data forwarding, and then use applications or computing engines such as Realtime Compute and MaxCompute to process the streaming data. You can generate real-time charts, alerts, and statistics from the forwarded data.This topic uses a Thing Specification Language (TSL) model topic as an example to describe the process of forwarding message data.
How it works
Data forwarding sends device topic messages to a DataHub project topic. You can then use DataHub for traffic scrubbing, analysis, and data archiving. For more information, see DataHub.
In the preceding figure:
-
Data source: For information about the supported topic types, see Data formats (for products and devices other than cloud gateways), Custom topics (for MQTT cloud gateways), Message forwarding topics (for GB/T 32960 cloud gateways), Message forwarding topics (for JT/T 808 cloud gateways), and Message forwarding topics (for SL 651 cloud gateways).
-
Data destination: The DataHub project and its topic that you create to receive device data.
-
Resolver script: Configure the data forwarding function
writeDatahub(destinationId, data)to forward topic data to a DataHub project topic.datasupports only Map and Binary data types. For more information about the function, see Function list.
Scenarios
Forward data from IoT Platform to DataHub for unified management:
-
Deliver data to downstream systems for analysis and archiving to build a clear data pipeline and unlock data value.
-
Combine DataHub with Realtime Compute to clean heterogeneous data from multiple sources into structured data in real time for further analysis.
-
Build a real-time data warehouse with layers for raw data, real-time details, and real-time summaries.
For more information, see DataHub Scenarios.
Limits
-
Your IoT Platform instance and its region must support forwarding data to DataHub. For more information about the supported regions, see Features by region.
-
Both the new and previous versions of the data forwarding feature support forwarding data to DataHub. For an example of how to use the previous version, see Forward data to DataHub (Previous version).
-
For more information about the limits on forwarding device messages from an IoT Platform instance, see Limits.
Prerequisites
-
You have added a data source for the device topic whose data you want to forward. For example, you can create a data source named DataSource and add the TSL model data topic of a specific device. For more information, see Add a data source.
-
You have created a DataHub project and a topic to receive data. For more information about how to use DataHub, see Project operations.
ImportantFor an Enterprise instance, the DataHub project must be in the same region as the instance.
Create a data destination
-
Log on to the IoT Platform console.
-
On the Instance Overview tab, find your instance under All Environments and click the instance card.
-
In the left-side navigation pane, choose .
-
On the Data Forwarding page, click Go to New Version in the upper-right corner.
NoteIf you have performed this operation before, you are automatically redirected to the new version of the Data Forwarding page.
- Click the Data Destination tab. On this tab, click Create Data Destination.
-
In the Create Data Destination dialog box, enter a name for the data destination, such as DataPurpose. Configure the parameters as described in the following table, and then click OK.
Parameter
Description
Operation
Select Send data to DataHub.
Region
Select the region where your DataHub project is located.
Project
Select a DataHub project.
You can click Create Project to go to the DataHub console and create a project. For more information, see Project operations.
Topic
Select the DataHub topic that receives data.
After you select a topic, the rules engine automatically obtains the topic's schema and maps the filtered data to it.
Note-
When you map data to the schema, use
${}. Otherwise, the system stores a constant in the table. -
The schema's data types must match the data types that the rules engine processes. Otherwise, the system cannot store the data.
You can click Create Topic to go to the DataHub console and create a DataHub topic.
Role
Select the RAM role that grants IoT Platform permission to write data to DataHub.
If no RAM role exists, click Create RAM Role to create a RAM role and authorization policy in the RAM console. Create a RAM role.
-
Configure and start the resolver
Create a parser named DataParser. For more information, see Step 1: Create a parser.
On the Parser Details page, associate the parser with the created data source.
In the Data Source step of the wizard, click Associate Data Source.
In the dialog box that appears, select DataSource from the Data Source drop-down list, and then click OK.
On the Parser Details page, associate the parser with the created data destination.
Click Data Destination in the wizard. In the Data Destination section, click Associate Data Destination.
In the dialog box that appears, select DataPurpose from the Data Destination drop-down list, and then click OK.
In the Data Destination section, view and save the data destination ID. In this example, the ID is 1000.
When you write the parser script, you must use the data destination ID.
- On the Parser Details page, click Parser.
-
In the script editor, enter a resolver script.
The resolver script syntax is similar to JavaScript. For more information, see Script syntax.
For more information about the function parameters, see Function list.
// Use the payload() function to get the message content reported by the device and convert it to the JSON format. var data = payload("json"); // Forward the TSL model data directly. writeDatahub(1000, data); -
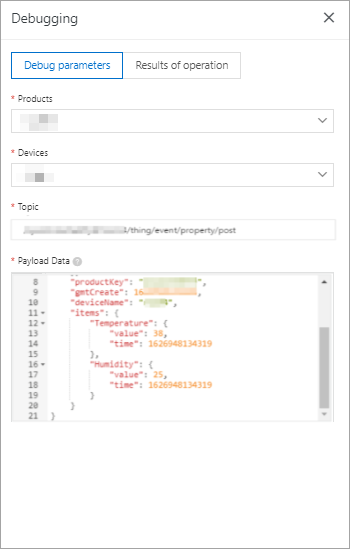
Click Debug. Follow the on-screen instructions to select a product and a device, and enter the topic and payload data to test the script.
The following figure shows sample parameters.
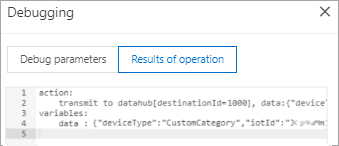
The following result indicates that the script is executed successfully.
- Click Publish.
Go to the Parser tab of the Data Forwarding page. Find the DataParser parser and click Start in the Actions column to start the parser.
What to do next
-
View the operational logs of Device-to-Cloud Messages and Data Forwarding in the IoT Platform console. Navigate to the IoT Platform Logs tab on the page for your instance. For more information, see IoT Platform logs.
-
Log on to the DataHub console to view the data written to DataHub. For more information, see Quick Start (Synchronization example).
-
Synchronize data from the topic to other Alibaba Cloud products in real time or near real time to connect data across services. Supported products include MaxCompute (formerly ODPS), AnalyticDB for MySQL (ADS), ApsaraDB RDS, Tablestore, Object Storage Service (OSS), Elasticsearch, and Function Compute. For more information, see Data synchronization.
References
-
To connect a device to IoT Platform and report data, see Device connection guide.
-
On the instance details page, view the available resources for message forwarding TPS to ensure that device messages can be forwarded to DataHub. For more information, see View instance information and operational data. If the available resources are insufficient, upgrade the instance. For more information, see Upgrade an instance.
-
For frequently asked questions about DataHub, see DataHub FAQ.