Tutorials - Channel partner product management
Product Management is a key module of the Channel Partner Supply Workbench. This tutorial describes common procedures for channel partners to manage products.
Practice 1: Select and import products
Selecting and importing products is the process of choosing products from the selection pool for a specific business and importing them into the corresponding business product library. You can import products using the standard method or by uploading a file. We recommend using the file upload method to import many products at once.
The following sections use the product selection and import process in the primary channel partner workbench as an example. The process is similar for secondary channel partners because their selection pools and business product libraries have a one-to-one correspondence. Therefore, this document does not describe the process for secondary channel partners in detail.
Log on to the Channel Partner Workbench. In the navigation pane on the left, choose to open the Selection Pool page. In the product list, you can click an entry in the Business Library Import Details column to view the product import details. For example, click "Imported into 1 business library" as shown in the following figure.
Standard import
Select the products to import and click Import to Business Product Library.
On the Selection Pool - Import to Business Product Library page, configure the products.
Ordinal number |
Description |
1 |
Select a Business Name and verify that the Business ID is correct. |
2 |
Set the product sales method: Click Advanced Configuration. Set the Sales Model. Currently, only the Distribution model is supported. Specify whether to support a billing cycle. |
3 |
Set Product Pricing Policy: You can select Quick Automatic Pricing (achieved through Products) or Manual Pricing Later. If you are importing products for the first time, you can select Manual Pricing Later. If you have already configured Category Price Rules, you can select Quick Automatic Pricing. |
4 |
Set the product business policy: Click Advanced Configuration and select whether invoices can be issued. |
5 |
After the configuration is complete, click Confirm Import. |
Import by file upload
A single file for import can contain a maximum of 5,000 records, with one record per line. To import more than 5,000 records, you must split the data into multiple files and create a separate import task for each file.

Serial number |
Description |
1 |
Set filter conditions such as Imported to Specified Business Product Library and Business ID (for Import) to filter for products that have not been imported into the specified business library. You can combine these with other filter options for a more refined search. |
2 |
Click Filter. |
3 |
Click Batch Export to Excel to export the information of products that have not been imported into the business library. Go to to view the export task. Download the file after the task is complete. |
4 |
Click Import to Business Product Library. Do not select any products. Otherwise, you are directed to the standard import configuration page. You are then taken to the Selection Pool - Import to Business Product Library page.
4.1. Select the business to import to. 4.2. Download the Excel template. Fill in the product information (Supplier Store ID, Platform Product ID) as required by the template. Then, save and upload the file.
Note
4.3. Set configuration items such as Sales Method, Pricing Policy, and Product Invoice. 4.4. Click Confirm Import to create an import task. You can go to the Task Hub of the destination business's Channel Partner Supply Workbench to check the task progress. The product import task may take some time to run. Please wait. If any products fail to import, you can click Details in the Task Hub to view and export the failure details. |


After the product selection and import is complete, you can go to the Channel Partner Supply Workbench for the corresponding business and check the Product list to verify that the products were imported successfully. Alternatively, you can go to the Task Hub to view the status of the import task.
Practice 2: Configure supply prices
Product status definitions:
Listed: The product is available for sale. When you list a product, its status changes to Listed.
Not Listed: The product has been delisted or has not been listed yet. After a product is imported from the product selection library to the business system, it has a status of Not Listed by default. For more information, see Practice 1: Select and import products.
Sellable: The product is in the Listed state on the supplier's side and has been authorized for the channel partner.
Unsellable: If the product on the supplier's side has an abnormal status, such as being delisted, having inventory issues, being deleted, or being part of a marketing campaign, its status becomes Unsellable for the channel partner.
Configuration notes for different distributor levels when you set supply prices:
Default Level: You cannot change the supply price for distributors at the default level. The supply price for these distributors is equal to the purchase price from the supplier.
Other Levels (Non-default): You can change the supply price. Changes to level configurations require approval from LinkedMall operations staff.
There are three ways to configure supply prices: change the price of a single product, change prices in batch, and use a Price Policy Template.
Change the price of a single product
Go to the Channel Distributor Supply Workbench. In the left-side menu, click to open the Business System Product page and select products with the Not Distributed status. For more information about how to configure the supply price for a single product, see Modify Product Supply Price. The main steps are as follows:
Ordinal Number |
Description |
1 |
Click Add Distributor. If the distributor is at the Default Level, the price input box is grayed out and cannot be modified. |
2 |
The default price in the input box is Base Supply Price × 100%, which is the purchase price from the supplier. You can change it to a specific value, such as 99.99, with up to two decimal places. |
3 |
Switch SKUs and configure the supply price for all SKUs. |
4 |
After checking that everything is correct, click OK. |
Change prices in batch
To adjust the supply prices for multiple products in batch, click Batch Import Price Adjustment and upload an Excel file as prompted. For more information, see Batch Import Price Adjustment.
You cannot change the supply price of listed products. When you change prices in batch, if the uploaded Excel file contains listed products, the system automatically skips them.
Price Policy Template
A price policy template lets you configure a supply price policy and associate it with products. Associated products automatically adopt the supply price policy from the template.
For more information about how to configure a price policy template, see Price Policy Template. Follow these steps to associate a price policy template with a product:
Ordinal Number |
Description |
1 |
On the Price Policy Template page, click Add Policy Template. |
2 |
Enter a template name, such as "Low-margin product price template" or "Snacks category price template". |
3 |
Configure the supply price for distributors of different levels. The Base Supply Price is the distribution purchase price. You cannot change the supply price for the default distributor level. |
4 |
(Optional) To configure a special supply price for a specific distributor, click Add Distributor and make the configuration. The supply price for a specific distributor has the highest priority. It is not affected by the price policy of the distributor's level. |
5 |
Go to the Business Product Library page, select the Unlisted product list, and click in the Price Policy Template column to associate a price policy template. For more information, see Configure a price policy template for a single product.
Note
You cannot change the price policy template for listed products. |
Practice 3: [Advanced] Configure supply prices—Manage prices by category
Managing product prices by category means creating a unified pricing plan based on the product's category.
Price new products
First, you can configure category pricing rules. When you select and import a product from a category that is included in the rules, its supply price is automatically configured based on the associated price policy template. The steps are as follows:
Ordinal Number |
Description |
1 |
Add and configure category price rules. For more information, see Add a rule. |
2 |
When you select and add products to the inventory, select Quick Automatic Pricing for Pricing Policy. For more information, see Practice 1: Select and Add Products to Inventory. |
Stocked product pricing
To modify price policy templates for existing products in batch, see Batch Associate Price Policy Templates.
Practice 4: Authorize distributors
After each price change, you must recheck the product scope that you have authorized for your distributors. Make sure the corresponding products are selected. Otherwise, distributors will not be able to sell them.
Go to the Channel Partner Supply Workbench for the corresponding channel partner and business. In the left-side menu, click to open the Distributor Management page. For more information about how to view the product scope and add products, see View Product Scope.
An exclusive template is a price policy template that is exclusive to a single product. When you use this method to set a distributor's supply price, the system automatically grants authorization to the distributor. You do not need to grant authorization separately.
Practice 5: List products
After you import a product from the product selection library to the business system (see Practice 1: Select and import products), the product has a status of Not Listed by default. You must list the product to make it available in the product selection libraries of distributors. For more information, see Product status definitions.
Before you list products, ensure that you have completed the product sales configuration. This includes configuring the supply price, configuring a Price Policy Template, authorizing distributors, configuring a sales method, and verifying the product configuration.
Standard listing
1. Configure the sales method
Configure a single product
Go to the Channel Partner Supply Workbench for the corresponding channel partner and business. In the left-side menu, click to open the Business Product Library page. Select the Unlisted tab. For more information about the configuration method, see Set the sales method for a single product.
Batch configuration
For more information, see Set sales methods in batch.
2. Verify the product configuration
Before listing, verify that the following information or configurations for the products to be listed are complete:
No. |
Confirmation Item |
1 |
Practice Two: Configure Supply Price, configure Price Policy Template, and Practice Four: Authorize Resellers. |
2 |
|
3 |
Use the Product Configuration feature to verify details such as product image and text information, tax rates and tax codes, and SKU availability status. For more information, see Product Configuration. |
3. List products
List a single product
To list a single product, see Listing.
List products in batch
To list multiple products in batch, see Batch listing.
List products by file upload
A single file for listing can contain a maximum of 5,000 records, with one record per line. To list more than 5,000 records, you must split the data into multiple files and create a separate batch listing task for each file.
Go to the Unlisted tab in the business product library and click Batch List. Do not select any products.
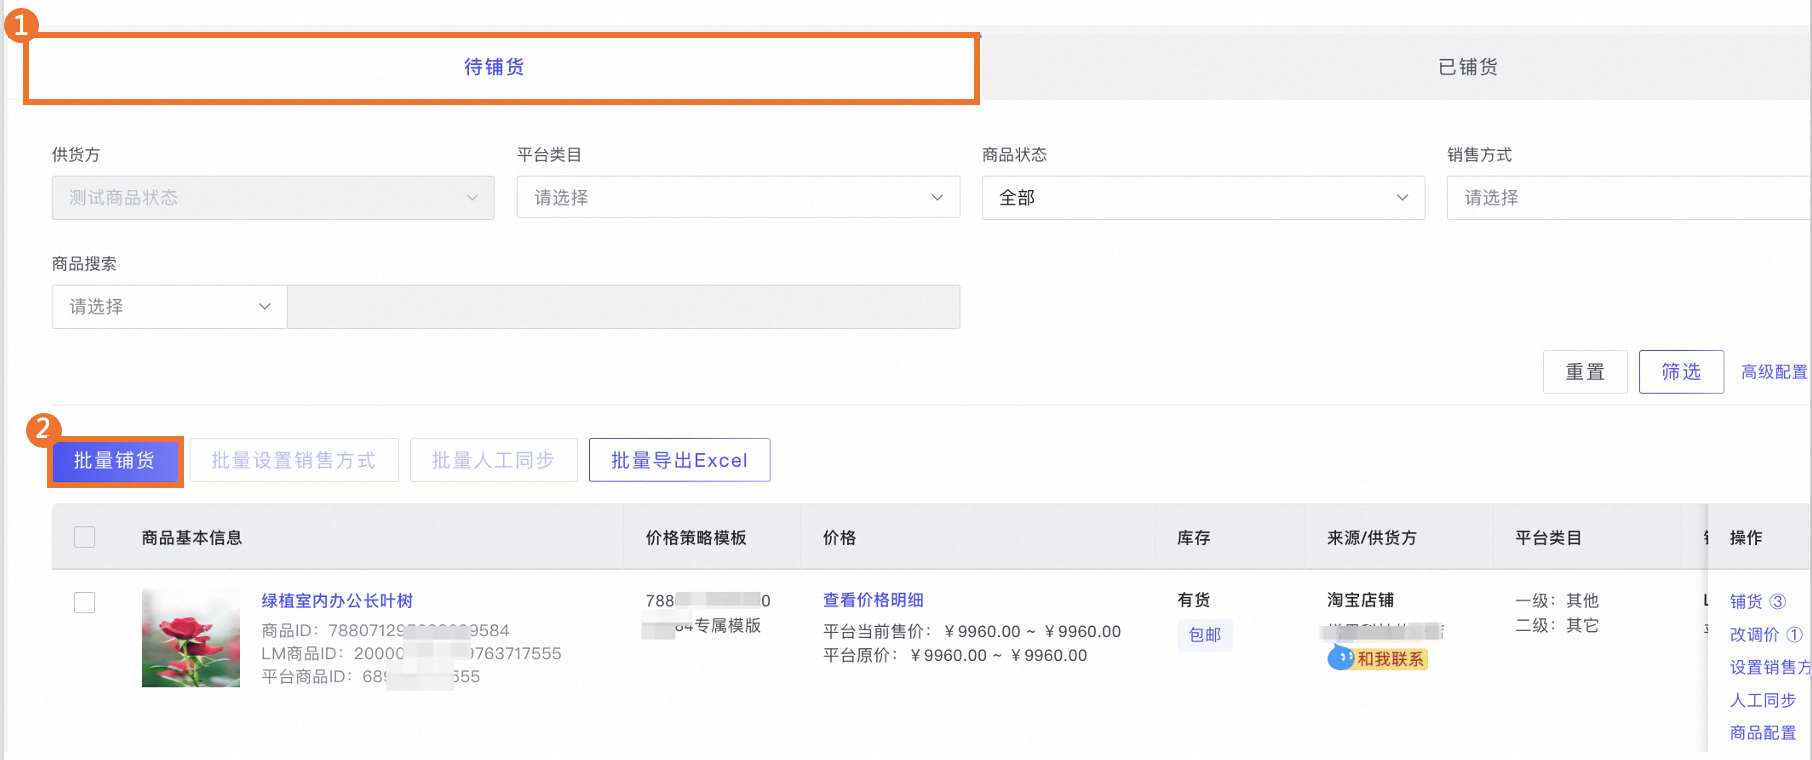
In the Batch List window, follow the steps to upload the file.
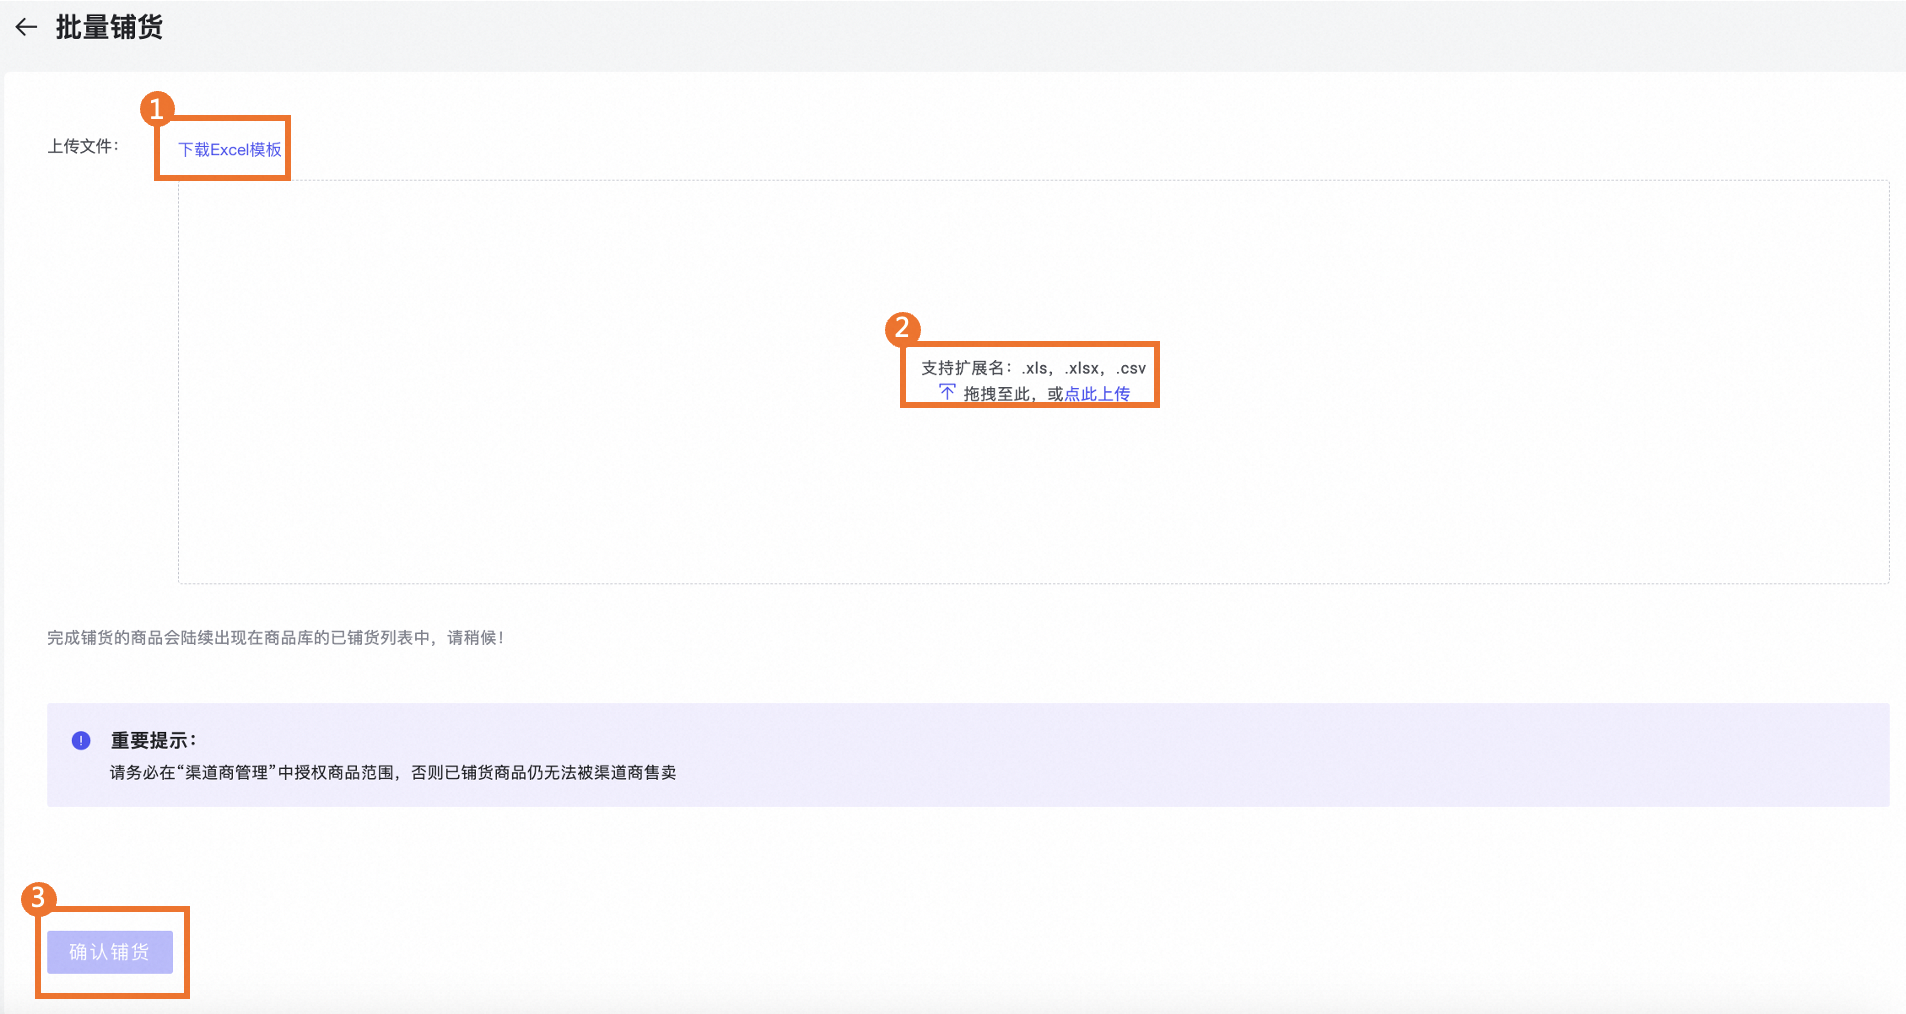
Ordinal number
Description
1
Click Download Excel Template.
2
In the downloaded Excel template file, carefully read the Listing Tips. Fill in the information for the products to be listed as required by the template and upload the file.
NoteYou can use the Batch Export to Excel feature in the To be listed list to export the information of products to be listed and extract their product IDs. Because the exported product information is listed by SKU, products with multiple SKUs will have multiple entries. When you copy the product IDs into the listing file, make sure to remove duplicates.
Field descriptions:
Product ID: Enter the product ID, not the platform product ID or LM product ID.
Store ID: The distribution store ID of the destination distributor. If a primary channel partner is listing to a secondary channel partner, enter the secondary channel partner's business ID. You can view this ID by going to . Do not enter the purchaser ID. This field is optional. If you enter a specific store ID, the product will be listed to that store. If you leave it blank, the product will be listed to all stores with which a partnership has been established.
Price Policy Template ID: The ID of the price policy template applicable to the product. You can view this ID by going to .
NoteIf a product's price has been changed individually, enter the general template ID, such as the default price policy template ID, during batch listing.
Sales Method: Unless you have special requirements, you can select Distribution and Consignment.
Support Billing Cycle: Select Yes or No as needed.
Billing Cycle/Day: If billing cycles are supported, enter 90. If not, leave this field blank.
3
Click Confirm Listing to create a batch listing task. Batch listing may take some time to run. Please wait for the task to complete.
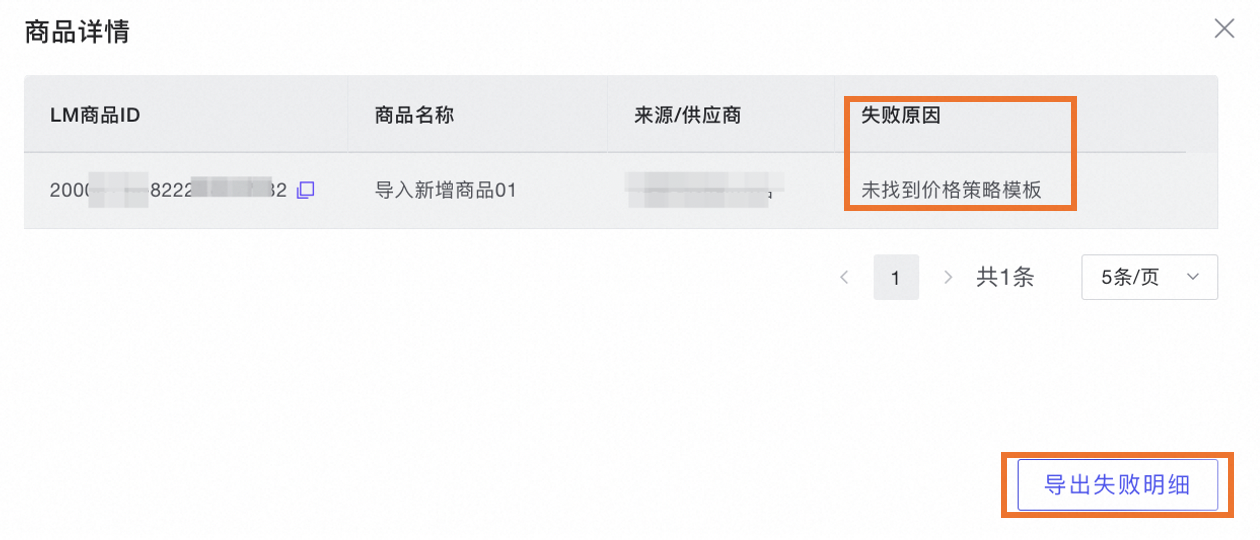
You can go to the Task Hub to check the progress of the Batch Product Listing (File Upload) task. If any products fail to list, you can click Details to view them.

You can view the reason for failure in the pop-up window. Click Export Failure Details to export information about the products that failed to list and the reasons for failure.
You can download the failure details file for the listing task from Product Export Records.
After the products are listed successfully, go to the Listed tab. In the Listing Details column, click an entry to view the details. For example, as shown in the figure below, you can click Listed to 1 product library to view the listing details.The Listing Details window displays the following information:

Practice 6: Add and delete SKUs
Add SKUs
Automatic addition
You can configure rules to automatically add new SKUs using the Add New SKU configuration item in Automatic Synchronization Rules. For more information, see Set automatic synchronization rules. These rules apply to all global products, including both listed and unlisted products. Configure these rules with caution.
Manual addition
To manually add an SKU, see Add an SKU.
Delete SKUs
To delete a product SKU, see Delete. Deleting an SKU makes it unsellable. If a product has only one SKU, deleting the SKU also removes the product from the business system. Proceed with caution.
Practice 7: Product synchronization
Product synchronization keeps the channel partner's product information consistent with the supplier's. It can be done automatically or manually.
Automatic synchronization
Distributors can configure product synchronization rules by setting Automatic Synchronization Rules. For more information, see Configure automatic synchronization rules. These rules apply to all global products, including both listed and unlisted products, so you must exercise caution during configuration.
Manual synchronization
To synchronize the information of a specific product, you can use the manual synchronization feature.
Synchronize a single product
To manually sync a single product, see Manually sync product data.
Synchronize in batch
To synchronize multiple products in batch, see Batch manual synchronization.
Practice 8: Product tag management
The business product libraries in the channel partner console support product tag management.
Currently, LinkedMall supports two main types of tags: system tags and custom tags. System tags are synchronized from Tmall and Taobao platforms, such as "7-day return" and "authenticity guarantee". Custom tags are created and managed by channel partners based on their business needs. Channel partners cannot delete or create system tags. The following sections describe how to manage custom tags and apply them to products.
Product tag management
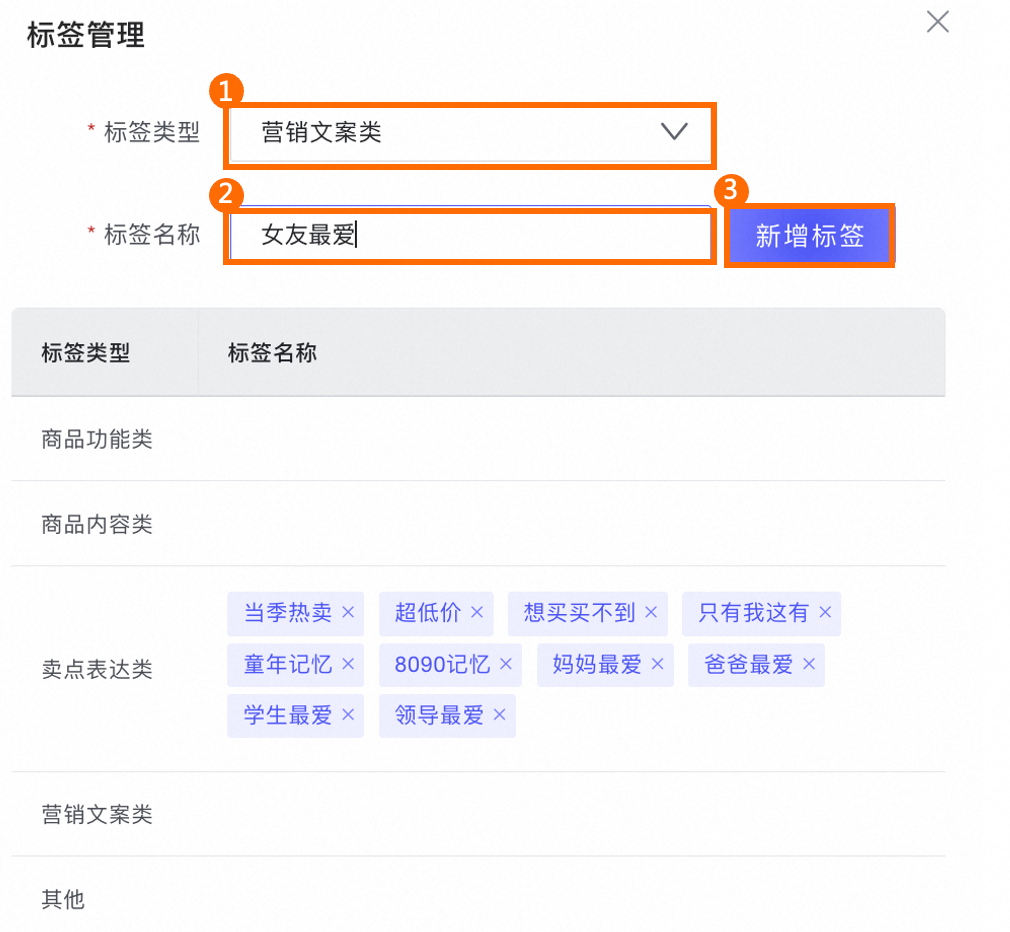
Click  . In the tag management window, you can add or delete tags.
Add a tag: Select a Tag Type, enter a Tag Name, and then click Add Tag.
NoteYou can create up to 10 tags for each tag type.
Creating new tag types is not currently supported.
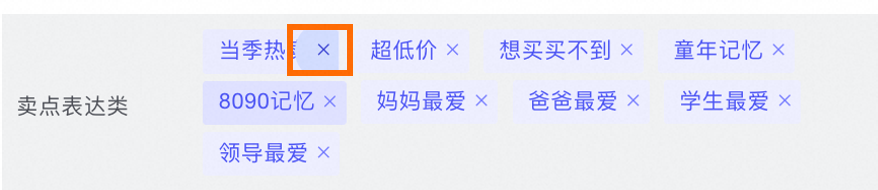
Delete a tag: Click the X icon next to the tag name to delete it.
ImportantWhen you delete a tag, it is also removed from all associated products. Proceed with caution.
Tagging products
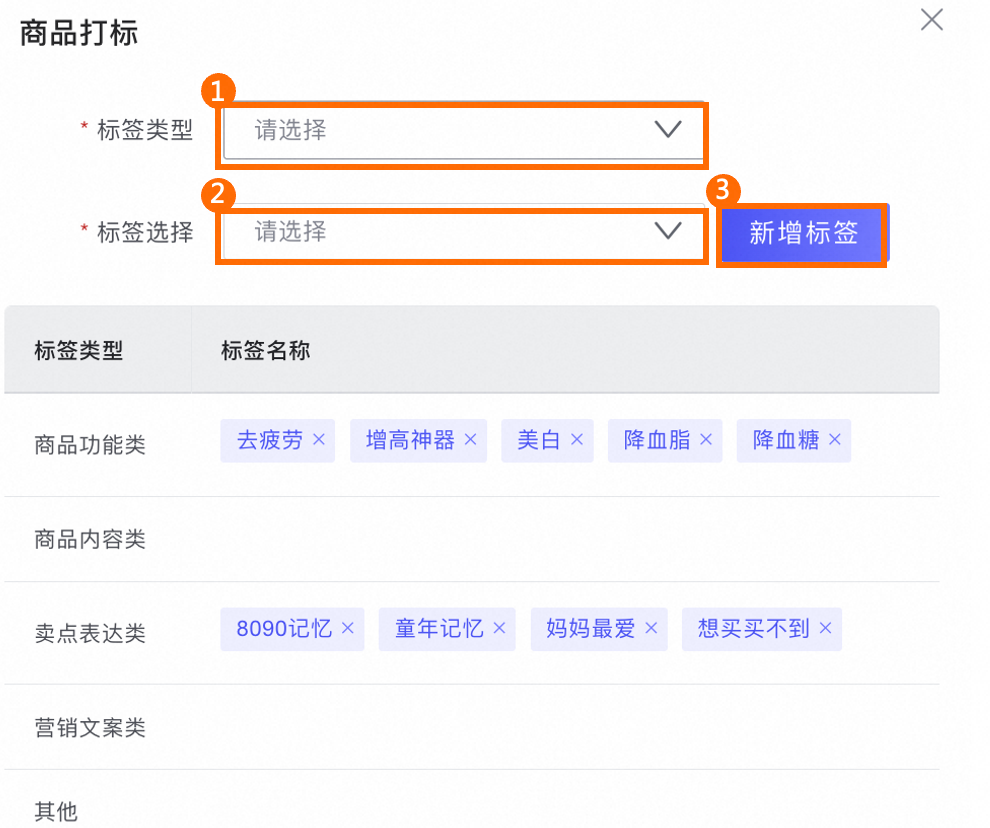
Tag or remove tags from a single product
In the Operation column, click Tag Product.
In the Tag Product window, select a Tag Type and a Tag, and then click Add Tag.
NoteA product can be associated with up to 10 tags.
To delete a tag, click the X icon next to the tag name.

Tag or remove tags in batch
Currently, you can tag or remove tags from products in batch at the category level.
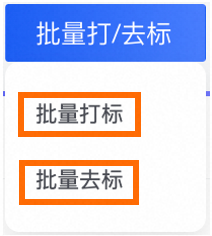
In the upper-right corner of the business product library page, click
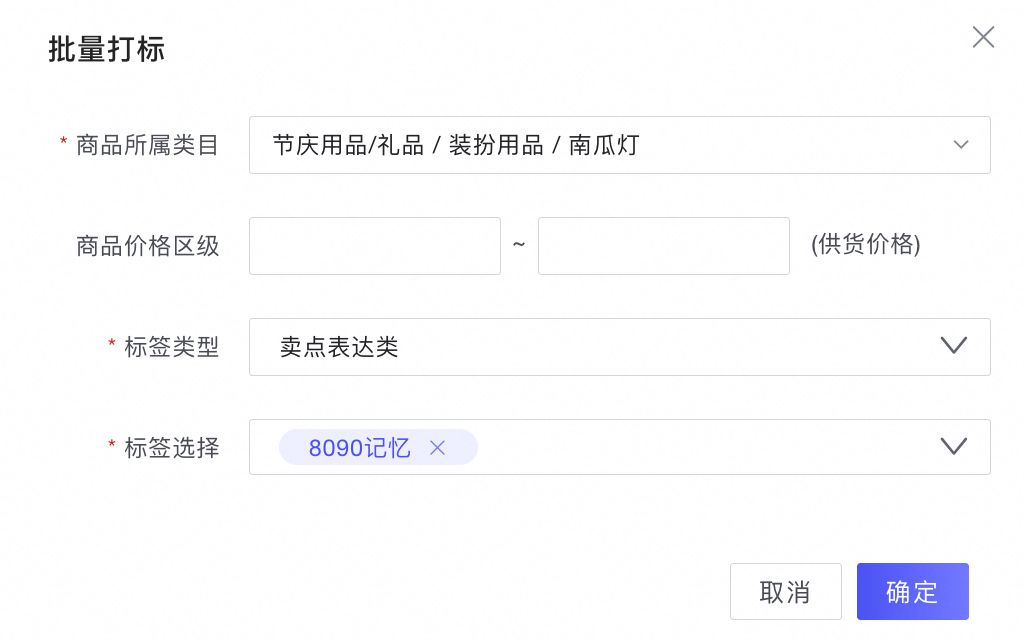
and select Batch Tag or Batch Remove Tags.To tag or remove tags in batch, select the Category, Price Range (optional), Tag Type, and Tag, and then click OK.
NoteTagging or removing tags from products in batch may take some time. Please wait.
During batch tagging, if a product is already associated with the tag to be added, the system automatically skips tagging that product. This does not affect the tagging of other products.
During batch tagging, if the maximum number of tags for a product is exceeded, the tagging for that product fails. This does not affect the tagging of other products.
During batch tag removal, if a product is not associated with the tag to be removed, the system automatically skips removing the tag from that product. This does not affect the removal of tags from other products.
 and select Batch Tag or Batch Remove Tags.