Create metadata mappings and data synchronization for Hologres
This topic describes how to create metadata mappings and data synchronization for Hologres from MaxCompute.
Background information
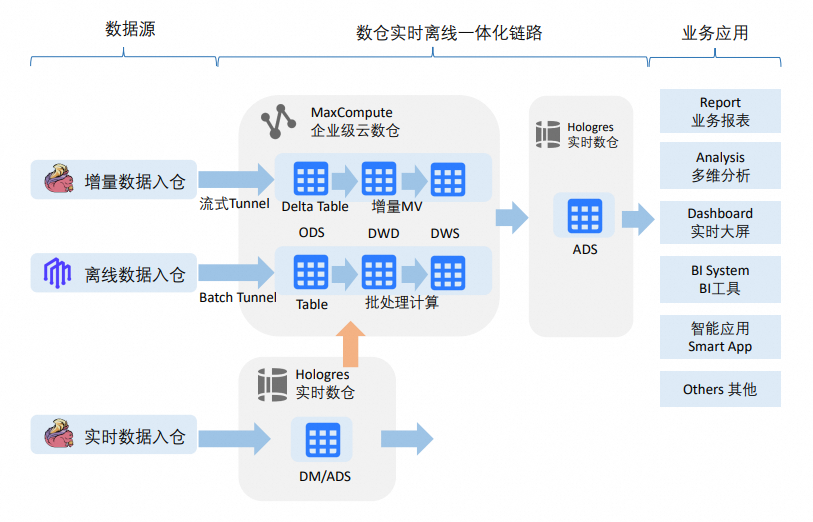
In a traditional data warehouse architecture, upstream real-time or batch data is written to a data warehouse and analyzed using an online analytical processing (OLAP) engine, as shown in the upper part of the following figure. However, some scenarios require you to read Hologres data from MaxCompute, as shown in the lower part of the following figure. Examples of these scenarios include the following:
Real-time data exposure and archiving: Data is quickly exposed from real-time data sources to business applications. After the business requirements for the real-time data warehouse are met, the data is archived to the appropriate layer and subject area of the enterprise data warehouse.
Business-first with data backflow: Business requirements are met first, without unified processing by the data warehouse. After the data mart stabilizes, the data must flow back to the enterprise data warehouse and be merged with data in the Data Warehouse Detail (DWD) and data warehouse service (DWS) layers.
Data access methods for these scenarios include the following:
Browsing data in the real-time data warehouse during the iteration and refinement of the data warehouse model.
Periodically archiving data from the real-time data warehouse or data mart to the enterprise data warehouse.
Writing data processed by the enterprise data warehouse to the Application Data Store (ADS) layer of Hologres for business use.
Function introduction
This tutorial shows you how to build a metadata mapping link from MaxCompute to Hologres. This link provides the following features:
Schema-level metadata mapping: Use Resource Access Management (RAM) role authentication to read Hologres metadata and data in real time through an external schema, which enables schema-level data access.
Table-level metadata mapping: Select a destination table in the Hologres data catalog to automatically create a MaxCompute external table that maps to the Hologres table with a single click.
Database-level metadata mapping: Use RAM role authentication to read Hologres metadata and data in real time through an external project, which enables database-level data access.
Data synchronization: Configure a table that requires recurring synchronization as a data synchronization task with a single click. This fulfills the requirement for periodic synchronization to an enterprise data warehouse.
Data type mapping between MaxCompute and Hologres differs, and some Hologres data types cannot be synchronized to MaxCompute.
Data synchronization flow
This tutorial is based on Build a real-time data warehouse using Flink and Hologres. It adds a data synchronization flow to the DWD layer of the Hologres real-time data warehouse. In this flow, MaxCompute maps Hologres schemas and tables and synchronizes data from the DWD layer tables. The process is as follows: 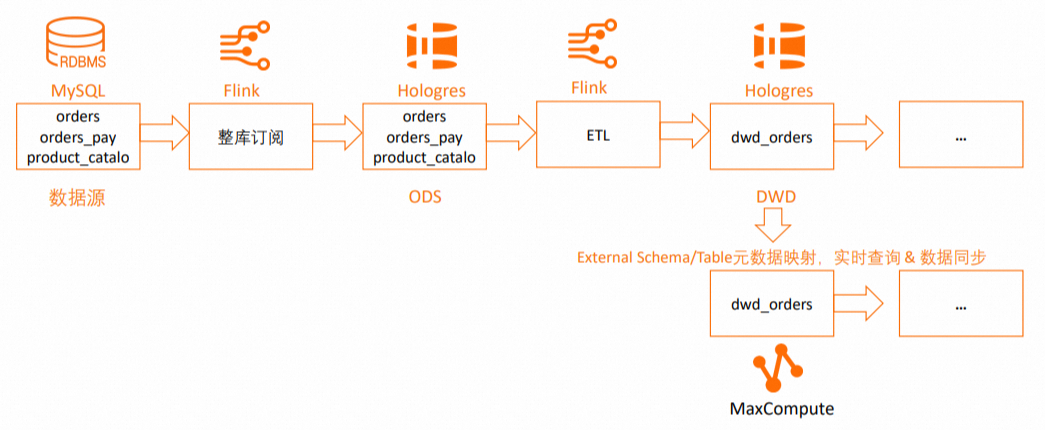
Supported:
Map Hologres schemas using external schemas.
Map Hologres tables using external tables.
Map Hologres databases using external projects.
Specify Hologres tables for one-time or recurring data synchronization.
Procedure
Prerequisites
A MaxCompute project is created, and support for the schema level is enabled.
A RAM role is created and a trust policy is configured.
ApsaraDB RDS is activated.
Hologres is activated.
Flink is activated.
Step 1: Prepare an RDS MySQL data source
Create an ApsaraDB RDS for MySQL instance, create test tables, and write test data to the tables. This instance will be used as the data source.
The ApsaraDB RDS for MySQL instance, Hologres instance, and Flink instance must be in the same region and zone, and use the same VPC.
You can use the network probe feature in the Real-time Computing console to check the network connectivity between the Flink workspace and the RDS for MySQL and Hologres instances. For more information, see Perform a Network Probe.
Sign in to the RDS console.
In the left navigation bar, select Instances, and in the top-left corner, select the region.
On the Instances page, click Create Instance.
In this example, Billing method and Engine are set to pay-as-you-go and MySQL 8.0, respectively.
On the Instances page, click the target instance's Instance ID/Name to open the Instance Details page.
In the left navigation bar, click Accounts.
Create a database logon account.
In the left navigation bar, click Databases.
Click Create Database. Configure the following parameters:
Parameter
Required
Description
Example
Database Name
Required
The name must be 2 to 64 characters in length.
It must start with a letter and end with a letter or a digit.
It can contain only lowercase letters, digits, underscores (_), and hyphens (-).
The database name must be unique within the instance.
If the database name contains a hyphen (
-), the hyphen (-) in the created database folder name is converted to@002d.
hologres_testAuthorized By
Optional
Only standard accounts appear here. A privileged account has full permissions on all databases and does not require authorization.
Select the logon account you just created.Click Log On to Database. In the left navigation bar, select Instance and double-click the created database. On the SQL Console page on the right, execute the following statements to create a test table and write test data.
CREATE TABLE `orders` (
  order_id bigint not null primary key,
  user_id varchar(50) not null,
  shop_id bigint not null,
  product_id bigint not null,
  buy_fee numeric(20,2) not null,
  create_time timestamp not null,
  update_time timestamp not null default now(),
  state int not null
);


CREATE TABLE `orders_pay` (
  pay_id bigint not null primary key,
  order_id bigint not null,
  pay_platform int not null,
  create_time timestamp not null
);


CREATE TABLE `product_catalog` (
  product_id bigint not null primary key,
  catalog_name varchar(50) not null
);

-- Prepare the data
INSERT INTO product_catalog VALUES(1, 'phone_aaa'),(2, 'phone_bbb'),(3, 'phone_ccc'),(4, 'phone_ddd'),(5, 'phone_eee');

INSERT INTO orders VALUES
(100001, 'user_001', 12345, 1, 5000.05, '2023-02-15 16:40:56', '2023-02-15 18:42:56', 1),
(100002, 'user_002', 12346, 2, 4000.04, '2023-02-15 15:40:56', '2023-02-15 18:42:56', 1),
(100003, 'user_003', 12347, 3, 3000.03, '2023-02-15 14:40:56', '2023-02-15 18:42:56', 1),
(100004, 'user_001', 12347, 4, 2000.02, '2023-02-15 13:40:56', '2023-02-15 18:42:56', 1),
(100005, 'user_002', 12348, 5, 1000.01, '2023-02-15 12:40:56', '2023-02-15 18:42:56', 1),
(100006, 'user_001', 12348, 1, 1000.01, '2023-02-15 11:40:56', '2023-02-15 18:42:56', 1),
(100007, 'user_003', 12347, 4, 2000.02, '2023-02-15 10:40:56', '2023-02-15 18:42:56', 1);

INSERT INTO orders_pay VALUES
(2001, 100001, 1, '2023-02-15 17:40:56'),
(2002, 100002, 1, '2023-02-15 17:40:56'),
(2003, 100003, 0, '2023-02-15 17:40:56'),
(2004, 100004, 0, '2023-02-15 17:40:56'),
(2005, 100005, 0, '2023-02-15 18:40:56'),
(2006, 100006, 0, '2023-02-15 18:40:56'),
(2007, 100007, 0, '2023-02-15 18:40:56');
Step 2: Create a Hologres instance and a new database
Create a Hologres instance and a database. Flink uses this database to receive table data from RDS for MySQL.
Log on to the Hologres management console. In the upper-left corner, select a region.
If you do not have an instance, purchase a Hologres instance.
For Product Type, select Exclusive instance (pay-as-you-go)
Instance Type: Select Virtual Warehouse.
For Reserved Compute Resources for Virtual Warehouse, select 64 CU.
On the Instances page, click the name of the target instance.
On the instance details page, click Connect to Instance.
Click the Metadata Management tab.
Click Create Database, enter the Database Name in the dialog box that appears, and leave the other parameters at their default settings.
In this example, the Hologres database is named
holodb.Click the Security Center tab.
In the navigation pane on the left, click Users.
Grant the
SuperUserpermission to theAliyunODPSDefaultRolerole so that it can perform table operations in Hologres. For more information, see User Management.Grant the RAM role the Developer permission for the instance. This is supported only in SPM mode. For more information, see DB Management.
Step 3: Create a whole-database sync task for RDS for MySQL in Flink (ODS layer)
Create a whole-database sync task in Flink to synchronize data from RDS for MySQL to the
publicschema of theholodbHologres database. Use the defaultinit_warehousecompute group in Hologres to query the Operational Data Store (ODS) data.Before you start, enable binary logging for MySQL. To check whether binary logging is enabled, run the
show variables like "log_bin";command in your RDS for MySQL database. For more information, see MySQL server configuration requirements.Create a session cluster.
Log in to the real-time compute for Apache Flink console and select a region in the upper-left corner.
Click the target workspace name, and in the left navigation pane, choose .
Click Create Session Cluster.
Create a Hologres catalog.
Click the name of the target workspace, and then in the left-side navigation pane, select Data Management.
On the catalog list page, click Create Catalog. In the Create Catalog dialog box, select Hologres, click Next , and configure the following parameters:
Parameter
Required
Description
catalog name
Required
A custom name for the Hologres catalog.
endpoint
Required
On the Hologres instance details page, go to the Network Information section and find the endpoint for the specified VPC. Example:
hg****cn-cn-2****f-cn-shenzhen-vpc-st.hologres.aliyuncs.com:80.dbname
Required
The Hologres database name.
username
Required
Your Access Key ID.
password
Required
Your Access Key Secret.
Create a MySQL catalog.
On the catalog list page, click Create Catalog . In the Create Catalog dialog box, select MySQL, click Next , and configure the following parameters:
Parameter
Required
Description
catalog name
Required
A custom name for the MySQL catalog.
hostname
Required
-
The IP address or hostname of the MySQL database.
-
Log on to the ApsaraDB RDS for MySQL console. On the instance details page, click Database Connection to view the internal endpoint, public endpoint, and internal port.
-
For cross-VPC or public network access, ensure network connectivity. For more information, see network connectivity.
port
Optional
The port for connecting to the server. The default value is 3306.
default database
Required
The default database name.
username
Required
The username to connect to the MySQL database. Log on to the ApsaraDB RDS for MySQL console. On the instance details page, click Accounts to view the username.
password
Required
The password to connect to the MySQL database. Log on to the ApsaraDB RDS for MySQL console. On the instance details page, click Accounts to view the password.
-
Synchronize data from RDS for MySQL to Hologres using Flink.
Click the target workspace name, and then in the left navigation pane, select .
On the Drafts tab, click
 to create a new folder.
Right-click a folder and select New Blank Stream Draft. In the New Draft dialog box, enter a Name and select an Engine Version.
CREATE DATABASE IF NOT EXISTS <your hologres catalog>.<hologres database name>    -- The table_property.binlog.level parameter was set when the catalog was created, so binary logging is enabled for all tables created by CDAS.
AS DATABASE <your mysql catalog>.<mysql database name> INCLUDING all tables -- Select which tables from the input database to ingest as needed.
/*+ OPTIONS('server-id'='8001-8004') */ ;   -- Specify the server ID range for the mysql-cdc instance.
In the top-right corner, click Deploy.
On the Deployments page, click the target job to open the deployment details page.
In the upper-right corner of the page, click Start, select stateless start, and then click Start.
NoteBy default, this example synchronizes data to the public schema of the Hologres database. You can also synchronize data to a specified schema in the destination Hologres database. For more information, see Use as a destination catalog for CDAS. After you specify a schema, the table name format also changes when you use the catalog. For more information, see Use a Hologres catalog.
If the data structure of a source table changes, the change is reflected in the sink table only after a data modification, such as a deletion, insertion, or update, occurs in the source table.
Step 4: Load data into Hologres
Table groups store data in Hologres.
To query data from a table group, such as order_dw_tg_default, in the holodb database using the init_warehouse virtual warehouse, you must load the table group into the virtual warehouse. You can then use the init_warehouse virtual warehouse to query and write data.
On the HoloWeb developer page, click SQL Editor, confirm the instance and database names, and then execute the following commands.
For more information, see Create a new virtual warehouse instance.
Log on to the Hologres management console. In the upper-left corner, select a region.
In the navigation pane on the left, click Instances.
On the Instances page, click the name of the target instance.
On the instance details page, click Connect to Instance.
Click the SQL Editor tab.
Confirm the instance and database names, and then run the following commands. After the table group is loaded, you can see that the compute resource group has loaded the data from the
holodb_tg_defaulttable group.-- View the table groups in the current database. SELECT tablegroup_name FROM hologres.hg_table_group_properties GROUP BY tablegroup_name; -- Load a table group into the virtual warehouse. CALL hg_table_group_load_to_warehouse ('<hologres-database-name>.<table-group-name>', '<your-virtual-warehouse-name>', 1); -- View the table groups loaded in the virtual warehouse. SELECT * FROM hologres.hg_warehouse_table_groups;Run the following commands to view the data in the three tables that were synchronized from MySQL to Hologres.
--- Query data from the orders table.
SELECT * FROM orders;

--- Query data from the orders_pay table.
SELECT * FROM orders_pay;

--- Query data from the product_catalog table.
SELECT * FROM product_catalog;
Step 5: Create a DWD layer table in Flink
This step uses the Hologres connector's partial column update capability. You can express partial updates with INSERT DML. The job queries multiple dimension tables by using high-performance point queries, enabled by Hologres row storage and hybrid row-column storage. With strong resource isolation, write, read, and analytics workloads do not interfere with each other.
Use the Flink Catalog feature to create the dwd_orders wide table in the DWD layer in Hologres.
Log in to the real-time compute for Apache Flink console and select a region in the upper-left corner.
Click the target workspace name, and then in the left navigation pane, select .
On the Query Script tab, click
 to create a new query script.
Enter the following code and click Run in the upper-right corner.
-- Fields in a wide table must be nullable. Different streams write to the same sink table, so any column can be null.
CREATE TABLE <hologres catalog>.<hologres database>.dwd_orders (
  order_id bigint not null,
  order_user_id string,
  order_shop_id bigint,
  order_product_id bigint,
  order_product_catalog_name string,
  order_fee numeric(20,2),
  order_create_time timestamp,
  order_update_time timestamp,
  order_state int,
  pay_id bigint,
  pay_platform int comment 'platform 0: phone, 1: pc',
  pay_create_time timestamp,
  PRIMARY KEY(order_id) NOT ENFORCED
);

-- Use a catalog to modify the properties of a Hologres physical table.
ALTER TABLE <hologres catalog>.<hologres database>.dwd_orders SET (
  'table_property.binlog.ttl' = '604800' -- Set the binlog TTL to one week.
);
Consume the binlogs of the
ordersandorders_paytables in the ODS layer in real time.Click the target workspace name, and then in the left navigation pane, select .
Create an SQL stream job named DWD. Copy the following code to the SQL editor, and then deploy and start the job. The
orderstable is joined with theproduct_catalogdimension table, and the final result is written to thedwd_orderstable to enrich the data in real time.BEGIN STATEMENT SET; INSERT INTO <your hologres catalog name>.<your hologres database name>.dwd_orders ( order_id, order_user_id, order_shop_id, order_product_id, order_fee, order_create_time, order_update_time, order_state, order_product_catalog_name ) SELECT o.*, dim.catalog_name FROM <your hologres catalog name>.<your hologres database name>.orders as o LEFT JOIN <your hologres catalog name>.<your hologres database name>.product_catalog FOR SYSTEM_TIME AS OF proctime() AS dim ON o.product_id = dim.product_id; INSERT INTO <your hologres catalog name>.<your hologres database name>.dwd_orders (pay_id, order_id, pay_platform, pay_create_time) SELECT * FROM <your hologres catalog name>.<your hologres database name>.orders_pay; END;View the data in the
dwd_orderswide table.On the HoloWeb developer page, connect to the Hologres instance and log on to the destination database. Then, run the following command in the SQL editor.
SELECT * FROM dwd_orders;The following result is returned:
+------------+---------------+---------------+------------------+----------------------------+------------+-------------------+-------------------+-------------+------------+--------------+-----------------+
| order_id   | order_user_id | order_shop_id | order_product_id | order_product_catalog_name | order_fee  | order_create_time | order_update_time | order_state | pay_id     | pay_platform | pay_create_time |
+------------+---------------+---------------+------------------+----------------------------+------------+-------------------+-------------------+-------------+------------+--------------+-----------------+
| 100002     | user_002      | 12346         | 2                | phone_bbb                  | 4000.04    | 2023-02-15 15:40:56 | 2023-02-15 18:42:56 | 1           | NULL       | NULL         | NULL            |
| 100004     | user_001      | 12347         | 4                | phone_ddd                  | 2000.02    | 2023-02-15 13:40:56 | 2023-02-15 18:42:56 | 1           | NULL       | NULL         | NULL            |
| 11111      | user_test     | 12346         | 2                | phone_bbb                  | 4000.04    | 2025-12-15 00:00:00 | 2025-12-15 00:00:00 | 1           | NULL       | NULL         | NULL            |
| 100001     | user_001      | 12345         | 1                | phone_aaa                  | 5000.05    | 2023-02-15 16:40:56 | 2023-02-15 18:42:56 | 1           | NULL       | NULL         | NULL            |
| 100007     | user_003      | 12347         | 4                | phone_ddd                  | 2000.02    | 2023-02-15 10:40:56 | 2023-02-15 18:42:56 | 1           | NULL       | NULL         | NULL            |
| 100006     | user_001      | 12348         | 1                | phone_aaa                  | 1000.01    | 2023-02-15 11:40:56 | 2023-02-15 18:42:56 | 1           | NULL       | NULL         | NULL            |
| 100005     | user_002      | 12348         | 5                | phone_eee                  | 1000.01    | 2023-02-15 12:40:56 | 2023-02-15 18:42:56 | 1           | NULL       | NULL         | NULL            |
| 100003     | user_003      | 12347         | 3                | phone_ccc                  | 3000.03    | 2023-02-15 14:40:56 | 2023-02-15 18:42:56 | 1           | NULL       | NULL         | NULL            |
+------------+---------------+---------------+------------------+----------------------------+------------+-------------------+-------------------+-------------+------------+--------------+-----------------+
Step 6: Create a MaxCompute external data source for a Hologres database
When you map Hologres tables using an external schema, you do not need to create tables that contain Data Definition Language (DDL) metadata in MaxCompute. If the table schema or data in the source Hologres database changes, MaxCompute detects the changes in real time. You can then query the updated metadata and data.
Log in to the MaxCompute console and select a region in the upper-left corner.
-
In the left-side navigation pane, choose .
-
On the External Data Source page, click Create External Data Source.
In the Create External Data Source dialog box, configure the parameters. The following tables describe the parameters.
Parameter
Required
Description
External Data Source Type
Required
Select Hologres.
External Data Source Name
Required
A custom name. The name must meet the following requirements:
Contains only lowercase letters, digits, and underscores (_).
Is no more than 128 characters long.
Example:
holo_external_source.Description
Optional
Enter a description as needed.
Connection Method
Required
The default value is classic network access (internal network).
InstanceID
Required
Select the Hologres instance in the current region that you want to connect to.
Host
Required
This is generated by the system by default.
Port
Required
This is the system-generated default.
DBNAME
Required
The name of the Hologres database that you want to connect to.
Authentication And Authorization
Required
RAM role
RoleARN
Required
The Alibaba Cloud Resource Name (ARN) of the RAM role.
Log in to the RAM console.
In the left navigation bar, select .
In the Basic Information section, you can obtain the ARN.
Example:
acs:ram::124****:role/aliyunodpsholorole.Foreign Server Supplemental Properties
Optional
Additional properties for the external data source. After you specify these properties, tasks that use this data source can access the source system based on the defined behavior.
NoteFor information about supported parameters, see future updates in the official documentation. More parameters will be supported as the product evolves.
Step 7: Attach MaxCompute and Hologres compute resources in DataWorks
Log in to the DataWorks console and select a region in the upper-left corner.
Create a new DataWorks workspace. In this tutorial, the workspace is named
Hologres_DW_TEST.On the Workspaces page, click the name of the target workspace.
On the Workspace Details page, click Computing Resource in the navigation pane on the left.
On the Computing Resource page, click Associate Computing Resources, and select MaxCompute and Hologres.
Enter the basic information. For more information, see Attach compute resources.
Add and view MaxCompute projects and Hologres instances.
In the navigation pane on the left, choose .
Select Workspace, and click Go to Data Studio.
Add and view MaxCompute projects and Hologres instances.
Step 8: Map a Hologres table to MaxCompute
External table: Synchronize a single Hologres table as needed.
External schema: Synchronize data at the schema level. This lets you grant permissions based on table names in MaxCompute.
External project: Query a wider range of data using a user identity. After a user is added to the project, their table permissions are controlled in Hologres.
Method 1: Create a MaxCompute external project to map a Hologres database
Create a Hologres external project in MaxCompute
Log in to the MaxCompute console and select a region in the upper-left corner.
In the left-side navigation pane, choose .
On the External Project tab, click Create Project.
In the Create Project dialog box, configure the project information. For descriptions of the parameters, see Create a Hologres external project.
Click OK to create the project.
Bind the MaxCompute external project in DataWorks
On the Workspaces page, click the name of the target workspace.
On the Workspace Details page, click Computing Resource in the navigation pane on the left.
On the Computing Resource page, click Associate Computing Resources and select MaxCompute. In the Project Name field, select the new external project. For more information, see Bind a compute resource.
Add and view the MaxCompute project and Hologres instance in DataWorks
In the navigation pane on the left, choose .
Select Workspace, and click Go to Data Studio.
Add and view the MaxCompute project.
In DataStudio, create a MaxCompute SQL node and select External Project as the compute resource on the right. Run the following SQL statements to query the Hologres table in the external project or write data to a MaxCompute internal table.
SET odps.namespace.schema=true;
SELECT * FROM ext_project_holo.public.dwd_orders;

-- Synchronize data from the DWD layer to a MaxCompute internal table. The internal table format is: internal_project.schema.table_name.
SET odps.namespace.schema=true;
create table managed_project.schema.table_name as
  select * from ext_project_holo.public.dwd_orders;
Method 2: Create a MaxCompute external schema to map a Hologres schema
This method uses the data catalog feature of DataWorks to map a Hologres schema. You can also use MaxCompute SQL to create an external schema that maps to a Hologres schema. For more information, see Hologres external schema.
Log in to the DataWorks console and select a region in the upper-left corner.
In the navigation pane on the left, choose .
Select Workspace, and click Go to Data Studio.
On the DataStudio page, click the
 icon in the left navigation bar to go to the Data Catalog.
Expand the Hologres data catalog, right-click the Schema of the target instance (in this example,
public), and select Metadata Mapping to MaxCompute.On the Metadata Mapping to MaxCompute page, configure the Hologres source and MaxCompute target parameters.
The key parameters for this tutorial are configured as follows. Keep the default values for the other parameters.
Parameter name
Description
Project Find Method
Select DataWorks data source binding.
Data Source
Select the name of the MaxCompute compute resource that is bound to DataWorks.
External Schema Name
Specify the name of the external schema in the target MaxCompute project to which the metadata from the source Hologres schema is mapped.
In this tutorial, set this to
public.External Data Source
Select the name of the Hologres federated data source that has been created in MaxCompute.
In this tutorial, this is
holo_external_source.Click Run in the upper-left corner of the page.
Upon successful execution, a MaxCompute external schema with the same name as the Hologres schema (public) appears.
Browse the tables in Hologres and run the following SQL commands in MaxCompute to query data or write data to a MaxCompute internal table.
SET odps.namespace.schema=true;
SELECT * FROM public.dwd_orders;

-- Synchronize data from the DWD layer to a MaxCompute internal table. The internal table format is: internal_schema.table_name.
SET odps.namespace.schema=true;
CREATE TABLE managed_schema.table_name AS
  SELECT * FROM es_public.dwd_orders;
If the schema-level mapping is successful but the mapped table name is not displayed in the MaxCompute directory of the data catalog and a query fails, confirm that the permissions of the created RAM role are correctly configured. For more information, see Hologres external tables.
Unlike external schemas, external tables require you to create the Hologres table as an external table in MaxCompute. External tables support two authentication methods: RAMRole and dual-signature.
RAMRole: Supports cross-account role assumption. In Hologres, complete the following operations:
Add the RAMRole as a user of the Hologres instance. For more information, see User management.
Grant the Developer permission for the instance to the RAM role (supported only in SPM mode). For more information, see DB management.
Dual-signature: Uses the identity of the user who is currently running the task for authentication. This means that if the current user has permissions on specific tables in Hologres, they can also use this identity to access Hologres data through the MaxCompute external table. For more information, see Hologres external tables.
Method 3: Create a MaxCompute external table to map a Hologres table
This method uses the data catalog feature of DataWorks to map a Hologres table. You can also use MaxCompute SQL to create an external table that maps to a Hologres table. For more information, see Hologres external tables.
You can map some or all of the fields. For mapping rules, see the tblproperties parameter section in Hologres external tables.
Log in to the DataWorks console and select a region in the upper-left corner.
In the navigation pane on the left, choose .
Select Workspace, and click Go to Data Studio.
On the DataStudio page, click the
 icon in the left navigation bar to go to the Data Catalog.
Expand the Hologres data catalog, right-click the
dwd_orderstable in thepublicschema of the target instance, and select Metadata Mapping to MaxCompute.On the Metadata Mapping to MaxCompute page, configure the Hologres source and MaxCompute target parameters.
The key parameters for this tutorial are configured as follows. Keep the default values for the other parameters. For more information about the parameters, see Single-table metadata mapping.
Parameter name
Description
Instance search method
Select From DataWorks Data Sources.
Data Source
Select the name of the MaxCompute data source that is bound to DataWorks.
Schema
Specify the name of the external schema in the target MaxCompute project to which the metadata from the source Hologres schema is mapped.
In this tutorial, set this to
default.External Table
Specify the name of the new external table in MaxCompute. The data from the source table is mapped to this table. By default, the name is the same as the Hologres table name.
Creating an external table is a one-time action. Metadata is not automatically refreshed. To refresh the metadata, delete the current external table and manually create the metadata mapping again.
Permissions to Access MaxCompute External Table
Select Dual-signature.
If you select the RamRole method, you must add a user and grant DB authorization in Hologres.
Lifecycle
Set the lifecycle of the table.
Click Run in the upper-left corner of the page.
Upon successful execution, the new external table is displayed under the MaxCompute schema on the left.
In MaxCompute, query the data of the external table or write the data to a MaxCompute internal table.
SET odps.namespace.schema=true;
SELECT * FROM dwd_orders;

-- Synchronize data from the DWD layer to a MaxCompute internal table. The internal table format is: internal_schema.table_name.
SET odps.namespace.schema=true;
CREATE TABLE table_name AS
  SELECT * FROM dwd_orders;
Method 4: Create an auto-triggered task to synchronize a Hologres table to a MaxCompute internal table
To periodically archive data from a DWD table in a Hologres real-time data warehouse to an internal table in a MaxCompute data warehouse, you can use a data synchronization task and configure a recurring schedule.
Log in to the DataWorks console and select a region in the upper-left corner.
In the navigation pane on the left, choose .
Select Workspace, and click Go to Data Studio.
On the DataStudio page, click the
icon in the left navigation bar to go to the Data Development page, and create a new directory structure.On the DataStudio page, click the
icon in the left navigation bar to go to the Data Catalog.Expand the Hologres data catalog. Right-click the
dwd_orderstable in thepublicschema of the target instance, and select Sync Data to MaxCompute.On the Metadata Mapping to MaxCompute page, configure the parameters for the Hologres source and the MaxCompute target.
The key parameters for this tutorial are configured as follows. Keep the default values for the other parameters. For more information about the parameters, see Single-table metadata mapping.
In the Create Node dialog box, set the table name to
dwd_holo_ordersand click OK. The configuration page for synchronizing data from Hologres to MaxCompute opens. You can then configure the parameters for the Hologres source and the MaxCompute target.The key parameters for this tutorial are configured as follows. For more information about the parameters, see Configure a synchronization node.
Parameter name
Description
Data Source
Select the name of the Hologres data source that is bound to DataWorks.
Schema
Select the schema where you want to store the data.
Table
Specify a custom name for the MaxCompute internal table.
In this tutorial, set this to
dwd_holo_orders.Lifecycle
Set the lifecycle of the table.
Import Method
Select the method to write data to the MaxCompute internal table:
Overwrite: Select this option to delete the original data and write the new data to the target table.
Append: Select this option to keep the original data and append the new data to the target table.
Access Hologres permissions
Select one of the following methods to access the Hologres instance as needed:
Dual-signature access method: Verifies permissions for Hologres using the current identity.
Make sure that you have read permissions on the MaxCompute table and permissions on the corresponding Hologres source table in the MaxCompute project.
RamRole access method: Verifies the access identity using a specified RAM role.
Grant the
AliyunSTSAssumeRoleAccessaccess policy to the Resource Access Management (RAM) user. For more information, see RAM role authorization mode. After the authorization is complete, configure the specified RAM role in RamRole.
On the right side of the page, click Schedule Config. On the Schedule Config page that appears, configure the workflow and scheduling cycle. For more information, see Node scheduling configuration.
Click Run in the upper-left corner of the page.
Upon successful execution, the new internal table is displayed under MaxCompute on the left. You can use the following SQL statement in MaxCompute to query the data of this table.
SET odps.namespace.schema=true;
SELECT * FROM default.dwd_holo_orders;
 icon in the left navigation bar to go to the Data Development page, and