Developing with MaxFrame notebooks
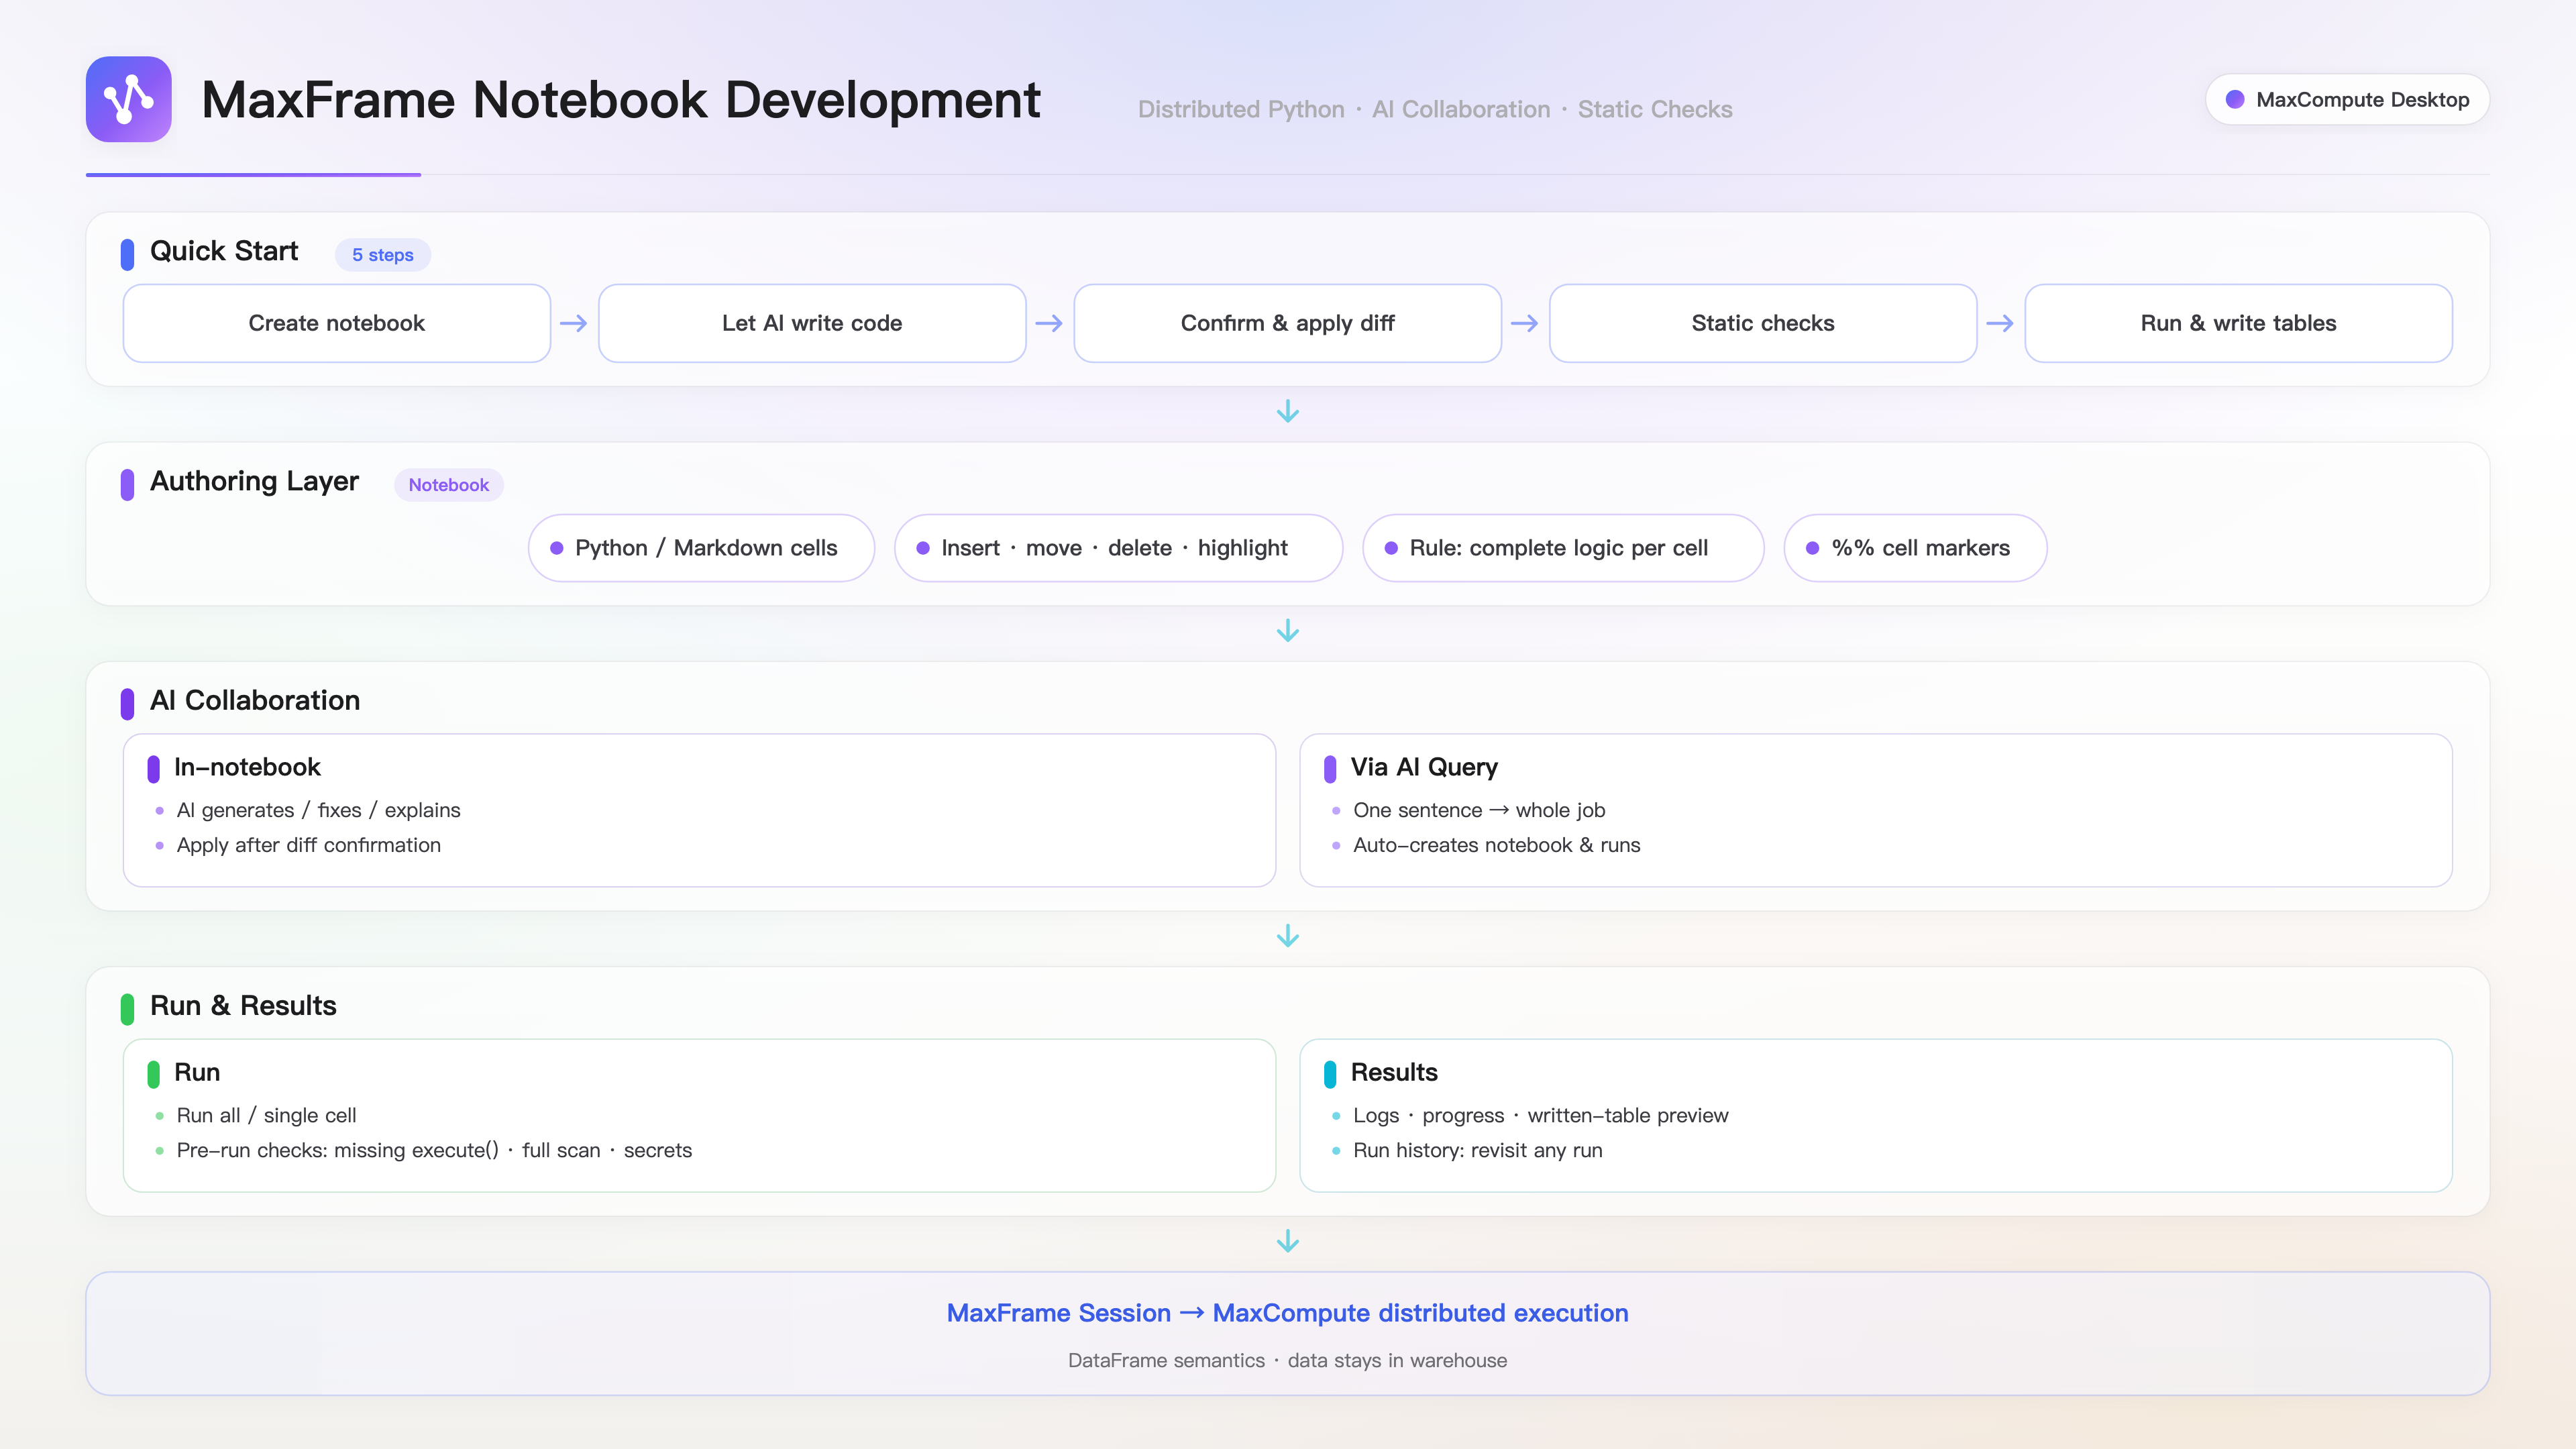
MaxFrame Notebook is a Python data processing module built into the MaxCompute AI Data Discovery Client. It allows you to write big data processing jobs using pandas-style code. You can run your code cell by cell in the client, view the output of each step, inspect output tables, or have the AI generate an entire job from a single prompt.
Overview
MaxFrame is a distributed Python computing framework for MaxCompute. Its API is highly compatible with pandas, but all computations are performed on MaxCompute. This lets you process datasets far larger than a single machine's memory.
In the client, you do not need to install a local Python environment or configure an AccessKey. Create a new notebook to start writing and running code. Your credentials are automatically injected based on your current connection.
Use cases
Multi-step data processing: Use a single notebook to chain together a complete pipeline, including data extraction, cleaning, deduplication, data masking, creating derived fields, and writing to a result table.
Logic that is hard to express in SQL: Use Python for more intuitive operations like bulk processing with regular expressions, complex string manipulation, custom row-level calculations, and cross-column derivations.
Multimodal data processing: With the Blob column type, process images, audio, and video stored in tables at scale.
AI-powered generation: Describe which table to read, what to do, and which table to write to, and have the AI generate, check, and run the complete job for you.
Features
Feature | Description |
Notebook editing | Supports Python and Markdown cells, with options to insert, delete, move up or down, and apply syntax highlighting. |
Cell-by-cell execution | You can run all cells or a single cell individually. |
Result viewing | Displays output logs, a progress bar, and a data preview of the cell's output table. |
Static checking | Checks for common issues before execution, such as omitted calls to |
Run history | Maintains a history of runs for each cell, allowing you to review the results of any previous run. |
AI collaboration | Let AI generate, fix, or explain code within the notebook, or generate an entire job from a single prompt in the AI dialog. |
Prerequisites
The MaxCompute AI Data Discovery Client is installed and running.
A data connection is configured, and the desired MaxCompute project is selected. Without an active connection, the MaxFrame section does not appear in the left-side navigation pane.
The account used for the current connection must have read and write permissions for the target project. Table creation and write permissions are required to write to a result table.
To use AI features, you must configure the API URL, API Key, and model name in Settings > AI Configuration.
Quick start
This example shows how to read a detail table, clean and deduplicate the data, and write the results to a new table.
Step 1: Create a notebook
In the left-side navigation pane, in the MaxFrame section, click the + icon. Enter a name, for example, mf_my_pipeline, and then click Create Notebook. The editor opens automatically. You can also create a notebook by selecting the MaxFrame type from the unified new file dialog.
Notebook names must be unique within the same project. If creation fails, try a different name or delete the existing draft with the same name.
Step 2: Generate code with AI
Click Continue with AI in the editor toolbar. The AI Assistant panel on the right switches to the MaxFrame Job Assistant. Describe your requirements in the input box, for example:
Read project_with_dr.sales_detail, remove duplicate records, and filter out rows where the amount is null.
Aggregate daily sales amount and order count, and write the results to project_with_dr.sales_daily.
Use separate cells for each step, and add step names in Markdown cells.
The AI first reads the current notebook and then generates the code.
Step 3: Confirm and apply
Before the AI modifies the notebook, a confirmation card appears, showing the proposed changes and their rationale:
Click Apply to Notebook: The code is written to the notebook, the editor refreshes immediately, and the AI automatically performs a check.
Click Cancel: The changes are not applied. You can then ask the AI to generate the code again.
If you are not satisfied after applying the changes, you can continue the conversation. For example, say "change the deduplication to only apply to the order ID". The AI remembers the previous context.
Step 4: Check the code
Click Check at the top of the editor. The client scans the code for common issues and displays the results in the Advisor tab of the bottom panel.
Click Go to next to an issue to jump to the corresponding line of code. You can also click Let Agent Fix All to have the Agent correct the issues.
Step 5: Run job and write to table
Click Run in the toolbar. The client executes all Python cells from top to bottom and displays the progress at the top, such as "Running cell 3/5".
After to_odps_table(...).execute() completes, the result is written to the MaxCompute table. No additional publishing or deployment steps are required. After the run completes, you can preview the output data below the cell.
If you only modified a single cell, you do not need to run all cells again. Click Run Cell in that cell's toolbar.
Writing a notebook
Cell types
A notebook is essentially a standard Python file that uses comments to define cells:
Marker | Type | Purpose |
| Python | Executable processing code. |
| Markdown | Step descriptions, assumptions, and notes. Not executed or checked. |
The top of the editor shows the cell structure of the current notebook, for example, 8 cells · 3 Markdown · 5 Python.
Editing operations
Action | Method |
Add a cell | In the add bar between cells or at the end of the notebook, click Python or Markdown. |
Edit code | Click Edit Code Cell in the cell toolbar. After editing, click Preview to return to the rendered view. |
Edit description text | Click directly in the Markdown area to edit. |
Reorder cells | Use the Move Cell Up / Move Cell Down buttons in the cell toolbar. |
Delete a cell | Click Delete Cell in the cell toolbar. At least one Python cell must remain. |
Run a cell | Click Run Cell in the cell toolbar. |
Your content is saved automatically. The status at the top displays Unsaved, Saving, or Saved. The notebook is always saved before being checked or run.
You can right-click a notebook in the left-side navigation pane to Add to Chat (send the code as an attachment to the AI), Copy Name, or Delete.
Code organization rules
Each cell is compiled and executed independently, but variables are shared between cells. Note the following two rules:
Rule 1: The code block within each cell must be syntactically complete.
Statement blocks such as
try/finally,if,for, anddefcannot be split across multiple cells. Doing so will result in a syntax error.# ✗ Incorrect: try and finally are split into two cells # %% try: result.execute() # %% finally: session.destroy()# ✓ Correct: The entire block is in the same cell # %% try: result.execute() finally: session.destroy()Rule 2: Variables can be used across cells.
Variables defined in one cell, such as
sessionanddf, can be referenced in subsequent cells without redefinition.Code generated by the AI automatically follows these two rules. Please keep them in mind when writing code manually.
If the last line of a cell is an expression, its value is automatically displayed. This is useful for quickly viewing results and is consistent with Jupyter's behavior.
Complete example
# %% [markdown]
# ## Step 1: Create a session
# MaxFrame requires you to explicitly create a session and release it when the job is finished.

# %%
import maxframe.dataframe as md
from maxframe.session import new_session

session = new_session()

# %% [markdown]
# ## Step 2: Read and clean the table
# Deduplicate and filter out null amounts.

# %%
df = md.read_odps_table("project_with_dr.sales_detail")
clean = df.dropna(subset=["amount"]).drop_duplicates(subset=["order_id"])

# %% [markdown]
# ## Step 3: Summarize by day and write to the result table

# %%
daily = clean.groupby("stat_date").agg({"amount": "sum", "order_id": "count"})
daily.columns = ["total_amount", "order_count"]

try:
    md.to_odps_table(daily, "project_with_dr.sales_daily", overwrite=True).execute()
finally:
    session.destroy()
Usage notes:
MaxFrame uses lazy execution. Computations are not submitted until you call
execute().overwrite=Trueoverwrites the entire result table with each run. If the table does not exist, MaxFrame automatically creates it.Wrap
execute()andsession.destroy()in atry/finallyblock within the same cell to ensure resources are released correctly.Do not hard-code an AccessKey in your code. Credentials are automatically injected based on the current connection. If you need PyODPS, call
ODPS.from_environments()to get an authenticated entrypoint.
Running a job and viewing results
Execution modes
Mode | Entrypoint | Use case |
Run all | Click Run at the top of the editor. | Run the entire notebook. This resets the run state and starts from a clean environment. |
Run cell | Click Run Cell in the cell toolbar. | Ideal for incremental debugging when you have modified only one cell and want to reuse variables from previously run cells. |
A cancel button appears at the top while the job is running. Only one job can run in the same notebook at a time. If you trigger another run, a message is displayed: This draft already has a running task. Wait for it to finish or cancel it before trying again.
Cell output
After each cell runs, the results are displayed in three tabs below the cell:
Tab | Content |
Output | Logs printed by the code. You can expand, collapse, and copy the content. |
Target table | A data preview of the cell's output table. |
Console | Error messages and a progress bar. |
Target table preview: The client automatically identifies the cell's output table and displays its data directly in the Target table tab. You can switch between viewing the first 20, 50, or 100 rows, refresh the data, or click the external link icon to open the full table details.
Review history: If a cell has been run multiple times, a selector appears in the top-right corner, allowing you to switch between and view the results of previous runs by time and status. The last 10 runs for each cell are retained. The output area also displays the duration, instance ID, and an Open LogView link for the current run, allowing you to jump directly to MaxCompute for troubleshooting.
Bottom panel
There are three collapsible tabs at the bottom of the editor:
Run details: This is divided into four sub-tabs: Summary, Standard output, Console, and DAG. The summary shows the status and duration of the current run. If a run fails, the client highlights the failure location and provides a Let Agent Fix button.
History: Shows a complete record of all runs for this notebook, including time, mode, status, and duration. Failed runs are marked in red, and you can expand them to see details.
Advisor: Lists the issues found by the most recent check.
Checking jobs
Click Check at the top of the editor. The client scans the Python code for common pitfalls when writing MaxFrame jobs without actually running the job or consuming computing resources. Markdown content is not checked. The check covers four main categories:
Jobs that produce no results: A missing session creation, a forgotten
execute()call, or incorrect session cleanup timing. Because MaxFrame uses lazy execution, these issues can cause a job to seem to complete successfully but produce no results.Performance and cost risks: Reading a partitioned table without specifying a range, which results in a full table scan; fetching a large result set back to the client; or using row-by-row processing for large-scale data.
Security issues: Hard-coding credentials in the code. Credentials are automatically injected by the client and should not be written in a draft.
Incomplete output: The job does not write to any table. This can be ignored if the job is only for analysis, but it needs to be addressed if the job is intended to deliver a result table.
AI-powered job development
The client provides two ways to collaborate with AI. Choose the one that best fits your current workflow.
Modify code with AI
After opening a notebook, click Continue with AI. The right-side panel switches to the MaxFrame Job Assistant. In an empty session, three quick actions are available:
Quick action | Description |
Generate notebook job | Generates a complete job, including Markdown for descriptions and Python for logic, then automatically checks and requests to run it. |
Check and fix | Troubleshoots issues with code, session lifecycle, and the usage of |
Explain current job | Explains the input tables, key transformations, output tables, and potential risks without modifying the code. |
Actions with side effects require manual confirmation through two types of confirmation cards:
Code modification: Shows a summary of changes and the reasons. Click Apply to Notebook to accept or Cancel to reject.
Execution request: This card notifies you that running the notebook will reset the run state, execute all Python cells, and potentially consume computing resources or modify data. You must click Run Notebook to proceed.
The input box is locked while waiting for confirmation. You can stop the AI at any time during its response. If stopped, the dialog context is fully retained, allowing you to add more details or change your request.
The dialog history is saved on the server. Click the clock icon at the top of the panel to retrieve previous conversations. Click + to start a new dialog.
Generate job from AI dialog
If the data processing is just one part of a larger analysis task, you can describe your requirements directly in the AI dialog (AI Query) without manually creating a notebook. For example:
Use MaxFrame to aggregate daily sales and order counts from project_with_dr.sales_detail, write the results to project_with_dr.sales_daily, and then create a line chart of the sales trend for the last 30 days based on sales_daily.The AI will identify the MaxFrame processing task, delegate it to a specialized sub-task, and then use the resulting table to continue with charting.
After the sub-task writes the code, the MaxFrame Notebook page opens automatically, either in the right-side panel of the dialog or in a tab in the main area.
The code and execution process are displayed in real-time, cell by cell, just as if you had clicked Run manually.
If the task fails, the sub-task will read the error, modify the code, and retry until it succeeds, without requiring your intervention at each step.
You can see the status of this job in the list of sub-Agents on the right and click it to jump back to the corresponding notebook at any time.
For data modification operations like creating, writing, or updating tables, we recommend executing them through a MaxFrame sub-task. In the main dialog, such operations trigger per-item confirmations, which interrupts the interactive flow. When delegated to a MaxFrame sub-task, the code runs in the MaxFrame runtime, making the process fully visible, cancelable, and resumable. Upon completion, the sub-task automatically returns the output table name for subsequent steps.
After the sub-task completes, the AI can use the returned table name to continue executing SQL queries, generating charts, or adding content to a dashboard, without you having to pass the table name manually.
If the job is interrupted, the AI will inform you, and you can instruct it to continue the unfinished job. You can also cancel the operation at any time, which will immediately terminate the sub-task.