Develop Python UDFs
Developing Python user-defined functions (UDFs) lets you perform custom computations that are impossible with built-in functions. The client offers a complete workflow, including code authoring, syntax checks, local debugging, dependency packaging, and registration. This process eliminates the need to configure local environments, upload packages manually, or rely on trial and error with multiple SQL jobs, allowing you to deliver custom functions quickly.
Overview
A user-defined function (UDF) is a MaxCompute extension for invoking custom computational logic within SQL queries. The client integrates this process into a single workbench where you can manage UDF drafts on the left, write code in the central editor, and use the bottom panel for data previews, SQL validation, dependencies, debugging, registration, and history.
Drafts are saved locally and are only published to a MaxCompute project after you click Register to ODPS. (ODPS is a legacy service endpoint name for MaxCompute that is still used in the client UI.) This allows you to modify and debug your code repeatedly on your local machine before publishing.
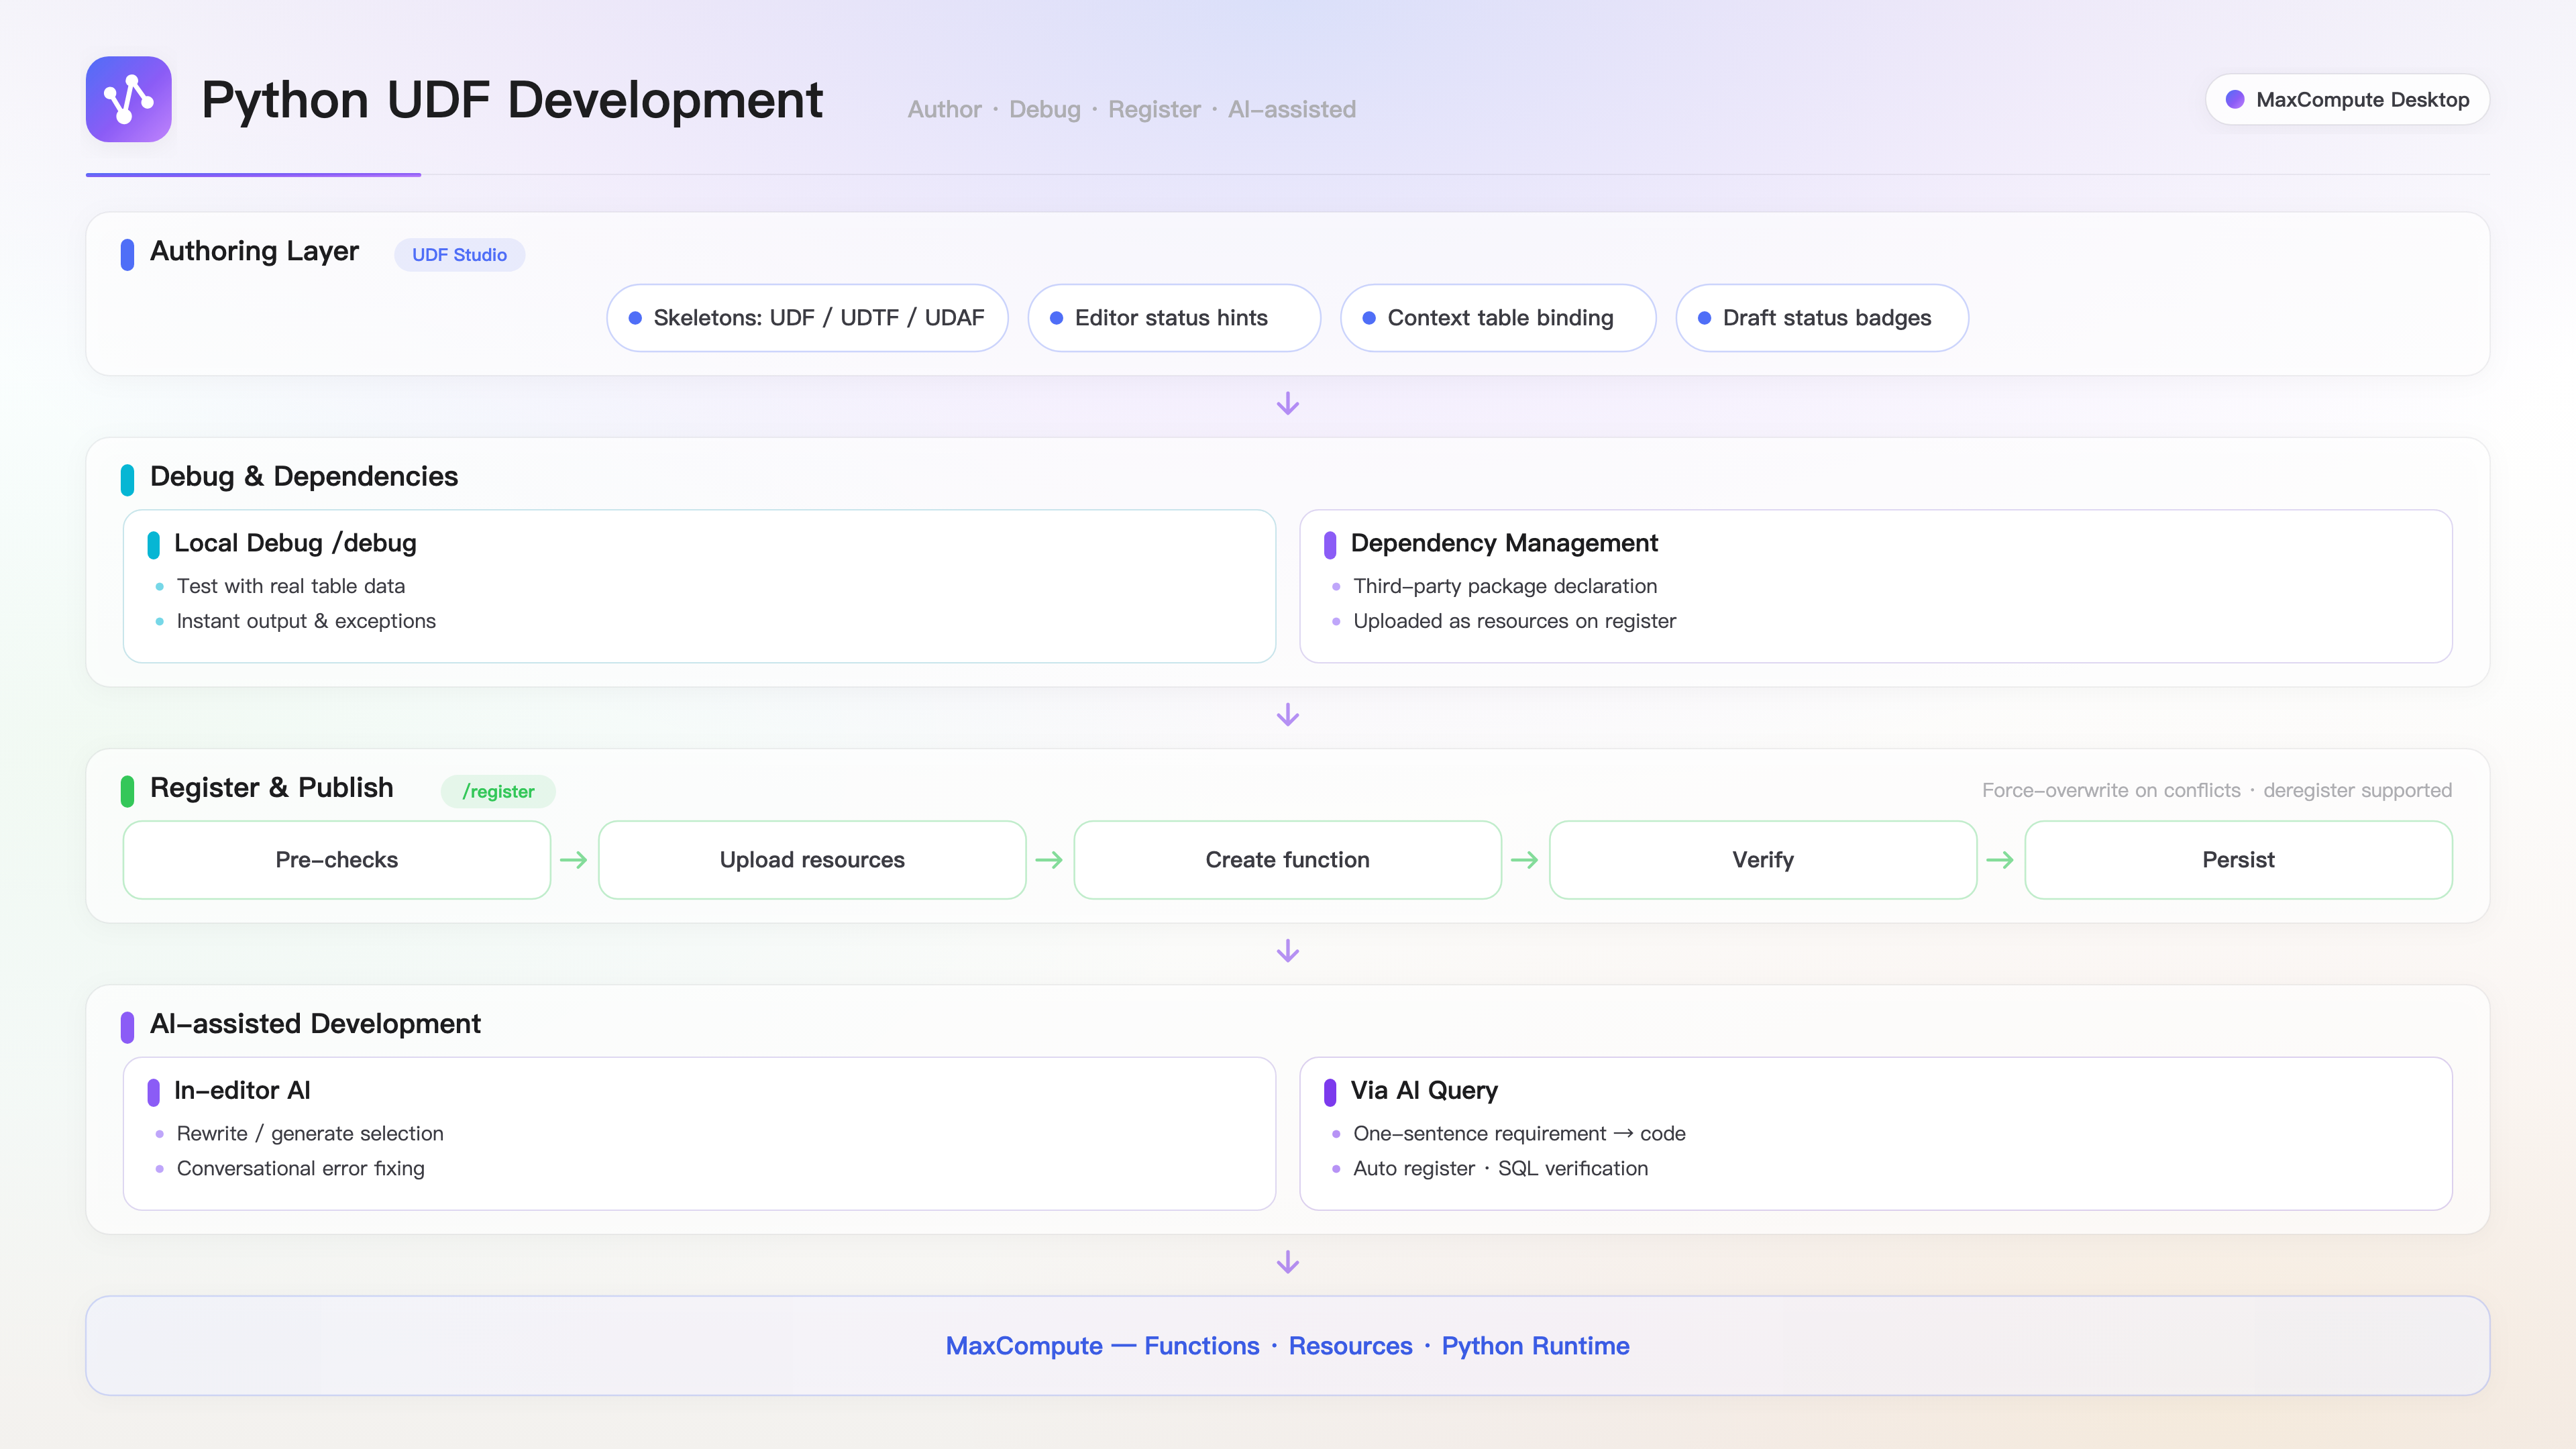
Use cases
Field cleansing and standardization: Apply custom logic row by row for tasks like masking phone numbers, normalizing addresses, or converting encodings. This approach is often simpler and more maintainable than using complex SQL expressions.
Business rule encapsulation: Package business logic, such as risk scoring or tag determination, into reusable functions for multiple SQL jobs.
Complex parsing: Parse JSON, log strings, or semi-structured text to split a single input row into multiple output rows or columns.
Calculations with third-party libraries: Import third-party Python packages to perform calculations unavailable in built-in functions.
Feature index
Category | Features |
Draft management | Create UDFs, delete drafts, Add to AI chat, Copy name |
Code authoring | Python syntax highlighting, automatic generation of a function skeleton, support for UDF, UDTF, and UDAF types |
Validation and debugging | Syntax check, local debugging (with sampled data from real tables), SQL validation |
Dependency management | Add Python dependencies, reuse project resources |
Publishing | Register to ODPS, post-registration check, force overwrite, unregister |
History | Compilation history, debugging history |
AI collaboration | AI-powered code generation and fixing in the editor, delegated development via AI Query (natural language data analysis), and manual approval before publishing |
Prerequisites
The UDF feature is available only when you have an active connection to a selected MaxCompute project.
Quick start
The following steps demonstrate how to create a UDF that converts a string to uppercase and publish it to MaxCompute.
In the UDF section of the sidebar, click the + icon (or select the UDF type in the unified creation dialog).
In the dialog box, configure the following parameters:
Function name: Enter
str_upper.Type: Keep the default, UDF.
Parameter signature: Keep the default
STRINGinput andSTRINGoutput.Context table (Optional): Select a table for debugging. The table and column names will be automatically populated for debugging and SQL validation later.
Click Create. The client generates a function skeleton and opens the editor. Change the return value of the
evaluatemethod toa.upper().Click Syntax check at the top. A Syntax check passed message in the status area indicates that the code is valid.
Switch to the Debug tab below, confirm that the Table name and Input columns are filled in, and click Run debug. Verify the output in the results table.
Click Register to ODPS at the top. Wait for the process to complete the following stages: Pre-check, Upload resources, Create function, and Persist. A Registration successful message in the status area confirms that the function has been published.
Develop a UDF
Function types and skeletons
The type you select when creating a draft determines the generated function skeleton:
Type | Description | Generated class and methods |
UDF | One input row corresponds to one output row. | A standard class that implements |
UDTF | One input row can produce multiple output rows. | Inherits from |
UDAF | Multiple input rows are aggregated into a single result. | Inherits from |
The following function skeleton is generated for a UDF. The function signature is determined by the parameter signature you provided during creation:
from odps.udf import annotate

@annotate('string -> string')class str_upper(object):
    def __init__(self):
        passdef evaluate(self, a):
        return a
For a UDTF, you must declare multiple output columns in the Parameter signature section by using the Add output column option.
Editor and status indicators
The editor is based on Monaco and provides Python syntax highlighting, bracket pair colorization, and automatic line wrapping. Code changes are saved automatically, so there's no need to save manually.
The editor displays status indicators at the top based on the synchronization state between the draft and MaxCompute:
Never registered: A message indicates that the current draft has not been registered to ODPS. You can click Register to ODPS to publish it.
Registered but modified: A yellow warning bar indicates "The code has been modified, and the version running on ODPS is from the previous registration." The live function continues to run the old logic until you register the new version.
Context table
You can bind a context table to your draft by clicking Select table in the top bar. After binding:
The Data tab displays the table's column names, types, partition identifiers, and comments, and allows you to preview its data.
The Debug tab automatically populates the table name and uses the first 10 non-partition columns as input columns.
The validation statement generated in the SQL tab automatically references this table.
Click the × icon next to the table name to unbind it.
Draft list statuses
The draft list in the sidebar uses two indicators to show the status of a draft:
UDTF or UDAF badge: Appears after the name to indicate a non-standard UDF type. Standard UDFs do not have a badge.
Yellow dot: Appears after the name to indicate that the code has been modified but not yet re-registered.
You can right-click a draft to Add to AI chat (sends the code as an attachment to the AI), Copy name, or Delete.
Local debugging
Local debugging runs the UDF on your machine using real data sampled from a table. It does not submit a MaxCompute job and therefore consumes no compute resources.
Switch to the Debug tab below.
Enter the debugging parameters:
Table name: The format is
<project_name>.<table_name>.Input columns: A comma-separated list of columns that correspond sequentially to the function's input parameters.
Partition (Optional): The format is
ds=20260101/hh=00.Sample rows: The default is 100, and the maximum is 1,000.
Click Run debug. The execution proceeds through three stages: Python syntax pre-check, Sample input, and Execute UDF. You can interrupt the process by clicking the stop button.
Review the results. The results area shows the number of output rows, exit code, and execution time. The output is displayed row by row in a table. You can expand the Standard error section to view
printoutputs and exception stack traces for troubleshooting.
The final debug statuses include Success, Failure, Timeout, Out of memory, Terminated due to high local memory usage, and Canceled. The latter two statuses indicate that the sampled data or the function itself consumed too much memory. In such cases, try reducing the number of sample rows and debugging again.
Manage dependencies
You can add third-party libraries to your UDF on the Python wheels page of the Dependencies tab.
Enter the dependency declaration in the input box, such as
numpy==1.26.4.Click Add. The client resolves and downloads the wheel package from PyPI, and obtains separate artifacts for the server runtime and for local debugging.
Once added, the dependency appears in the list and is automatically added to your code's
sys.path, allowing you toimportit directly.
If other drafts in the project have already uploaded the same resource, you can click Reuse project resources to select it directly and avoid re-uploading.
Common reasons for failure:
The dependency only provides platform-specific compiled wheels, and no version compatible with the server environment is available on PyPI.
The package is only available as a source package (sdist) and does not have pre-compiled binary wheels.
The package name is misspelled.
These issues indicate that the dependency is not a pure Python package. You may need to find a pure Python alternative or follow the official MaxCompute documentation to upload the resource manually.
Register to MaxCompute
Register the function
Click Register to ODPS at the top, or review the resource list in the Register tab below before publishing. The registration process proceeds through the following stages, with real-time progress shown in the status area:
Pre-check: Validates the draft's integrity and determines the list of resources to be uploaded.
Upload resources: Uploads the code and dependencies as MaxCompute resources. A counter shows the
uploaded/totalprogress.Create function: Executes the
CREATE FUNCTIONstatement.Check (Optional): Runs if Post-registration check is selected. See the section below for details.
Persist: Records the registration result, and the "unregistered" indicator in the editor disappears.
The Register tab also displays the function name, language, and a resource manifest (including type, path, size, and sha256) for the current release, which you can review before publishing.
Post-registration check
The Post-registration check option is disabled by default. If you enable it, the client submits a smoke query to MaxCompute to confirm that the function loads correctly at runtime.
This check submits an actual job, which takes longer and incurs compute costs. However, it helps detect issues where a function registers successfully but fails at runtime. We recommend running this check at least once before final deployment.
The check covers two runtimes: it first validates against Python 3.11 (cp311) and then against the server's default, Python 2.7 (cp27). If the latter fails, the function is still registered, but a warning is issued indicating that SQL calls without the cp311 flag may fail.
Handle naming conflicts
If a resource or function with the same name already exists in MaxCompute, the registration will fail with the error: A function with the same name already exists on ODPS. You can then:
Click Force overwrite to replace the existing resource and function with the current draft.
Alternatively, cancel the registration and create a new draft with a different function name.
Force overwriting a function directly replaces the deployed version, which can affect production SQL jobs that use it. Always assess the potential impact before proceeding.
Call the function in SQL
After the function is registered, you can call it in SQL. Because the server's default runtime is cp27, we recommend explicitly declaring the runtime version:
SET odps.sql.python.version=cp311;
SELECT str_upper(name) FROM <project_name>.<table_name> LIMIT 10;
The SQL tab below provides another way to validate your function. It generates a query that references the context table and automatically prepends SET odps.sql.python.version=cp311; to the statement. You can click Run to view the results and the Logview.
Unregister
Click Unregister in the Register tab to remove the function from MaxCompute. The local draft will be preserved.
Develop a UDF with AI
The client offers two ways to collaborate with AI, depending on your current workflow.
Method 1: AI-assisted editing
After opening a UDF draft, you can describe your requirements in natural language in the AI chat sidebar. For example, "replace the middle 8 digits of an ID number with asterisks." The AI reads the current draft, suggests changes, and waits for your confirmation.
The input box supports two types of shortcuts:
Type
@to reference context, such as providing a table's schema to the AI.Type
/to invoke one of four commands:Command
Action
/buildCompile / run syntax check
/registerRegister UDF to ODPS
/debugRun local debugging for the UDF
/killForcibly release a session lock
Operations that involve code changes or publishing first display a confirmation card. The action is executed only after you Approve it and is canceled if you Decline.
Overwriting the entire source file: Displays the changes in a diff view.
Patching part of the source file: Displays the patch content.
For actions such as adding dependencies, running local debugging, sampling table data, executing SQL, or registering a UDF, the card displays the relevant parameters.
Method 2: Delegate to AI Query
In an AI Query chat, you can directly state a request that requires a UDF. For example, "write a UDF to mask phone numbers, then register it and count the distinct users per city." The AI identifies this as a programming task and delegates it to a specialized UDF sub-task, requiring no manual selection of tools or steps.
During the process, you will observe the following:
Automatic editor opening. When the sub-task generates the initial code, the client automatically opens an editor tab for the draft. Subsequent code revisions are synchronized in real time, allowing you to monitor progress or take over and make manual edits at any time.
Progress in the development panel. The AI Coding panel (a side panel showing the sub-task's execution flow) logs key events on a timeline, such as UDF draft, UDF code updated, and UDF published. If a syntax check fails, the AI attempts to fix the error and rerun the check automatically.
Manual confirmation before publishing. A confirmation card appears with a message like, "Please confirm to publish UDF 'xxx' to ODPS project 'xxx'. The
CREATE FUNCTIONstatement will be executed only after confirmation."Artifact access in the sidebar. An entry for the draft is saved in the sub-task list. You can click it to return to the editor.