SchedulerX supports scheduled tasks, multi-language scripts, and HTTP APIs. It also supports scheduling native Kubernetes jobs and pods. This topic describes how to deploy SchedulerX in a Kubernetes environment.
Use cases
Using SchedulerX to schedule Kubernetes jobs offers the following benefits.
Edit script pods online
Kubernetes jobs are often used in data processing and O&M scenarios, and are typically implemented as scripts. The native method requires you to package scripts into an image and configure the script commands in a YAML file. To modify a script, you must rebuild and redeploy the image. The following is an example:
SchedulerX eliminates the need to build images or write YAML files, which improves development efficiency. You can edit scripts (Shell, Python, PHP, or Node.js) directly in the MSE SchedulerX console, and SchedulerX automatically runs them as pods. Changes to a script take effect in the next scheduled run. Additionally, K8s tasks let you use container technology without understanding its underlying details.
Visual workflow orchestration
Argo is commonly used for workflow orchestration in Kubernetes, as shown in the following example.
SchedulerX lets you orchestrate K8s tasks with a drag-and-drop visual UI, which is more convenient than typical code-based solutions. The visual workflow graph also helps you quickly locate runtime bottlenecks and improve O&M efficiency.
Alerting and monitoring
When scheduling pods or jobs with SchedulerX, you can use its built-in monitoring and alerting features.
-
Supported alert channels: SMS messages, phone calls, emails, and webhooks (DingTalk, WeCom, and Lark).
-
Supported alert policies: failure alerts and execution timeout alerts.
Log service
SchedulerX automatically collects logs for the pods and jobs it schedules, eliminating the need for a separate log service. If a pod fails to run, you can troubleshoot the failure directly in the MSE SchedulerX console.
Monitoring dashboard
The built-in monitoring dashboard in SchedulerX provides real-time monitoring for your tasks.
Hybrid deployment of offline and online tasks
SchedulerX supports hybrid deployment and scheduling of offline and online scheduled tasks for both Java and K8s task types. A business application usually includes multiple scheduled tasks. If a scheduled task runs frequently, you can run it in the same process as the business application. However, running tasks in-process consumes the CPU and memory of the online application and prevents isolation from online workloads. Therefore, when a scheduled task is resource-intensive but runs infrequently (for example, once an hour or once a day), you can add a separate pod to run the task. This ensures the task runs in a different process from the original online application.
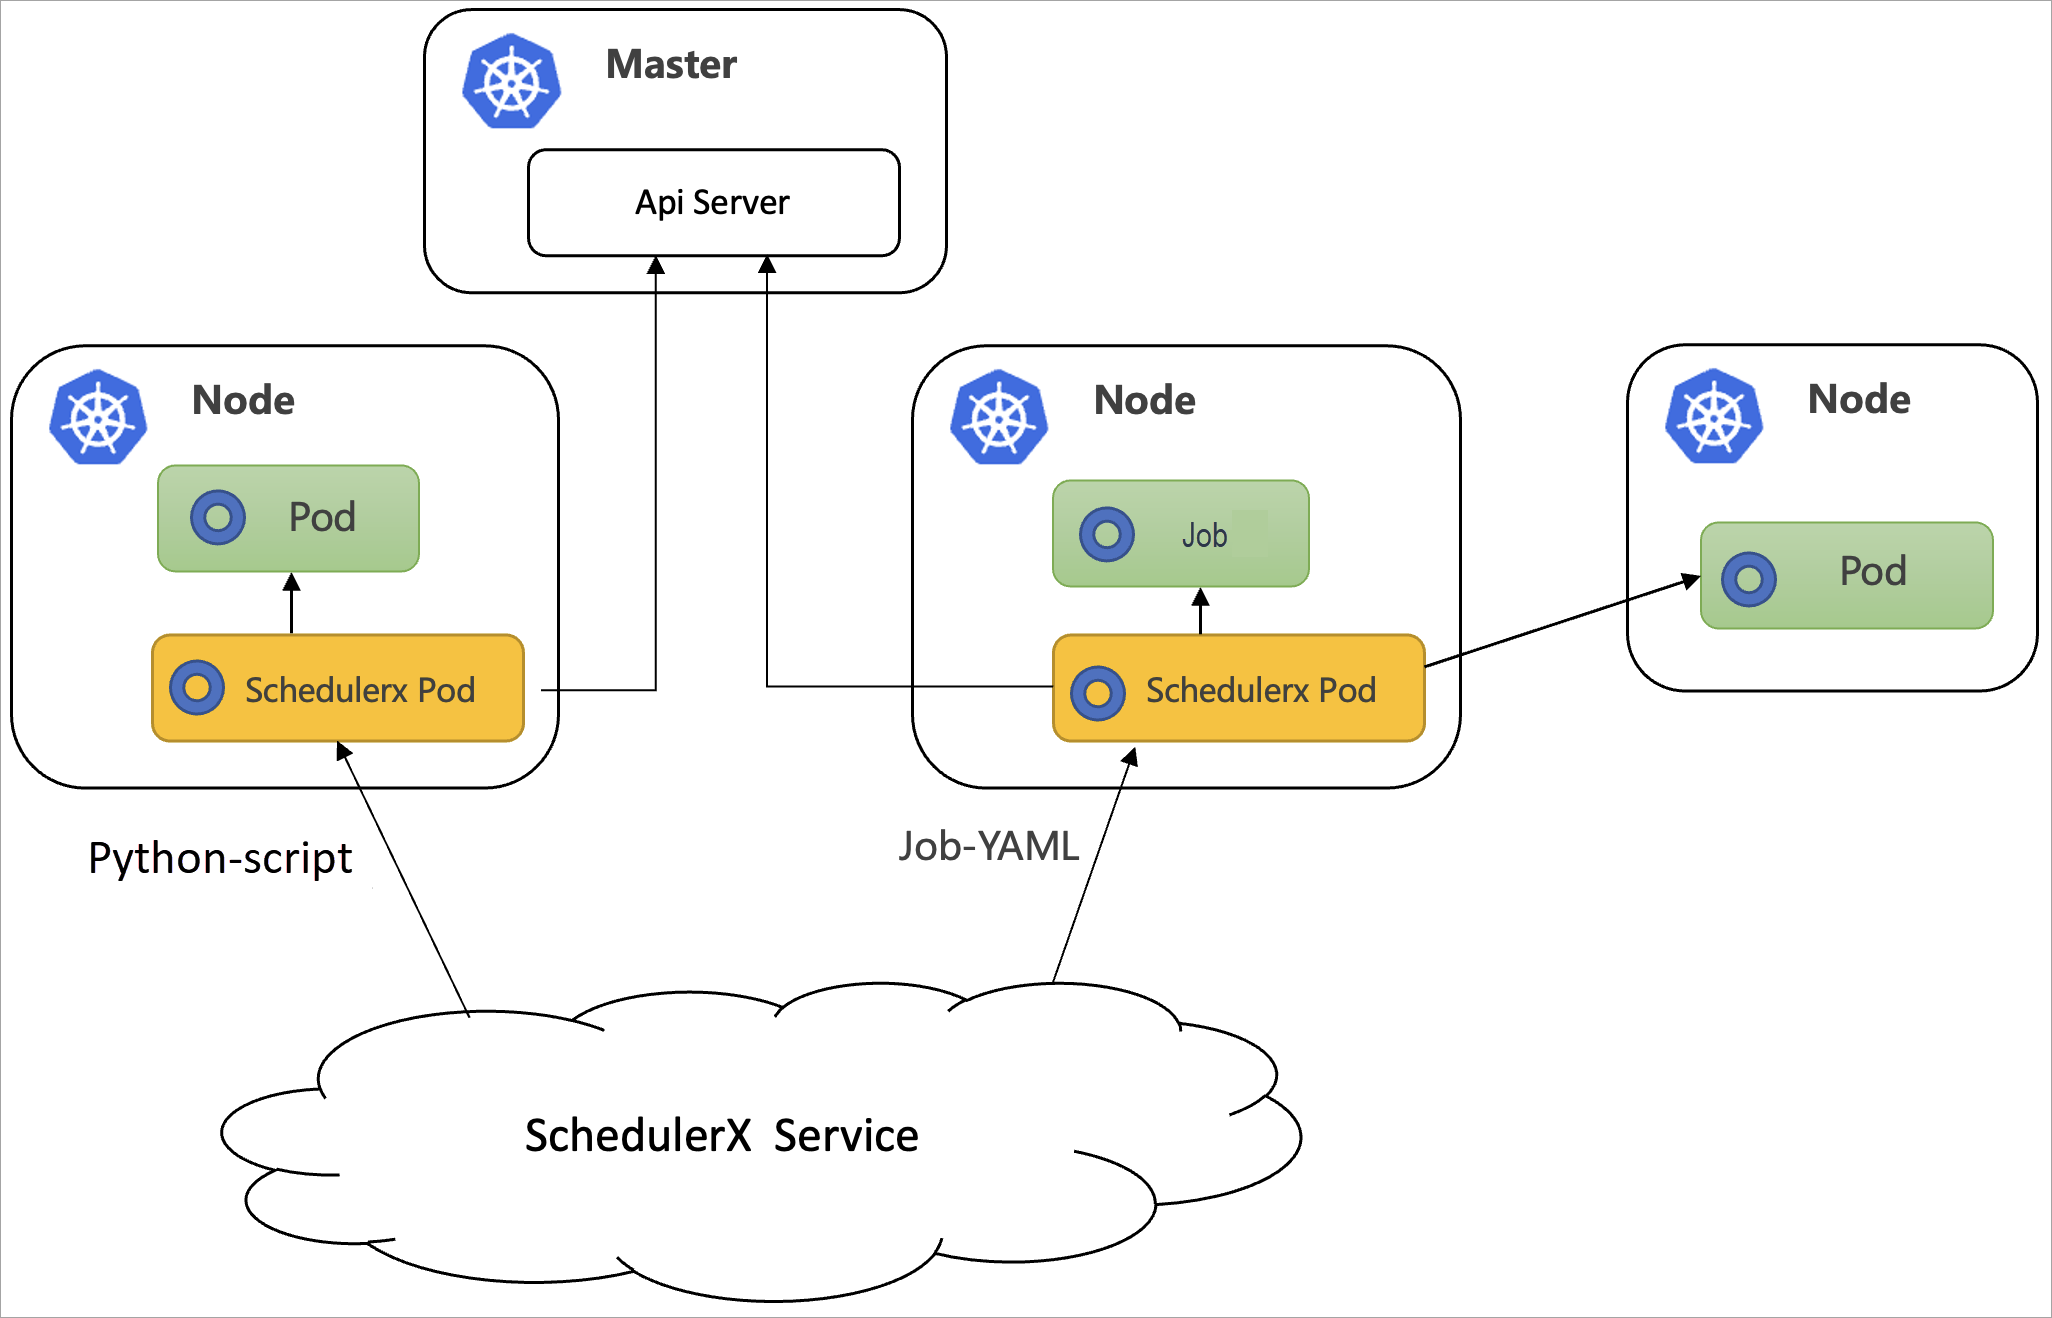
Method 1: Deploy using a deployment
For non-Java applications, you can deploy a schedulerx-agent.yaml file using a deployment. The agent runs as a standalone pod. The workflow and architecture are shown in the following figure.
Prerequisites
-
You have created a Kubernetes cluster (a Container Service for Kubernetes (ACK) cluster or a self-managed Kubernetes cluster). For more information, see Create a Kubernetes cluster.
-
You have activated Task Scheduling.
-
You have created a Kubernetes application in the MSE SchedulerX console. For more information, see Create an application.
In the Create Application dialog box, set Application Type to Kubernetes application and set Version to Professional Edition.
Step 1: Configure a service account
SchedulerX K8s tasks require a service account for authentication and authorization. By default, tasks run under the schedulerx service account within the target namespace.
In your Kubernetes cluster, you need to apply the schedulerx-serviceaccount.yaml configuration for each namespace where you intend to schedule pods or jobs. The following sample YAML contains the required role and binding.
If you need to schedule tasks across namespaces, use a ClusterRole and a ClusterRoleBinding.
Step 2: Install schedulerx-agent.yaml
The following is the configuration of the schedulerx-agent.yaml file.
SchedulerX agent image variables
|
Architecture |
Region |
Description |
|
X86_64 |
Chinese mainland |
schedulerx-registry.cn-hangzhou.cr.aliyuncs.com/schedulerx2/agent:latest-amd64 |
|
Outside the Chinese mainland |
schedulerx-registry.ap-southeast-1.cr.aliyuncs.com/schedulerx2/agent:latest-amd64 |
|
|
ARM64 |
Chinese mainland |
schedulerx-registry.cn-hangzhou.cr.aliyuncs.com/schedulerx2/agent:latest-arm64 |
|
Outside the Chinese mainland |
schedulerx-registry.ap-southeast-1.cr.aliyuncs.com/schedulerx2/agent:latest-arm64 |
SchedulerX agent env variables
|
Parameter |
Description |
|
${SCHEDULERX_ENDPOINT} |
The region and corresponding endpoint where your application is deployed. Example: addr-sh-internal.edas.aliyun.com. For more information, see Endpoint list. |
|
${SCHEDULERX_NAMESPACE} |
The namespace ID. You can obtain it on the Namespaces page in the MSE SchedulerX console. |
|
${SCHEDULERX_GROUPID} |
The GroupId (application ID). You can obtain it on the Application Management page in the MSE SchedulerX console. |
|
${SCHEDULERX_APPKEY} |
The AppKey (application key). You can obtain it on the Application Management page in the MSE SchedulerX console. |
After the deployment is complete, you can view the instance on the Application Management page in the MSE SchedulerX console. The presence of the instance indicates that the agent has connected successfully.
Method 2: Deploy SchedulerX using a Helm chart
Prerequisites
-
You have created a Kubernetes cluster (a Container Service for Kubernetes (ACK) cluster or a self-managed Kubernetes cluster). For more information, see Create a Kubernetes cluster.
-
You have activated Task Scheduling.
-
You have created an application of the Kubernetes application type in the MSE SchedulerX console. For more information, see Create an application.
-
You have installed Helm.
Step 1: Download the SchedulerX Helm chart
Run the following command to download the SchedulerX Helm chart:
wget https://schedulerx2.oss-cn-hangzhou.aliyuncs.com/helm/schedulerxchart-2.0.0.tgzStep 2: Install the SchedulerX Helm chart
-
Get the application access parameters from Task Scheduling.
-
Log on to the MSE SchedulerX console.
-
In the top navigation bar, select a region.
-
(This step is consolidated into the following one.)
-
On the Application Management page, click Access configuration in the Actions column. In the upper-left corner of the Access configuration page, select k8s.
-
-
Run the following installation command.
Note-
Replace the access parameters in the installation command with those of your target application.
-
The image address in the access configuration is the public X86_64 image by default. Select an image address that matches the region and architecture of your cluster nodes.
helm install  schedulerxchart schedulerxchart-2.0.0.tgz \
--set SCHEDULERX_ENDPOINT=<your_endpoint>\
,SCHEDULERX_NAMESPACE=<your_namespace_id>\
,SCHEDULERX_GROUPID=<your_group_id>\
,SCHEDULERX_APPKEY=****\
,SCHEDULERX_AGENT_IMAGE=schedulerx-registry.cn-hangzhou.cr.aliyuncs.com/schedulerx2/agent:latest-amd64
The following output is displayed after the installation:
NAME: schedulerxchart
LAST DEPLOYED: xxx
NAMESPACE: default
STATUS: deployed
REVISION: 1
TEST SUITE: None
SchedulerX agent image variables
Architecture
Region
Description
X86_64
Chinese mainland
schedulerx-registry.cn-hangzhou.cr.aliyuncs.com/schedulerx2/agent:latest-amd64
Outside the Chinese mainland
schedulerx-registry.ap-southeast-1.cr.aliyuncs.com/schedulerx2/agent:latest-amd64
ARM64
Chinese mainland
schedulerx-registry.cn-hangzhou.cr.aliyuncs.com/schedulerx2/agent:latest-arm64
Outside the Chinese mainland
schedulerx-registry.ap-southeast-1.cr.aliyuncs.com/schedulerx2/agent:latest-arm64
SchedulerX agent env variables
Parameter
Description
${SCHEDULERX_ENDPOINT}
The region and corresponding endpoint where your application is deployed. Example: addr-sh-internal.edas.aliyun.com. For more information, see Endpoint list.
${SCHEDULERX_NAMESPACE}
The namespace ID. You can obtain it on the Namespaces page in the MSE SchedulerX console.
${SCHEDULERX_GROUPID}
The GroupId (application ID). You can obtain it on the Application Management page in the MSE SchedulerX console.
${SCHEDULERX_APPKEY}
The AppKey (application key). You can obtain it on the Application Management page in the MSE SchedulerX console.
SCHEDULERX_AGENT_IMAGE
The image address.
After the installation is complete, you can view the instance in the MSE SchedulerX console.
-
Method 3: Deploy SchedulerX using the Java SDK
If your application is a Java application and you need to schedule Java programs in addition to K8s tasks, use the Java SDK for deployment. SchedulerX runs in the same process as your online application. The workflow and architecture are shown in the following figure.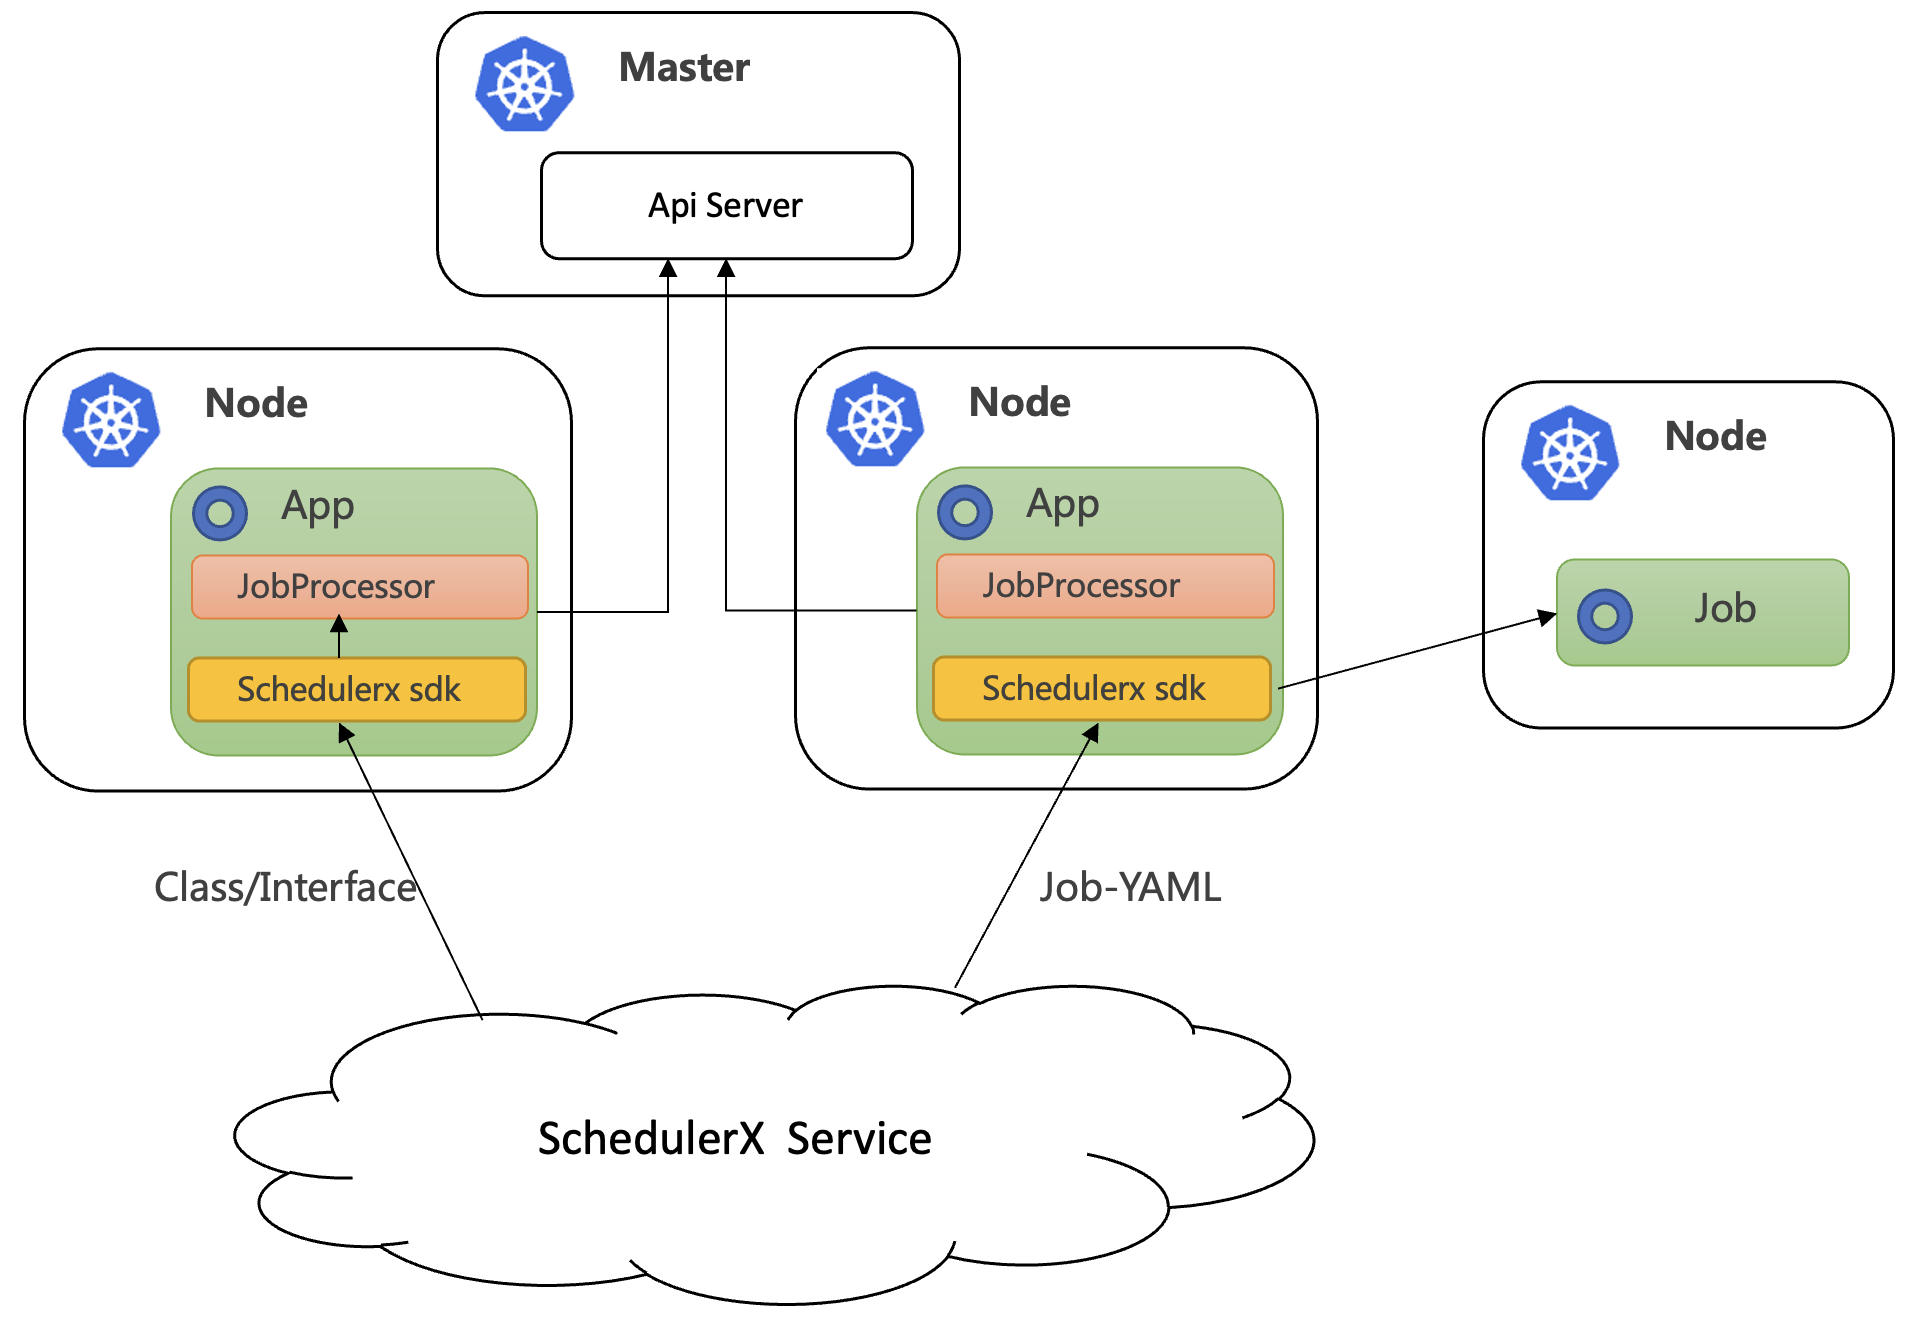
Prerequisites
-
Create a Kubernetes cluster (a Container Service for Kubernetes (ACK) cluster or a self-managed Kubernetes cluster). For more information, see Create a Kubernetes cluster.
-
You have activated Task Scheduling.
-
In the MSE SchedulerX console, create an application of the Kubernetes application type. For more information, see Create an application.
Connect to SchedulerX
For information about SDK integration, see Connect a Spring Boot application to SchedulerX.
To use K8s tasks, you must also add the schedulerx-plugin-kubernetes dependency, as shown in the following example.
Use the latest client version for schedulerx2.version. For more information, see Release notes.
<dependency>
  <groupId>com.aliyun.schedulerx</groupId>
  <artifactId>schedulerx2-spring-boot-starter</artifactId>
  <version>${schedulerx2.version}</version>
</dependency>
<dependency>
  <groupId>com.aliyun.schedulerx</groupId>
  <artifactId>schedulerx2-plugin-kubernetes</artifactId>
  <version>${schedulerx2-plugin-kubernetes.version}</version>
</dependency>
Next steps: Create a K8s task
To run the following scripts, create a K8s task on the Task Management page. For more information, see Task management.
Shell script
If you want to run a Shell script in a pod, create a K8s task on the Task Management page. Set Resource Type to Shell-Script and use the default busybox image or specify a custom image. In the script editor, you can directly write Shell commands, such as echo "Hello, World!".
Click run once. A pod named schedulerx-shell-{JobId} starts in the Kubernetes cluster.
# kubectl get pod | grep schedulerx
schedulerx-agent-xxx    1/1     Running     0          19h
schedulerx-shell-xxx    0/1     Completed   0          9s

# kubectl logs schedulerx-shell-xxx
Hello, World!
hello schedulerx!
On the Task Management page in the MSE SchedulerX console, you can query historical records and view the logs of the running pod.
Python script
If you want to run a Python script in a pod, create a K8s task on the Task Management page. Set Resource Type to Python-Script and use the default Python image or specify a custom image. You can directly write Python code in the script editor.
Click run once. A pod named schedulerx-python-{JobId} starts in the Kubernetes cluster.
# kubectl get pod | grep schedulerx
schedulerx-agent-xxx      1/1     Running     0     19h
schedulerx-python-xxx     0/1     Completed   0     xxx

# kubectl logs schedulerx-python-xxx
Hello, World!
hello schedulerx!
On the Task Management page in the MSE SchedulerX console, you can query historical records and view the logs of the running pod.
PHP script
If you want to run a PHP script in a pod, create a K8s task on the Task Management page. Set Resource Type to PHP-Script and use the default php:7.4-cli image or specify a custom image. You can directly write PHP code in the script editor.
Click run once. A pod named schedulerx-php-{JobId} starts in the Kubernetes cluster.
# kubectl get pod | grep schedulerx
schedulerx-agent-xxx    1/1     Running     0     19h
schedulerx-php-xxx      0/1     Completed   0     xxx
schedulerx-python-xxx   0/1     Completed   0     xxx
schedulerx-shell-xxx    0/1     Completed   0     xxx

# kubectl logs schedulerx-php-xxx
Hello, World!
hello schedulerx!
On the Task Management page in the MSE SchedulerX console, you can query historical records and view the logs of the running pod.
Node.js script
If you want to run a Node.js script in a pod, create a K8s task on the Task Management page. Set Resource Type to Nodejs-Script and use the default node:16 image or specify a custom image. You can directly write Node.js code in the script editor.
Click run once. A pod named schedulerx-node-{JobId} starts in the Kubernetes cluster.
# kubectl get pod | grep schedulerx
schedulerx-agent-xxx    1/1     Running     0     19h
schedulerx-node-xxx     0/1     Completed   0     23s
schedulerx-php-xxx      0/1     Completed   0     xxx
schedulerx-python-xxx   0/1     Completed   0     xxx
schedulerx-shell-xxx    0/1     Completed   0     xxx

# kubectl logs schedulerx-node-xxx
Hello, World!
On the Task Management page in the MSE SchedulerX console, you can query historical records and view the logs of the running pod.
Job-YAML
You can also use SchedulerX to run native Kubernetes jobs. Create a K8s task on the Task Management page and set Resource Type to Job-YAML. In the editor, enter the YAML definition for the job, such as a sample task that calculates pi.
Click run once. The job and its pod start successfully in the Kubernetes cluster.
# kubectl get job
NAME   COMPLETIONS   DURATION   AGE
pi     1/1           17s        6m5s

# kubectl get pod
NAME                         READY   STATUS      RESTARTS   AGE
hello                        0/1     Completed   0          6m8s
pi--1-jgck5                  0/1     Completed   0          xxx
schedulerx-agent-xxx         1/1     Running     0          19h
schedulerx-node-xxx          0/1     Completed   0          14m
schedulerx-php-xxx           0/1     Completed   0          19m
schedulerx-python-xxx        0/1     Completed   0          46m
schedulerx-shell-xxx         0/1     Completed   0          56m

# kubectl logs pi--1-jgck5
3.14159265358979323846264338327950288419716939937510582097494459230781640628620899862803482534211706...
On the Task Management page in the MSE SchedulerX console, you can query historical records and view the logs of the running pod.
Cronjob-YAML
You can also use SchedulerX to run native Kubernetes cronjobs. Create a K8s task on the Task Management page and set Resource Type to CronJob-YAML.
In the editor, enter the YAML definition for the cronjob, including configurations such as schedule and jobTemplate.
Click run once. On the Task instance records page, you can see that the pod starts successfully.
On the Task Management page in the MSE SchedulerX console, you can query historical records and view the logs of the running pod.
Pod-YAML
You can also use SchedulerX to run native Kubernetes pods. Create a K8s task on the Task Management page and set Resource Type to Pod-YAML. In the editor, enter the YAML definition for the pod, such as a sample that uses a busybox image to output hello world.
Click run once. The pod starts successfully in the Kubernetes cluster.
# kubectl get pod
NAME                         READY   STATUS      RESTARTS   AGE
hello                        0/1     Completed   0          2m39s
pi--1-jgck5                  0/1     Completed   0          49m
schedulerx-agent-xxx         1/1     Running     0          20h
schedulerx-node-xxx          0/1     Completed   0          58m
schedulerx-php-xxx           0/1     Completed   0          62m
schedulerx-python-xxx        0/1     Completed   0          90m
schedulerx-shell-xxx         0/1     Completed   0          100m

# kubectl logs hello
hello world
On the Task Management page in the MSE SchedulerX console, you can query historical records and view the logs of the running pod.
Keep the following in mind when running Kubernetes pods using SchedulerX:
-
Avoid long-running pods, such as web applications. These pods never enter a completed state.
-
Set the restart policy to Never.