AI content creation solution
Alibaba Cloud PAI provides an AI-powered content creation solution that helps you quickly build an end-to-end workflow, including offline model training, offline prediction, and online deployment. This solution extracts, refines, or summarizes key information from long and repetitive text to perform text generation tasks, such as text summarization, news headline generation, copywriting, question generation, essay writing, and classical poetry generation.
Prerequisites
Before you begin, complete the following:
-
Activate PAI and create a default workspace. For more information, see Activate PAI and create a default workspace.
-
Create an OSS bucket to store your datasets, trained model files, and configuration files. For more information about how to create a bucket, see Create a bucket in the OSS console.
Background information
Alibaba Cloud PAI supports text generation tasks in the field of intelligent content creation, including text summarization, news headline generation, copywriting, question generation, essay writing, and classical poetry generation. The following sections describe these tasks and outline the solution.
-
Task descriptions
Type
Description
Input example
Output example
Text summarization
Generates a concise summary from the input text.
Since the outbreak of the COVID-19 pandemic, the prominent issue of consuming wild animals and the significant public health risks it poses have drawn widespread public attention. Public security, forestry, and market supervision departments across the country have launched special campaigns to combat the entire chain of illegal hunting, trafficking, and consumption of wild animals, achieving remarkable results. During the crackdown on illegal activities involving wild animals, law enforcement found that a large consumer base for wild game, staggering profits from poaching, and the difficulty and high cost of identification are major reasons why the black market for poaching continues to operate underground.
Public security, forestry, and market supervision departments in many parts of the country have taken special actions to combat illegal hunting, trafficking, and consumption of wild animals, with significant impact.
News headline generation
Generates a news headline from the news text.
In a hospital in Guangzhou, six patients underwent bronchoscopy in a single morning. Five were diagnosed with lung cancer, and four were long-term smokers! Experts say that smoking and passive smoking are the main culprits of lung cancer, and secondhand and thirdhand smoke (particles and gases that linger indoors or on clothes and hair after smoking) are just as harmful!
Stay away from tobacco! It's not just secondhand smoke, but thirdhand smoke too!
Copywriting
Generates product copy from a product description.
Household ceramic mug.
This ceramic mug is fired from high-quality clay at high temperatures, resulting in a fine and translucent porcelain. The rim is smooth and round, providing a comfortable feel. The patterned design on the body is stylish and beautiful, showcasing a modern, simple, and elegant aesthetic. The rounded body is comfortable to hold, making it an excellent addition to your home.
Question generation
Generates answerable questions from a paragraph of text.
Kittens learn many skills, such as using a litter box and exploring their environment, from their mother. It's best to let a kitten stay with its mother for two to three months to ensure these skills are well-developed. If a female kitten is separated from her mother too early, she may have deficiencies in raising her own offspring later.
How long should a kitten stay with its mother?
Essay generation
Generates essay content based on a title.
The four seasons in my hometown.
The four seasons in my hometown are vibrant and colorful. In spring, all things revive. Blades of grass poke their heads out of the soil, curiously observing the world. The ice in the river melts, revealing the clear water where fish swim freely. The willow trees sprout new branches and tender green leaves, like young girls combing their beautiful long hair.
Classical poetry generation
Generates a classical poem based on keywords.
Zhuge Liang.
The sleeping dragon rises from Nanyang, as birds take flight to the north. If one is not cautious from the start, how can the state be secured? With a heart so true, his brilliance shines bright.
-
Solution
-
Use PAI's text summarization models and algorithms to fine-tune a model for your specific scenarios in the Designer visual modeling platform. This builds a custom Natural Language Processing (NLP) text summarization model.
-
Perform offline batch prediction in the Designer visual modeling platform by using either the default model provided by PAI or your own fine-tuned text summarization model.
-
Deploy the model as an EAS online service to automatically summarize text.
-
Workflow
The following figure shows the workflow for the AI-powered content creation solution.

-
Upload the training and validation datasets to an OSS bucket for subsequent model training and prediction.
-
Step 2: Build a text summarization model
In the Designer visual modeling platform, use the Text Summarization Training component and an NLP pre-trained model trained on large-scale data corpora to build a text summarization model.
-
Step 3: Perform offline batch prediction
In the Designer visual modeling platform, use the Text Summarization Prediction component with massive text data, your text summarization model, or the PAI default model to generate text summaries through offline batch prediction.
-
Step 4: Deploy and call the model service
With EAS, you can deploy the trained text summarization model as a service and call it from your production environment for real-time inference.
Step 1: Prepare data
-
Prepare the training and validation datasets.
This tutorial uses a subset of a news dataset for model training and prediction. The following table describes the required format for the training and validation datasets.
Data
Format
Columns
Sample file
Training dataset
TSV or TXT
-
News summary column
-
News source text column
Validation dataset
TSV or TXT
-
News headline summary column
-
News source text column
-
Tokenized news headline summary column (optional)
-
Tokenized news source text column (optional)
-
News category label column (optional)
-
-
Upload the datasets to your OSS bucket. For more information, see Upload files.
NoteIf you want to use your own dataset for model fine-tuning, you must upload it to an OSS bucket in advance.
Step 2: Build a text summarization model
Follow these steps to configure the workflow:
-
Go to the PAI-Designer page and create a blank workflow. For more information, see Create a blank pipeline.
-
In the workflow list, find the blank workflow you created and click Enter Workflow.
-
On the workflow page, drag the required components onto the canvas and configure their parameters as described below.
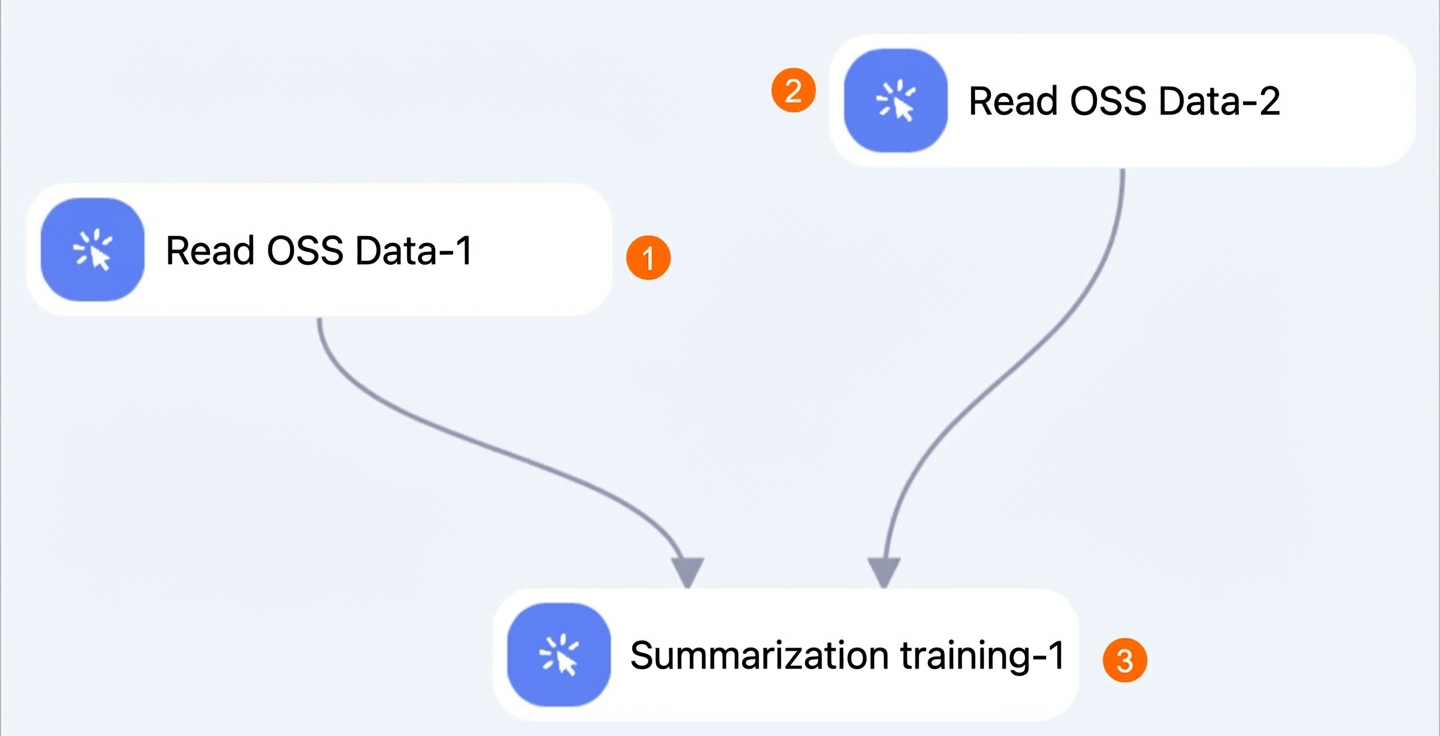
Area
Description
①
Configure the training dataset for the workflow. Set the OSS Data Path parameter of the Read OSS Data component to the OSS path of your training dataset.
②
Configure the validation dataset for the workflow. Set the OSS Data Path parameter of the Read OSS Data component to the OSS path of your validation dataset.
③
For details about the Text Summarization Training component's parameters, see Configuration of the Text Summarization Training component.
Table 1. Configuration of the text summarization training component
Tab
Parameter
Description
Example value
Field settings
Input data format
The data format for each column in the input file. Use commas (,) to separate multiple columns.
title_tokens:str:1,content_tokens:str:1
Source text column
The column containing the source news text.
content_tokens
Summary column
The column containing the news summary.
title_tokens
Model storage path
An OSS directory to store the trained model files.
oss://exampleBucket.oss-cn-shanghai-internal.aliyuncs.com/exampledirNoteUse your actual path.
Parameter settings
Pre-trained model
The name of the pre-trained model.
alibaba-pai/mt5-title-generation-zh
Batch size
The batch size for training. If you use multiple machines with multiple GPUs, this indicates the batch size on each GPU.
8
Max text length
The maximum overall length of a sequence that the system can process.
512
Number of epochs
The total number of training epochs.
3
Learning rate
The learning rate used during model building.
3e-5
Save checkpoint steps
The interval, in training steps, at which to evaluate the model and save the best-performing checkpoint.
150
Language
The language for text processing:
-
zh: Chinese
-
en: English
zh
Copy from source
Specifies whether to use a copy mechanism. Valid values:
-
false: (Default) Do not copy.
-
true: Copy.
false
Min decoder length
The minimum length of the decoder output.
12
Max decoder length
The maximum length of the decoder output.
32
No repeat ngram size
The size of n-grams that cannot be repeated. For example, if you set this to 2, the model will not generate results like "day day".
2
Beam size
The number of beams for the beam search. A larger value improves accuracy but slows down prediction.
5
Number of returned sequences
The number of top-ranked candidate results to be returned by the model.
5
Execution tuning
GPU instance type
The GPU model of the computing resource. The default value is gn5-c8g1.2xlarge, which provides an 8-core CPU, 80 GB of memory, and a single P100 GPU.
gn5-c8g1.2xlarge
-
Step 3: Offline batch prediction
-
Configure the offline prediction workflow.
Use the model generated by the text summarization training component to make predictions and generate summaries. On the workflow page from Step 2, drag and drop the components as shown in the following figure and configure them based on the parameters described below.
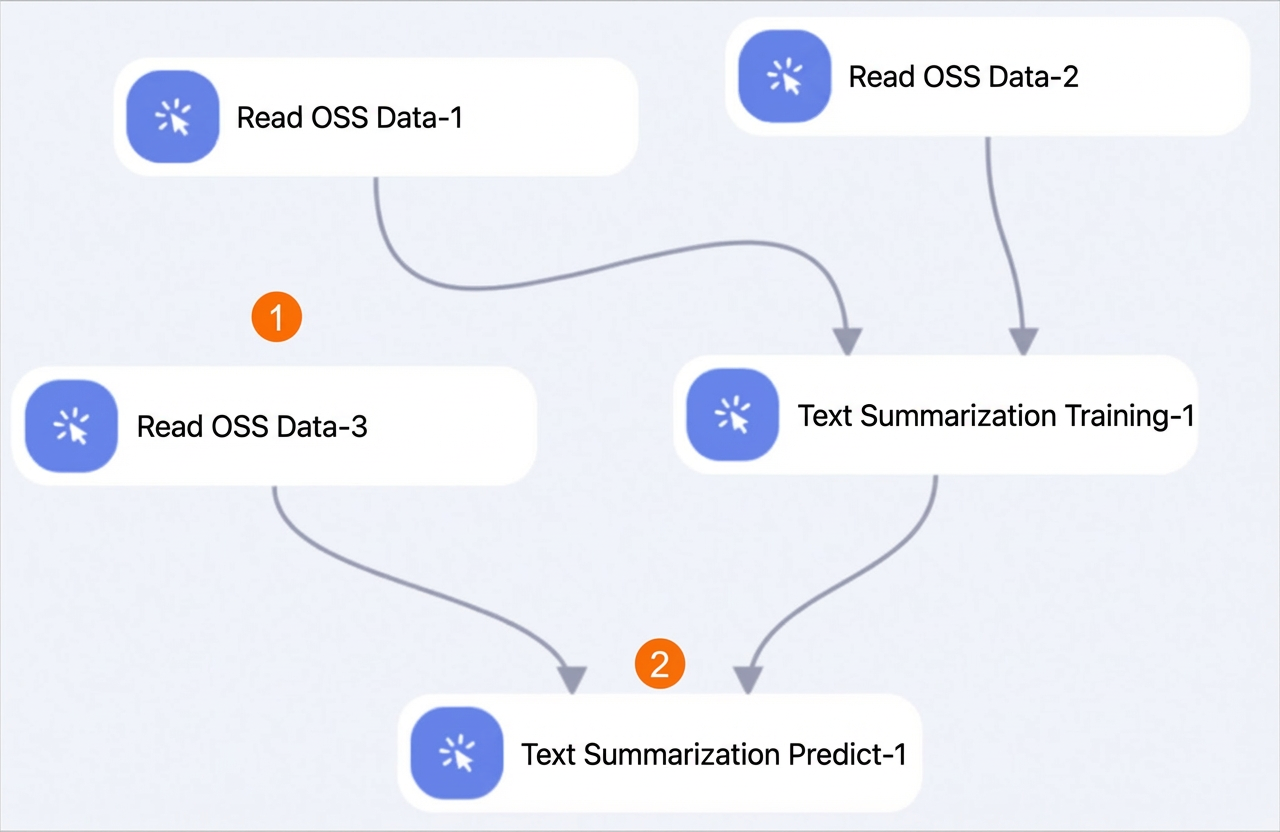
Area
Description
①
Configure the prediction dataset for the experiment. Use the validation dataset from Step 1 as the prediction dataset. Set the OSS Data Path parameter of the Read OSS Data component to the OSS path of your validation dataset.
②
For details about the Text Summarization Prediction component's parameters, see Configuration of the Text Summarization Prediction component.
Table 2. Configuration of the text summarization prediction component
Tab
Parameter
Description
Example value
Field settings
Input data format
The data format for each column in the input file. Use commas (,) to separate multiple columns.
title:str:1,content:str:1,title_tokens:str:1,content_tokens:str:1,tag:str:1
Source text column
The name of the column that contains the source news text in the input file.
content
Append columns to output
Appends specified text columns from the input file to the output. Use commas (,) to separate multiple columns.
title_tokens,content,tag
Output columns
Selects the columns to include in the output. Use commas (,) to separate multiple columns.
predictions,beams
Prediction data output
The OSS path to store the prediction results file.
oss://exampleBucket.oss-cn-shanghai-internal.aliyuncs.com/exampledir/pred_data.tsvNoteUse your actual path.
Use custom model
Specifies whether to use the PAI default model for direct prediction. Valid values:
-
Yes: Set to Yes if you use the Text Summarization Prediction component in scenario 2.
Specify the storage path of the PAI default model in the Model Storage Path parameter.
-
No: Set to No if you use the Text Summarization Prediction component in scenario 1.
No
Is megatron model
This only applies to pre-trained models with the
mgprefix listed in the Text Summarization Training component. Valid values:-
No (Default)
-
Yes
No
Parameter settings
Batch size
The batch size for prediction. If you use multiple machines with multiple GPUs, this indicates the batch size on each GPU.
8
Max text length
The maximum overall length of a sequence that the system can process.
512
Language
The language for text processing:
-
zh: Chinese
-
en: English
zh
Copy from source
Specifies whether to copy text segments from the source text into the output. Valid values:
-
false: (Default) Do not copy.
-
true: Copy.
false
Min decoder length
The minimum length of the decoder output. The model output will be longer than this value.
12
Max decoder length
The maximum length of the decoder output. The model output will be shorter than this value.
32
No repeat ngram size
The size of n-grams that cannot be repeated.
2
Beam size
The width of the beam search. A larger value improves accuracy but slows down prediction.
5
Number of returned sequences
The number of results to return.
5
Execution tuning
GPU instance type
The GPU model of the computing resource. The default value is gn5-c8g1.2xlarge, which provides an 8-core CPU, 80 GB of memory, and a single P100 GPU.
gn5-c8g1.2xlarge
-
-
Click Save and then click the
 icon at the top of the canvas.Note
You do not need to add extra DLC resources when running the workflow. If you receive a message indicating that DLC resources are insufficient, add general-purpose computing resources to the corresponding workspace. For more information, see Manage computing resources for a workspace.
Step 4: Deploy and call the service
After the workflow runs successfully, you can use Elastic Algorithm Service (EAS) to deploy the model as a service. You can then call the service from your production environment for inference.
Log on to the PAI console. Select a region on the top of the page. Then, select the desired workspace and click Enter Elastic Algorithm Service (EAS).
-
Deploy the model service.
-
On the Model Online Service (EAS) page, click Deploy Service. Then, in the Custom Model Deployment section, click Custom Deployment.
-
On the Custom Deployment page, configure the key parameters as described in the following table. For more information about other parameters, see Custom Deployment.
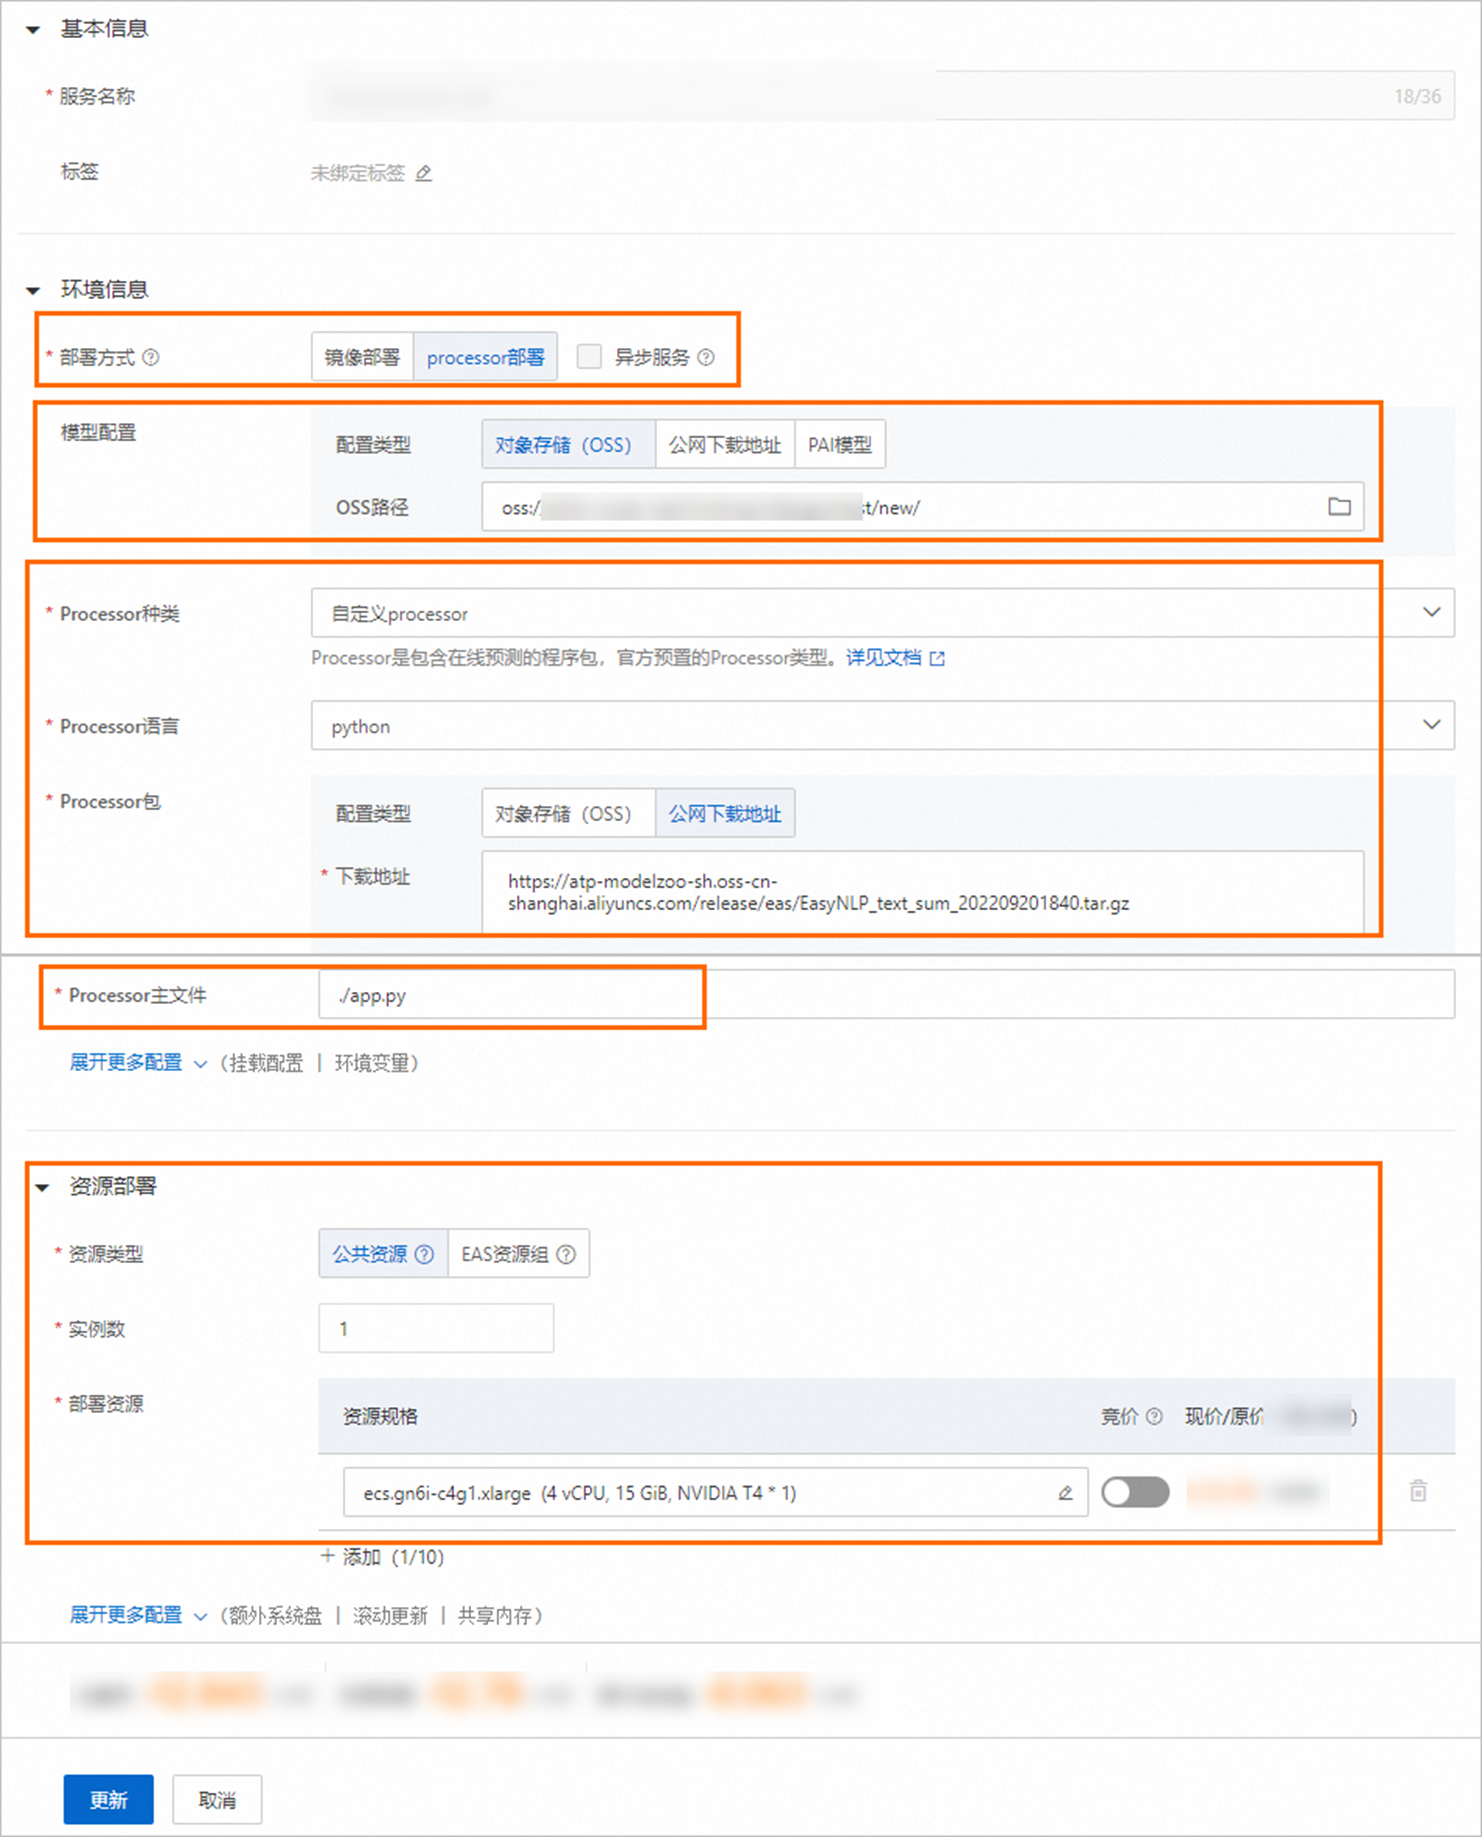
Parameter
Description
Environment information
Deployment method
Select Processor Deployment.
Model configuration
-
Configuration Type: Select Object Storage Service (OSS).
-
OSS Path: Select the model storage path you configured in the Text Summarization Training component, which is
oss://exampleBucket.oss-cn-shanghai-internal.aliyuncs.com/exampledir. Use your actual path.
Processor type
Select Custom Processor.
Processor language
Select python.
Processor package
-
Configuration Type: Select Public URL.
-
URL Path: Set to
https://atp-modelzoo-sh.oss-cn-shanghai.aliyuncs.com/release/eas/EasyNLP_text_sum_202209201840.tar.gz.
Processor main file
Set to
./app.py.Resource deployment
Resource type
Select Public resource.
Resource specification
Select a resource specification, for example, ecs.gn6i-c4g1.xlarge.
Verify that the service configuration is correct. The following is a sample configuration.
{ "metadata": { "instance": 1 }, "cloud": { "computing": { "instance_type": "ecs.gn6v-c8g1.2xlarge" } }, "name": "test_sum_new", "model_path": "oss://exampleBucket.oss-cn-shanghai-internal.aliyuncs.com/exampledir", "processor_type": "python", "processor_path": "https://atp-modelzoo-sh.oss-cn-shanghai.aliyuncs.com/release/eas/EasyNLP_text_sum_202209201840.tar.gz", "processor_entry": "./app.py" } -
-
Click Deploy and wait for the deployment to complete.
-
-
Debug the model service.
-
On the Elastic Algorithm Service (EAS) page, find the target service and in the Actions column, click
 and select Online Debugging.
 -
On the debugging page, in the Online debugging request parameters section, enter the following content in the Body field.
[ {"content": "In a hospital in Guangzhou, six patients underwent bronchoscopy in a single morning. Five were diagnosed with lung cancer, and four were long-term smokers! Experts say that smoking and passive smoking are the main culprits of lung cancer, and secondhand and thirdhand smoke (particles and gases that linger indoors or on clothes and hair after smoking) are just as harmful!"}, {"content": "A postdoctoral fellow from the University of Florida tied the knot in a Buddhist ceremony on Xiamen Island. Instead of a kiss, they bowed; instead of vows, they chanted praises. The Buddhist wedding held at the Mahavira Hall of Bailudong Temple will be an unforgettable memory for the couple. A Buddhist wedding differs from a typical ceremony by integrating Buddhist rituals, creating a solemn and grand occasion."} ] -
Click Send Request. The prediction result is displayed in the debugging information area, as shown in the following figure.
-
View the public endpoint and token that are used to access a service.
On the Elastic Algorithm Service (EAS) page, find the service that you want to manage and click Invocation Method in the Service Type column.
In the Invocation Method dialog box, click the Public Endpoint tab to view the public endpoint and token that are used to access the service.
-
Use a script to make batch calls.
-
Create a Python script named eas_text_sum.py to call the model service.
#!/usr/bin/env python
#encoding=utf-8
from eas_prediction import PredictClient
from eas_prediction import StringRequest
if __name__ == '__main__':
    # Replace the parameters in PredictClient() with your actual endpoint.
    client = PredictClient('http://1664xxxxxxxxxxx.cn-hangzhou.pai-eas.aliyuncs.com', 'text_sum_new')
    # Replace the token with your actual token.
    client.set_token('<token>')
    client.init()
    # The input request must be constructed based on the model. This is only an example that uses strings for input and output.
    request = StringRequest('[\
    {"content": "In a hospital in Guangzhou, six patients underwent bronchoscopy in a single morning. Five were diagnosed with lung cancer, and four were long-term smokers! Experts say that smoking and passive smoking are the main culprits of lung cancer, and secondhand and thirdhand smoke (particles and gases that linger indoors or on clothes and hair after smoking) are just as harmful!"},\
    {"content": "A postdoctoral fellow from the University of Florida tied the knot in a Buddhist ceremony on Xiamen Island. Instead of a kiss, they bowed; instead of vows, they chanted praises. The Buddhist wedding held at the Mahavira Hall of Bailudong Temple will be an unforgettable memory for the couple. A Buddhist wedding differs from a typical ceremony by integrating Buddhist rituals, creating a solemn and grand occasion."}\
]')
    for x in range(0, 1):
        resp = client.predict(request)
        print(str(resp.response_data, 'utf8'))
print("test ending")
Parameters:
-
client: The service endpoint and service name. Configure this parameter as shown in the sample code.
-
<token>: Replace this with your service token.
-
-
Upload the eas_text_sum.py script to your terminal and run the following command in the directory where the script is located.
python <eas_text_sum.py>Replace <eas_text_sum.py> with the actual name of your Python script.
-
-
After calling the model service, monitor key metrics such as QPS, RT, CPU, GPU, and Memory.
-
On the Elastic Algorithm Service (EAS) page, find the service you called and click the
icon in the Service monitoring column. -
On the Monitoring tab, you can view the service metrics. The service monitoring chart below shows that the latency for a single prediction in this tutorial is approximately 200 ms. Your model's actual latency may vary.
-
 and select Online Debugging.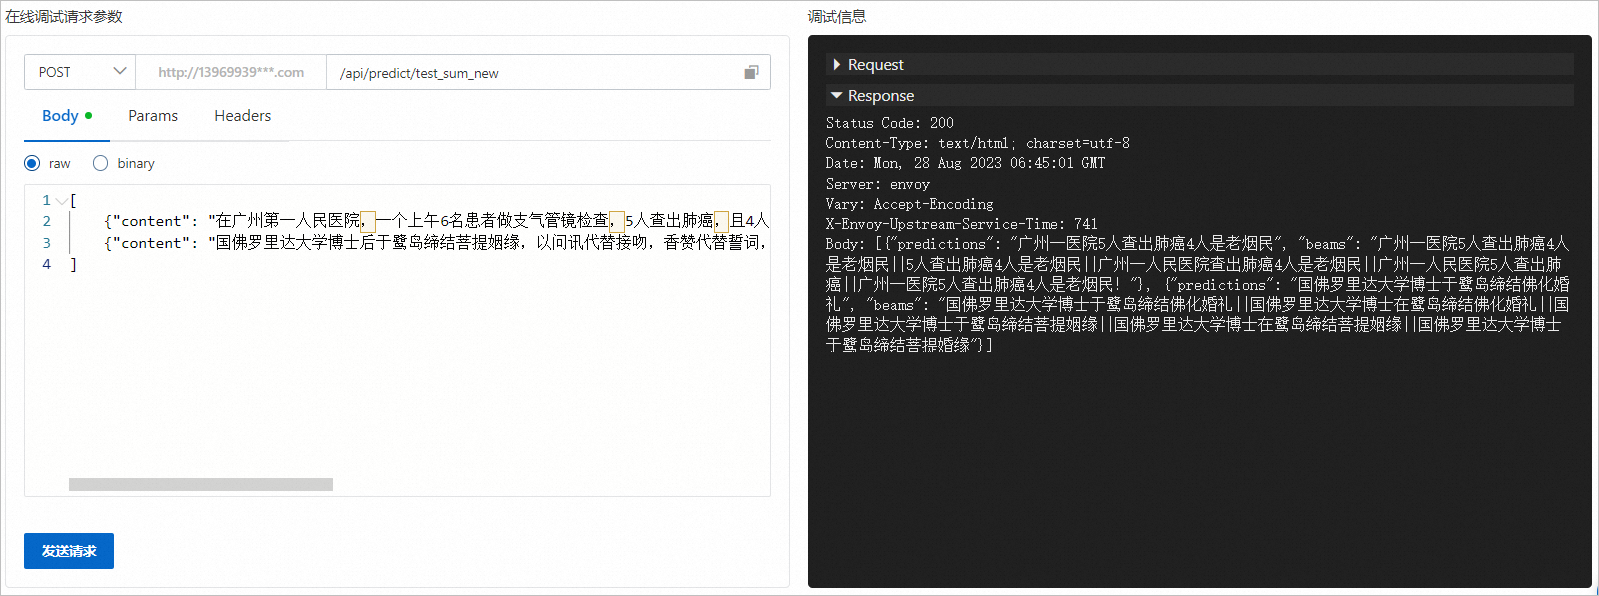
 icon in the Service monitoring column.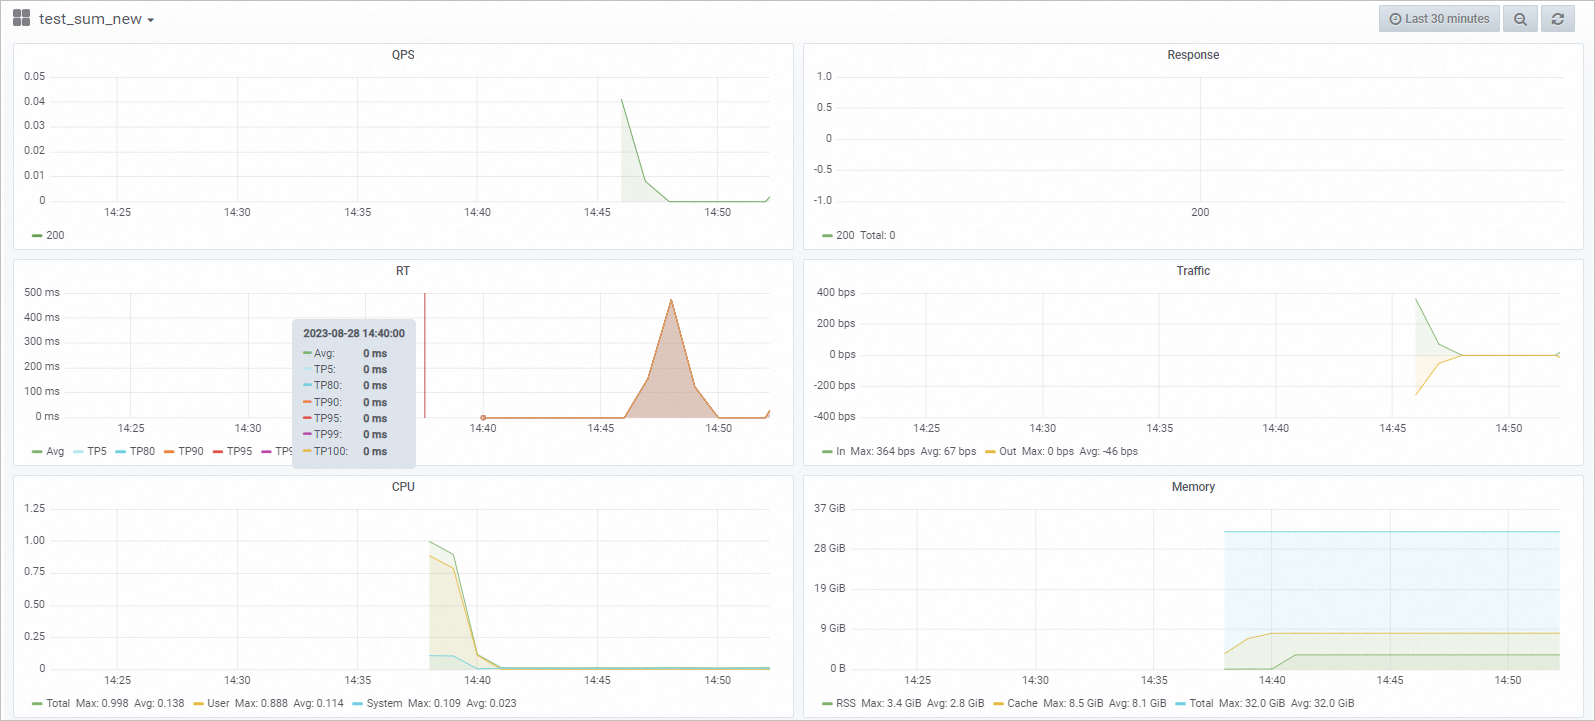
Related documents
For more information about text generation components, see the following topics: