Migrate a self-managed SQL Server database to ApsaraDB RDS for SQL Server by uploading a full backup file (.bak) to Object Storage Service (OSS) and importing it into your RDS instance. Suitable for one-time migrations, disaster recovery, and cloud-based data backup.
How it works
-
Back up your on-premises SQL Server database to a
.bakfile. -
Upload the backup file to an OSS bucket in the same region as your RDS instance.
-
Trigger an import task from the RDS console — the system pulls the file from OSS and restores it.
This solution supports database-level migration only. To migrate multiple or all databases at once, use the instance-level migration solution.
Limitations
Review these constraints before you start:
-
Migration scope: Database-level only. One database per task.
-
Version compatibility: The source SQL Server version cannot be newer than the destination RDS instance version. For example, you cannot restore a SQL Server 2016 backup to a SQL Server 2012 instance.
-
Backup type: Full backup files (
.bak) only. Differential backups and log backups are not accepted by the import process. -
File name: Cannot contain special characters such as
!@#$%^&*()_+-=. -
File format: If the source is a backup file downloaded from ApsaraDB RDS for SQL Server (
.zipformat), decompress it to.bakbefore uploading. -
Supported extensions:
.bak(full backup),.diff(differential backup),.trnor.log(log backup). Files with other extensions are not recognized. -
AliyunRDSImportRole: After granting OSS access to the RDS service account, a role named
AliyunRDSImportRoleis created in RAM. Do not modify or delete this role — doing so will cause migration tasks to fail. If you accidentally delete it, re-grant permissions through the migration wizard. -
Post-migration accounts: After migration, the original database accounts from the source instance become unavailable. Create new accounts in the ApsaraDB RDS console.
-
OSS file retention: Do not delete the backup file from OSS until the migration task completes.
Billing
| Scenario | Cost |
|---|---|
| Uploading a backup file to OSS | Free |
| Storing the backup file in OSS | OSS storage fees apply. See OSS pricingOSS pricing. |
| Importing over the internal network (same region) | Free |
| Importing over the internet | OSS outbound traffic fees apply. See OSS pricingOSS pricing. |
Prerequisites
Before you begin, make sure that:
-
The RDS instance has enough remaining storage space to hold the data file. If not, upgrade the instance storage.
-
For SQL Server 2012 or later, or SQL Server 2008 R2 with cloud disks: The RDS instance does not contain a database with the same name as the database to be migrated.
-
For SQL Server 2008 R2 with high-performance local disks: A database with the same name as the database to be migrated already exists on the RDS instance.
-
If using a Resource Access Management (RAM) user:
-
The RAM user has AliyunOSSFullAccess and AliyunRDSFullAccess permissions. See Manage OSS permissions using RAM and Manage ApsaraDB RDS permissions using RAM.
-
Your Alibaba Cloud account has granted the ApsaraDB RDS service account access to your OSS resources. See the authorization steps below.
-
Your Alibaba Cloud account has created a custom access policy and attached it to the RAM user. The policy must include: ``
json { "Version": "1", "Statement": [ { "Action": [ "ram:GetRole" ], "Resource": "acs:ram:*:*:role/AliyunRDSImportRole", "Effect": "Allow" } ] }``
-
Authorize RDS to access OSS
To check or grant authorization:
-
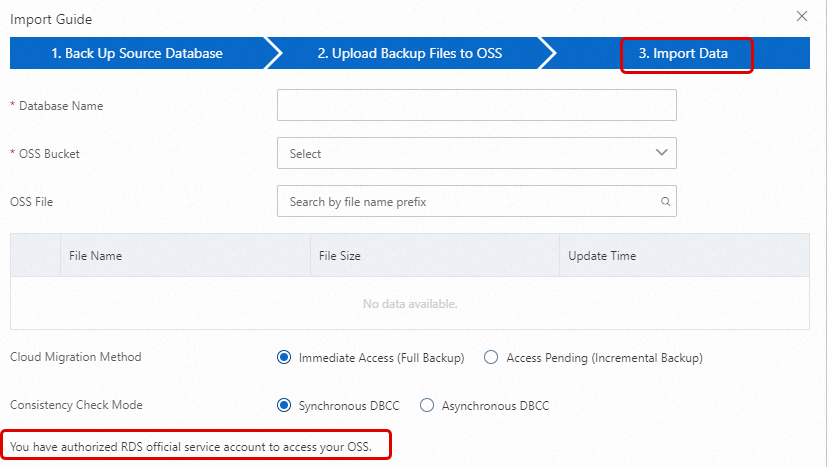
Go to the Backup and Restoration page of the RDS instance and click Migrate OSS Backup Data to RDS.
-
In the Import Guide, click Next twice to reach step 3. Import Data.
-
If the message You have authorized RDS official service account to access your OSS appears in the lower-left corner, authorization is already in place. Otherwise, click Authorization URL to grant access.
Prepare the source database
In your on-premises SQL Server environment, run DBCC CHECKDB to verify the database has no errors before backing it up:
DBCC CHECKDBA clean database returns:
CHECKDB found 0 allocation errors and 0 consistency errors in database 'xxx'.
DBCC execution completed. If DBCC printed error messages, contact your system administrator.
Do not proceed if the check reports errors. See DBCC CHECKDB failed for how to fix issues.
Step 1: Back up the local database
Choose the procedure that matches your RDS instance type.
SQL Server 2012 or later, or SQL Server 2008 R2 with cloud disks
Stop all write operations to the database before starting the backup. Data written during the backup process is not included in the backup file.
-
Download the backup script and open it in SQL Server Management Studio (SSMS).
-
In the script, set the parameters in the
SELECTstatement underYOU HAVE TO INIT PUBLIC VARIABLES HERE:Parameter Description @backup_databases_listDatabases to back up. Separate multiple database names with semicolons ( ;) or commas (,).@backup_typeBackup type: FULL,DIFF, orLOG.@backup_folderLocal directory for the backup file. Created automatically if it does not exist. @is_run1to run the backup;0to perform a dry run (check only). -
Run the script.
SQL Server 2008 R2 with high-performance local disks
-
Open SQL Server Management Studio (SSMS) and log in to the database you want to migrate.
-
Check the current recovery model:
USE master; GO SELECT name, CASE recovery_model WHEN 1 THEN 'FULL' WHEN 2 THEN 'BULK_LOGGED' WHEN 3 THEN 'SIMPLE' END model FROM sys.databases WHERE name NOT IN ('master','tempdb','model','msdb'); GO -
If the
modelcolumn is notFULL, set it toFULL:ImportantSetting the recovery model to
FULLincreases the volume of transaction log data. Make sure you have enough disk space before proceeding.ALTER DATABASE [dbname] SET RECOVERY FULL; GO ALTER DATABASE [dbname] SET AUTO_CLOSE OFF; GO -
Back up the database. The following example backs up
dbtesttod:\backup\backup.bak:USE master; GO BACKUP DATABASE [dbtest] TO DISK = 'd:\backup\backup.bak' WITH COMPRESSION, INIT; GO -
Verify the backup file:
USE master;
GO
RESTORE FILELISTONLY
  FROM DISK = N'D:\backup\backup.bak';
If the command returns a result set, the file is valid. If it returns an error, redo the backup.
-
(Optional) Restore the original recovery model if you changed it in step 3:
ALTER DATABASE [dbname] SET RECOVERY SIMPLE;
GO
Skip this step if the recovery model was already
FULLbefore you started.
Step 2: Upload the backup file to OSS
Prepare an OSS bucket
You need an OSS bucket in the same region as your RDS instance. A same-region setup uses the internal network, which is faster and incurs no outbound traffic charges.
If you already have a bucket, confirm that it meets these requirements:
-
Storage class: Standard. Infrequent Access, Archive, Cold Archive, and Deep Cold Archive are not supported.
-
Server-side encryption: disabled.
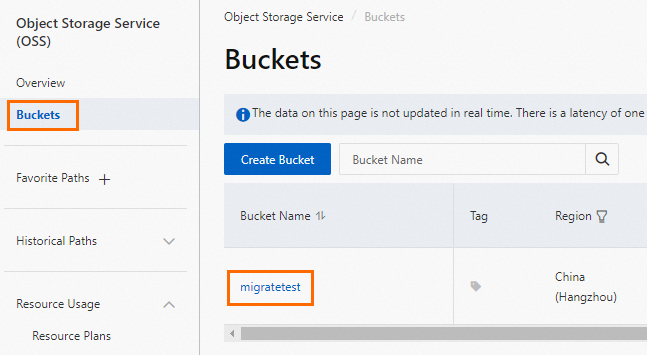
If you need to create a bucket, make sure you have activated OSS, then:
-
Log in to the OSS console, click Buckets, and then click Create Bucket.
-
Set the following parameters. Leave all other parameters at their default values.
ImportantDo not enable server-side encryption when creating the bucket. Delete the bucket after migration to prevent data exposure and reduce costs.
Parameter Description Example Bucket name Globally unique, cannot be changed after creation. Lowercase letters, digits, and hyphens only. Must start and end with a lowercase letter or digit. 3–63 characters. migratetestRegion Must match the region of your RDS instance. China (Hangzhou) Storage class Select Standard. Standard
Upload the backup file
Choose an upload method based on your file size.
Option 1: ossbrowser (recommended for most cases)
-
Download ossbrowser.
-
On Windows x64: decompress
oss-browser-win32-x64.zipand runoss-browser.exe. -
Select Log On With AK, enter your AccessKeyId and AccessKeySecret, and click Log On.
An AccessKey pair is used for identity verification. Keep your AccessKey confidential.

-
Click the destination bucket.

-
Click
 , select the backup file, and click Open.
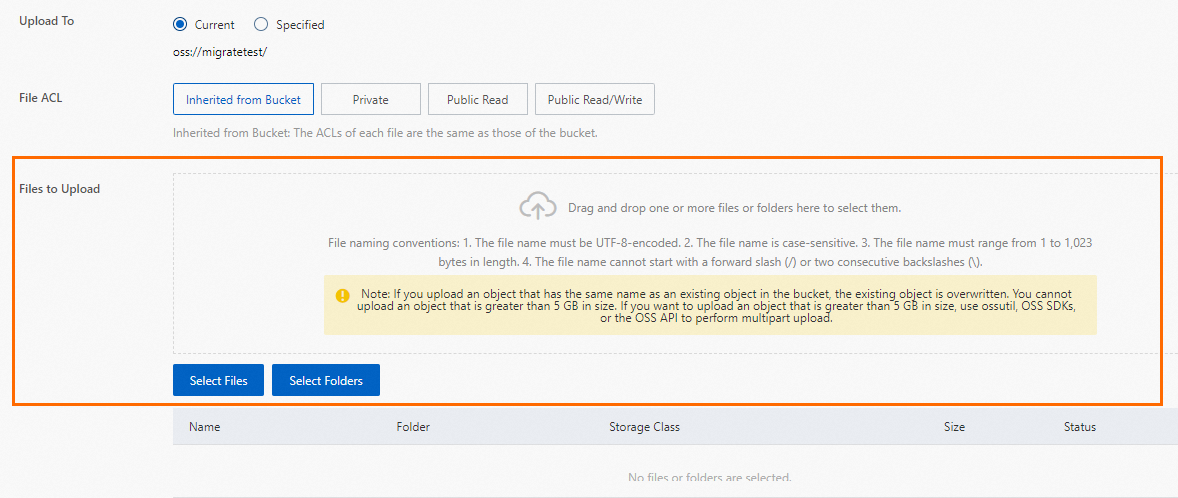
Option 2: OSS console (for files smaller than 5 GB)
-
Log in to the OSS console.
-
Click Buckets, then the name of your bucket.
-
In the Objects list, click Upload Object.

-
Drag the backup file to the Files to Upload area, or click Select Files to browse.
-
Click Upload Object.

Get the backup file URL (SQL Server 2008 R2 with high-performance local disks only)
After uploading the file, generate a temporary URL to use in the import step:
-
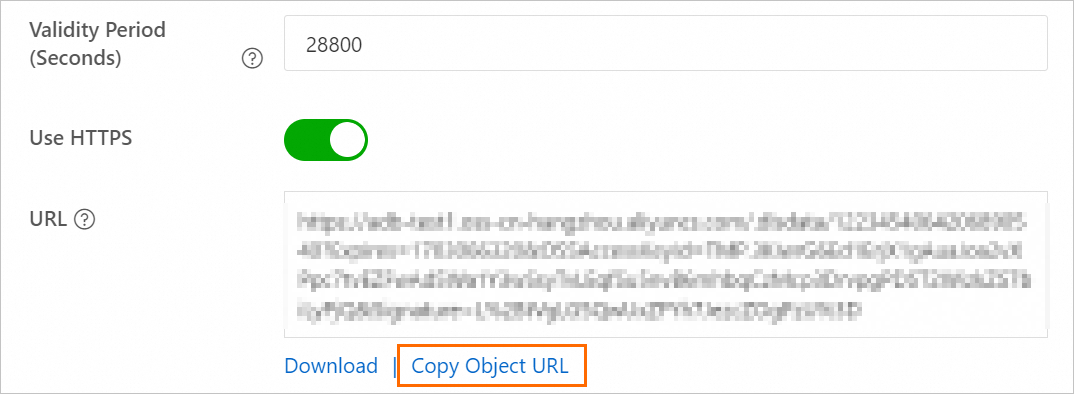
Log in to the OSS console and click Buckets.
-
Click the name of the destination bucket.
-
In the left navigation pane, select File Management > Files.
-
In the Actions column for the backup file, click Details. Set Expiration (Seconds) to
28800(8 hours).ImportantThe migration task uses this URL to download the file. If the URL expires before the task completes, the migration fails.
-
Click Copy File URL.
-
To migrate over the internal network, change the public endpoint in the URL to the internal endpoint. For example, change
oss-cn-shanghai.aliyuncs.comtooss-cn-shanghai-internal.aliyuncs.com.The internal endpoint format varies by region. See .
Step 3: Import the OSS backup data
Choose the procedure that matches your RDS instance type.
SQL Server 2012 or later, or SQL Server 2008 R2 with cloud disks
-
Go to the Instances page. In the top navigation bar, select the region of your RDS instance, then click the instance ID.
-
In the left navigation pane, click Backup and Restoration.
-
Click Migrate OSS Backup Data to RDS.
-
In the Import Guide, click Next twice to reach the data import step.
On first use, you must authorize ApsaraDB RDS to access OSS. Click Authorization URL and complete the authorization. Without this, the OSS Bucket list will be empty. If the file you uploaded is not visible, check that the file extension meets the requirements in Limitations and that the bucket and RDS instance are in the same region.
-
Configure the import settings:
Parameter Description Database name The name for the restored database on the RDS instance. Must follow SQL Server naming conventions and not conflict with any existing database or unattached database file. If the backup set contains a database file with the same name as the target database, you can restore using that file — the database file name must match the target database name. OSS bucket Select the bucket containing the backup file. OSS file Click the search icon to find the file by prefix. The list shows file name, size, and update time. Cloud migration method Immediate Access (Full Backup): Full migration from a single full backup file. Sets BackupMode=FULLandIsOnlineDB=True. Access Pending (Incremental Backup): Migration using a full backup plus log or differential backups. SetsBackupMode=UPDFandIsOnlineDB=False.Consistency check mode Asynchronous DBCC: Opens the database immediately and runs DBCC CHECKDBin the background. Reduces downtime. SetsCheckDBMode=AsyncExecuteDBCheck. Use this when minimizing downtime is the priority. Synchronous DBCC: RunsDBCC CHECKDBbefore opening the database. Takes longer but confirms data consistency upfront. SetsCheckDBMode=SyncExecuteDBCheck. -
Click OK.
After the task completes, the RDS instance backs up at the next scheduled time per the automatic backup policy. The resulting backup set includes the migrated data and is available on the Backup and Restoration page. To generate a backup immediately, trigger a manual backup.
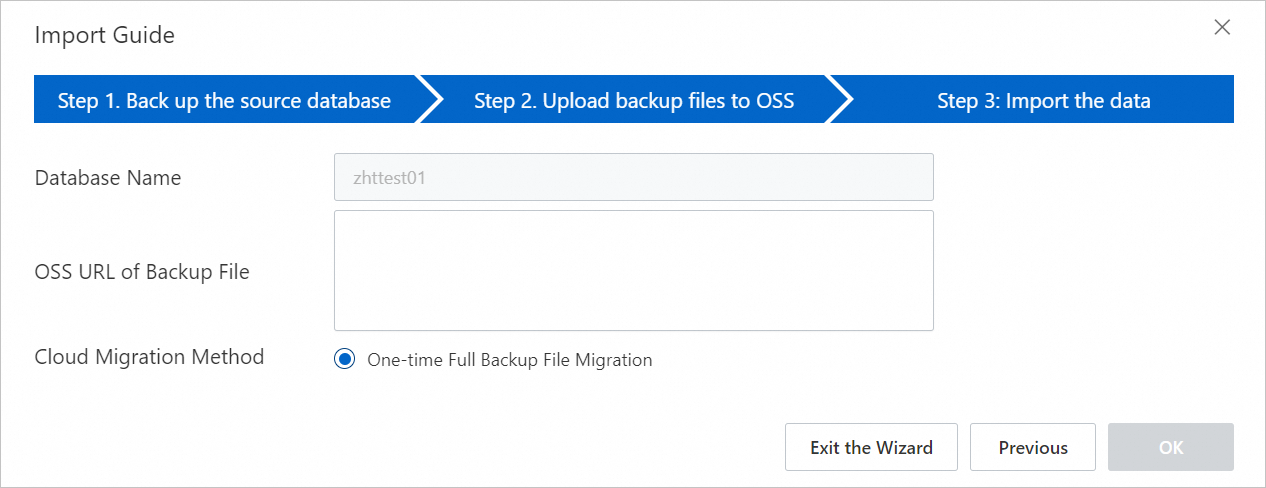
SQL Server 2008 R2 with high-performance local disks
-
Go to the Instances page, select the region, and click the instance ID.
-
In the left navigation pane, click Databases.
-
In the Actions column for the destination database, click Migrate Backup Files from OSS.
-
In the Import Guide, review the information and click Next.
-
Review the OSS upload prompts and click Next.
-
In the OSS URL of backup file field, enter the URL you copied in step 2, then click OK.
This instance type supports one-time import of a full backup file only.

Step 4: Monitor the migration task
Choose the view that matches your RDS instance type.
SQL Server 2012 or later, or SQL Server 2008 R2 with cloud disks
Go to Backup and Restoration and click the Cloud Migration Records of Backup Data tab. The tab shows the task status, start time, and end time. By default, records from the past week are displayed — adjust the time range as needed.

If Task Status is Failed, check Task Description or click View File Details to identify the cause, then rerun the task after resolving the issue.
SQL Server 2008 R2 with high-performance local disks
On the Data Migration To Cloud page, find the migration task to view its progress.
If Task Status is Failed, check Task Description or click View File Details to identify the cause, then rerun the task after resolving the issue.
Common return messages
| Task type | Status | Task description | Meaning |
|---|---|---|---|
| One-time full backup import | Success | success |
Migration completed successfully. |
| Failed | Failed to download backup file since OSS URL was expired. |
The OSS download URL expired before the task finished. Regenerate the URL and retry. | |
Your backup is corrupted or newer than RDS, failed to verify. |
The backup file is corrupted, or the source SQL Server version is newer than the RDS instance version. | ||
DBCC checkdb failed |
The source database has consistency errors. | ||
autotest_2008r2_std_testmigrate_log.trn is a Transaction Log backup, we only accept a FULL Backup. |
The file is a log backup. Provide a full backup file instead. | ||
autotest_2008r2_std_testmigrate_diff.bak is a Database Differential backup, we only accept a FULL Backup. |
The file is a differential backup. Provide a full backup file instead. |
Troubleshooting
The database (xxx) already exists on RDS. Please back it up and drop it, then try again. or Database 'xxx' already exists. Choose a different database name.
ApsaraDB RDS for SQL Server does not allow migrating into an existing database. Back up and delete the existing database, then retry.
Backup set (xxx.bak) is a Database Differential backup, we only accept a FULL Backup.
The provided file is a differential backup. This migration method accepts full backup files only.
Backup set (xxx.trn) is a Transaction Log backup, we only accept a FULL Backup.
The provided file is a log backup. This migration method accepts full backup files only.
Failed to verify xxx.bak, backup file was corrupted or newer edition than RDS. {#backup-verification-failed}
Two possible causes:
Corrupted file: Create a new full backup of the source database and start a new migration task.
Version mismatch: The source SQL Server version is newer than the destination RDS instance version. Use an RDS instance running the same version or newer. To upgrade an existing RDS instance, see Upgrade the database engine version.
DBCC checkdb failed
The source database has errors. Fix them with the following command, then retry the migration:
DBCC CHECKDB (DBName, REPAIR_ALLOW_DATA_LOSS) WITH NO_INFOMSGS, ALL_ERRORMSGSThis command may cause data loss.
Not Enough Disk Space for restoring, space left (xxx MB) < needed (xxx MB). or Not Enough Disk Space, space left xxx MB < bak file xxx MB.
The RDS instance does not have enough storage. Upgrade the instance storage and retry.
Cannot open database "xxx" requested by the login. The login failed.
The account lacks permissions for the database. On the Account Management page, grant the required permissions. See Grant permissions to an account and Permissions supported by different account types.
Your RDS doesn't have any init account yet, please create one and grant permissions on RDS console to this migrated database (xxx).
The RDS instance has no privileged account. The backup was restored successfully, but no permissions could be granted. Create a privileged account.
The OK button is grayed out when configuring the migration task
The RAM user has insufficient permissions. Review the RAM user requirements in Prerequisites.
permission denied when granting permissions for AliyunRDSImportRole as a RAM user
Use your Alibaba Cloud account to temporarily add AliyunRAMFullAccess to the RAM user.
API reference
| API | Description |
|---|---|
| CreateMigrateTask | Creates a migration task that restores a backup file from OSS to an ApsaraDB RDS for SQL Server instance. |
| CreateOnlineDatabaseTask | Opens the database of a migration task. |
| DescribeMigrateTasks | Lists migration tasks for an ApsaraDB RDS for SQL Server instance. |
| DescribeOssDownloads | Queries file details of a migration task. |