Migrate incremental backup data to the cloud (SQL Server 2008 R2 on cloud disks and SQL Server 2012 or later)
ApsaraDB RDS for SQL Server enables incremental data migration to the cloud. First, upload the full backup files to Alibaba Cloud Object Storage Service (OSS), then use the ApsaraDB RDS console to restore the data to a specified ApsaraDB RDS for SQL Server instance. Finally, import differential or log backup files to the instance to complete the migration. This process reduces downtime to minutes.
Use cases
Use incremental data migration to RDS SQL Server for the following use cases:
-
You want to perform a physical migration to RDS SQL Server using backup files instead of a logical migration.
Note-
Physical migration is file-based, whereas logical migration generates DML statements from the data and executes them on the destination RDS SQL Server instance.
-
A physical migration ensures that the destination database is 100% identical to the source database. In contrast, a logical migration cannot guarantee this consistency. For example, attributes such as index fragmentation and statistical information might differ after the migration.
-
-
You require minimal downtime, limited to a few minutes.
NoteIf longer downtime is acceptable (for example, a 2-hour outage) and your database is smaller than 100 GB, migrate your database using a full backup file.
Prerequisites
-
Your RDS for SQL Server instance must meet the following requirements:
-
The instance must run SQL Server 2012 or later, or be an SQL Server 2008 R2 instance that uses cloud disks.
-
The instance must not contain a database with the same name as the one you are migrating.
-
The instance's available storage space must be greater than the size of the data file you are migrating. If storage space is insufficient, upgrade the instance storage.
-
-
The recovery model for your on-premises SQL Server database must be
FULL.Note-
Incremental data migration requires transaction log backups. The Simple recovery model does not support transaction log backups.
-
A large differential backup file can prolong the incremental data migration.
-
If you log on as a RAM user, the following requirements must be met:
The RAM user is granted the AliyunOSSFullAccess and AliyunRDSFullAccess permissions. For more information about how to grant permissions to a RAM user, see Manage OSS permissions by using RAM and Manage ApsaraDB RDS permissions by using RAM.
Your Alibaba Cloud account (primary account) has authorized the ApsaraDB RDS official service account to access your OSS resources.
Manually create a permission policy in your Alibaba Cloud account (primary account), and then attach the policy to the RAM user.
Preparations
Run the DBCC CHECKDB command on the self-managed database to check for allocation errors and consistency errors. The expected output is as follows:
...
CHECKDB found 0 allocation errors and 0 consistency errors in database 'xxx'.
DBCC execution completed. If DBCC printed error messages, contact your system administrator.
Notes
-
Migration level: This solution migrates only a single database. To migrate multiple or all databases, see SQL Server instance-level cloud migration.
-
Version compatibility: You cannot restore a backup from a self-managed SQL Server instance to an ApsaraDB RDS for SQL Server instance that runs an earlier SQL Server version.
-
Permission management: After you authorize the ApsaraDB RDS service account to access OSS, a role named
AliyunRDSImportRoleis created in Resource Access Management (RAM). Do not modify or delete this role. Otherwise, the cloud migration task will fail. If you accidentally modify or delete this role, you must re-grant the permissions by using the migration wizard. -
Account management: After the migration is complete, you cannot use existing database accounts. You must create new accounts in the ApsaraDB RDS console.
-
OSS file retention: Do not delete the backup file from OSS before the cloud migration task is complete. Otherwise, the task will fail.
-
Backup file requirements:
-
Filename restrictions: The backup filename cannot contain special characters (such as
!@#$%^&*()_+-=). Otherwise, the cloud migration will fail. -
File extensions: ApsaraDB RDS supports backup files with the following extensions:
.bak(full backup),.diff(differential backup), and.trnor.log(log backup). ApsaraDB RDS does not recognize other file types.Note-
In practice, a file's extension does not necessarily indicate its backup type. For example, a
.bakfile can contain a full backup, differential backup, or transaction log backup. -
A SQL Server log backup file downloaded from the ApsaraDB RDS console defaults to the
.zip.logformat. This differs from the.bakbackup file generated by the official script in Step 1. After you convert the file format, you can use the file for incremental cloud migration.Processing method: Change the file extension to
.zipand decompress the file. Then, rename the decompresseddatabase_name.lbakfile to have the.bakextension. Finally, upload this.bakfile to OSS as an incremental log backup for cloud migration.
-
-
Example workflow
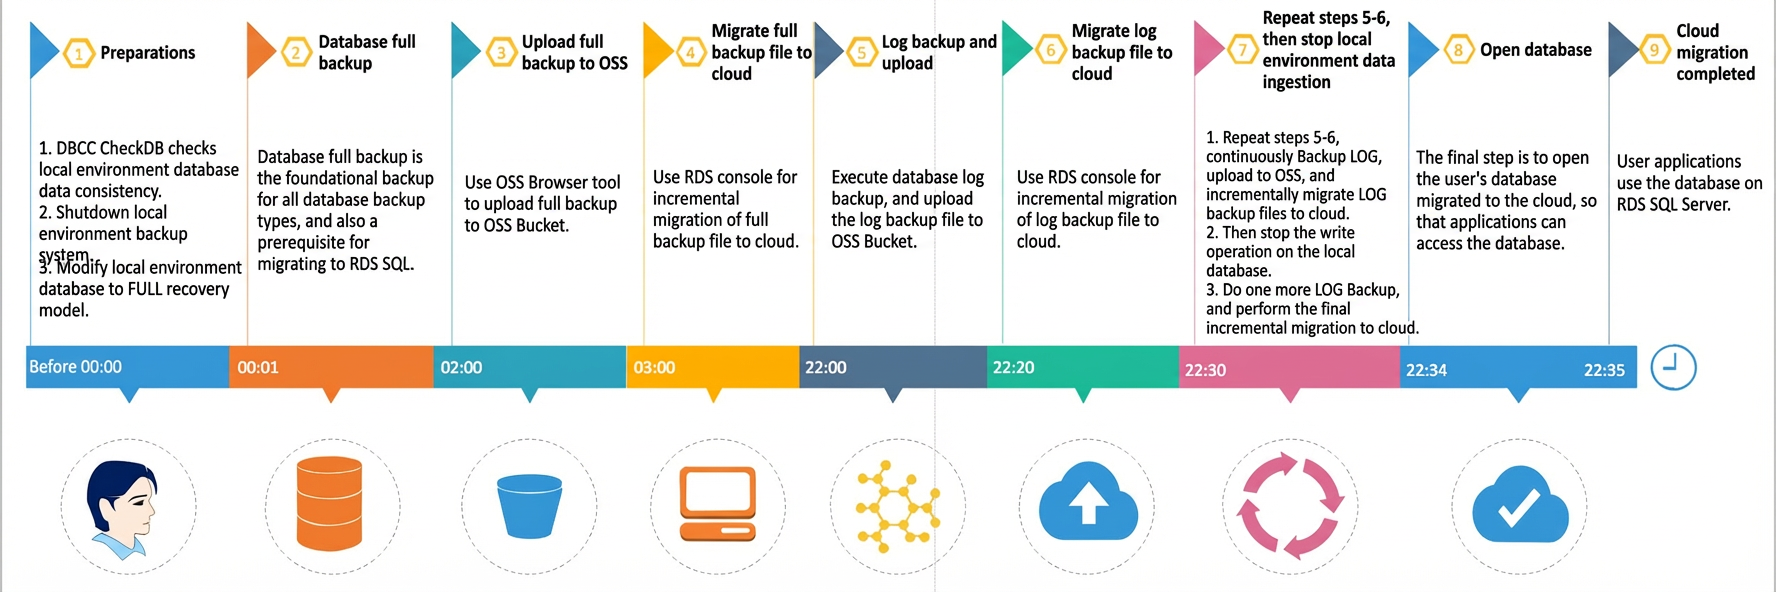
The table below describes the migration timeline shown in the figure above.
|
Migration phase |
Step |
Description |
|
full data migration phase |
Step 1. Before 00:00 |
Complete the preparations:
|
|
Step 2. 00:01 |
Perform a full backup of the source database. Duration: ~1 hour. |
|
|
Step 3. 02:00 |
Upload the backup file to an OSS bucket. Duration: ~1 hour. |
|
|
Step 4. 03:00 |
In the ApsaraDB RDS console, restore the full backup file. Duration: ~19 hours. |
|
|
incremental migration phase |
Step 5. 22:00 |
Run an incremental log backup of the source database and upload it to OSS. Duration: ~20 minutes. |
|
Step 6. 22:20 |
Restore the log backup file. Duration: ~10 minutes. |
|
|
Step 7. 22:30 |
|
|
|
Cutover |
Step 8. 22:34 |
The final log backup is restored in about 4 minutes. You can then bring the database online. |
|
Step 9. 22:35 |
The database is online. If you choose to run the DBCC check asynchronously, this final step takes about 1 minute. |
This workflow shows that the required application downtime is very short. You only need to stop application writes immediately before the final log backup. In this example, the total downtime is under 5 minutes.
Step 1: Back up the local database
-
Download the backup script and open it in SSMS.
-
Modify the following parameters.
Parameter
Description
@backup_databases_list
A semicolon-separated or comma-separated list of databases to back up.
@backup_type
The type of backup to perform. Valid values:
-
FULL: full backup
-
DIFF: differential backup
-
LOG: log backup
@backup_folder
The local directory for the backup file. The script automatically creates this directory if it does not exist.
@is_run
Determines whether to run a backup. Valid values:
-
1: Runs a backup.
-
0: Runs a check only and does not perform a backup.
-
-
Run the backup script.
The script generates a
.bakfile by default, regardless of the selected backup type.
2. Upload backup file to OSS
-
To upload a backup file to OSS, you must first create a bucket.
-
If you already have a bucket in OSS, ensure that it meets the following requirements:
-
The storage class of the bucket is Standard. The storage class cannot be Infrequent Access (IA), Archive, Cold Archive, or Deep Cold Archive.
-
Data encryption is not enabled for the bucket.
-
-
If you do not have a bucket in OSS, create one. (Ensure that you have activated OSS.)
-
Log on to the OSS console, click Buckets, and then click Create bucket.
-
Configure the following key parameters. Keep the default values for other parameters.
Important-
The bucket is used only for this data migration you only need to configure the key parameters. After the migration is complete, delete the bucket promptly to prevent data leaks and avoid related charges.
-
Do not enable data encryption when you create the bucket.
Parameter
Description
Example
Bucket Name
The name of the bucket. The name must be globally unique and cannot be changed after the bucket is created.
Naming conventions:
-
Can contain only lowercase letters, digits, and hyphens (-).
-
Must start and end with a lowercase letter or a digit.
-
Must be 3 to 63 characters in length.
migratetest
Region
The region where the bucket resides. To use an internal network for uploading from an ECS instance and restoring to an RDS instance, the ECS instance, bucket, and RDS instance must be in the same region.
China (Hangzhou)
Storage Type
Select Standard. The migration method described in this topic does not support buckets of other storage classes.
Standard
-
-
-
-
Upload the backup file to OSS.
After backing up the local database, upload the backup file to an OSS bucket that is in the same region as your RDS instance. This allows communication over the internal network, which avoids internet traffic charges and improves upload speed. You can use one of the following methods:
-
Download ossbrowser.
-
For example, on a Windows x64 system, decompress the downloaded
oss-browser-win32-x64.zippackage and double-click theoss-browser.exeapplication. -
Use the AK logon method, enter your Access Key ID and Access Key Secret, keep the default values for other parameters, and then click Log On.
NoteAn AccessKey is used for identity verification to ensure data security. Keep your AccessKey pair secure.
-
After you log on, click the target bucket, for example, migratetest, in the Buckets list to open its file management page.
-
Click
 , select the backup file to upload, and then click Open.
-
3. Create a cloud migration task
Go to the Instances page. In the top navigation bar, select the region in which the RDS instance resides. Then, find the RDS instance and click the ID of the instance.
-
In the navigation pane on the left, click Restoration.
-
At the top of the page, click Restore Backup Data from OSS.
-
On the Import Guide page, click Next twice to go to the Import Data step.
NoteIf this is your first time using the migrate OSS backup data to RDS feature, you must authorize the RDS account to access OSS. Click Authorize to grant the required permissions. Otherwise, the OSS Bucket drop-down list is empty.
-
Set the following parameters and click Yes.
Wait for the cloud migration task to complete. Click Refresh to view the task's latest status. If the task fails, troubleshoot the issue based on the error message in the task description. For more information, see Common errors.
Parameter
Description
Database Name
The name of the destination database on the RDS instance. The name must comply with SQL Server naming conventions.
Important-
Before you start the migration, ensure the destination instance has no existing database or unattached database file with the same name as the database in the backup file.
-
If a database with the same name as the database specified in the backup file already exists on the destination instance, or if an unattached database file with the same name exists, the cloud migration fails.
OSS Bucket
Select the OSS bucket where the backup file is stored.
OSS File
Click the magnifying glass icon to perform a fuzzy search for backup files by prefix. The results display the filename, file size, and last modified time. Select the backup file to migrate.
Cloud Migration Method
Select Do Not Open Database.
-
Immediate Access (Full Backup): Use this method for a full data migration to the cloud if you have a single full backup file to migrate. For this option, the
CreateMigrateTaskoperation uses the following parameters:BackupMode = FULLandIsOnlineDB = True. -
Access Pending (Incremental Backup): Use this method for an incremental data migration to the cloud if you are migrating a full backup file followed by differential backups or log files. For this option, the
CreateMigrateTaskoperation uses the following parameters:BackupMode = UPDFandIsOnlineDB = False.
-
4. Import differential or log backups
After migrating the full backup of your self-managed SQL Server database, import the differential or log backup files.
Go to the Instances page. In the top navigation bar, select the region in which the RDS instance resides. Then, find the RDS instance and click the ID of the instance.
-
In the left navigation pane, click Restoration, and then the Backup Data Upload History tab.
-
In the task list, find the corresponding task and click Upload Incremental Files in the Actions column. Select the incremental file and click OK.
Note-
If you have multiple log backup files, create a separate migration task for each.
-
Ensure the final backup file does not exceed 500 MB. This will minimize the time required for the incremental cloud migration.
-
Before generating the final log backup file, stop all write operations on the self-managed database. This ensures data consistency between the self-managed database and the RDS for SQL Server instance.
-
5. Open the database
After importing a backup file, the database on your ApsaraDB RDS for SQL Server instance enters the In Recovery or Restoring state. For High-availability Edition instances, the state is In Recovery, and for Basic Edition instances, the state is Restoring. In either state, the database is unavailable for read and write operations. You must open the database to make it available.
Go to the Instances page. In the top navigation bar, select the region in which the RDS instance resides. Then, find the RDS instance and click the ID of the instance.
-
In the left-side navigation pane, choose Restoration, and then click the Cloud Migration Records of Backup Data tab.
-
In the task list, find the record of the backup file import and click Open Database in the Actions column.
-
Select a database consistency check option and click OK.
NoteThe following options are available for the database consistency check:
-
Asynchronous DBCC: This option performs the
DBCC CHECKDBoperation asynchronously after the database opens. This method minimizes downtime by bringing the database online faster. It is ideal if your database is large and theDBCC CHECKDBoperation is time-consuming. Use this option if your service is sensitive to downtime and you do not need the immediate results of the check. For the CreateMigrateTask API call, this option sets theCheckDBModeparameter toAsyncExecuteDBCheck. -
Synchronous DBCC: This option performs the
DBCC CHECKDBoperation as the database opens. This method lets you immediately verify data consistency and identify any errors. Use this option if you prioritize data verification, but note that it increases the time it takes to open the database. For the CreateMigrateTask API call, this option sets theCheckDBModeparameter toSyncExecuteDBCheck.
-
6. View cloud migration backup details
To view the backup file details for a cloud migration task, go to the Restoration page in the left-side navigation pane of the RDS instance. On the Cloud Migration Records of Backup Data tab, find the task and click View File Details in the rightmost column.
After the cloud migration, the system automatically creates a backup based on the RDS instance's automatic backup policy. This backup runs at a specified backup time, which you can adjust. The resulting backup set contains the migrated data and is available on the Restoration page.
If you need a backup before the next scheduled time, you can perform a manual backup.
Common errors
For common errors during full backup data migration, see Common errors in full backup data migration.
You may encounter the following errors during an incremental upload:
-
Failed to open database
-
Error message: Failed to open database xxx.
-
Cause: The source SQL Server database uses advanced features that are not supported by the selected ApsaraDB RDS for SQL Server instance edition. For example, this error occurs if your source SQL Server instance runs Enterprise Edition with data compression or partitioning enabled, and you migrate data to an ApsaraDB RDS for SQL Server instance that runs Web Edition.
-
Solution:
-
Disable the advanced features on your source SQL Server instance, create a new backup, and then try the migration again.
-
Purchase an ApsaraDB RDS for SQL Server instance with the same SQL Server edition as your source instance. For more information, see Create an ApsaraDB RDS for SQL Server instance.
NoteFor more information, see Feature comparison among different SQL Server versions and RDS editions.
-
-
-
LSN mismatch in the backup chain
-
Error message: The log in this backup set begins at LSN XXX, which is too recent to apply to the database. RESTORE LOG is terminating abnormally.
-
Cause: In SQL Server, a differential or log backup can be restored only if its starting Log Sequence Number (LSN) aligns with the LSN of the previously restored backup file. This error occurs if the LSNs do not match.
-
Solution: Select the backup files with matching LSNs for the incremental upload. Ensure that you upload the backup files in chronological order.
-
-
Asynchronous DBCC CHECKDB fails
-
Error message: asynchronously DBCC checkdb failed: CHECKDB found 0 allocation errors and 2 consistency errors in table 'XXX' (object ID XXX).
-
Cause: After the backup file is restored to the ApsaraDB RDS for SQL Server instance, the system runs an asynchronous DBCC CHECKDB. If this check fails, it indicates that the source database already contained consistency errors.
-
Solution:
-
On the destination ApsaraDB RDS for SQL Server instance, run the following command:
DBCC CHECKDB (DBName,REPAIR_ALLOW_DATA_LOSS)ImportantThis repair command may cause data loss.
-
On the source instance, run the following command to repair the errors, and then retry the incremental upload.
DBCC CHECKDB (DBName,REPAIR_ALLOW_DATA_LOSS)
-
-
-
Incorrect backup file type for incremental upload
-
Error message: Backup set (xxx) is a Database FULL backup, we only accept transaction log or differential backup.
-
Cause: During an incremental upload to an ApsaraDB RDS for SQL Server instance, the system accepts only log backup files or differential backup files after a full backup is restored. This error occurs if you select a full backup file again.
-
Solution: Select a log backup file or a differential backup file.
-
-
Database count exceeds the limit
-
Error message: The database (xxx) migration failed due to databases count limitation.
-
Cause: This error occurs when you migrate a database to an instance that has reached its maximum database limit.
-
Solution: Migrate the database to another ApsaraDB RDS for SQL Server instance, or delete unnecessary databases from the current instance.
-
-
Insufficient RAM user permissions
-
Q1: In Step 5 of Create a data migration task, why is the OK button dimmed and unclickable even though all parameters are configured?
-
A1: This can occur if your RAM user lacks the required permissions. See the Prerequisites section in this topic and grant the necessary permissions.
-
Q2: How do I resolve the
no permissionerror that occurs when a RAM user tries to grant theAliyunRDSImportRole? -
A2: Use your Alibaba Cloud account to temporarily grant the
AliyunRAMFullAccesspermission to the RAM user. For instructions on granting permissions to a RAM user, see Use RAM to manage ApsaraDB RDS permissions.
-
-
Incremental backup restored to an incorrect full backup
-
Error message: This differential backup cannot be restored because the database is not in the correct state. RESTORE DATABASE is terminating abnormally.
-
Cause: This error occurs if a newer incremental backup is restored to an older full backup. This breaks the backup chain because the LSN of the differential backup file does not align with the LSN of the full backup file that was restored with the
NORECOVERYoption. -
Solution: Ensure you selected the correct backup files and are uploading them in the correct order. You can query the
msdb.dbo.backupsettable on the source instance to verify the order and LSN relationship between your full and differential backup files.
-
-
Error with multi-file Striped Backups
-
Error message: Failed to verify (xxx.bak), error message:The media set has xxx media families but only 1 are provided. All members must be provided. VERIFY DATABASE is terminating abnormally.
-
Cause: The source database was backed up using the Striped Backup feature, which writes a single full backup to multiple .bak files. However, you provided only one of these files for the migration task. ApsaraDB RDS for SQL Server does not support migrating data from multiple backup files in a single task.
-
Solution: Back up the source database to a single .bak file and then retry the upload.
-
Related API operations
API | Description |
Restores backup files from OSS to an ApsaraDB RDS for SQL Server instance and creates a data migration task. | |
Opens the database of a backup data migration task on an ApsaraDB RDS for SQL Server instance. | |
Queries the list of backup data migration tasks on an ApsaraDB RDS for SQL Server instance. | |
Queries the details of the backup files of a backup data migration task on an ApsaraDB RDS for SQL Server instance. |