The Model Context Protocol (MCP) is an open protocol that provides a channel for information exchange between large models and external tools. This product transforms internal standard operating procedures into an automation process that can be invoked by an AI agent as an MCP Tool.
For an example of the development and usage process, see Develop an MCP Tool for AI agent invocation.
Key concepts
This section introduces key concepts and extensions related to the Model Context Protocol (MCP) that are used in this product.
Supported MCP protocol version: 2025-03-26.
MCP Server. This product classifies MCP Servers into two types:
Category
Description
System MCP Server
Provides common MCP Tools, such as querying task status and results by TaskId.
The product provides a default system MCP Server named
aiworker_system. You cannot add, modify, or delete this MCP Server or the MCP Tools it contains.You can decide whether to use the system MCP Server based on your system integration plan.
Business MCP Server
Tools published from an automation process must belong to a business MCP Server.
The product provides a default business MCP Server named
aiworker_default.You can create multiple business MCP Servers and organize them by department, such as finance or marketing.
MCP Tool
This product only supports publishing MCP Tools. MCP Resources and Prompts are not supported.
Tool version. This product adds the concept of a "tool version" as an extension to the MCP protocol. This concept is used only for managing tool definitions and is not visible to the MCP Client during invocation.
Relationship with an MCP Server. The following restrictions are added in addition to the MCP protocol:
The tool name must be unique within a tenant (your RPA enterprise).
A tool can belong to only one MCP Server.
MCP gateway instance
The MCP gateway is responsible for unified management of MCP invocations. This product includes a built-in MCP gateway instance, so you can invoke tools immediately after publishing them.
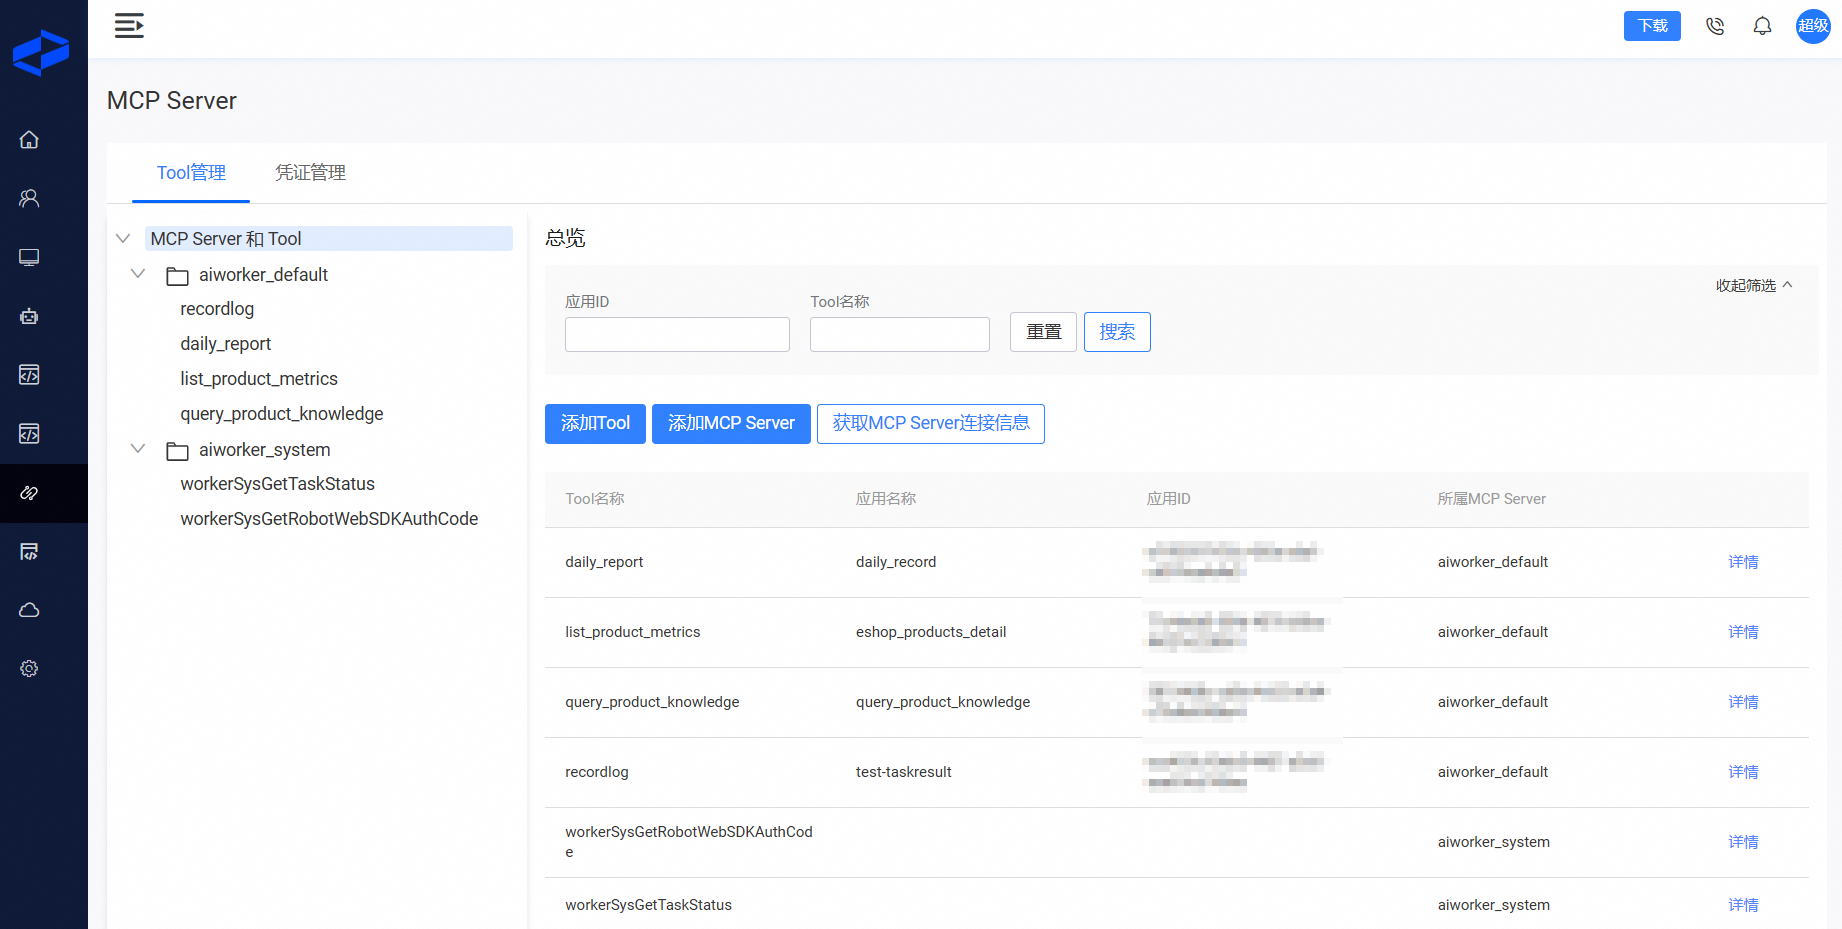
Manage tools
When you navigate to the MCP Server menu, the tool management interface appears. The tree on the left lists all MCP Servers and MCP Tools in your tenant (RPA enterprise). By default, the root node is selected, which shows basic information for all tools and lets you search for them. If you select a tool under a business MCP Server, you can view its version information and publish status. You can also perform actions like renaming the tool from the tree structure.
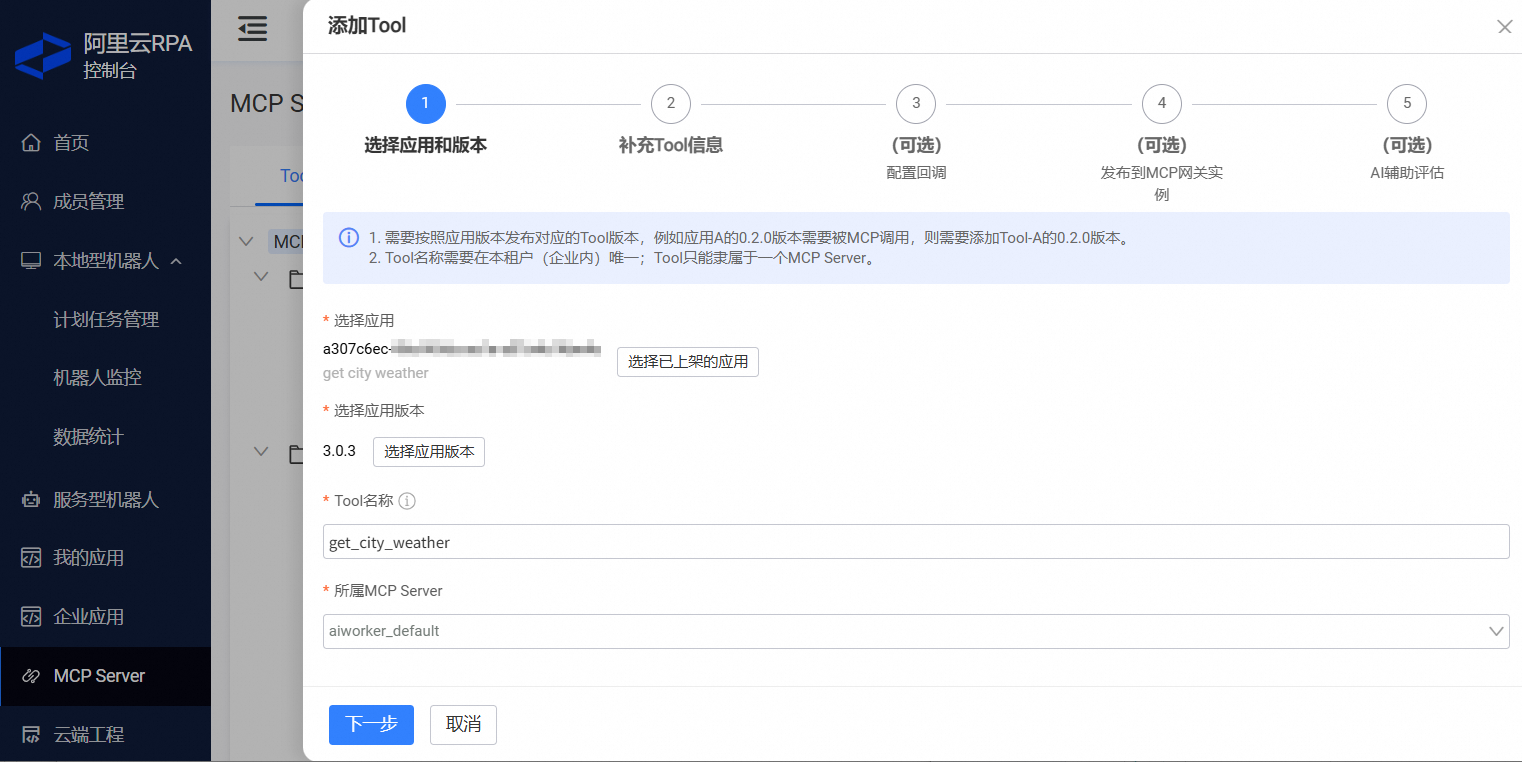
Add a tool
Select the application and application version, and configure basic information such as the tool name and its parent MCP Server.
Parameter
Description
Application and application version
ImportantRelationship between a tool and an RPA application:
You can create MCP Tools only from published applications.
An application has a one-to-one relationship with a tool. Similarly, an application version has a one-to-one relationship with a tool version.
Tool name
The tool name can be up to 100 characters long. Chinese characters are not supported. We recommend using underscores (_) to separate words.
ImportantWe recommend that you do not use the application name as the tool name.
In scenarios that involve on-premises robots, users can also filter and run applications by name in the robot client. The large model uses the tool name and tool description to find the required tool. Therefore, the tool name should be easily understood by the large model.
MCP Server
You can select only a business MCP Server.
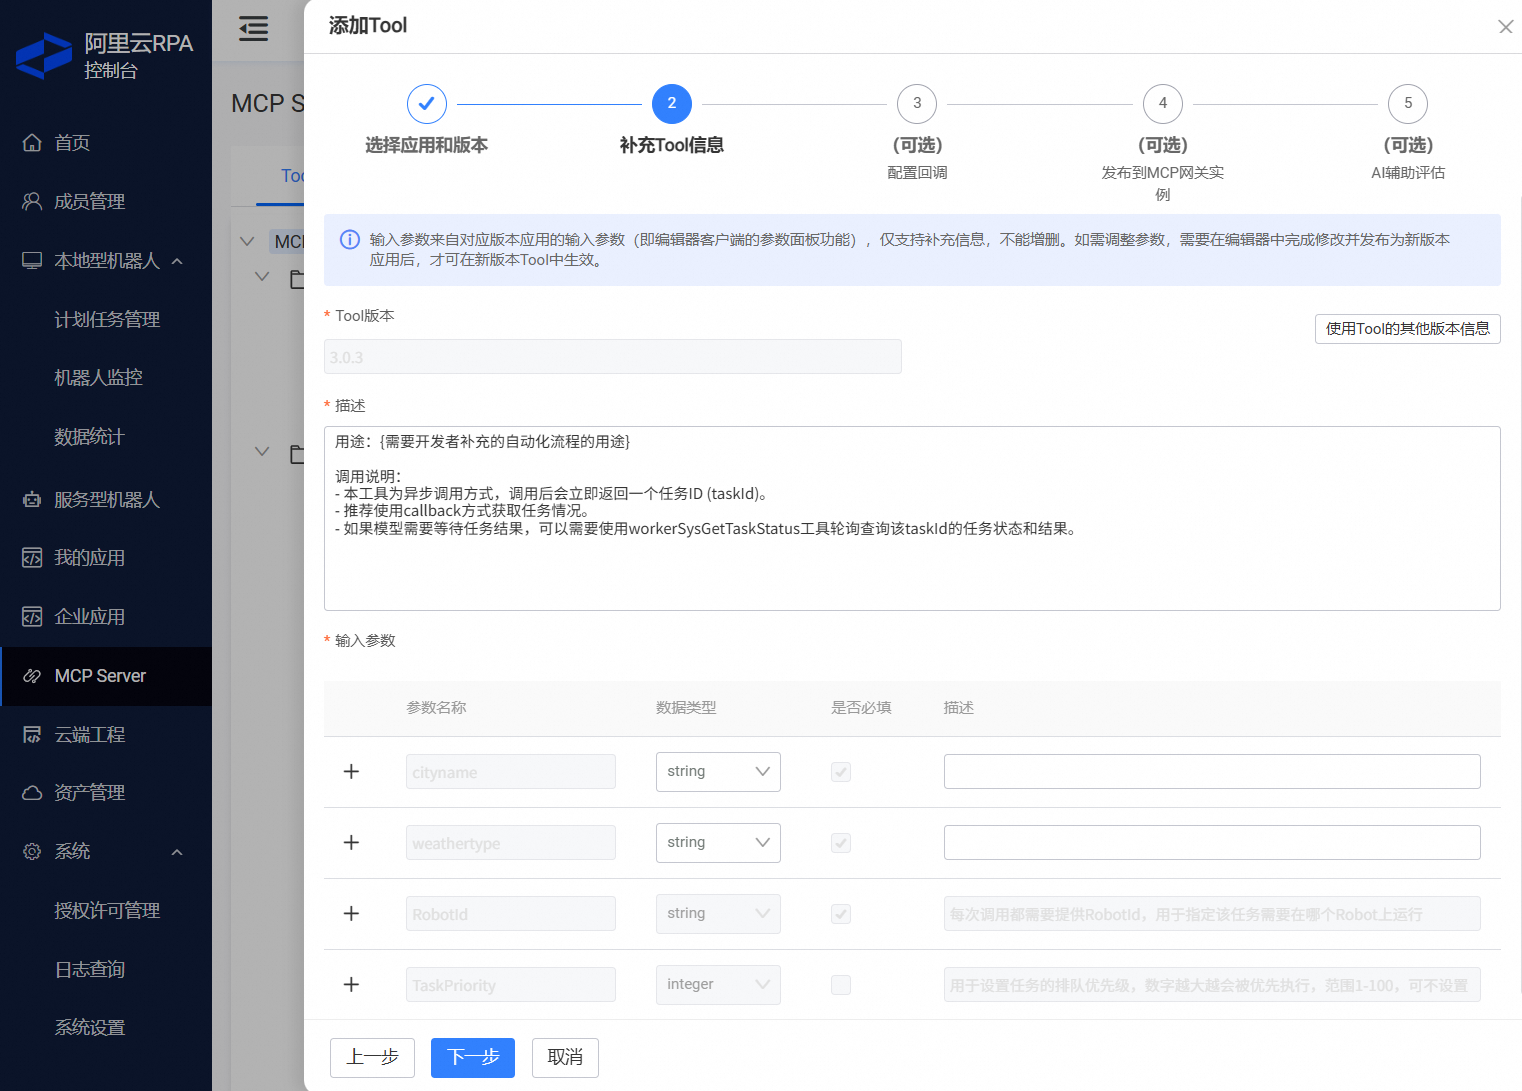
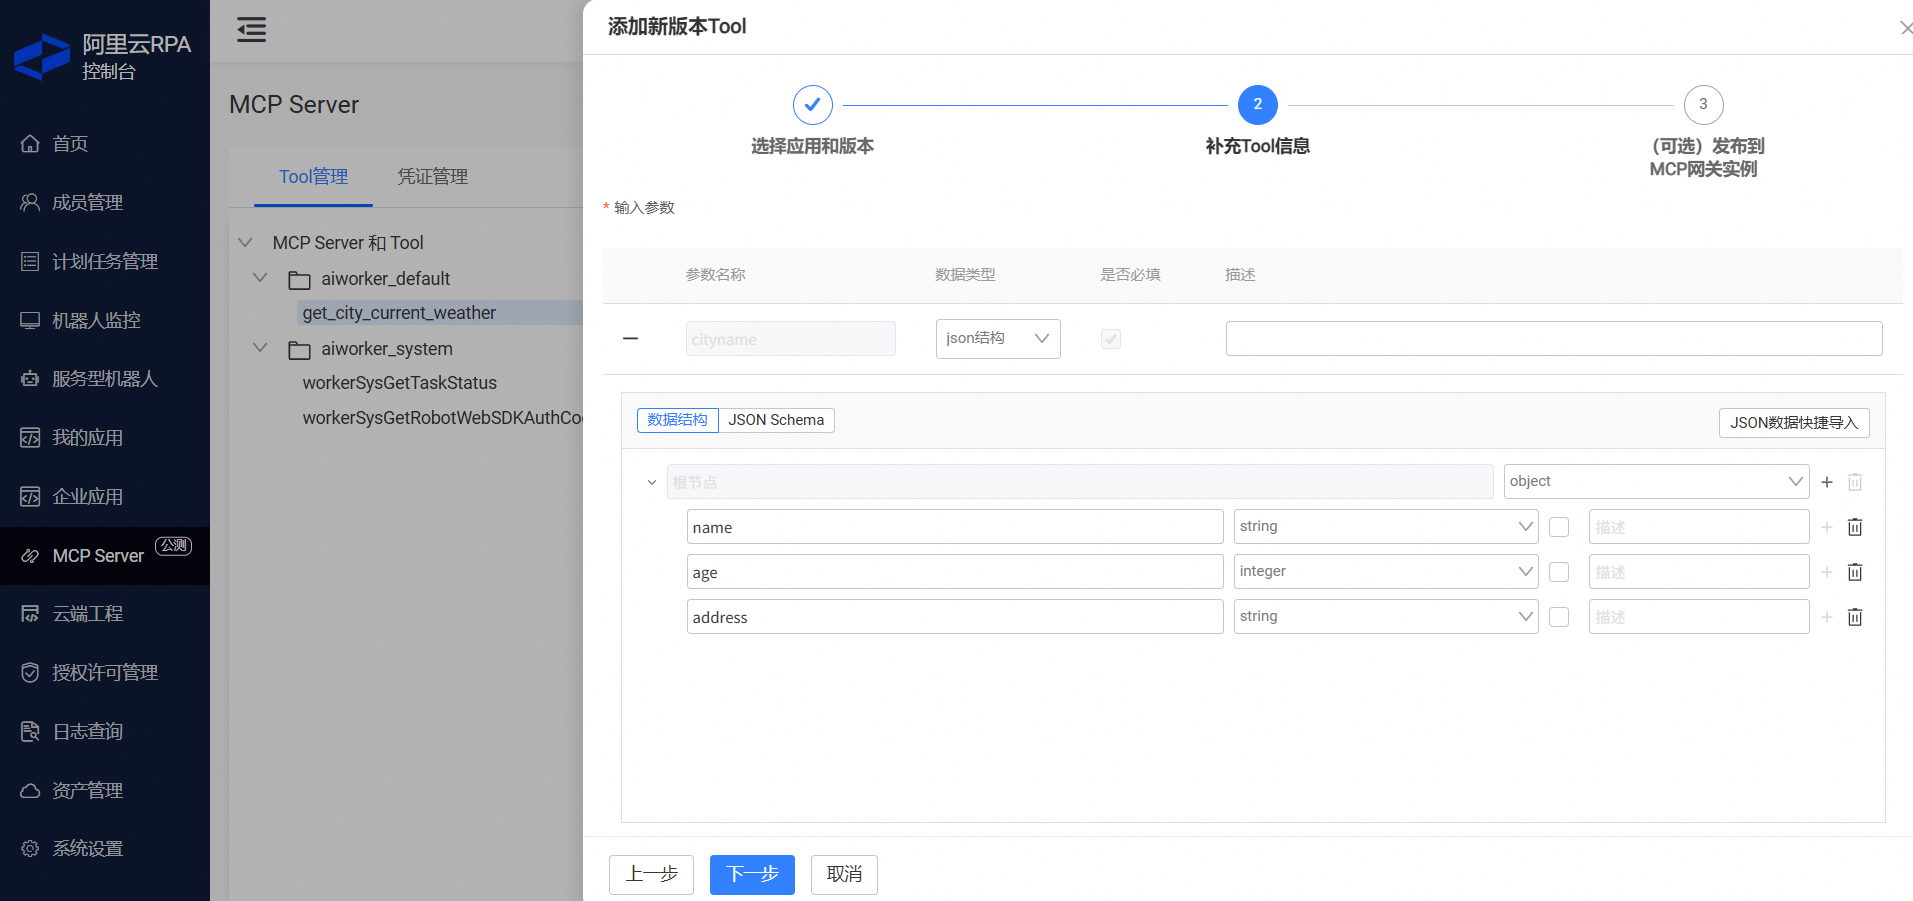
Provide the tool description and input parameter information for this tool version.
Parameter
Description
Tool description
The product provides a default description template. You can use this template as a starting point and modify it as needed.
Input parameters
Input parameters fall into two categories: automation process input parameters and system input parameters.
System input parameters cannot be modified or deleted.
You define the name, type, and required status of an automation process input parameter during the process development stage.
ImportantIn this step, the system validates the parameter name and type. If validation fails, you cannot proceed. Follow the error message to modify the parameters in the editor's Parameter Panel, republish the application as a new version, and then add a tool for the new version.
You must define or modify the parameter name, type, and required status in the editor's Parameter Panel, as shown in the following figure.
Automation process input parameters
Item
Details
Parameter name
Define and edit in the editor's Parameter Panel.
Format requirements: Case-sensitive letters, digits, or underscores. The name must start with a letter and cannot end with an underscore.
Parameter type
Editor Parameter Panel
NoteWhen you develop an MCP Tool with RPA, we recommend that you use the "Text Box" type for all parameters, as shown in the preceding figure. Perform format conversions as needed within the automation process. This approach minimizes issues caused by format conversion during data transmission.
Tool parameter type
The MCP protocol uses JSON-RPC to describe tool definitions. Therefore, when you add tool input parameter information in this step, use only basic JSON types and JSON Schema.
For detailed recommendations on how to use specific parameter types, see the following sections.
Required
Define and edit in the editor's Parameter Panel.
Parameter description
Provide a detailed description to help the large model understand the purpose of this input parameter and any additional requirements, such as format constraints.
Parameters can be categorized into three types based on their purpose: basic types, structured strings, and files.
Basic types
Supported basic types include
string,integer,date, anddatetime. You can also set validation conditions for these types, such as default values and enumerated values (enums).Structured strings
Automation processes often need to operate on a set of data, such as sending different messages to multiple people. In such cases, an input parameter must have a specific data structure. When you develop an MCP Tool with RPA, keep input parameter structures simple to help the large model generate tool inputs.
For structured input parameters, select the JSON structure type and follow the instructions to define it.
We recommend that the parameter structure does not exceed the complexity of the following examples:
Type
Example
Simple array
["1","2","3"]Two-dimensional array
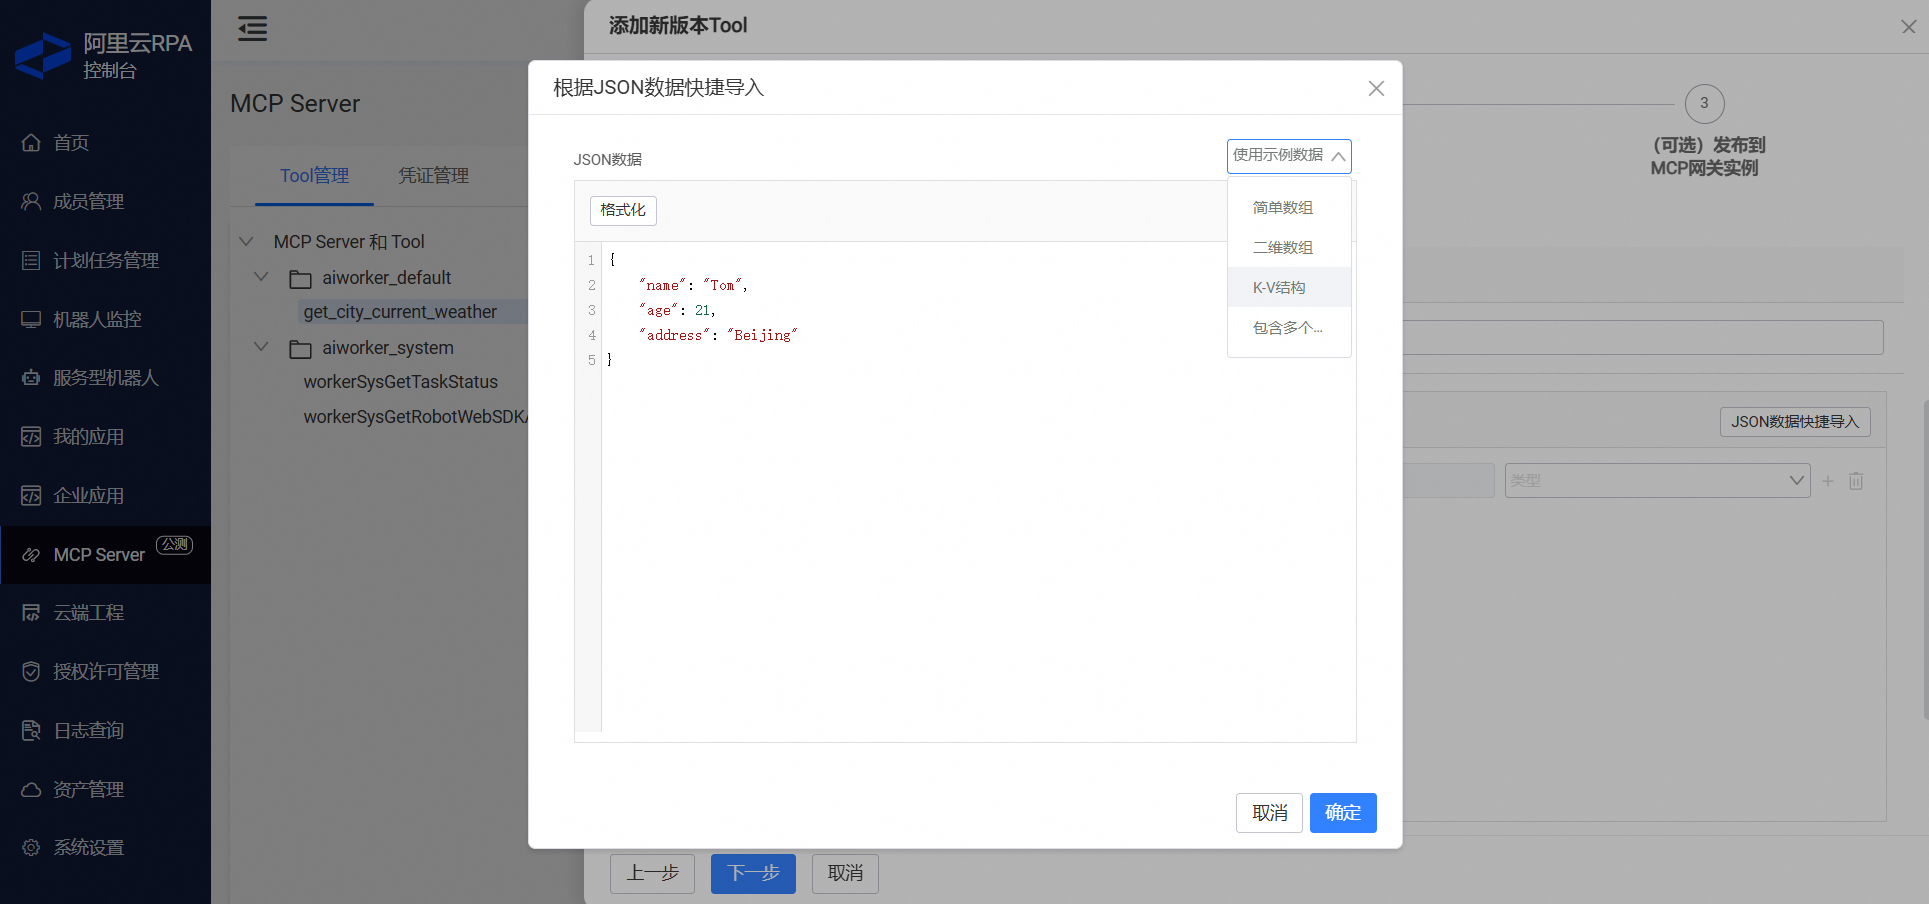
[
    ["1","2","3"],
    ["a","b","c"]
]
Key-value structure
{
    "name":"Tom",
    "age":21,
    "address":"Beijing"
}
Array of key-value objects
[
    {
        "name": "Tom",
        "age": 21,
        "address": "Beijing"
    },
    {
        "name": "Jerry",
        "age": 19,
        "address": "Hangzhou"
    }
]
Generate parameter definitions. You can use the features on the page to automatically generate parameter definitions.
Select JSON structure as the parameter type to open the JSON definition window. If you are familiar with JSON Schema, you can define the data structure directly in the window or import existing JSON Schema content.

You can also use the Quick JSON Data Import feature to automatically generate the corresponding JSON Schema from sample JSON data.

NoteWe recommend that you define a schema for structured input parameters to help the large model better understand and construct the required parameters.
To generate the definition, we recommend using the Quick JSON Data Import feature to automatically generate the schema from your data.
Files
Automation processes often need to handle files, such as reading data from an Excel file to fill out a web form. In such cases, you need to consider how to pass file content to the automation process.
Method 1: If the file content is small and has a clear structure, such as an Excel or CSV file, consider parsing the file content and passing it as a structured input parameter, as described earlier.
Method 2: If the file is large, we recommend passing a link to the file. The input parameter for the automation process would be a file URL, for example, a file stored in OSS. The process then downloads and parses the file to complete subsequent operations. For more information, see Download and upload files by using OSS.
System input parameters
Parameter name
Type
Required
Description
RobotId
string
Yes
Specifies the robot that runs the automation task.
You can invoke both on-premises robots and service robots by using MCP.
For more information about robot allocation strategies, see AI agent integration recommendations.
TaskPriority
integer
No
The priority of the automation task. This is an integer from 0 to 100. The default value is 50.
This priority applies only to the robot's task queue. A higher number indicates a higher priority.
(Optional) Configure callback settings.
After you configure a callback, the system triggers a callback notification when the status of a task created by this MCP Tool changes. The callback notification details depend on the robot type. For a service robot, see CreateTask. For an on-premises robot, see createServiceTask.
When you configure a callback URL, the system sends an HTTP POST request to the URL to verify connectivity.
ImportantThe validation method sends an HTTP POST request with an empty body to the URL over the internet. The test passes if the HTTP response status is 200.
(Optional) Publish to an MCP gateway instance. A tool must be published to an MCP gateway instance before you can invoke it. You can publish the defined tool directly in this step.
(Optional) Use a large model to evaluate the MCP Tool. This helps you refine the tool's information.
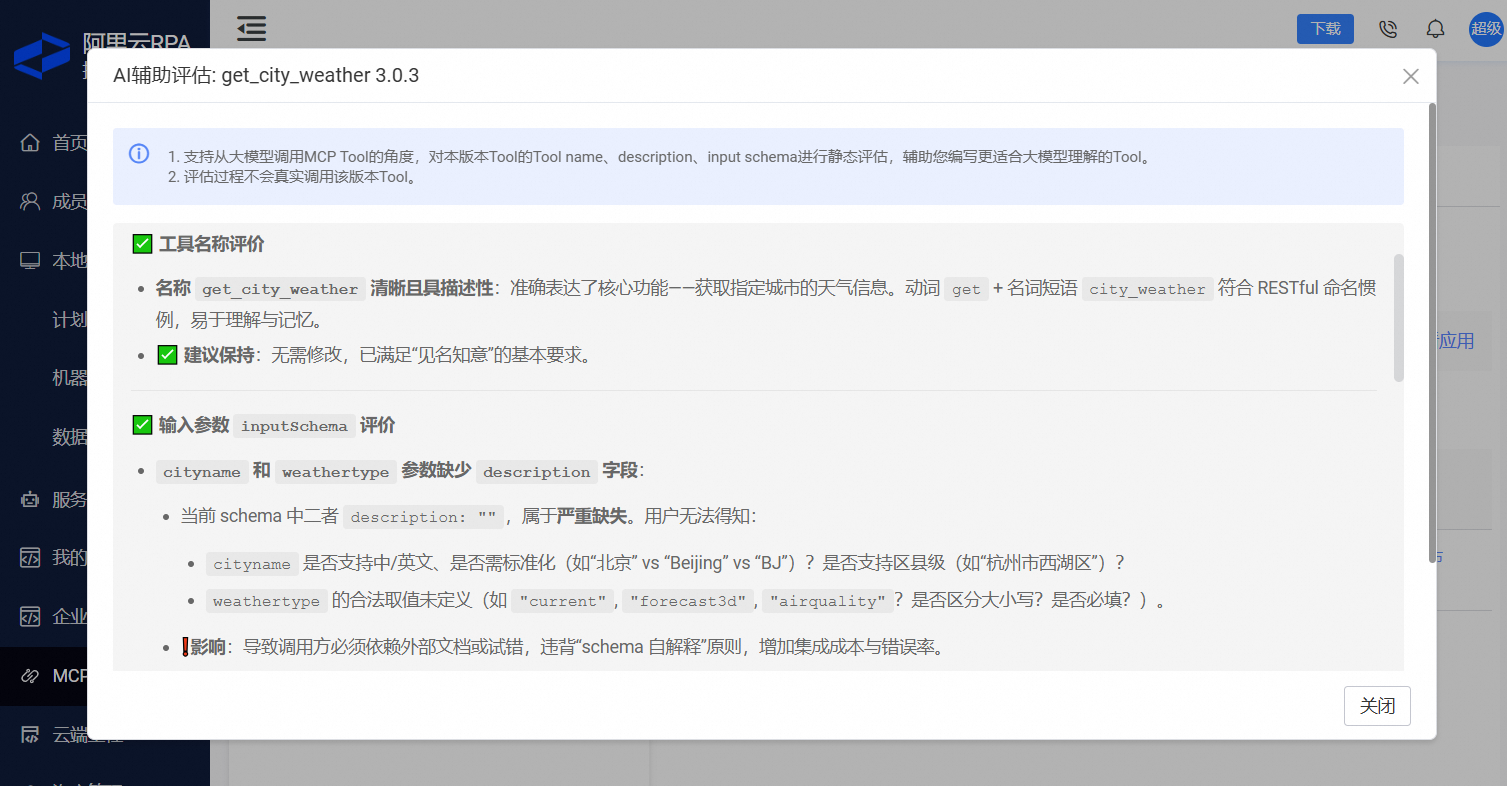
Evaluate a tool
Before a large model invokes an MCP Tool, you can use the AI-assisted evaluation feature. This feature assesses, from the model's perspective, whether the large model can accurately understand and use the tool's information. You can then decide whether to make changes based on the evaluation results.
The evaluation covers the tool name, description, and input schema of this MCP Tool version.
The evaluation process is static and does not trigger an actual MCP Tool invocation.
The following figure shows an example of an evaluation result:
Manage tool versions
Relationship between tools and RPA applications
When you publish a new version of an RPA application, the system does not automatically publish a corresponding new tool version. You must manually add the new version. As shown in the following figure, a tool can run only a specific version of an application.
Taking an RPA application offline
The system does not automatically take the corresponding tool offline, but MCP invocations will fail.
Because the application is offline, you cannot add a new tool version for it.
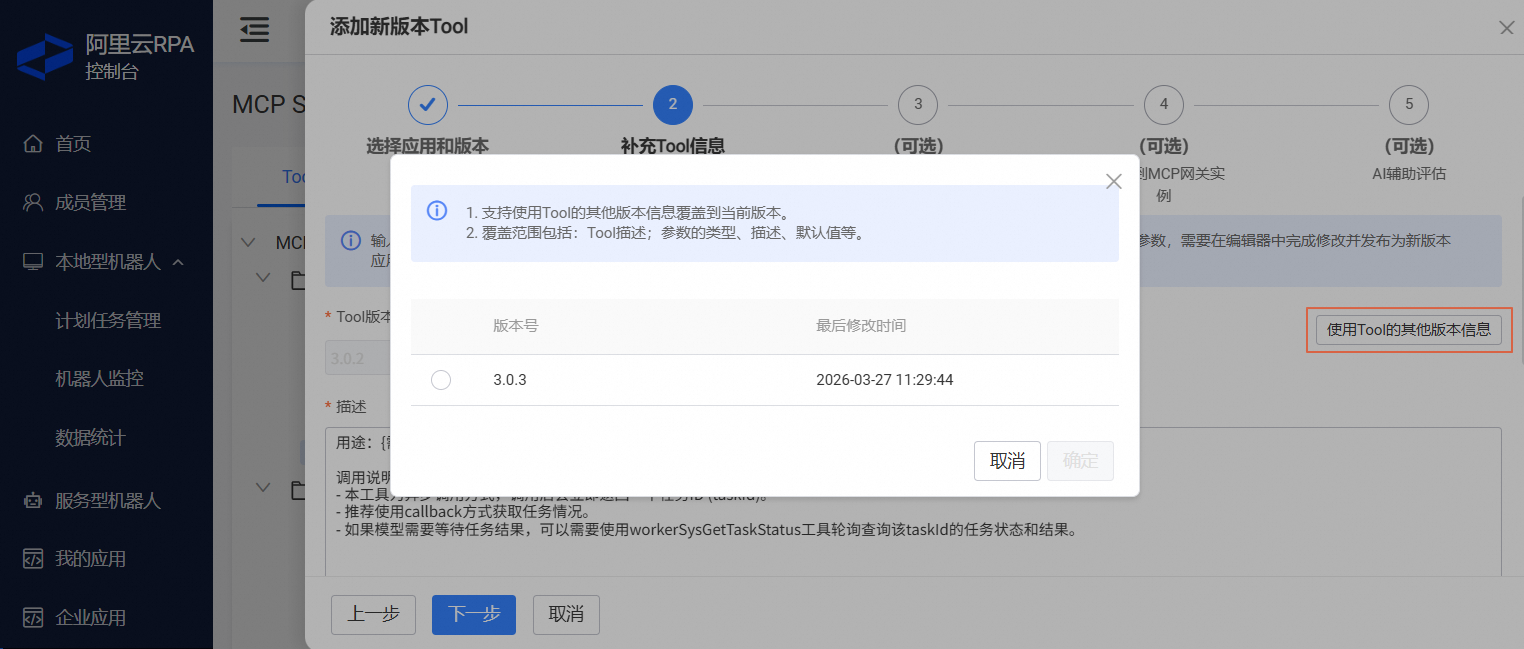
Add a new tool version
When you add a new version, you cannot change the tool name. To modify the name, you must use the 'Modify tool name' action separately.
Provide tool information. By default, you must provide the tool description and input information for the new version. You can use the Use Information of Other Tool Versions feature to modify the information from an existing version.
Switch tool versions
You can use the "Publish" and "Take offline" features to control which tool version runs on the MCP gateway instance.

If a tool has multiple versions, only one version of that tool can run on a single MCP gateway instance at a time.
Testing and production in development iterations
After you publish a tool, continuous development and iteration may involve the following types of changes:
Modifications to the tool's information, such as its description.
Adjustments to the automation process, which results in a new version of the corresponding RPA application.
In this situation, you need to test the tool before you deploy it to production. Similar to how you handle RPA applications (for more information, see 2. Test and publish an application to production), you can create an MCP Server and MCP Tool specifically for testing. The following table uses get_city_weather as an example.
Test stage |
Production deployment |
|
Project |
The project name is |
|
RPA application |
Publish a test application named |
Publish a production application named |
MCP Tool |
Publish a test MCP Tool named |
Publish a production MCP Tool named |
Other operations
Modify a specific tool version: You can modify the tool description and input information. After you make changes, you must publish the tool to the MCP gateway instance for the changes to take effect.
Modify the tool name: You must take all versions of the tool offline before you can modify its name.
Delete a tool version: You must take the version offline before you can delete it.
Delete a tool: After you delete all versions of a tool, the system automatically deletes the tool.
Invoke with MCP
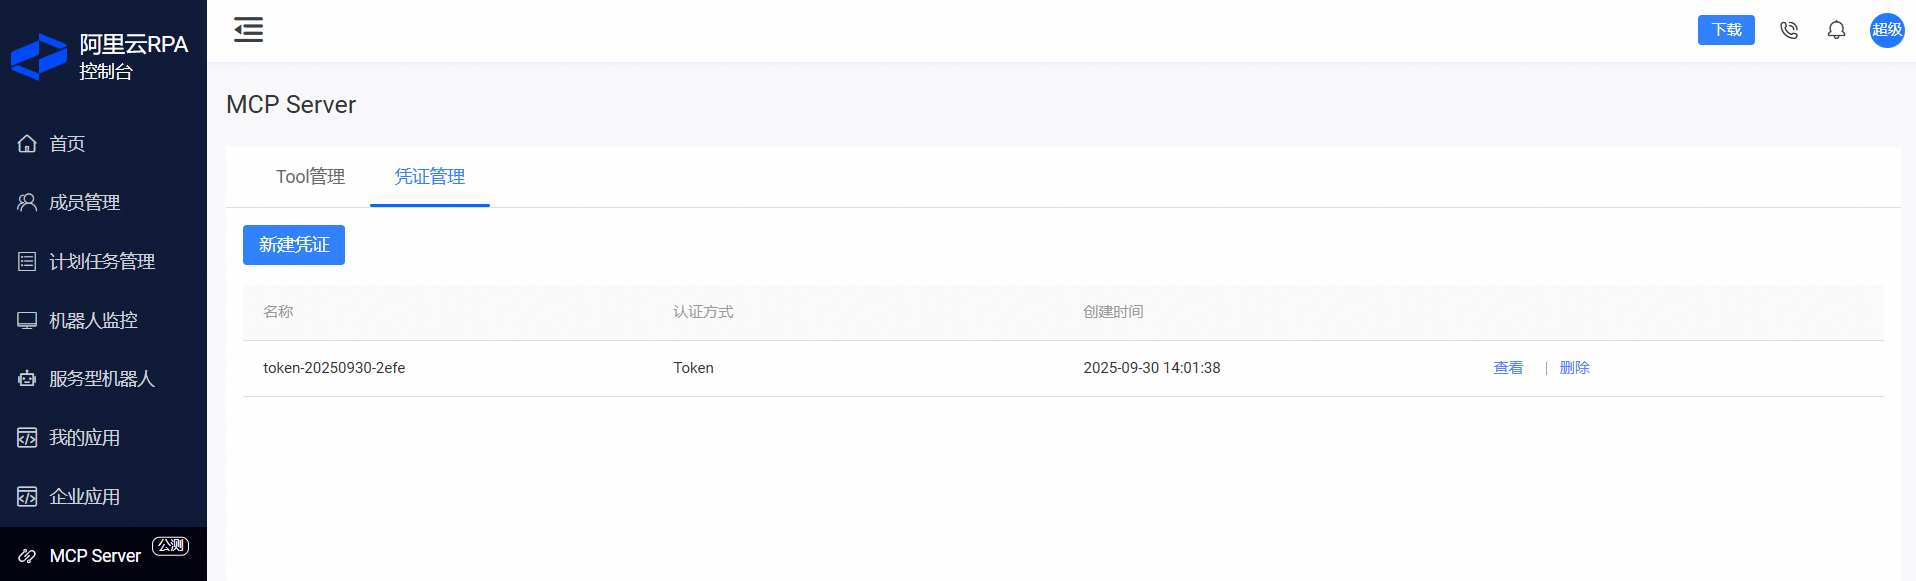
Authentication and permission scope
All MCP requests require authentication. Anonymous invocations are not supported. You can manage credentials in the MCP Server - credential management section.
The permission scope for an MCP invocation depends on the robot type. For more information about robot types, see Choose a robot type.
on-premises robot
You must request and receive approval for the scope of applications that a robot can run for a specific user account. For more information, see Publish and manage applications. Users can trigger applications by methods such as manual execution in the client or API calls.
If you use MCP to invoke this type of robot, the MCP Client can still retrieve the list of all tools on the MCP gateway instance. However, tool execution may fail if the token does not have permission to run the required application.
service robot
You can trigger a service robot by using API calls. The API can run all published applications, and your upper-layer system is responsible for controlling the scope of execution.
Therefore, when you use MCP to invoke this type of robot, the MCP Client can invoke all tools.
Get MCP connection information
In the MCP Server menu, you can use "Get MCP Server Connection Information" to obtain the invocation URL and connection details for a specific MCP gateway instance.
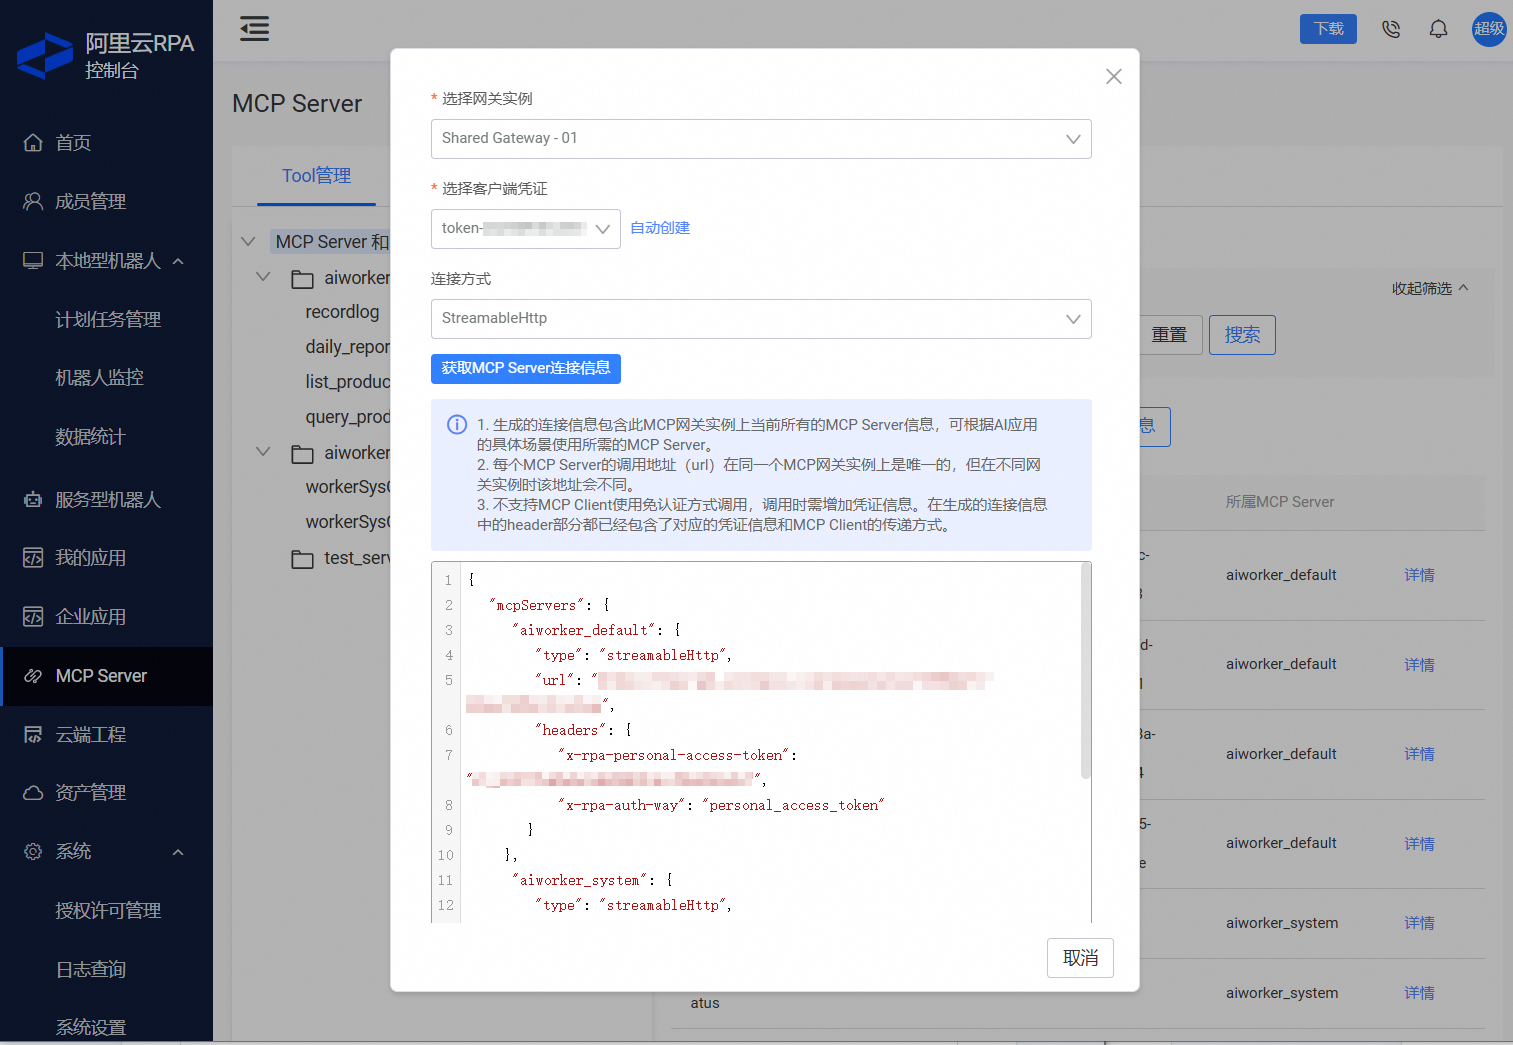
The connection information contains connection and authentication details for multiple MCP Servers, including business and system MCP Servers. Some AI application development platforms, such as Model Studio, or AI clients, such as Cherry Studio, allow you to add only one MCP Server at a time. In such cases, you must separate the connection information and enter it for each server individually.
System tools
workerSysGetTaskStatus
Purpose
Queries the status and result of a task based on its task ID.
Input
TaskId, string, requiredOutput
{ "requestId": "f507d191-8edb-4115-....", "success": true, "code": 0, "msg": "The request was successful.", "msgCode": "result.success", "data": { "TaskId": "150b05ea-0353-40c2-.....", "TaskStatus": "complete", "TaskPriority": 50, "TaskDescription": null, "RobotId": "55E7E02B93EDFE02....", "AppId": "a307c6ec-45ef-40cb-....", "AppParams": [ { "Name": "cityname", "Value": "Wuhan" }, { "Name": "weathertype", "Value": "temperature" } ], "TaskResult": "22", "CallbackConfig": null, "TaskCreateTime": 1760499398000, "TaskBeginTime": 1760499398000, "TaskEndTime": 1760499416000 }, "pager": null, "instanceId": null }TaskStatus: The status of the task. Valid values are:waiting: The task is waiting to be run.running: The task is running.complete: The task finished successfully.terminated: The task terminated with an error.
workerSysGetRobotWebSDKAuthCode
Purpose
Queries the authentication information required for WebSDK login based on a robot ID. This tool applies only to service robots.
Input
RobotId, string, requiredOutput
{
    "requestId": "931d9030-6c18-485f-....",
    "success": true,
    "code": 0,
    "msg": "The request was successful.",
    "msgCode": "result.success",
    "data": {
        "DesktopId": "ecd-bzhh....",
        "RegionId": "cn-beijing",
        "SessionStatus": "notConnected",
        "CurrentEndUserId": null,
        "TargetEndUserId": "....",
        "AuthCode": "...."
    },
    "pager": null,
    "instanceId": null
}
AI agent integration recommendations
The Develop an MCP Tool for AI agent invocation topic provides a usage case study. For production use, you also need to consider the following aspects:
Robot allocation method
As mentioned earlier, you must assign every automation task to a specific robot. This is because most operations on existing systems, such as platforms or software, require user login first. These systems have diverse login methods and security controls, limiting the use of on-demand resource management. In most cases, you must design a robot allocation strategy for end users based on your specific business requirements.
Recommended approach: In most cases, you can integrate the allocation process into the registration or onboarding workflow for your end users. By calling the RPA OpenAPI, such as the
ListRobotsinterface for a service robot, your system can manage and record robot allocations.
Large model scheduling method
Based on our production observations, more than 70% of automation tasks take longer than 30 minutes to complete. Therefore, you should generally handle MCP Tools developed with RPA by using asynchronous scheduling. The default tool description also informs the large model about this asynchronous invocation model.
Additionally, for an AI agent that interacts with end users through a chat interface, you must account for the long execution times of automation tasks.
Recommended approach: Use different methods for task execution and result retrieval, including getting task status and any business data the task generates.
Task execution: The task is triggered by the large model through MCP.
Result retrieval: Use backend OpenAPI calls, such as the
ListTaskDetailsandListTasksinterfaces for a service robot, or a callback mechanism, such as push notifications when the task status of a service robot changes. In the UI of the AI agent, use push notifications, such as WebSocket, to inform the user of the result.