Configure USB printers
To use USB printers on a cloud computer, an administrator must configure the required peripheral policies in the console, and end users must complete the setup on the Alibaba Cloud Workspace client and the cloud computer.
Obtain peripheral information
For USB peripherals, you need the VID (Vendor ID) and PID (Product ID), which are required when you configure peripheral policies. Both VID and PID are hexadecimal values, such as 0xa12c, where the 0x prefix is typically optional. You can look up the VID and PID of a connected USB peripheral in several ways.
The availability of peripheral devices on a cloud computer depends on multiple factors, including the type and version of the Alibaba Cloud Workspace terminal, the cloud computer image type and version, the type and version of the local device running the Alibaba Cloud Workspace client, and the brand and model of the peripheral device. You can visit the peripheral compatibility page to check whether a specific peripheral is compatible with a cloud computer. The data on this page was obtained under laboratory conditions and may differ from actual results.
From the Alibaba Cloud Workspace terminal
Open and log on to the Alibaba Cloud Workspace client.
In the upper-right corner of the client, click the icon, and then select Settings.
In the left-side navigation pane of the Settings window, click Peripherals, and then view the VID and PID of the USB peripheral on the Local USB Peripherals panel.
From the computer's device manager
You can find the VID and PID of a peripheral in the device management information on your computer.
Windows
In the Start menu, search for and open Device Manager.
In the Device Manager window, navigate to , and then double-click the USB device you want to look up.
On the Details tab of the properties dialog box, select Hardware Ids from the Property drop-down list. The VID and PID are displayed in the text box below.
macOS
In the system menu bar, choose , and then click More Info in the dialog box.
At the bottom of the About This Mac panel, click System Report.
In the left-side navigation pane of the new window, choose Hardware > USB, select the USB device you want to look up in the right-side panel, and then view the VID and PID below.
From the floating menu
Click the floating menu and select Peripherals & Printers.
On the Advanced Management tab, view the VID and PID of the USB peripheral in the device list.
Use a third-party tool
You can use the USB Device Tree Viewer tool to view peripheral information. This tool supports only Windows.
Download the tool: https://www.uwe-sieber.de/usbtreeview_e.html#download.
Extract the downloaded package, and then double-click
UsbTreeView.exeto open it.In the left-side directory of the tool, select the USB device you want to look up, and then view the VID and PID in the Device ID section of the right-side panel.
Alibaba Cloud Workspace hardware terminal
When you use a cloud computer through an Alibaba Cloud Workspace hardware terminal such as Alibaba Cloud Workspace Terminal, Alibaba Cloud Workspace Terminal Pro, or 23.8-inch Alibaba Cloud Workspace All-In-One Terminal, the administrator and end users must complete the following steps to configure peripheral access.
Administrator: Configure peripheral policies
Peripheral management policies are part of the cloud computer policy, and must be created and maintained by an administrator in the console.
The following examples use the EDS Enterprise Edition console. For the Business Edition procedure, see Manage policies.
General procedure for creating or modifying peripheral policies
Create a custom policy and associate it with a cloud computer
Modify a custom policy already associated with a cloud computer
Peripheral policy settings
Enable USB redirection
Method 1: Globally enable USB redirection
Configuration path: .
Configuration requirements: Turn on the USB Redirection switch.

Method 2: Enable USB redirection for specific USB devices by using a peripheral whitelist
After you globally enable USB redirection, all USB devices can connect to the cloud computers associated with the policy. If you do not want all USB devices to connect to the cloud computers associated with the policy, you can turn off the USB Redirection switch and enable USB redirection for specific USB devices by adding a peripheral whitelist.
Configuration path: .
Configuration requirements: Enter the device name, VID, PID, and set Blacklist/Whitelist to Whitelist.

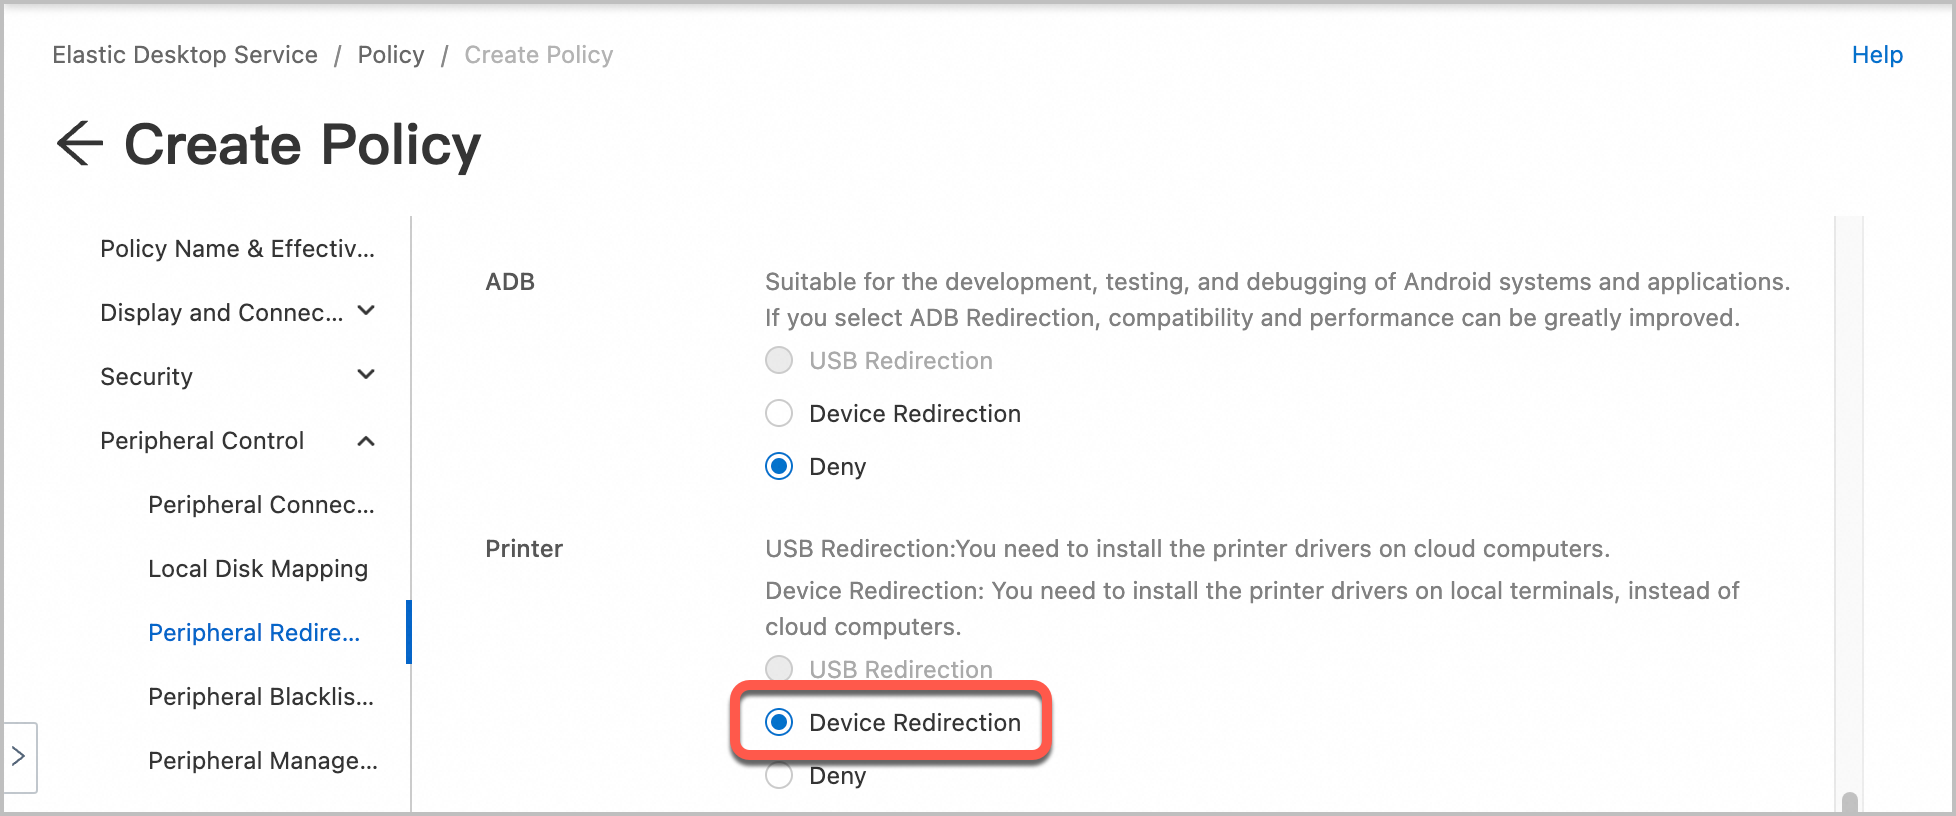
Enable device redirection for printers
Configuration path: .
Configuration requirements: Set the redirection mode for printers to Device Redirection.
End user: Configure and use the peripheral
Add USB printers
Direct connection
-
Connect the USB printer to the Alibaba Cloud Workspace hardware terminal using a USB cable.
-
Connect to the cloud computer, click the floating menu on the cloud computer desktop, and select Peripherals and Printers.
-
On the Advanced Management tab, find the target USB printer, and then select USB Redirection in the Redirection Mode column.
Add through search (not recommended)
This method has known compatibility issues and is not recommended. Only try this method when using certain HP printer models.
-
Connect the USB printer to the Alibaba Cloud Workspace hardware terminal using a USB cable.
Log on to the WUYING Terminal.
NoteThis topic uses WUYING Cube AS05 V7.10 as an example.
Click the navigation icon
 in the lower-left corner of the task, and select Settings.
In the left navigation bar of the System Settings window, click Printers And Peripherals, and on the Printer tab on the right, click Add Printer.
On the Add Printer panel, click Manually Search And Add Printer.
-
On the Manually Search and Add Printer panel, click the USB Printer tab, select the target USB printer and the corresponding driver, and then click OK.
Install drivers
After the peripheral is connected, it generally cannot be used directly. You must install the driver first. Multiple driver installation methods are available. After installing the driver, unplug and replug the USB printer or reconnect to the cloud computer.
Automatic scan and install
The first time you connect a peripheral, the system automatically scans for a matching driver. If one is found in the driver library, a Download and Install Driver dialog box appears. Click Install Now.
This feature requires the following conditions:
-
Cloud computer image: Windows operating system, image version V2.5.0 or later.
-
Alibaba Cloud Workspace terminal:
-
Alibaba Cloud Workspace Terminal: version V7.5 or later.
-
Alibaba Cloud Workspace Terminal Pro: version V7.5 or later.
-
Alibaba Cloud Workspace Notebook: version V7.5 or later.
-
Alibaba Cloud Workspace Notebook Pro: version V7.5 or later.
-
Install through Cloud Computer Manager
Cloud Computer Manager is a built-in utility on your cloud computer for system and peripheral management.
-
Open Cloud Computer Manager in one of the following ways:
-
Double-click the Cloud Computer Manager shortcut icon on the cloud computer desktop.
-
Click the floating ball on the cloud computer desktop and then click Cloud Computer Manager.
-
-
On the Cloud Computer Manager home page, click Peripherals & Printers.
-
On the Peripherals & Printers page, find the peripheral whose status is Driver Missing and click Repair.
-
If a driver is found in the driver library, click Download and Install Driver in the dialog box. After installation, click Close.
-
If no driver is available in the driver library but the driver is detected on your local device, click Upload and Install Local Driver in the dialog box. After installation, click Close.
-
If no driver is available in the driver library or on your local device, visit the peripheral manufacturer's website from your cloud computer and download the driver.
When the peripheral status changes to Connected, the driver installation is successful and the peripheral is ready for use.
-
Install through WUYING Application Center
WUYING Application Center is a tool for administrators to distribute and manage applications centrally. You can also use it to install peripheral drivers.
Connect to the cloud computer. On the desktop of the cloud computer, double-click the
 icon to open Wuying App Center.
-
In the left-side navigation pane of Application Center, click Driver Center.
NoteThis feature is supported only in WUYING Application Center on Windows cloud computers with image version V2.10.0 or later.
-
On the WUYING Driver Library or Enterprise Driver Library tab, search by device type or brand, and then click Download and Install on the card of the target peripheral.
Manual installation
If none of the preceding methods work, visit the peripheral manufacturer's website from your cloud computer and download the official driver.
Windows client/macOS client
When you use a cloud computer through the Windows client/macOS client, the administrator and end users must complete the following steps to configure peripheral access.
Administrator: Configure peripheral policies
Peripheral management policies are part of the cloud computer policy, and must be created and maintained by an administrator in the console.
The following examples use the EDS Enterprise Edition console. For the Business Edition procedure, see Manage policies.
General procedure for creating or modifying peripheral policies
Create a custom policy and associate it with a cloud computer
Modify a custom policy already associated with a cloud computer
Peripheral policy settings
Enable device redirection for printers
Configuration path: .
Configuration requirements: Set the redirection mode for printers to Device Redirection.

End user: Configure and use the peripheral
Add USB printers
-
Connect the USB printer to the local computer running the Alibaba Cloud Workspace client using a USB cable.
-
Connect to the cloud computer, click the floating menu on the cloud computer desktop, and select Peripherals and Printers.
-
On the Advanced Management tab, find the target USB printer, and then select USB Redirection in the Redirection Mode column.
Install drivers
After the peripheral is connected, it generally cannot be used directly. You must install the driver first. Multiple driver installation methods are available. After installing the driver, unplug and replug the USB printer or reconnect to the cloud computer.
Automatic scan and install
The first time you connect a peripheral, the system automatically scans for a matching driver. If one is found in the driver library, a Download and Install Driver dialog box appears. Click Install Now.
This feature requires the following conditions:
-
Cloud computer image: Windows operating system, image version V2.5.0 or later.
-
Alibaba Cloud Workspace client:
-
Windows client: version V7.6 or later.
-
macOS client: version V7.6 or later.
-
Install through Cloud Computer Manager
Cloud Computer Manager is a built-in utility on your cloud computer for system and peripheral management.
-
Open Cloud Computer Manager in one of the following ways:
-
Double-click the Cloud Computer Manager shortcut icon on the cloud computer desktop.
-
Click the floating ball on the cloud computer desktop and then click Cloud Computer Manager.
-
-
On the Cloud Computer Manager home page, click Peripherals & Printers.
-
On the Peripherals & Printers page, find the peripheral whose status is Driver Missing and click Repair.
-
If a driver is found in the driver library, click Download and Install Driver in the dialog box. After installation, click Close.
-
If no driver is available in the driver library but the driver is detected on your local device, click Upload and Install Local Driver in the dialog box. After installation, click Close.
-
If no driver is available in the driver library or on your local device, visit the peripheral manufacturer's website from your cloud computer and download the driver.
When the peripheral status changes to Connected, the driver installation is successful and the peripheral is ready for use.
-
Install through WUYING Application Center
WUYING Application Center is a tool for administrators to distribute and manage applications centrally. You can also use it to install peripheral drivers.
Connect to the cloud computer. On the desktop of the cloud computer, double-click the
icon to open Wuying App Center.-
In the left-side navigation pane of Application Center, click Driver Center.
NoteThis feature is supported only in WUYING Application Center on Windows cloud computers with image version V2.10.0 or later.
-
On the WUYING Driver Library or Enterprise Driver Library tab, search by device type or brand, and then click Download and Install on the card of the target peripheral.
Migrate drivers from a local device
If the local device running the Alibaba Cloud Workspace client already has a peripheral driver, you can migrate it directly to the cloud computer. Migrated drivers are also uploaded to your organization's driver library and shared with other cloud computers in the organization.
Prerequisites
-
Cloud computer image: Windows operating system, image version V2.6.0 or later.
-
Alibaba Cloud Workspace client:
-
Only Windows client (version V7.7 or later) is supported.
-
Sufficient permissions to package the driver for migration (read access to the driver directory on drive C).
-
-
Cloud computer policy: Disk redirection must be enabled. If not, contact your IT administrator.For more information, see Configuration reference.
-
Local device storage: at least 500 MB of available storage space.
-
Network: a stable connection for transferring driver files.
Before migrating a driver, verify that it works correctly with the peripheral on your local device.
Procedure
-
Open Cloud Computer Manager in one of the following ways:
-
Double-click the Cloud Computer Manager shortcut icon on the cloud computer desktop.
-
Click the floating ball on the cloud computer desktop and then click Cloud Computer Manager.
-
-
On the Cloud Computer Manager home page, click Peripherals & Printers.
-
On the Peripheral Management page, click Peripherals & Printers.
-
On the Peripherals & Printers page, click Driver Migration.
-
On the Driver Migration page, select the peripheral type, accept the Driver Migration Privacy Agreement, and then click Scan Now.
-
On the Install Driver page, select a detected driver, accept the agreement, and click Install.
Repeat this step if you need to migrate multiple drivers.
Manual installation
If none of the preceding methods work, visit the peripheral manufacturer's website from your cloud computer and download the official driver.
After the driver is installed, restart the cloud computer. After restarting, reconnect to the cloud computer to use the peripheral.
Troubleshooting
For common questions about cloud computer policies, see Policy FAQ.
For common questions about peripherals, see Peripheral FAQ.
For troubleshooting methods for common issues, see Self-help Guide for Peripheral Issues.