After you create an image, you can publish a delivery group to provide cloud applications from the image to specified end users. This topic describes how to publish a delivery group.
Publish a delivery group
Log on to the App Streaming console.
In the left-side navigation pane, click Delivery Groups.
On the Delivery Group page, click Publish Delivery Group.
In the Publish Delivery Group panel, configure the following parameters, and then click Buy Now.
Parameter
Description
Region and office network
Region
The region where the delivery group is located. To reduce latency, select a region that is close to your end users.
NoteAfter a delivery group is published, you cannot change its region. Plan your region deployment carefully before you proceed.
Office Network
Select an Office Network.
You can select an existing office network or click Create Office Network to create a new one.
NoteAfter you create an office network, click the refresh icon next to the drop-down list to update the list of office networks.
Configure delivery group
Delivery group specifications
The resource specifications for the delivery group. To learn about the use cases for each specification type, click Specification Details.
Image
The image that the delivery group uses to create resources.
Billing Method
Select a purchase method:
Monthly subscription
Pay-as-you-go
Duration
If you select monthly subscription, choose a subscription duration.
Resources in delivery group
The number of resources in the delivery group.
Auto-renewal
If you select pay-by-month as the billing method and the purchase duration is 1 month or longer, you can choose whether to enable Enable Auto-renewal.
NoteThe auto-renewal period is the same as the subscription duration that you select. For example, if you select a two-month subscription duration and enable auto-renewal, the system automatically renews the subscription for another two months upon expiration.
After you enable auto-renewal, you can select Price > Renewal in the top menu bar of the console and modify the auto-renewal period on the Renewal page.
Assign users (optional)
Assign User
To assign the delivery group to users when you publish it, click Assign Now.
You can select existing users or follow the on-screen instructions to create new users or import users in batches, and then assign the delivery group to them.
To assign the delivery group to users after it is published, click Assign Later.
Advanced settings (optional)
Delivery group name
A custom name for the delivery group. If you do not enter a name, the system automatically generates one based on default rules.
Session type
The session type for the cloud applications in the delivery group. Valid values are Independent Session and Shared Session.
Other
Agreements
Read the agreements listed here.
On the Publish Delivery Group page, confirm your configuration and click Place Order.
On the Pay page, select a payment method and click Pay.
Update a delivery group policy
If necessary, follow these steps to update the policy of a delivery group.
In the left-side navigation pane, click Delivery Groups.
On the Delivery Group page, find the delivery group that you want to manage. You can search for the delivery group by its status, name, or ID.
In the Actions column of the delivery group, click Update Policy.
In the Update Policy panel, modify the parameters for Session, Policy Period, and Display as needed, and then click OK.
Update a delivery group image
To distribute different applications to end users, you can either create a new delivery group or update the image of an existing one. Updating an existing delivery group's image reuses existing resources and incurs no additional costs. Follow these steps to update the image of a delivery group.
In the left-side navigation pane, click Delivery Groups.
On the Delivery Group page, find the delivery group that you want to manage. You can search for the delivery group by its status, name, or ID.
In the Actions column of the delivery group, click Update Image.
In the Update Image panel, select the new image and click Start to Update.
WarningStarting an image update disconnects active cloud application sessions. Proceed with caution to prevent data loss.
Update assigned users
If necessary, follow these steps to change the users assigned to a delivery group.
In the left-side navigation pane, click Delivery Groups.
On the Delivery Group page, find the delivery group that you want to manage. You can search for the delivery group by its status, name, or ID.
In the Actions column of the delivery group, click Update Assigned Users.
In the View/Assign Users panel, add or remove authorized users as needed, and then click Close.
You can also click Created User to manually enter or import new user information in batches. For more information about how to create users, see Manage users.
OTA update
App Streaming updates its components through OTA updates. Follow these steps to manage these updates.
In the left-side navigation pane, click Delivery Groups.
On the Delivery Group page, find the delivery group that you want to manage. You can search for the delivery group by its status, name, or ID.
In the Actions column of the delivery group, click OTA Updates and perform one of the following operations:
When App Streaming pushes an update, a red dot icon appears in the upper-right corner of the OTA Updates button. In the OTA Updates panel, go to the Update Settings tab to view the OTA version description and set a start time for the update. The start time must be within seven days from the current time.
You can also view the OTA update history for the delivery group on the Update History tab.
Renew subscription resources
If necessary, follow these steps to renew your subscription resources.
In the left-side navigation pane, click Delivery Groups.
On the Delivery Group page, find the delivery group that you want to manage. You can search for the delivery group by its status, name, or ID.
In the Actions column of the delivery group, click Renew Resources.
In the Renew Resources dialog box, view the resource expiration time, select a renewal duration, and then click OK.
On the Pay page, select a payment method and click Pay.
NoteFor more information about billing, see Billing overview.
Purge or delete a delivery group
If a delivery group is no longer needed, you can purge or delete it. You can also delete subscription-based delivery groups that have a publish status of Publish Failed.
In the left-side navigation pane, click Delivery Groups.
On the Delivery Group page, find the delivery group that you want to manage. You can search for the delivery group by its status, name, or ID.
In the Actions column of the delivery group, perform one of the following operations based on your scenario:
If the delivery group is subscription-based and has an
Expiredstatus, click Purge Resources.If the delivery group is subscription-based and has a
Recyclingstatus, click Delete.If the delivery group is pay-as-you-go and has a
Published,Updating,Update Failed, orPayment Overduestatus, click Purge Resources.
Pay-as-you-go elastic resource billing example
The following scenario shows how costs are calculated when you use pay-as-you-go elastic resources in addition to your subscription resources.
Purchased subscription resources
Assume that you successfully purchased the following subscription resources at 08:00:
Resource specification | Resource count | Duration |
Office - 4 vCPU, 8 GiB memory | 2 | 1 week |
Delivery group policy settings
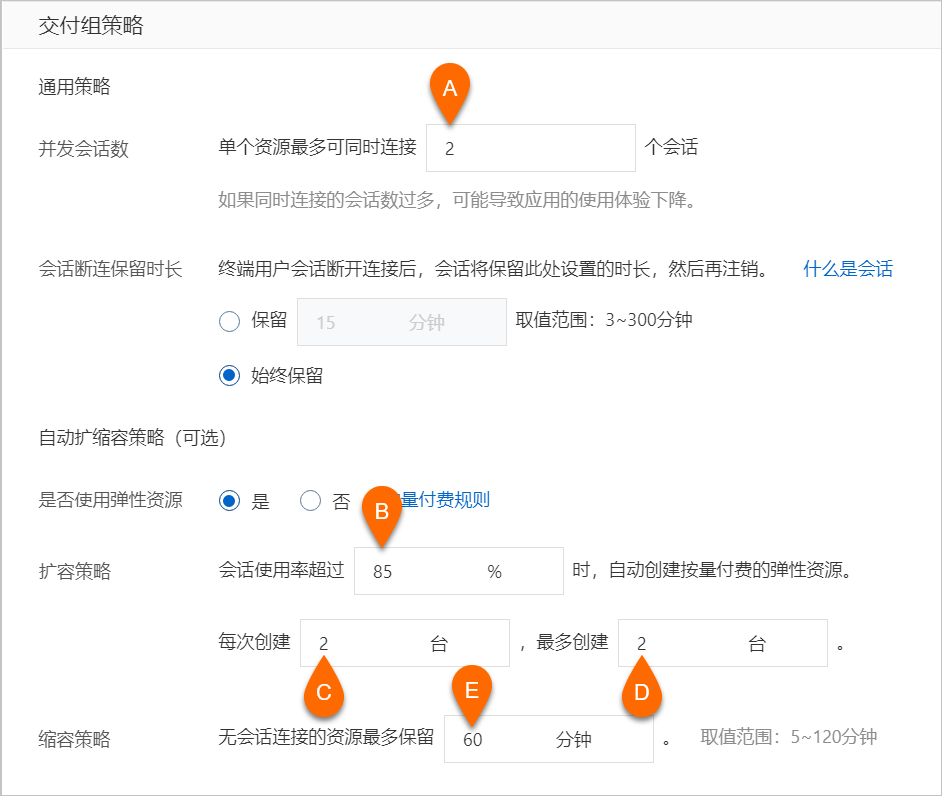
(A) Concurrent sessions: 2
(B) Session usage threshold: 85%
(C) Elastic resource creation step size: 2
(D) Maximum elastic resources: 2
(E) Maximum idle duration for resources: 60 minutes
Session connections and elastic scaling process
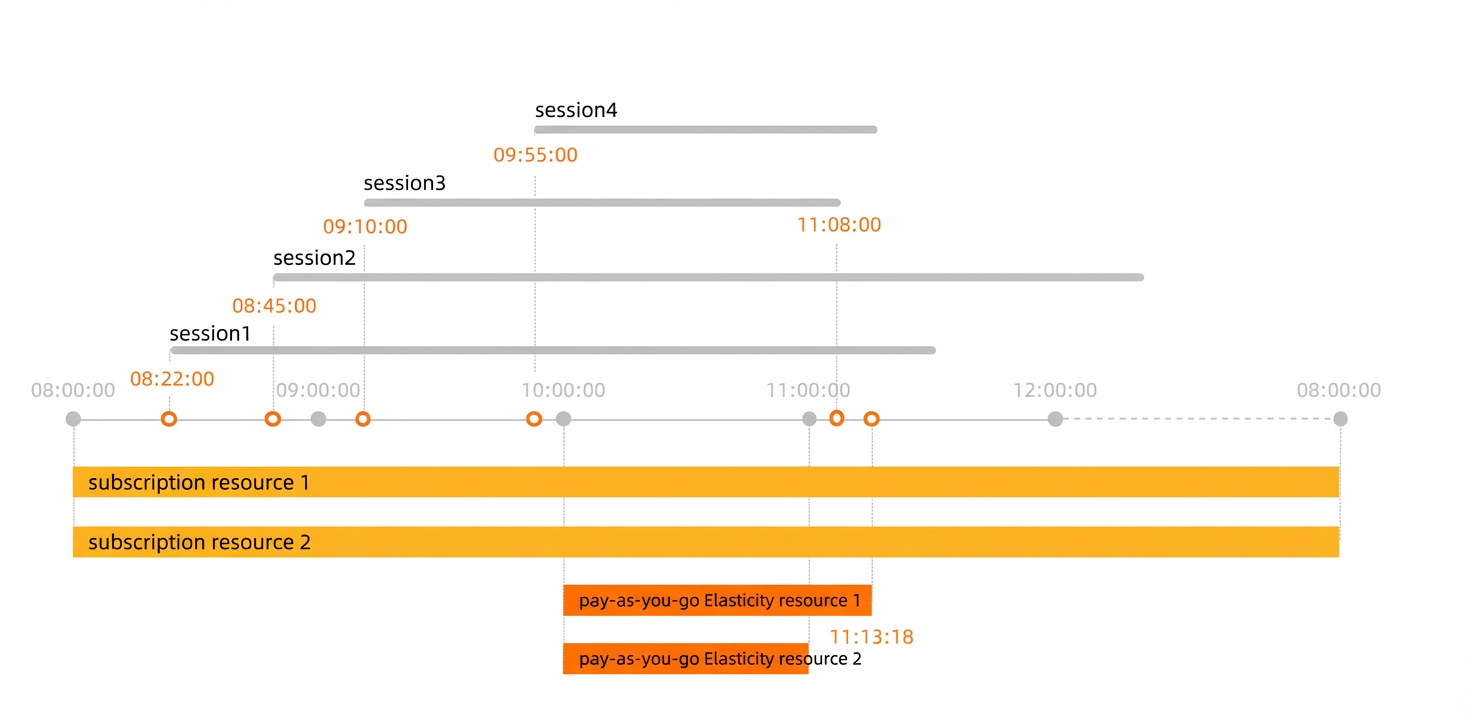
The scale-out policy is triggered by session usage. The formula is Session usage = Current sessions ÷ (Total resources × Concurrent sessions per resource) × 100%.
Time | Session connection change | Current sessions | Session usage | Resource change |
08:22:00 | Session 1 connects. | 1 | 1 ÷ (2 × 2) × 100% = 25% | Session usage (25%) is below the threshold (85%). The scale-out policy is not triggered. No resource changes occur. |
08:45:00 | Session 2 connects. | 2 | 2 ÷ (2 × 2) × 100% = 50% | Session usage (50%) is below the threshold (85%). The scale-out policy is not triggered. No resource changes occur. |
09:10:00 | A connection was successfully established for Session 3. | 3 | 3 ÷ (2 × 2) × 100% = 75% | Session usage (75%) is below the threshold (85%). The scale-out policy is not triggered. No resource changes occur. |
09:55:00 | Session 4 connects. | 4 | 4 ÷ (2 × 2) × 100% = 100% | Session usage (100%) exceeds the threshold (85%). The scale-out policy is triggered. Two pay-as-you-go elastic resources are automatically created. |
10:00:00 | No change in session count. | 4 | 4 ÷ (4 × 2) × 100% = 50% | The two pay-as-you-go elastic resources have been created. The total resource count is now 4. Session usage (50%) is below the threshold (85%). The scale-out policy is not triggered. No further resource changes occur. Note The time required to create pay-as-you-go elastic resources can vary. The time used in this example is for demonstration purposes only. |
11:00:00 | No change in session count. | 4 | 4 ÷ (4 × 2) × 100% = 50% | The pay-as-you-go elastic resources created at 10:00 have been idle for the maximum duration (60 minutes), which triggers the scale-in condition:
To prevent repeated scaling, WUYING AppStreaming scales in only one elastic resource. The resource count becomes 3, consisting of two subscription resources and one remaining pay-as-you-go elastic resource. |
11:08:00 | Session 3 disconnects. | 3 | 3 ÷ (3 × 2) × 100% = 50% | The remaining pay-as-you-go elastic resource has been idle for more than the maximum duration (60 minutes). Because the session count has also decreased, the scale-in condition is triggered. If one elastic resource is scaled in, session usage becomes 3 ÷ (2 × 2) × 100% = 75%. This is below the threshold (85%), so the scale-out policy is not triggered again. The resource can be scaled in. |
11:13:18 | No change in session count. | 3 | 3 ÷ (2 × 2) × 100% = 75% | The scale-in is successful. The resource count is now 2, consisting of the two subscription resources. |
Cost calculation
Resource type | Resource specification | Resource count | Unit price | Usage duration | Cost |
Subscription resource | Office - 4 vCPU, 8 GiB memory | 2 | 199 CNY/month | 1 week | 199 × 2 × 7 ÷ 30 ≈ 92.87 (CNY) |
Pay-as-you-go elastic resource | Office - 4 vCPU, 8 GiB memory | 2 | 0.726736 CNY/hour |
| 0.726736 × (73 ÷ 60 + 18 ÷ 3600) + 0.726736 × (60 ÷ 60) ≈ 1.61 (CNY) |
Total cost | 92.87 + 1.61 = 94.48 (CNY) | ||||
Result
After the delivery group is published, App Streaming sends an activation notification to each assigned user's email address and mobile number. Users can then access the cloud applications with the provided credentials, such as the workspace ID and username. For more information, see Access App Streaming by using an Alibaba Cloud Workspace terminal.