Use an Apsara Devops pipeline to deploy an application to SAE with a Kubernetes YAML file
This topic describes how to use an Apsara Devops pipeline to build an image from a source code repository and automatically deploy a Serverless App Engine (SAE) application using a Kubernetes YAML file. A simple example is used to demonstrate this procedure and guide you on how to apply it to your business.
Solution overview

To implement this solution, perform the following steps:
Upload the source code
Configure the Apsara Devops pipeline
Set the code source
Build and upload the image
Deploy the SAE application
Run the Apsara Devops pipeline and verify the result
Quick start
1. Upload the source code
To quickly try this procedure, upload the sample code spring-boot-demo.zip to a source code repository, such as a self-managed GitLab, Codeup, or GitHub.
The files in the sample code are described as follows:
Dockerfile: Builds an image from the source code.manifests/dp.yaml: Specifies the configuration for deploying the application to SAE using a Kubernetes YAML file.
2. Configure the Apsara Devops pipeline
Log in to the Apsara Devops pipeline console and click New Pipeline.
This topic demonstrates the procedure for creating a pipeline from an empty template. Select Empty Template and click Create.
2. 1 Set the code source
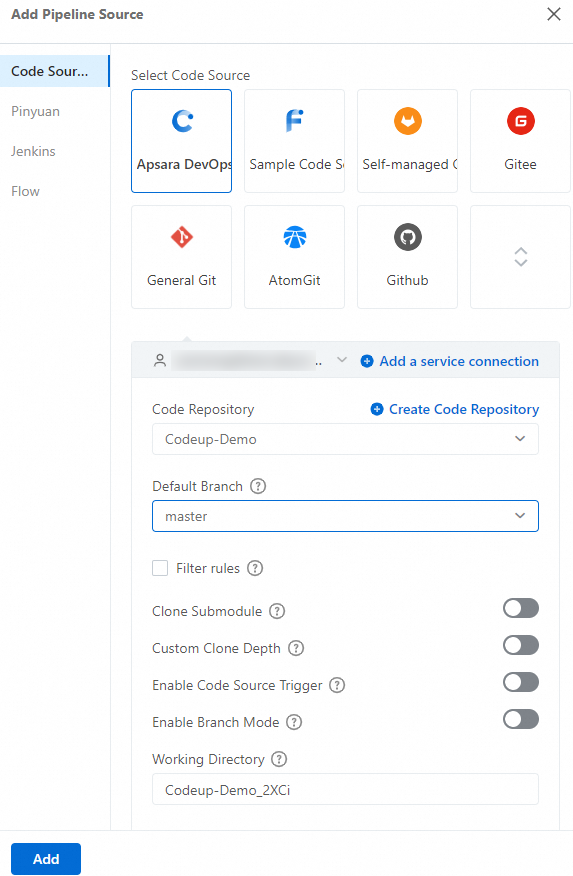
On the Flow Configuration page, click Add Pipeline Source. Select the source code repository type for the sample code. Then, configure the Code Repository and Default Branch.
If this is the first time you are using the pipeline, you must click Add Service Connection or Enterprise Public Key to grant the Apsara Devops pipeline access to your source code repository.
2. 2 Build and upload the image
In the next stage of the pipeline, add a task to build and upload the image:
Click the default Empty Task node. On the Edit page, configure the following parameters:
Set Build Cluster to Apsara Devops China (Hong Kong) Build Cluster because the
Dockerfilein the sample code depends on images from outside China.Select a Build Node. The node must be Linux/amd64.
Click Add Step, and then select Build Image And Push To ACR (Personal Edition) or Build Image And Push To ACR (Enterprise Edition) from the Build category.
This topic assumes that you have activated Container Registry (ACR) and have created a Personal Edition instance or created an Enterprise Edition instance.
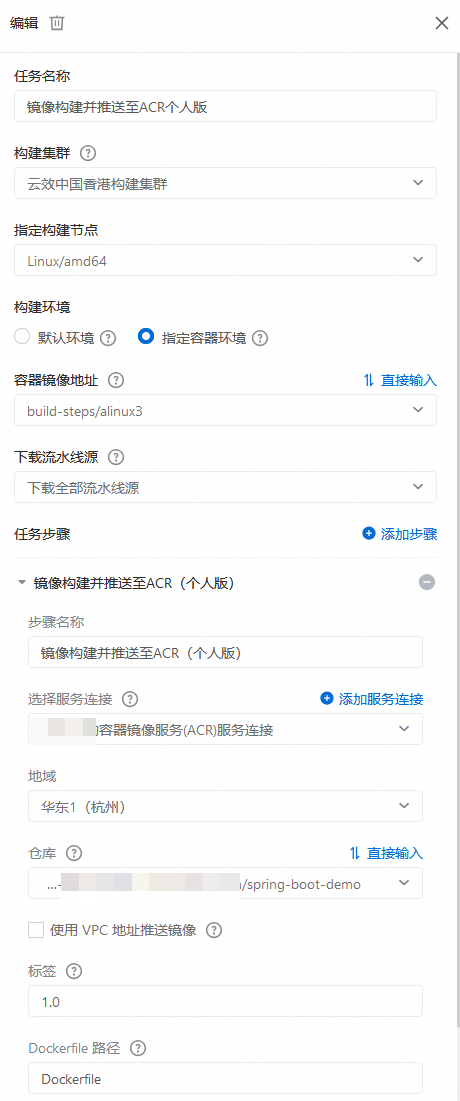
Build and push image to ACR (Personal Edition)
The first time you use the pipeline, you must click Add Service Connection to grant the Apsara DevOps pipeline access to Container Registry.
Configure the following parameters:
Select the destination Region and Repository to upload the image.
Set the Tag to a fixed parameter, such as
1.0, or a dynamic parameter, such as${DATETIME}. The dynamic parameter uses the current date and time as the version name when the image is pushed to ACR.Set the Dockerfile Path to
Dockerfilebecause theDockerfilefile in the sample code is in the root directory of the code repository.
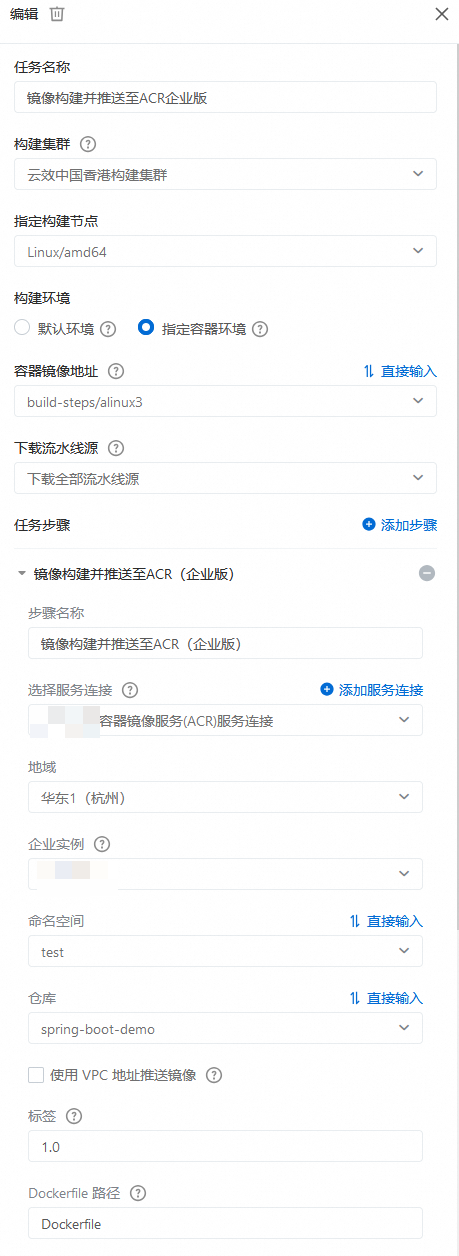
Build and push image to ACR (Enterprise Edition)
ImportantThe destination ACR Enterprise Edition instance must have Internet access enabled for the image repository. You must then add the public egress IP address of the Flow build cluster to the public network whitelist of ACR. For more information, see Configure public network access control. To find the public egress IP address of the Flow build cluster, see Build cluster.
The first time you use the pipeline, you must click Add Service Connection to grant the Apsara DevOps pipeline access to Container Registry.
Configure the following parameters:
Select the destination Region, Enterprise Instance, Namespace, and Repository to upload the image.
Set the Tag. You can use a fixed parameter, such as
1.0, or a dynamic parameter, such as${DATETIME}. The dynamic parameter uses the current date and time as the tag when the image is pushed to ACR.Set the Dockerfile Path to
Dockerfilebecause theDockerfilefile is in the root directory of the code repository.
2. 3 Deploy the SAE application
In the next stage of the pipeline, add a task to deploy the SAE application:
To create a task, click New Task and select the Blank Task template. On the Edit page, configure the following parameters:
Select a Build Node. Only Linux/amd64 build nodes are supported.
Click Add Step, and then in the Publish category, select Kubectl SAE Publish.
The first time you use the pipeline, you must click Add Service Connection to grant the Apsara DevOps pipeline access to SAE.
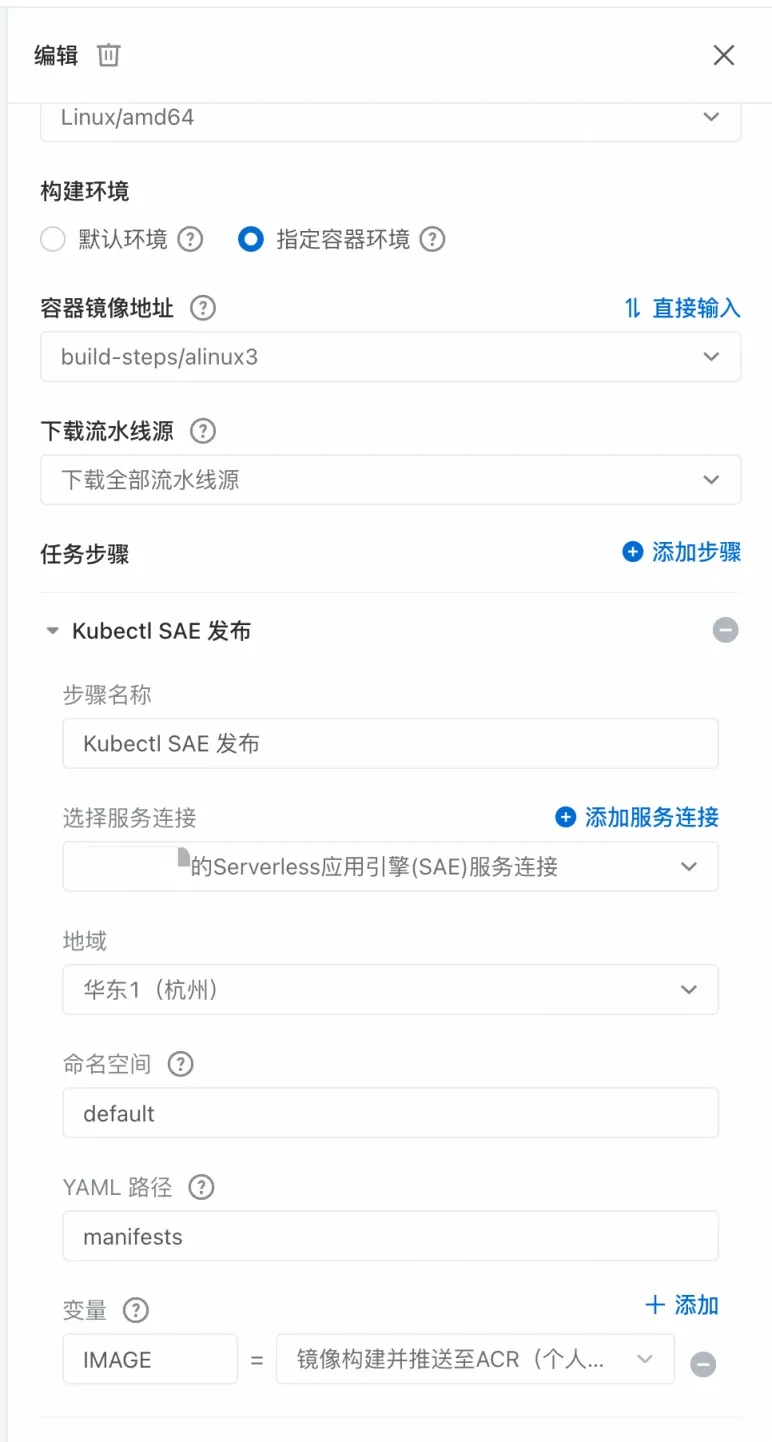
Configure the following parameters:
Select the Region and Namespace where the destination SAE application is located. In this example, Namespace is set to default.
Set the YAML Path to
manifestsbecause the YAML file in the sample code is in themanifestsdirectory of the code repository.Set the Variables. Add a definition for the
IMAGEvariable, which is referenced in the sample YAML file:IMAGE = Build and push image to ACR (Personal/Enterprise Edition).Image Public Address. The variable is automatically replaced when the application is deployed.
3. Run the Apsara Devops pipeline and verify the result
Save and run the pipeline.
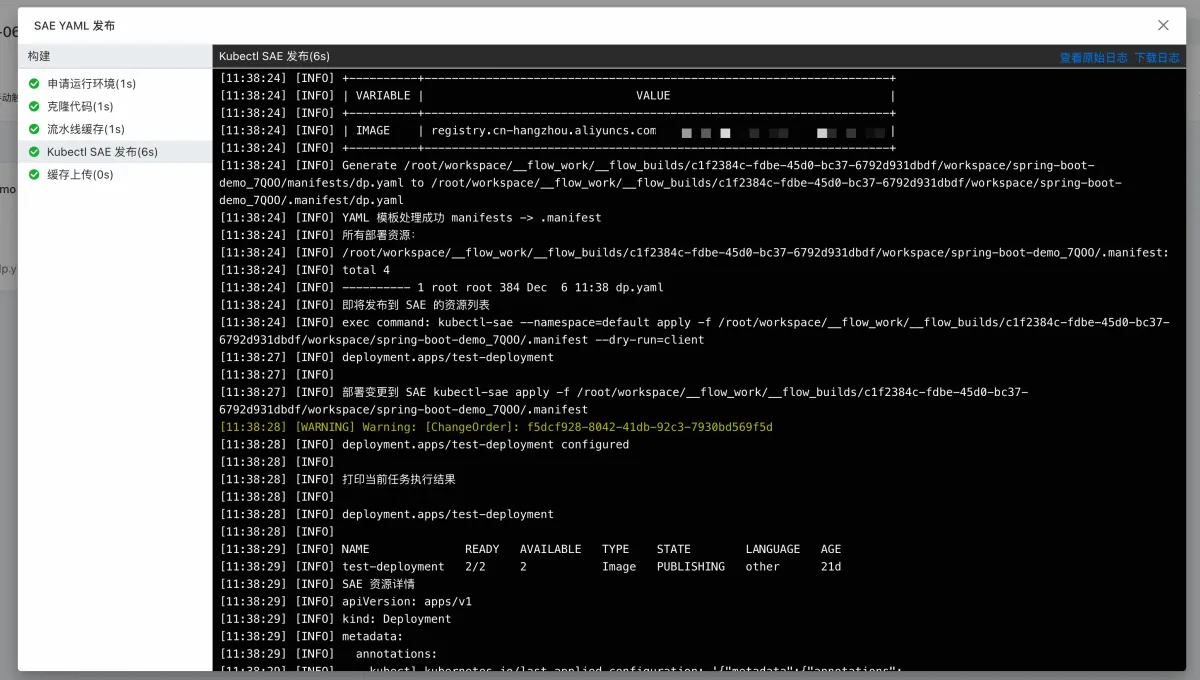
After the run completes, click Logs on each node to view the execution process and results. The logs for the SAE application deployment node include all scanned YAML files, the standard Kubernetes deployment output, and a resource summary.

Log on to the SAE console. In the navigation pane on the left, choose . Then, select the destination region and namespace. You can view the deployed application. The application name is
test-deployment.
4. Clean up resources
Click the deployed application. On the Basic Information page, choose . Follow the on-screen instructions to delete the application.
Learn more
How it works
Apsara Devops pipelines use the kubectl-sae tool to manage the underlying Kubernetes cluster resources of SAE applications based on the YAML files in the code source. This process implements application deployment and resource management on SAE.
To learn how to use the kubectl-sae tool on your local machine or an Elastic Compute Service (ECS) instance, see Quick start for the saectl tool.
Use in your production environment
Write YAML files
To learn how to write YAML files, see the related documents in the saectl tool directory.
The sample code uses manifests/dp.yaml to specify the configuration for deploying the application to SAE. In a production environment, you can also include multiple YAML files in the manifests path to manage various SAE resources. The execution order is not guaranteed when you deploy resources from multiple YAML files. If the execution order is important, you can split the deployment into multiple pipelines and run them manually in the desired order.
Set the correct file paths
In a production environment, the paths to the Dockerfile and YAML files in the code source might be different from those in the sample code. When you configure the Apsara Devops pipeline, make sure to set the correct paths.
Dockerfile Path: The path to the Dockerfile relative to the root directory of the code repository, such as
META/config/DockerfileorDockerfile.Set the YAML Path: The path to the directory that contains the YAML files, relative to the root directory of the code repository. For example, if the YAML files are in the
manifestsdirectory, set this parameter tomanifests.
Customize the pipeline
You can add task nodes for code scanning, testing, and other functions to the pipeline as needed.
Automatically trigger the pipeline from a code source
To automatically trigger the pipeline for operations such as uploading code, see Code source triggers.