本文基于LLaMA-Factory提供了一套Qwen1.5-7B模型在阿里云ECS上进行指令微调的训练方案,最终可以获得性能更贴近具体使用场景的语言模型。
背景信息
通义千问为阿里云研发的人工智能大规模语言模型,该模型属于AI生成内容(AIGC)领域,旨在为用户提供多样化的语言理解和生成能力。该项目包含了多个版本的模型,其中Qwen1.5是通义千问系列中的一个重大更新版本,发布于2024年。Qwen1.5系列属于开源模型,允许任何人访问和利用这些先进模型来进行二次开发、微调或创建新的应用,促进了人工智能技术的普及和创新。
LLM具有建模大量词语之间联系的能力,但是为了让其强大的建模能力向下游具体任务输出,需要进行指令微调,根据大量不同指令对模型部分权重进行更新,使模型更善于遵循指令。指令微调中的指令简单直观地描述了任务,具体的指令格式如下:
{
  "instruction": "Given the following input, find the missing number",
  "input": "10, 12, 14, __, 18",
  "output": "16"
}LLaMA-Factory是零隙智能(SeamLessAI)开源的低代码大模型训练框架,它集成了业界最广泛使用的微调方法和优化技术,并支持业界众多的开源模型的微调和二次训练,开发者可以使用私域数据、基于有限算力完成领域大模型的定制开发。LLaMA-Factory还为开发者提供了可视化训练、推理平台,一键配置模型训练,实现零代码微调LLM。
本文基于LLaMA-Factory提供了一套Qwen1.5-7B模型,基于DeepSpeed进行指令微调训练,并使用DeepGPU加速训练。DeepGPU包括DeepNCCL和Deepytorch Training两个训练加速器。
加速器 | 说明 | 相关文档 |
DeepNCCL | DeepNCCL是为阿里云神龙异构产品开发的一种用于多GPU互联的AI通信加速库,在AI分布式训练或多卡推理任务中用于提升通信效率。 | |
Deepytorch Training | Deepytorch Training是阿里云自研的AI训练加速器,为传统AI和生成式AI场景提供训练加速功能 |
阿里云不对第三方模型“Qwen1.5-7B-Chat”的合法性、安全性、准确性进行任何保证,阿里云不对由此引发的任何损害承担责任。
您应自觉遵守第三方模型的用户协议、使用规范和相关法律法规,并就使用第三方模型的合法性、合规性自行承担相关责任。
操作步骤
准备工作
操作前,请先在合适的地域和可用区下创建VPC和交换机。
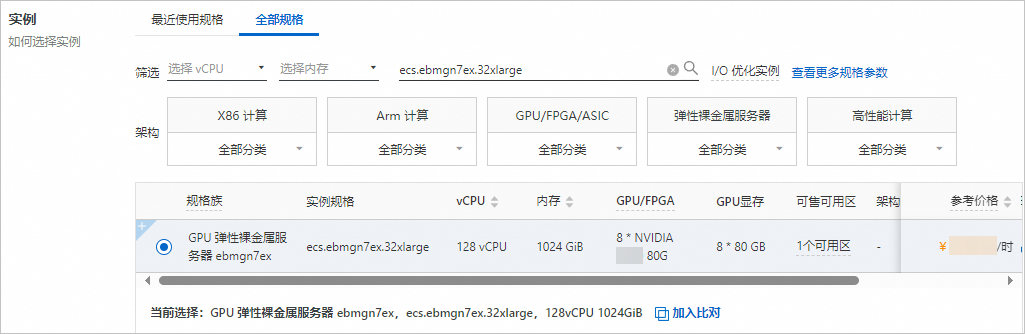
本文使用ecs.ebmgn7ex.32xlarge规格的ECS实例(您也可以选择包含8卡NVIDIA GPU的实例)进行训练,仅部分地域可用区支持该实例规格,具体请参见ECS实例规格可购买地域。
创建ECS实例
前往实例创建页。
按照向导完成参数配置,创建一台ECS实例。
需要注意的参数如下。更多信息,请参见自定义购买实例。
实例:规格选择ecs.ebmgn7ex.32xlarge(必须包含8卡NVIDIA GPU)。
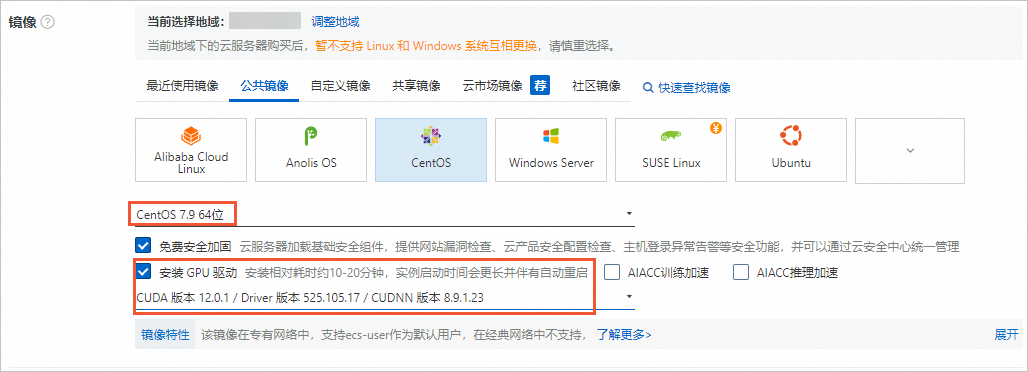
镜像:公共镜像CentOS 7.9 64位,并选中安装GPU驱动,选择CUDA 版本12.0.1/Driver 版本525.105.17/CUDNN 版本8.9.1.23。
系统盘:不小于200 GiB。
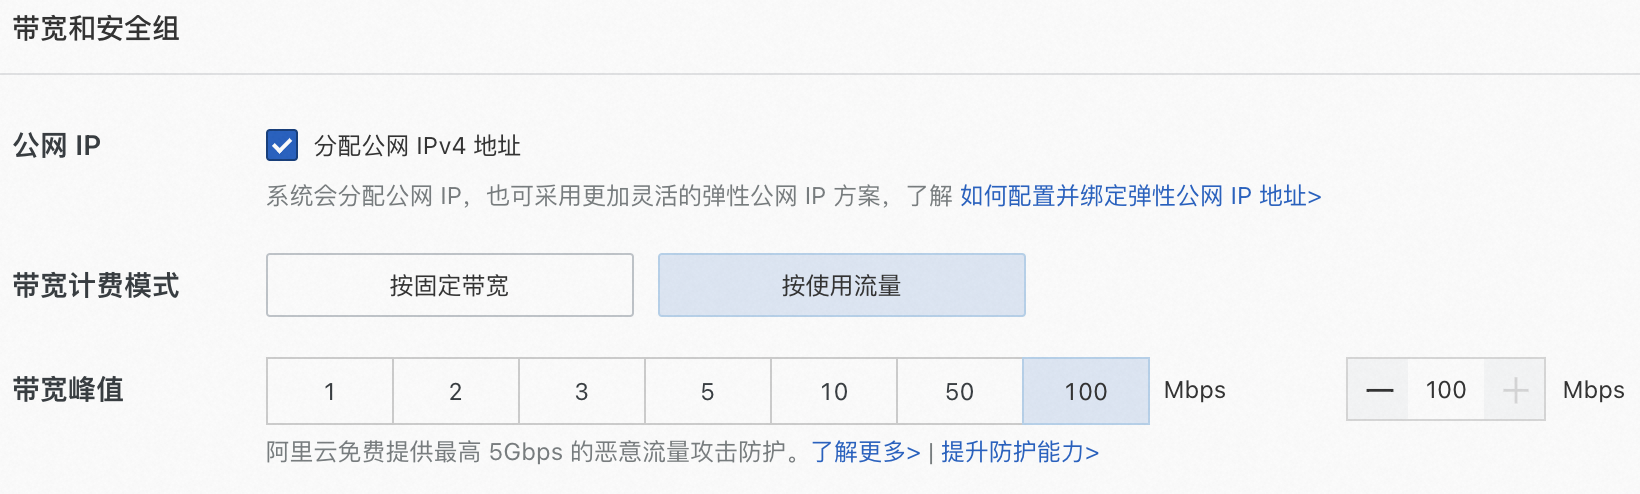
公网IP:选中分配公网IPv4地址,按需选择计费模式和带宽。本文使用按流量计费,带宽峰值为100 Mbps。
使用Workbench连接实例。
具体操作,请参见使用Workbench登录Linux实例。
部署环境
部署训练所需环境。
安装Docker。
sudo yum install -y yum-utils device-mapper-persistent-data lvm2 sudo yum-config-manager --add-repo https://download.docker.com/linux/centos/docker-ce.repo sudo yum install -y docker-ce sudo systemctl enable docker sudo systemctl restart docker安装NVIDIA Docker镜像。
source /etc/os-release
export distribution=$ID$VERSION_ID
curl -s -L https://nvidia.github.io/libnvidia-container/$distribution/libnvidia-container.repo | sudo tee /etc/yum.repos.d/nvidia-container-toolkit.repo
sudo yum clean expire-cache
sudo yum install -y nvidia-docker2
sudo systemctl restart docker
构建镜像。
本文以构建llama-factory-test镜像为例,您可以根据业务需求自行调整。
创建llama_factory.dockerfile文件。
FROM nvidia/cuda:11.8.0-cudnn8-devel-centos7

LABEL org.opencontainers.image.authors="ALIBABA DEEPGPU"


SHELL ["/bin/bash", "-c"]

# install common tools
RUN yum -y install wget curl bzip2 openssl openssl-devel openssh-server openssh-clients vim unzip git git-lfs tmux

WORKDIR /examples
ARG EXAMPLES_NAME="LLaMA-Factory-0.6.1"
RUN wget https://github.com/hiyouga/LLaMA-Factory/archive/refs/tags/v0.6.1.zip -O ${EXAMPLES_NAME}.zip && \
  unzip ${EXAMPLES_NAME}.zip && mv ${EXAMPLES_NAME} LLaMA-Factory && \
  rm -rf ${EXAMPLES_NAME}.zip

WORKDIR /workspace
# install gcc g++
RUN yum install -y centos-release-scl && \
  yum install -y devtoolset-8-gcc* && \
  scl enable devtoolset-8 bash && \
  source /opt/rh/devtoolset-8/enable && \
  echo "source /opt/rh/devtoolset-8/enable" >>~/.bashrc && \
  ln -sf /opt/rh/devtoolset-8/root/usr/bin/gcc /usr/local/bin/gcc && \
  ln -sf /opt/rh/devtoolset-8/root/usr/bin/g++ /usr/local/bin/g++

RUN yum install -y epel-release && yum install -y pdsh libaio-devel

# install erdma driver
RUN echo "[erdma]" > /etc/yum.repos.d/erdma.repo && \
  echo "name = ERDMA Repository" >> /etc/yum.repos.d/erdma.repo && \
  echo "baseurl = https://mirrors.aliyun.com/erdma/yum/redhat/\$releasever/erdma/x86_64" >> /etc/yum.repos.d/erdma.repo && \
  echo "gpgcheck = 1" >> /etc/yum.repos.d/erdma.repo && \
  echo "enabled = 1" >> /etc/yum.repos.d/erdma.repo && \
  echo "gpgkey = https://mirrors.aliyun.com/erdma/GPGKEY" >> /etc/yum.repos.d/erdma.repo && \
  yum makecache && \
  yum install -y libibverbs rdma-core librdmacm libibverbs-utils

# install conda
ARG CONDA_PATH=/opt/conda
ARG	ANACONDA_FILE=Miniconda3-py310_23.5.2-0-Linux-x86_64.sh
RUN wget -q -c -O ~/miniconda.sh https://repo.anaconda.com/miniconda/$ANACONDA_FILE || wget -q -c -O ~/miniconda.sh https://ali-perseus-build-dep.oss-cn-huhehaote.aliyuncs.com/$ANACONDA_FILE && \
  chmod +x ~/miniconda.sh && \
  ~/miniconda.sh -b -p ${CONDA_PATH} && \
  rm ~/miniconda.sh
RUN source /opt/conda/etc/profile.d/conda.sh && \
  echo ". /opt/conda/etc/profile.d/conda.sh" >>/etc/bashrc && \
  conda init bash && \
  conda config --add channels https://mirrors.tuna.tsinghua.edu.cn/anaconda/pkgs/free/ && \
  conda config --add channels https://mirrors.tuna.tsinghua.edu.cn/anaconda/pkgs/main/ && \
  conda config --add channels https://mirrors.tuna.tsinghua.edu.cn/anaconda/cloud/conda-forge/ && \
  conda config --set show_channel_urls yes && \
  mkdir -p ~/.pip && \
  echo "[global]" >~/.pip/pip.conf && \
  echo "index-url = https://pypi.tuna.tsinghua.edu.cn/simple" >>~/.pip/pip.conf && \
  echo "[install]" >>~/.pip/pip.conf && \
  echo "trusted-host = https://pypi.tuna.tsinghua.edu.cn" >>~/.pip/pip.conf && \
  conda update --all -y

ENV PATH ${CONDA_PATH}/bin:$PATH
SHELL ["conda", "run", "-n", "base", "/bin/bash", "-c"]

RUN pip install --upgrade pip && \
  pip install setuptools==69.5.1 && \
  pip install torch==2.1.0+cu118 torchvision==0.16.0+cu118 -f https://download.pytorch.org/whl/torch_stable.html && \
  pip install datasets evaluate accelerate -i https://pypi.tuna.tsinghua.edu.cn/simple/


RUN DS_SKIP_CUDA_CHECK=1 DS_BUILD_UTILS=1 DS_BUILD_FUSED_ADAM=1 pip install deepspeed && \
  pip install -U accelerate trl peft && \
  pip install diffusers==0.24.0 gradio==3.50.2

RUN pip install transformers[sentencepiece]==4.37.2 && \
  pip install flash-attn --no-build-isolation && \
  pip install --no-deps https://download.pytorch.org/whl/cu118/xformers-0.0.22.post7%2Bcu118-cp310-cp310-manylinux2014_x86_64.whl && \
  rm -rf /root/.cache/*
构建镜像。
image_url="mydocker.hub/llama:llama-factory-test" && \
sudo docker build -f llama_factory.dockerfile -t ${image_url} .
出现如下图所示时,说明镜像已构建完成。

启动并登录容器。
sudo docker run -itd --rm --gpus all --ipc host --network host --privileged --workdir /workspace --name mytest mydocker.hub/llama:llama-factory-test
sudo docker exec -it mytest bash
若命令行首部出现
(base)标识,表示已进入容器。
使用DeepGPU加速训练。
安装DeepGPU。
pip3 install deepgpu -i https://pypi.tuna.tsinghua.edu.cn/simple使用DeepGPU。
以本方案为例,需要在训练文件train_bash.py(默认在
/examples/LLaMA-Factory/src目录下)中加入以下代码:import deepytorch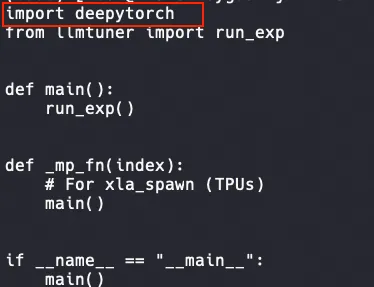
启动训练
下载tmux并创建一个tmux session。
tmux说明训练耗时较长,建议在tmux session中启动训练,以免ECS断开连接导致训练中断。
获取Qwen1.5-7B预训练权重。
yum install -y git-lfs git lfs install mkdir /models && cd /models git clone https://www.modelscope.cn/qwen/Qwen1.5-7B-Chat.git创建并设置DeepSpeed配置文件。
cd /examples/LLaMA-Factorycat << EOF | tee ds_config.json { "train_batch_size": "auto", "train_micro_batch_size_per_gpu": "auto", "gradient_accumulation_steps": "auto", "gradient_clipping": "auto", "zero_allow_untested_optimizer": true, "fp16": { "enabled": "auto", "loss_scale": 0, "loss_scale_window": 1000, "initial_scale_power": 16, "hysteresis": 2, "min_loss_scale": 1 }, "bf16": { "enabled": "auto" }, "zero_optimization": { "stage": 2, "allgather_partitions": true, "allgather_bucket_size": 5e8, "overlap_comm": true, "reduce_scatter": true, "reduce_bucket_size": 5e8, "contiguous_gradients": true, "round_robin_gradients": true } } EOF启动训练。
单台训练
DEEPGPU_DISABLE_AGSPEED=1 \
DEEPGPU_DISABLE_ACSPEED=1 \
deepspeed --master_port=$MASTER_PORT \
src/train_bash.py \
--deepspeed='./ds_config.json' \
--model_name_or_path='/models/Qwen1.5-7B-Chat' \
--use_fast_tokenizer \
--flash_attn \
--template='qwen' \
--dataset='alpaca_gpt4_en' \
--overwrite_cache \
--output_dir='/workspace/output' \
--overwrite_output_dir \
--do_train \
--per_device_train_batch_size=12 \
--gradient_accumulation_steps=1 \
--learning_rate=5e-05 \
--num_train_epochs=1.0 \
--max_steps=500 \
--lr_scheduler_type='cosine' \
--logging_steps=10 \
--save_steps=500 \
--fp16 \
--gradient_checkpointing \
--stage='sft' \
--finetuning_type='full' \
--plot_loss
多台训练
配置hostfile。
如下示例表示配置两台ECS实例(GPU总数为8)时,需要填入每台ECS实例的内网IP和slots,其中slots表示进程数(即GPU数量)。
cat > hostfile <<EOF
{private_ip1} slots=8
{private_ip2} slots=8
EOF
启动训练。
启动训练的命令脚本如下,
$MASTER_PORT请替换为2000~65535的随机端口号。cd /examples/LLaMA-Factory && \ DEEPGPU_DISABLE_AGSPEED=1 \ DEEPGPU_DISABLE_ACSPEED=1 \ deepspeed --master_port=$MASTER_PORT --hostfile hostfile \ src/train_bash.py \ --deepspeed='./ds_config.json' \ --model_name_or_path='/models/Qwen1.5-7B-Chat' \ --use_fast_tokenizer \ --flash_attn \ --template='qwen' \ --dataset='alpaca_gpt4_en' \ --overwrite_cache \ --output_dir='/workspace/output' \ --overwrite_output_dir \ --do_train \ --per_device_train_batch_size=12 \ --gradient_accumulation_steps=1 \ --learning_rate=5e-05 \ --num_train_epochs=1.0 \ --max_steps=500 \ --lr_scheduler_type='cosine' \ --logging_steps=10 \ --save_steps=500 \ --fp16 \ --gradient_checkpointing \ --stage='sft' \ --finetuning_type='full' \ --plot_loss
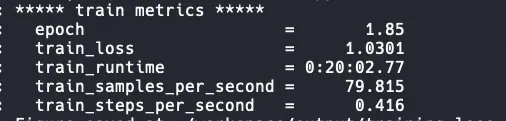
启动训练后预期返回如下:
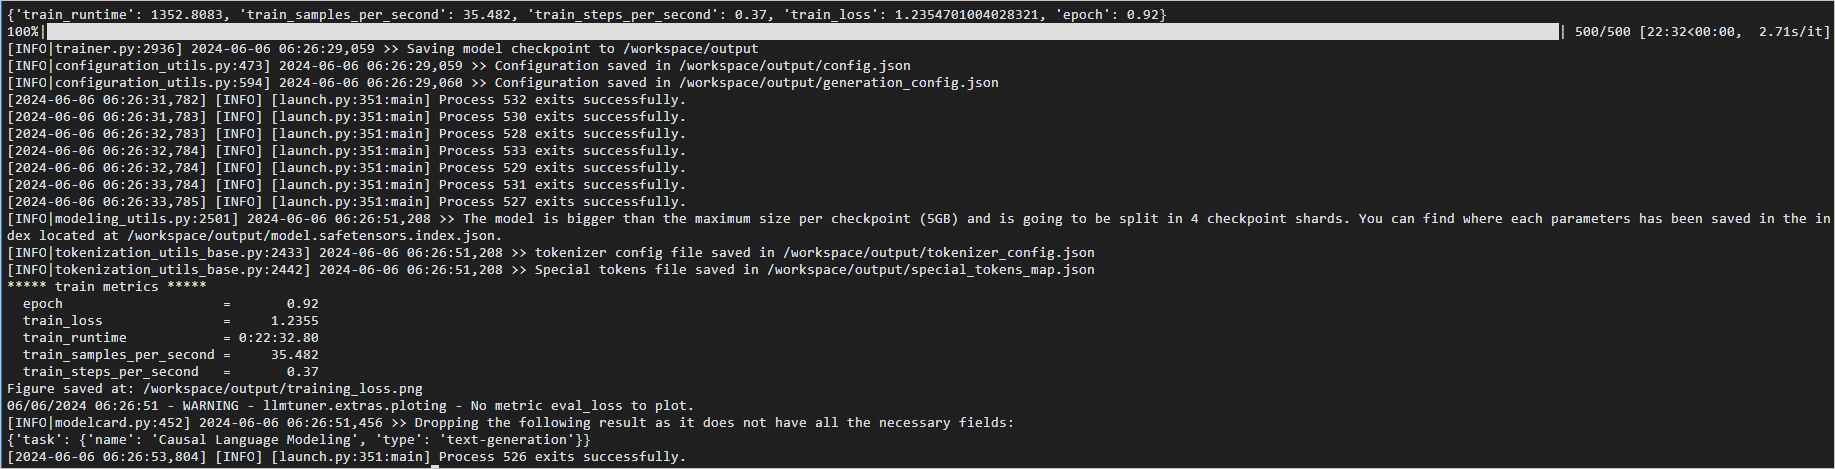 说明
说明训练完成大概需要30分钟左右,在tmux session中进行训练的过程中,如果断开了ECS连接,重新登录ECS实例后执行
tmux attach命令即可恢复tmux session,查看训练进度。
查看DeepGPU加速效果
以下是使用2台ecs.ebmgn7ex.32xlarge规格的ECS实例(2*8 NVIDIA GPU),基于DeepSpeed进行训练时,是否启动DeepGPU的性能对比。train_samples_per_second值越大代表训练速度越快。由下图可以看出启动DeepGPU后相比原生DeepSpeed提速49%左右。
训练完成后,您可以在容器的/workspace/output/train_results.json文件中了解性能。
使用DeepSpeed进行训练
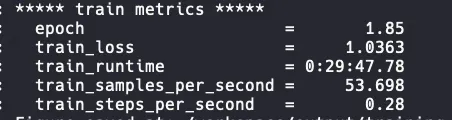
使用DeepSpeed+DeepGPU+DeepNCCL进行训练