使用vLLM镜像快速构建模型的推理环境

更新时间:
复制为 MD 格式

GPU的实例上部署vLLM镜像后,可以帮助您快速且方便地构建大语言模型(例如Llama模型、ChatGLM模型、百川Baichuan模型或千问Qwen模型)的推理环境,主要应用在智能对话系统、文本分类或分析等自然语言处理业务场景,您无需深入了解底层硬件,也无需额外配置即可开箱即用。本文为您介绍如何在GPU实例上使用vLLM容器镜像来快速构建大语言模型的推理服务。

说明

vLLM是一个开源的大语言模型的推理框架,与HuggingFace模型无缝集成,将vLLM打包成vLLM镜像后,可以快速且方便地构建大语言模型推理服务,更多信息,请参见vLLM

准备工作

获取vLLM容器镜像详细信息,以便您在GPU实例上部署该容器镜像时使用。例如,创建GPU实例时需要提前了解容器镜像适用的GPU实例类型,拉取容器镜像时需要提前获取镜像地址等信息。

  1. 登录容器镜像服务控制台

  2. 在左侧导航栏,单击制品中心

  3. 仓库名称搜索框,搜索vllm,并选择目标镜像egs/vllm

    vLLM容器镜像大概每3个月更新一次。镜像列表详情如下所示:

    镜像名称

    组件信息

    镜像地址

    vLLM(推荐)

    • vLLM:0.20.2

    • Python:3.12

    • CUDA:13.0

    • PyTorch:2.11.0

    • 基础镜像:Ubuntu 24.04

    egs-registry.cn-hangzhou.cr.aliyuncs.com/egs/vllm:0.20.2-pytorch2.11-cu130-20260512

    vLLM

    • vLLM:0.17.1

    • Python:3.12

    • CUDA:12.8

    • PyTorch:2.10.0

    • 基础镜像:Ubuntu 24.04

    egs-registry.cn-hangzhou.cr.aliyuncs.com/egs/vllm:0.17.1-pytorch2.10-cu128-20260312

    vLLM

    • vLLM:0.12.0

    • Python:3.12

    • CUDA:12.8

    • PyTorch:2.9.0

    • 基础镜像:Ubuntu 24.04

    egs-registry.cn-hangzhou.cr.aliyuncs.com/egs/vllm:0.12.0-pytorch2.9-cu128-20251215

    vLLM

    • vLLM:0.11.0

    • Python:3.12

    • CUDA:12.8

    • PyTorch:2.8.0

    • 基础镜像:Ubuntu 24.04

    egs-registry.cn-hangzhou.cr.aliyuncs.com/egs/vllm:0.11.0-pytorch2.8-cu128-20251015

    vLLM

    • vLLM:0.10.2

    • Python:3.12

    • CUDA:12.8

    • PyTorch:2.8.0

    • 基础镜像:Ubuntu 24.04

    egs-registry.cn-hangzhou.cr.aliyuncs.com/egs/vllm:0.10.2-pytorch2.8-cu128-20250922

    vLLM

    • vLLM:0.9.0.1

    • Python:3.12

    • PyTorch:2.7.1

    • CUDA:12.8

    • 基础镜像:Ubuntu 24.04

    egs-registry.cn-hangzhou.cr.aliyuncs.com/egs/vllm:0.9.0.1-pytorch2.7-cu128-20250612

    vLLM

    • vLLM:0.8.5

    • Python:3.12

    • PyTorch:2.6.0

    • CUDA:12.6

    • 基础镜像:Ubuntu 24.04

    egs-registry.cn-hangzhou.cr.aliyuncs.com/egs/vllm:0.8.5-pytorch2.6-cu126-20250430

    vLLM

    • vLLM:0.8.2

    • Python:3.10

    • PyTorch:2.6.0

    • CUDA:12.4.1

    • 基础镜像:Ubuntu 22.04

    egs-registry.cn-hangzhou.cr.aliyuncs.com/egs/vllm:0.8.2-pytorch2.6-cu124-20250328

    vLLM

    • vLLM:0.7.2

    • sglang:0.4.3.post2

    • Python:3.10

    • PyTorch:2.5.1

    • CUDA:12.4.1

    • 基础镜像:Ubuntu 22.04

    egs-registry.cn-hangzhou.cr.aliyuncs.com/egs/vllm:0.7.2-sglang0.4.3.post2-pytorch2.5-cuda12.4-20250224

    vLLM

    • vLLM:0.7.2

    • Python:3.10

    • PyTorch:2.5.1

    • CUDA:12.4.1

    • 基础镜像:Ubuntu 22.04

    egs-registry.cn-hangzhou.cr.aliyuncs.com/egs/vllm:0.7.2-pytorch2.5.1-cuda12.4-ubuntu22.04

    vLLM

    • vLLM:0.6.4.post1

    • Python:3.10

    • PyTorch:2.5.1

    • CUDA:12.4.1

    • 基础镜像:Ubuntu 22.04

    egs-registry.cn-hangzhou.cr.aliyuncs.com/egs/vllm:0.6.4.post1-pytorch2.5.1-cuda12.4-ubuntu22.04

    vLLM

    • vLLM:0.5.4

    • Python:3.10

    • PyTorch:2.4.0

    • CUDA:12.4.1

    • 基础镜像:Ubuntu 22.04

    egs-registry.cn-hangzhou.cr.aliyuncs.com/egs/vllm:0.5.4-pytorch2.4.0-cuda12.4.1-ubuntu22.04

操作步骤

  1. 创建GPU实例并安装Tesla驱动。

    对应安装的 CUDA 版本为 12.1.1,Driver 版本为 535.154.05,CUDNN 版本为 8.9.7.29

    • 实例:vLLM镜像仅支持以下GPU实例规格族

      • gn6e、ebmgn6e

      • gn7i、ebmgn7i、ebmgn7ix

      • gn7e、ebmgn7e、ebmgn7ex

      • ebmgn8v、ebmgn8is、gn8v、gn8is

    • 镜像:选择以Ubuntu 20.04操作系统为例。在GPU实例上使用vLLM容器镜像,需要提前在该实例上安装Tesla驱动且驱动版本应为535或更高,建议您通过ECS控制台购买GPU实例时,同步选中安装GPU驱动

      说明

      GPU实例创建完成后,会同时自动安装Tesla驱动、CUDA、cuDNN库等,相比手动安装方式更快捷。

  2. 远程连接GPU实例。

    具体操作,请参见使用Workbench登录Linux实例

  3. 执行以下命令,安装Docker环境。

    推荐使用docker-ce。如使用podman-docker,容器启动命令请参考NVIDIA官方文档
    sudo apt-get update
    sudo apt-get -y install ca-certificates curl
    sudo install -m 0755 -d /etc/apt/keyrings
    sudo curl -fsSL http://mirrors.cloud.aliyuncs.com/docker-ce/linux/ubuntu/gpg -o /etc/apt/keyrings/docker.asc
    sudo chmod a+r /etc/apt/keyrings/docker.asc
    echo \
      "deb [arch=$(dpkg --print-architecture) signed-by=/etc/apt/keyrings/docker.asc] http://mirrors.cloud.aliyuncs.com/docker-ce/linux/ubuntu \
      $(. /etc/os-release && echo "$VERSION_CODENAME") stable" | \
      sudo tee /etc/apt/sources.list.d/docker.list > /dev/null
    sudo apt-get update
    sudo apt-get install -y docker-ce docker-ce-cli containerd.io
  4. 执行以下命令,检查Docker是否安装成功。

    docker -v

    如下回显信息所示,表示Docker已安装成功。

    docker -v
    Docker version 27.1.1, build 6312585
  5. 执行以下命令,安装nvidia-container-toolkit。

    若安装失败,请参考解决方案
    curl -fsSL https://nvidia.github.io/libnvidia-container/gpgkey | sudo gpg --dearmor -o /usr/share/keyrings/nvidia-container-toolkit-keyring.gpg \
      && curl -s -L https://nvidia.github.io/libnvidia-container/stable/deb/nvidia-container-toolkit.list | \
        sed 's#deb https://#deb [signed-by=/usr/share/keyrings/nvidia-container-toolkit-keyring.gpg] https://#g' | \
        sudo tee /etc/apt/sources.list.d/nvidia-container-toolkit.list
    sudo apt-get update
    sudo apt-get install -y nvidia-container-toolkit
  6. 设置Docker开机自启动并重启Docker服务。

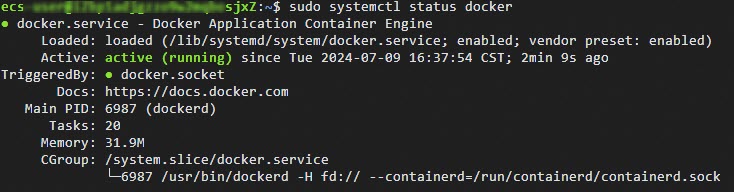
    sudo systemctl enable docker 
    sudo systemctl restart docker
  7. 执行以下命令,查看Docker是否已启动。

    sudo systemctl status docker

    如以下回显所示,表示Docker已启动。

    sudo systemctl status docker
    ● docker.service - Docker Application Container Engine
         Loaded: loaded (/lib/systemd/system/docker.service; enabled; vendor preset: enabled)
         Active: active (running) since Tue 2024-07-09 16:37:54 CST; 2min 9s ago
    TriggeredBy: ● docker.socket
           Docs: https://docs.docker.com
       Main PID: 6987 (dockerd)
          Tasks: 20
         Memory: 31.9M
         CGroup: /system.slice/docker.service
                 └─6987 /usr/bin/dockerd -H fd:// --containerd=/run/containerd/containerd.sock
  8. 执行以下命令,拉取vLLM镜像。

    说明

    拉取vLLM镜像大约需要30分钟左右,请您耐心等待。

    sudo docker pull <vLLM镜像地址>

    请将代码中的<vLLM镜像地址>替换为您在准备工作中获取的vLLM镜像地址。

    示例代码

    sudo docker pull egs-registry.cn-hangzhou.cr.aliyuncs.com/egs/vllm:0.5.4-pytorch2.4.0-cuda12.4.1-ubuntu22.04
  9. 执行以下命令,运行vLLM容器。

    sudo docker run -d -t --net=host --gpus all \
     --privileged \
     --ipc=host \
     --name vllm \
     -v /root:/root \
     <vLLM镜像地址>

    请将代码中的<vLLM镜像地址>替换为您在准备工作中获取的vLLM镜像地址。

  10. 执行以下命令,查看vLLM容器是否启动成功。

    docker ps

    如以下回显所示,表示vLLM容器已启动。

    root@xxxlkbtZ:~# docker ps
    CONTAINER ID   IMAGE                                                                                                COMMAND       CREATED          STATUS          PORTS   NAMES
    536xxx2c8dfc   egs-registry.cn-hangzhou.cr.aliyuncs.com/egs/vllm:0.4.0.post1-pytorch2.1.2-cuda12.1.1-cudnn8-ubuntu22.04   "/bin/bash"   13 seconds ago   Up 13 seconds           vllm

测试验证

本测试以Qwen2.5-7B模型为例,展示使用vLLM的推理效果。

  1. 执行以下命令,安装git-lfs便于下载大语言模型。

    apt install git-lfs
    cd /root
  2. 执行以下命令,下载modelscope格式的Qwen2.5-7B模型。

    git lfs clone https://www.modelscope.cn/Qwen/Qwen2.5-7B-Instruct.git
    说明

    下载模型过程中,如果显示内存不足导致模型下载失败,您可以通过扩容云盘来解决,具体操作,请参见云盘扩容指引

  3. 执行以下命令,进入vLLM容器。

    docker exec -it vllm bash
  4. 测试vLLM的推理效果。

    • 离线推理测试

      vllm提供了测试脚本demo脚本(vllm_demo.py)。

      1. 执行以下命令,编辑vllm_demo.py脚本。

        cd demo
        vim vllm_demo.py
      2. vllm_demo.py脚本中,将模型路径替换为您模型实际下载的路径,然后退出并保存脚本。
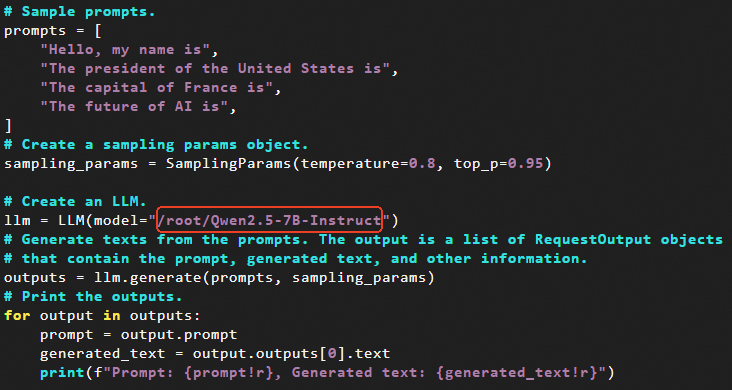
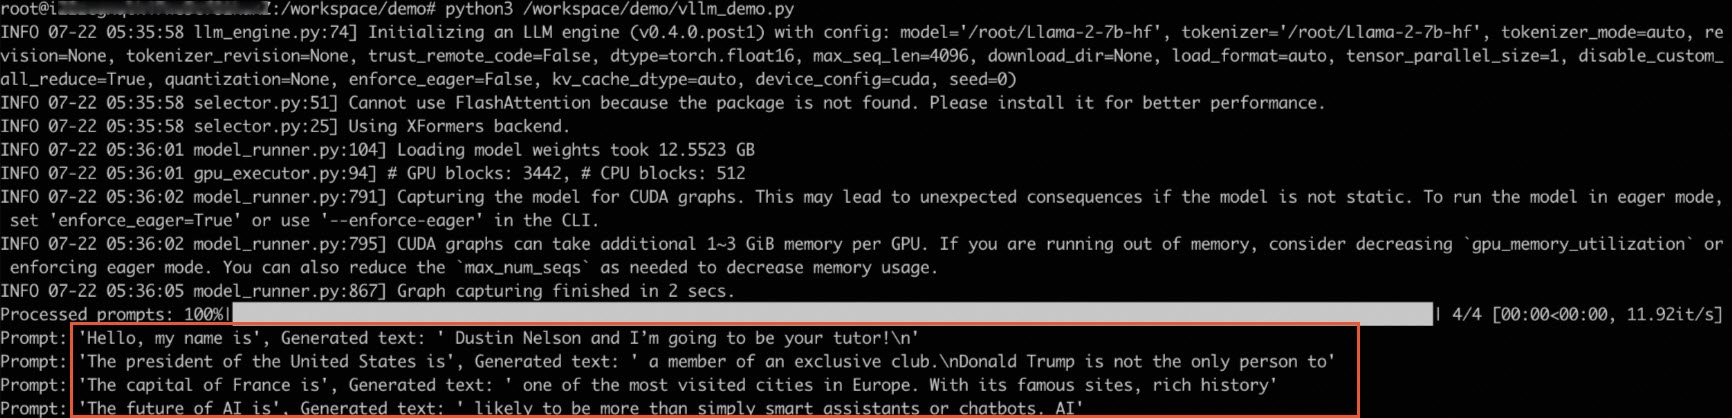
        # Sample prompts.
        prompts = [
            "Hello, my name is",
            "The president of the United States is",
            "The capital of France is",
            "The future of AI is",
        ]
        # Create a sampling params object.
        sampling_params = SamplingParams(temperature=0.8, top_p=0.95)
        # Create an LLM.
        llm = LLM(model="/root/Qwen2.5-7B-Instruct")
        # Generate texts from the prompts. The output is a list of RequestOutput objects
        # that contain the prompt, generated text, and other information.
        outputs = llm.generate(prompts, sampling_params)
        # Print the outputs.
        for output in outputs:
            prompt = output.prompt
            generated_text = output.outputs[0].text
            print(f"Prompt: {prompt!r}, Generated text: {generated_text!r}")
      3. 执行以下命令,测试vLLM的推理效果。

      python3 /workspace/demo/vllm_demo.py

      例如可以快速地处理对话问答任务,推理示例如下:

      root@ixxx:/workspace/demo# python3 /workspace/demo/vllm_demo.py
      INFO 07-22 05:35:58 llm_engine.py:74] Initializing an LLM engine (v0.4.0post1) with config: model='/root/Llama-2-7b-hf', tokenizer='/root/Llama-2-7b-hf', tokenizer_mode=auto, revision=None, tokenizer_revision=None, trust_remote_code=False, dtype=torch.float16, max_seq_len=4096, download_dir=None, load_format=auto, tensor_parallel_size=1, disable_custom_all_reduce=True, quantization=None, enforce_eager=False, kv_cache_dtype=auto, device_config=cuda, seed=0)
      INFO 07-22 05:35:58 selector.py:51] Cannot use FlashAttention because the package is not found. Please install it for better performance.
      INFO 07-22 05:35:58 selector.py:25] Using XFormers backend.
      INFO 07-22 05:36:01 model_runner.py:104] Loading model weights took 12.5523 GB
      INFO 07-22 05:36:01 gpu_executor.py:94] # GPU blocks: 3442, # CPU blocks: 512
      INFO 07-22 05:36:02 model_runner.py:791] Capturing the model for CUDA graphs. This may lead to unexpected consequences if the model is not static. To run the model in eager mode, set 'enforce_eager=True' or use '--enforce-eager' in the CLI.
      INFO 07-22 05:36:02 model_runner.py:795] CUDA graphs can take additional 1~3 GiB memory per GPU. If you are running out of memory, consider decreasing `gpu_memory_utilization` or enforcing eager mode. You can also reduce the `max_num_seqs` as needed to decrease memory usage.
      INFO 07-22 05:36:05 model_runner.py:867] Graph capturing finished in 2 secs.
      Processed prompts: 100%|████████████████████████████████████████████| 4/4 [00:00<00:00, 11.92it/s]
      Prompt: 'Hello, my name is', Generated text: ' Dustin Nelson and I'm going to be your tutor!\n'
      Prompt: 'The president of the United States is', Generated text: ' a member of an exclusive club.\nDonald Trump is not the only person to'
      Prompt: 'The capital of France is', Generated text: ' one of the most visited cities in Europe. With its famous sites, rich history'
      Prompt: 'The future of AI is', Generated text: ' likely to be more than simply smart assistants or chatbots. AI'
    • 在线推理测试

      1. 执行以下命令,启动vLLM推理服务。

        python3 -m vllm.entrypoints.openai.api_server \
        --model /root/Qwen2.5-7B-Instruct \
        --trust-remote-code \
        --tensor-parallel-size 1

        返回如下信息,表示vLLM推理服务已启动。

        INFO:     Started server process [264604]
        INFO:     Waiting for application startup.
        INFO:     Application startup complete.
        INFO:     Uvicorn running on socket ('0.0.0.0', 8000) (Press CTRL+C to quit)
      2. 执行以下命令,测试推理效果。

        curl http://localhost:8000/v1/chat/completions \
            -H "Content-Type: application/json" \
            -d '{
            "model": "/root/Qwen2.5-7B-Instruct",   
            "messages": [
            {"role": "system", "content": "你是个友善的AI助手。"},
            {"role": "user", "content": "介绍一下什么是大模型推理。" }
            ]}'

        执行命令后,预期返回JSON响应,包含模型生成的回复内容和token用量统计,finish_reasonstop表示推理正常完成。

        {"id":"chat-d6c1853xxx4347xxxada699a56f","object":"chat.completion","created":1734490743,"model":"/root/Qwen2.5-7B-Instruct","choices":[{"index":0,"message":{"role":"assistant","content":"大模型推理是基于大规模预训练模型的一种技术,这些模型通常具有数以亿计的参数,经过大量数据的训练后,能够执行各种复杂的任务,如自然语言处理、图像识别、语音识别等。大模型推理指的是使用这些大规模训练好的模型来对新的数据进行预测或决策的过程。\n\n大模型推理通常具有以下几个特点:\n\n1. **高精度**:由于模型的规模大,参数多,经过大量的训练数据学习,因此在处理任务时通常能获得较高的准确率和精确度。\n2. **复杂任务处理能力**:大模型能够处理复杂和多样化的任务,这得益于它们能够捕捉到数据中的深层次、长距离依赖关系。\n3. **资源需求高**:大模型的推理过程需要大量计算资源,包括强大的GPUTPU等加速硬件,以及足够的内存。此外,模型的部署和维护也需要较高的成本。\n4. **适应性**:虽然大模型本身是在大量数据上训练的,但在实际应用中,通过微调或迁移学习,可以在特定的任务上进一步优化模型的性能。\n\n大模型推理在许多领域都有广泛的应用,比如自然语言处理中的机器翻译、文本生成、情感分析等;在计算机视觉中的图像分类、目标检测等;以及在语音识别和生成方面。随着计算硬件技术的发展和大数据的普及,大模型推理技术正变得越来越重要。"},"tool_calls":[],"logprobs":null,"finish_reason":"stop","stop_reason":null}],"usage":{"prompt_tokens":26,"total_tokens":320,"completion_tokens":294},"prompt_logprobs":null}
        说明

        上述在线推理仅以一个demo的形式展示了推理效果。如果您想通过其他脚本测试在线推理的性能,请参考vllm官网中benchmarksbenchmark_serving.py的测试脚本。