Configure flow control rules
Flow control rules protect your applications by monitoring their QPS. When traffic exceeds a threshold, AHAS immediately throttles incoming requests. This prevents your application from being overwhelmed by a traffic surge and ensures high availability. This topic describes how to configure and manage flow control rules, including examples for three common use cases.
Prerequisites
Connect your application to AHAS Application Protection. For more information, see Application Access Method.
Background information
In networking, traffic control manages the rate of data transmission. Because the volume of incoming requests can be unpredictable and system capacity is finite, you must control traffic to match your system's processing capabilities.
Create a flow control rule
Log on to the AHAS console.
In the upper-left corner of the AHAS console, select the region where your application is deployed.
In the left-side navigation pane, choose .
On the Application Protection page, click the target application card on the Application Card tab.
Use one of the following methods to open the New Flow Control Rule page:
In the left-side navigation pane, click API Details. On the API Details page, click the
 or
or  icon in the upper-right corner of a resource card, and then in the Manage Rules dialog box, click the New Flow Control Rule tab.
In the left-side navigation pane, click Application Overview. Then, find the target API and click Flow Control in the Actions column.
In the left-side navigation pane, click Rule Settings. On the Flow Control Rules tab, click New Flow Control Rule in the upper-right corner.
In the New Flow Control Rule dialog box, configure the rule parameters.
Standalone mode
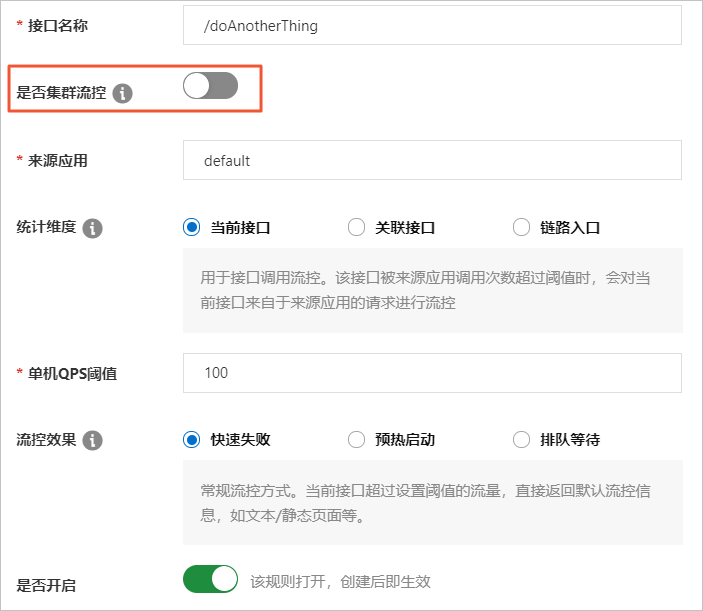
Parameter
Description
API name
The resource to apply flow control to.
Source application
The application that originates the calls. The default value is
default, which means the rule applies to calls from any source application.For a Dubbo service, enter the Dubbo applicationName of the caller. The calling application must also be connected to Sentinel.
For a web service, see Extended APIs.
If you are using annotations or custom instrumentation, see Common classes and their methods. ContextUtil only takes effect at the call chain entry, which is the first instrumented point.
For other applications under your account that are already connected to Traffic Protection, entering
defaultmeans no specific source is distinguished.
ImportantTo maintain optimal performance, we recommend keeping the number of source applications below 200 to ensure memory usage remains manageable.
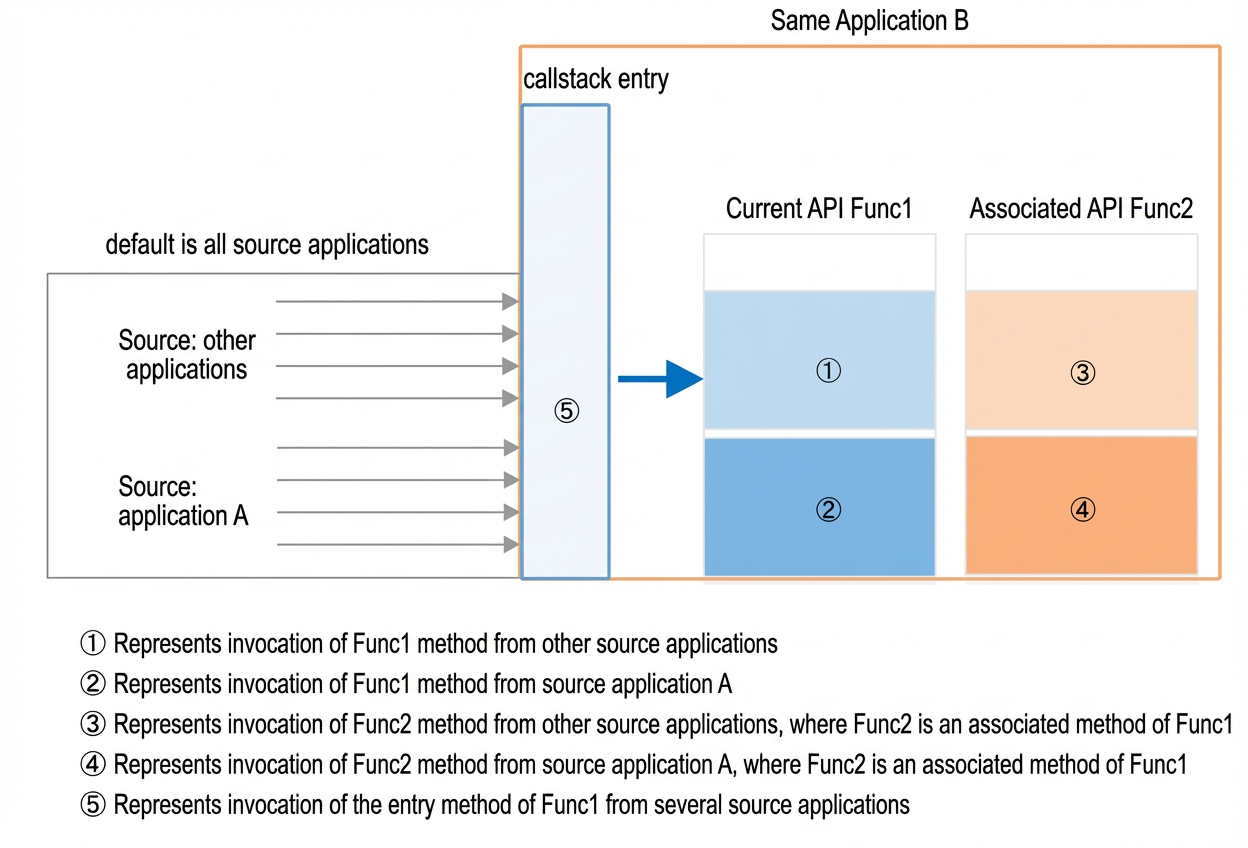
Statistic dimension
Select a statistic dimension to control traffic.
Current API: Directly controls traffic from the specified source application. If Source application is set to
default, the rule applies to traffic from all sources. This is typically used to ensure a smooth, steady flow of traffic. For more information, see Use cases.Associated API: Controls the traffic of a resource that is associated with the current resource. This is typically used to reserve resources for high-priority APIs during periods of resource contention. For more information, see Use cases.
Invocation link entry: Controls the entry traffic of the call chain where the resource is located. After you select Invocation link entry, you must also configure the Entry resource, which is the context name of the invocation link entry. This is typically used in scenarios such as warm-up to avoid traffic surges. For more information, see Common scenarios.
QPS threshold
The QPS threshold that triggers the flow control rule for the specified statistic dimension.
Flow control effect
Select a flow control effect to handle throttled requests.
Fail-fast: When the threshold is reached, requests are immediately rejected. The system returns a response based on the adapter module settings in your application configuration.
Warm up: You must set a specific warm-up period. For more information, see Warm up.
If your system has been idle for a long time, this behavior gradually increases the request processing rate when traffic suddenly increases. The rate slowly ramps up to the configured QPS threshold over the specified warm-up period. By default, the rate starts at one-third of the QPS threshold. Excess requests are rejected using the fail-fast behavior.
Queue and wait: Requests are processed at a steady rate. Excess requests are queued and processed later. This is often used for peak shaving. You must set a timeout period. If a request remains in the queue longer than the timeout period, it is rejected. For more information, see Peak shaving.
Enable
Turns the rule on or off. Changes take effect immediately.
Cluster flow control mode
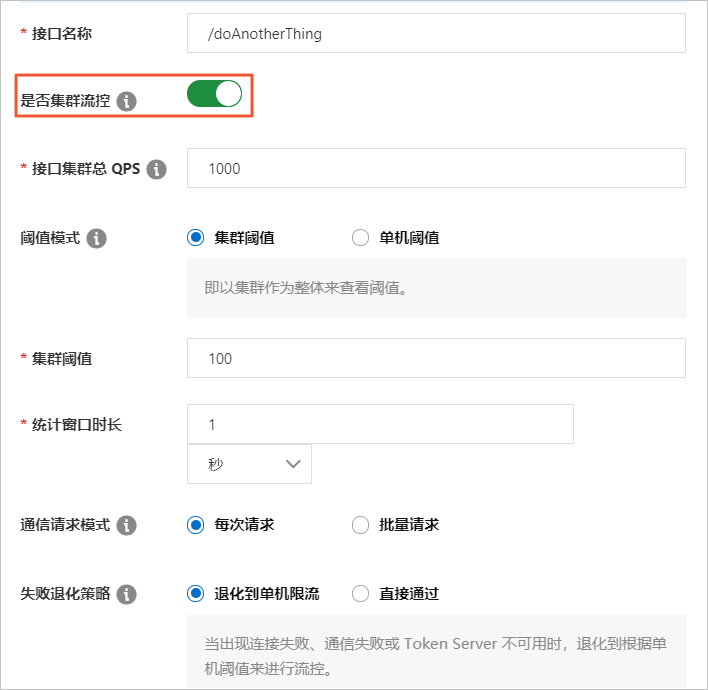
Parameter
Description
Enable cluster flow control
Enables cluster flow control to limit the total number of calls to this resource across the entire cluster.
Total cluster QPS for the API
The estimated maximum QPS for the resource across the cluster. This value serves as a reference for the Token Server's automatic token allocation. Requests that exceed this value will degrade to standalone flow control.
Threshold mode
You can set either a cluster QPS threshold or a standalone QPS threshold.
Cluster QPS threshold: The threshold applies to the entire cluster.
Standalone QPS threshold: The threshold applies to a single machine. The Token Server calculates the total cluster threshold based on the number of connected machines.
Failure degradation strategy
Specifies the behavior when the application cannot connect to the Token Server or when the Token Server is unavailable.
Degrade to standalone flow control: In case of a connection failure, the system degrades to standalone flow control based on a local threshold. You must set the standalone degradation threshold, which acts as the fallback limit for a single machine.
Pass directly: In case of a connection failure, the system ignores the failure and allows all requests to pass.
Click Create.
Use cases
The following examples show how to configure flow control rules for common use cases.
Scenario 1: Ensure a smooth traffic flow
Request traffic often has peaks and valleys. By delaying traffic from peak periods for later processing, this strategy, also known as peak shaving, helps maximize throughput while maintaining a good user experience. For more information, see Peak shaving.
For example, set Statistic dimension to Current API and Flow control effect to Queue and wait. Set the QPS threshold to 5. The system will then process one request every 200 ms. Excess requests are queued. If you also set the Wait time to 5s, any request expected to wait longer than 5s will be rejected immediately. See the following figure.

Scenario 2: Prioritize high-priority APIs during resource contention
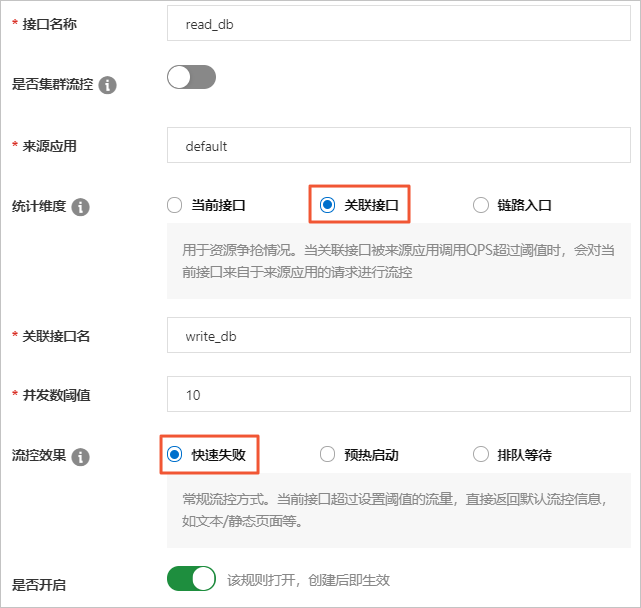
Assume you have two resources,
read_dbandwrite_db, that handle database read and write operations. To prevent data loss, thewrite_dbAPI has a higher priority. When write operations become too frequent, read requests should be throttled. This strategy is known as associated flow control. For more information, see associated flow control.For example, with Statistic Dimension set to Associated API, Flow Control Effect set to Fail-fast, and the Concurrency Threshold set to 10,
read_dbis throttled if the QPS of thewrite_dbresource exceeds 10. This reserves sufficient resources forwrite_dband preventswrite_dbdata loss. As shown in the following figure.Scenario 3: Use warm up to prevent traffic surges
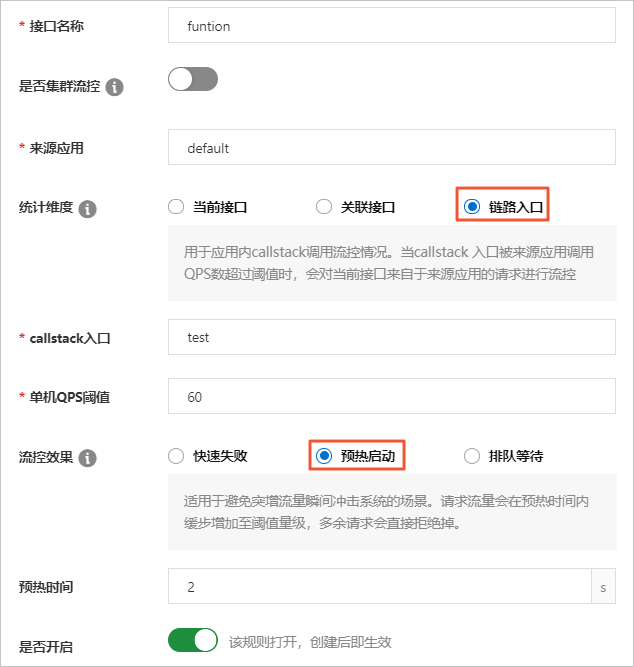
The
warm upbehavior prevents a sudden traffic surge from overwhelming your system, especially after a period of inactivity. It gradually increases the allowed traffic from a lower initial threshold up to the configured maximum over a set warm-up period. This is ideal for handling bursty traffic. For more information, see Warm up.For example, set Statistic dimension to Invocation link entry and Flow control effect to Warm up. Set the QPS threshold to 60 and the Warm-up time to 2s. By default, the warm-up process starts at one-third of the QPS threshold. In this example, when the entry-point QPS exceeds 20 (60 / 3), the allowed rate gradually increases to 60 over the 2-second warm-up period. See the following figure.
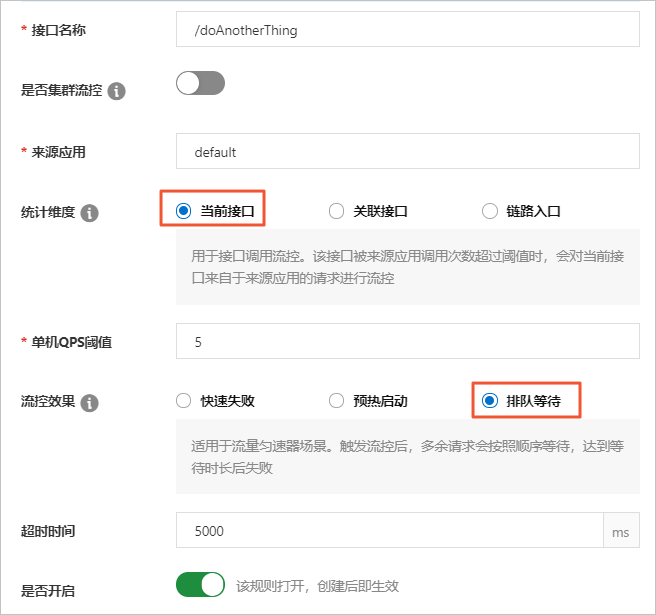
Manage flow control rules
The Flow Control Rules page lets you enable, disable, edit, or delete rules.
Enable or disable a single rule:
On the Flow Control Rules page, find the target rule and click the switch in the Status column to enable or disable it.
Enable or disable multiple rules in batch:
On the Flow Control Rules page, select the checkboxes for the rules you want to manage, and then click Enable in Batch or Disable in Batch.
Edit a rule:
On the Flow Control Rules page, find the target rule and click Edit in the Actions column to modify its settings.
Delete a rule:
On the Flow Control Rules page, find the target rule and click Delete in the Actions column.