Asset management (Enterprise Edition)
Assets are the core resources in a visualization project. They include various widgets such as charts, maps, text, and images. Asset management is a key module for managing visualization applications and includes operations such as adding, searching, and favoriting assets. This helps you efficiently manage and maintain project resources. This topic describes how to add and manage assets. It provides a guide that covers basic to advanced operations to help you efficiently design and use assets, which improves the development efficiency and visual effectiveness of your visualization projects.
Prerequisites
You have created a visualization project.
Access asset management
- Log on to the DataV console .
On the My Visualizations page, click Edit for the visualization project that you created.
In the canvas editor, click the
 icon in the upper-left corner to expand the Asset List.
The All Assets module is displayed by default in the Asset List area.
NoteClick the
 icon to the right of All Assets to refresh the asset library. This is useful if a pull operation from the asset library fails or if the asset library is updated. Click the
  icon to collapse the Asset List. You can click the
  icon in the top toolbar of the canvas editor to expand or collapse the Asset List.
Basic asset operations
Add an asset
In the Asset List, click a widget type icon in the left navigation pane. Select a widget and add it to the visualization project. This example uses a column chart widget.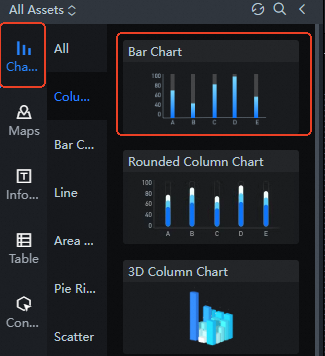 After the widget is added, it automatically appears on the canvas. You can drag the widget's border to resize it, or click and drag the widget to reposition it.
Search for an asset
The search feature lets you quickly find assets by name. This improves the efficiency of developing visualization applications.
Click the
 icon to the right of All Assets. In the search dialog box, enter the name of the asset that you want to search for. The system then automatically searches for matching components (fuzzy matching is supported) and displays them in the Component List area.
Optional: The search results also display widgets from the Unpurchased Widgets asset package. You can click Go To Purchase on a widget to go to the purchase page and obtain the corresponding asset package.
Click the
icon to the right of the search box to clear the content in the search box.
 icon to the right of All Assets. In the search dialog box, enter the name of the asset that you want to search for. The system then automatically searches for matching components (fuzzy matching is supported) and displays them in the Component List area.
 icon to the right of the search box to clear the content in the search box.
Copy an asset
In the canvas editor, click an asset in the Layer panel or on the canvas, and then right-click and select Copy. The copied asset overlaps the original asset on the canvas. You can then move the asset to the desired position.
Before copying an asset, make sure that the asset has been added to your visualization project.
Delete an asset
The delete feature lets you remove assets that are no longer used in your visualization application. Batch deletion is supported. If you delete an asset by mistake, you can recover it from the deletion backup.
In the canvas editor, click an asset in the Layer panel or on the canvas.
Right-click and select Delete (or click the
icon at the bottom of the Layer panel) to permanently delete the asset.Click the
icon in the upper-right corner of the canvas to open the Asset Deletion Backup panel. In the Asset Deletion Backup panel, you can perform the following operations on the assets that you deleted.Operation
Description
View backup asset information
The list shows the name of each backed-up asset and the time it was deleted. You can locate the backup asset you need and choose a subsequent operation.
Select or deselect a backup asset
In the panel, you can select multiple backup assets by selecting the check boxes to the left of the assets, or by clicking the select all check box at the top of the panel. To deselect, clear the check boxes for the assets, or click the Cancel button in the lower-right corner of the panel.
Recover a backup asset
Click the
icon to the right of a backup asset in the panel to recover the asset and add it back to the canvas editor.Select multiple backup assets or all backup assets in the panel, and then click Batch Recover in the lower-right corner to recover multiple backup widgets and add them to the canvas editor.
ImportantIf the backup panel contains a deleted map sub-widget and its corresponding parent widget, you must recover the parent widget before recovering the sub-widget. Before the parent widget is recovered, the
icon for the sub-widget is grayed out in the panel.Delete a backup asset
Click the
icon to the right of a backup asset in the panel to delete the backup asset from the panel.NoteDeleting a backup asset is irreversible. Once a backup asset is deleted from the panel, it cannot be recovered. Proceed with caution.
 icon at the bottom of the Layer panel) to permanently delete the asset.
 icon in the upper-right corner of the canvas to open the Asset Deletion Backup panel. In the Asset Deletion Backup panel, you can perform the following operations on the assets that you deleted.
 icon to the right of a backup asset in the panel to recover the asset and add it back to the canvas editor.
Manage asset status
Upgrade an asset
Assets are updated and upgraded from time to time. You can upgrade outdated assets to the latest version individually or in batches to ensure optimal features and performance.
Upgrade a single asset
Click an outdated asset on the canvas to open its configuration panel.
In the upper-right corner of the asset configuration panel on the right side of the canvas, click Update Version to upgrade the selected asset to the latest version.
Upgrade assets in a batch
Click the Asset Upgrade (
) icon in the toolbar at the top of the canvas editor.In the upgrade panel that appears, click One-click Upgrade to upgrade all outdated assets in the visualization application to the latest version.
 ) icon in the toolbar at the top of the canvas editor.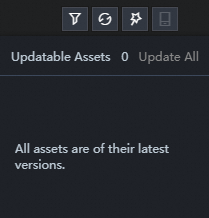
Lock or unlock an asset
The lock feature is used to lock configured assets in a visualization application to prevent accidental modification. This helps avoid configuration errors caused by having too many assets or user errors, ensuring project stability and security.
Locked assets are not affected by other layout operations in the visualization application.
Once an asset is locked, you cannot perform any operations on it on the canvas until it is unlocked.
In the canvas editor, click an asset in the Layer panel or on the canvas. Right-click and select Lock (or click the
icon at the bottom of the Layer panel) to lock the asset.When an asset is locked, a lock icon appears on its layer in the Layer panel on the left, and the layer is grayed out.
In the Layer panel on the left, select the locked asset. Right-click and select Unlock to unlock the asset. You can also click the
icon on the asset's layer or at the bottom of the Layer panel to unlock it.
 icon at the bottom of the Layer panel) to lock the asset.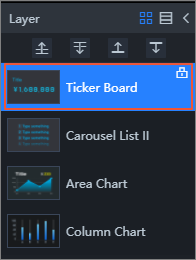
Hiding assets
The hide feature lets you hide deployed assets. This can reduce system load and allow you to quickly deploy other assets if high resource usage (such as CPU and memory) causes application lag. Hiding assets can make the application interface clearer, improve operational smoothness, and significantly enhance your workflow efficiency.
In the canvas editor, click an asset in the Layer panel or on the canvas.
NoteBefore favoriting an asset, make sure that you have added the asset to your visualization project.
Right-click and select Hide (or click the
icon at the bottom of the Layer panel) to hide the asset.When an asset is hidden, a hide icon appears on its layer in the Layer panel on the left, and the layer is grayed out.
NoteAfter an asset is hidden, you cannot perform any operations on it on the canvas. To modify the asset's configuration, you must first show the asset again by following the steps below.
In the Layer panel on the left, select the hidden asset. Right-click and select Show (or click the
icon at the bottom of the Layer panel) to show the asset.
 icon at the bottom of the Layer panel) to hide the asset.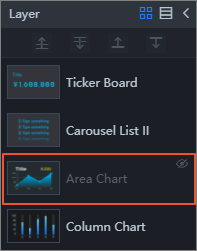
Favorite Assets
The favorite feature lets you save important or frequently used assets from your visualization application to the favorites list for quick access and management. You can use this feature to favorite one or more assets, view the list of favorited assets, and perform operations such as deleting, renaming, or upgrading them to blocks. Favoriting assets not only improves the efficiency of reusing assets but also provides a more flexible way to manage projects, ensuring that you can quickly find and use key resources when needed.
Quota limits
The quota for favorited assets varies by edition:
Enterprise Edition: Up to 20 assets.
Professional Edition: Up to 40 assets.
Premium Edition: Up to 1,000 assets.
Favoriting an asset
Favorite a single asset
In the canvas editor, perform the following steps to favorite an asset.
NoteBefore favoriting an asset, make sure that you have added the asset to your visualization project.
In the Layer panel or on the canvas, click to select an asset, and then right-click and select Favorite.
ImportantThe data of a favorited asset is affected by changes to its data source. To ensure consistency, use static data when you favorite an asset.
In the Favorite dialog box, enter a name for the favorited asset (the default is its display name in the asset list), and then click OK.
After the asset is favorited, go to the All Assets page and click the Favorite icon in the navigation pane on the left to view your favorited assets. Click a favorited asset to apply it to your visualization project.
Favorite multiple assets
You can use the group and favorite feature to categorize and favorite multiple assets as a collection, making them easier to find and use.
Because DataV has a quota on the number of favorited assets, grouping and favoriting assets can also help you conserve your quota.
In the Layer panel or on the canvas, hold down the Ctrl key and click to select multiple assets. Right-click and select Group to group the assets.
Select the grouped asset, right-click, and select Favorite to favorite the entire group in the asset favorites.
ImportantChanges to the data source of a favorited asset may cause the asset to become unavailable. We recommend using static data for the asset when you favorite it.
Management of Asset Favorites
Return to the DataV console.
Click My Assets, and then click Widget Favorites on the left side of the page to go to the widget management page.
On the widget management page, you can view your favorited assets and delete or rename them.
View favorited assets: View the assets you have favorited and your remaining quota.
Delete a favorited asset: Move the mouse pointer over a favorited asset and click the
icon to delete it from your favorites.Rename a favorited asset: Move the mouse pointer over the asset name, click the
icon, and enter text to modify the name.
 icon to delete it from your favorites.
 icon, and enter text to modify the name.
Upgrade a favorited asset to a block
Move the mouse pointer over a favorited asset and click the Upgrade to Block icon to upgrade the favorited asset to a block.
Group assets
The group feature lets you combine multiple assets (such as charts, text, and images) into a single group for unified management and operations. After grouping, you can adjust the size, position, transparency, and 3D transformation parameters of all assets within the group at once. You can also implement a carousel effect for the objects within the group.
Group operations
In the Layer panel or on the canvas, hold down the Ctrl key and click to select multiple assets.
NoteBefore grouping assets, make sure that the assets have been added to your visualization project. If not, add the assets first. For more information, see Add an asset.
Right-click and select Group (or click the
icon at the bottom of the Layers panel) to add the selected assets to a layer group.After grouping assets, select the group, right-click, and select Ungroup. After ungrouping, all assets in the group return to their ungrouped state. The assets become independent and can no longer be dragged or moved as a group.
NoteAfter selecting one or more assets in the layer or on the canvas, you can use the keyboard shortcut Ctrl + G to group them and Ctrl + Shift + G to ungroup them.
 icon at the bottom of the Layers panel) to add the selected assets to a layer group.
Group configuration
After grouping assets, you can enable the 3D Transform switch in the group configuration panel on the right. Configure the 3D transform, perspective distance, and vanishing point position as described below to achieve a perspective projection effect for the grouped assets.
3D Transform: Click the
or icon to arrange the assets within the group horizontally or vertically. Click an asset thumbnail to select the corresponding asset within the group and configure its 3D properties.
Parameter
Description
Rotate
The rotation axis for an asset in the group. You can choose to rotate around the x-axis, y-axis, or z-axis.
Scaling
The scaling values for an asset in the group on the x-axis and y-axis. Turn on the Scale Ratio switch to lock the aspect ratio. When you change the scaling value in one direction, the value in the other direction changes proportionally. If you turn off the switch, the scaling values for the two directions can be changed independently.
Pan
The translation values for an asset in the group on the x-axis, y-axis, and z-axis.
Perspective Distance: The distance value for the 3D perspective of the grouped assets, in pixels.
NoteThe perspective distance is the distance from the observer to the plane where the z-value is 0. If an asset's z-value is greater than the perspective distance, the asset disappears because it is out of the viewing range. Therefore, the perspective distance must be a positive number.
Vanishing Point Position: The vanishing point is the intersection point in a 2D projection of parallel lines in 3D space. You can set the position of the vanishing point on the x-axis and y-axis. The unit is %, and the value range is 0 to 100.
During the configuration of a visualization application, if too many assets cause them to overlap or crowd the interface, you can use the in-group carousel feature. This lets DataV automatically display each asset in sequence to optimize the layout. Click Too many widgets? Try the carousel feature at the bottom of the panel or the
icon on the right side of the configuration panel to configure the carousel effect for the objects within the group. In the carousel configuration panel, turn on the In-group Object Carousel switch and configure the Basic Settings and Animation Settings as described below.Basic Settings
Parameter
Description
Group Alignment
Click the thumbnails to select the alignment for the carousel assets in the Horizontal (including align left, align center, and align right) and Vertical (including align top, align center, and align bottom) directions.
Trigger Method
The trigger method for the asset carousel. Options include the following:
Auto Trigger: On the preview or published page, the assets play in a carousel automatically.
Event Trigger: On the preview or published page, the assets play in a carousel only when the corresponding event configured in the Blueprint editor is triggered.
Manual Trigger: After you select Manual Trigger, you must also set a Trigger Key. The default is Shift + ↑. After the trigger key is set, you must press the trigger key on the preview or published page to trigger the asset carousel.
Duration
The duration of the asset carousel, in ms.
Animation Settings
Click an asset thumbnail to select the corresponding asset within the group and configure its animation properties.
Parameter
Description
Animation
The animation effect for the asset carousel. Fade and Slide are supported.
Animation Duration
The duration of the animation, in ms.
Easing Effect
The easing effect for the animation. Linear, EaseIn, EaseOut, and EaseInOut are supported.
Preview: Click Preview to preview the carousel effect of the grouped assets. Click Pause to stop the preview.
 or
or  icon to arrange the assets within the group horizontally or vertically.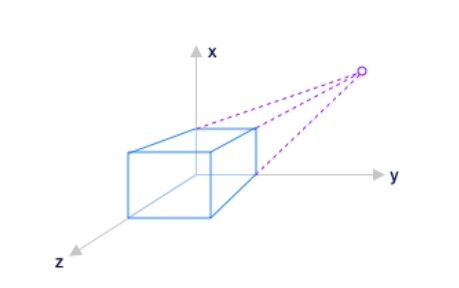
 icon on the right side of the configuration panel to configure the carousel effect for the objects within the group. In the carousel configuration panel, turn on the In-group Object Carousel switch and configure the Basic Settings and Animation Settings as described below.