Flying Routes Layer
The Flying Routes Layer is a subcomponent of the Flat Map with 3D Effects that displays an animated route between two geographic coordinates. You can independently configure the layer's style and data, including the route's fly speed, color, thickness, and its start and end coordinates. This article describes the configuration options for the Flying Routes Layer.
Click Flying Routes Layer under subcomponent management to open the configuration panel and configure the style and data of the Flying Routes Layer.
If the Flying Routes Layer does not appear in subcomponent management, you have not yet added the Flying Routes Layer subcomponent. See Map container to add it.
Configuration
- Search for Configurations: In the right-side panel of Canvas Editor, click the Settings tab, and click Search for Configurations in the upper-right corner. Enter the required configuration item in the search box, and click the search icon to quickly locate the configuration item. Fuzzy match is supported. For more information, see Search for Configurations.
Height: The route's flight height. The value ranges from 0 to 3.
Fly speed: The route's flight speed. The value ranges from 0.1 to 25.
Hue: The route's hue. The value ranges from 0 to 1.
NoteThis value is the standard hue value (0-360) divided by 360. In the HSL color model, hue is an angle on the color wheel, ranging from 0 to 360 degrees.
Density: The number of particles in a single flight animation.
Data
The following example shows the required JSON data format.
[
  {
    "from": "116.85059,31.69078", "to": "118.69629,36.20882"
  },
  {
    "from": "120.89355,37.09024", "to": "116.93848,31.61597"
  },
  {
    "from": "121.28906,29.34388", "to": "117.20215,31.12820"
  },
  {
    "from": "118.16895,31.57854", "to": "119.79492,32.47270"
  },
  {
    "from": "116.76270,33.35806", "to": "116.49902,38.95941"
  },
  {
    "from": "116.41113,30.93992", "to": "114.78516,26.58853"
  },
  {
    "from": "115.83984,32.13841", "to": "97.47070,37.54458"
  },
  {
    "from": "116.27930,32.36140", "to": "114.08203,36.27971"
  },
  {
    "from": "103.66699,25.79989", "to": "116.05957,31.54109"
  },
  {
    "from": "112.14844,24.40714", "to": "116.71875,33.21112"
  },
  {
    "from": "116.93848,31.65338", "to": "118.34473,26.62782"
  },
  {
    "from": "90.70313,42.26105", "to": "116.23535,32.32428"
  },
  {
    "from": "116.41113,30.82678", "to": "114.87305,36.94989"
  },
  {
    "from": "116.45508,30.78904", "to": "118.91602,28.57487"
  },
  {
    "from": "116.01562,40.07807", "to": "116.71875,31.69078"
  },
  {
    "from": "116.71875,31.72817", "to": "108.45703,40.24599"
  },
  {
    "from": "117.99316,40.84706", "to": "116.85059,31.69078"
  },
  {
    "from": "118.30078,36.56260", "to": "117.24609,40.97990"
  },
  {
    "from": "119.35547,26.86328", "to": "120.41016,32.28713"
  },
  {
    "from": "113.07129,31.42866", "to": "106.04004,31.31610"
  },
  {
    "from": "116.85059,31.31610", "to": "110.43457,32.76880"
  },
  {
    "from": "-98.789063,45.58329", "to": "112.506475,37.996794"
  },
  {
    "from": "-58.359375,-18.979026", "to": "117.427515,30.749109"
  },
  {
    "from": "144.140625,-28.613459", "to": "117.778677,28.918633"
  },
  {
    "from": "10.195313,16.636192", "to": "114.263844,36.879973"
  },
  {
    "from": "116.372386,30.142774", "to": "-109.335938,56.559482"
  },
  {
    "from": "113.560997,36.597899", "to": "-52.382813,-9.795678"
  }
]
Table 1. Field descriptions
Field | Description |
from | The starting point's coordinates (longitude,latitude), separated by a comma. |
to | The destination point's coordinates (longitude,latitude), separated by a comma. |
Parameter | Description |
Controlled mode | When enabled, the component does not request data upon initialization. Data requests can only be triggered by a callback ID or an action configured in the Blueprint Editor. When disabled, data can be requested using the automatic update request feature. This option is disabled by default. |
Automatic update request | When enabled, you can set a polling frequency for automatic data updates. When disabled, the component does not update data automatically. To update data, you must refresh the page or trigger an update with a Blueprint Editor action or a callback ID. |
Data source | Click Configure Data Source to open the Set Data Source panel. In this panel, you can modify the data source type, edit data query code, preview the data source response, and view the data response result. For more information, see Configure Asset Data. |
Filter | A filter allows you to transform data structures, filter data, and perform simple calculations. Click Add Filter to configure a filter script in the Set Data Source panel. For more information, see Use Filters. |
Data response result | Shows the response from the data request. When the data source changes, you can click the |
 icon on the right to see the latest response.
Interaction
This component does not have any interaction events.
Blueprint Editor interaction configuration
In the Canvas Editor, go to the subcomponent management list for the
Flat Map with 3D Effectscomponent and click the icon next to
 Flying Routes Layer.Click the
 icon in the upper-left corner of the page.
In the Blueprint Editor, click the
Flying Routes Layercomponent in the Import Nodes panel. Its configuration parameters appear on the canvas, as shown in the following figure.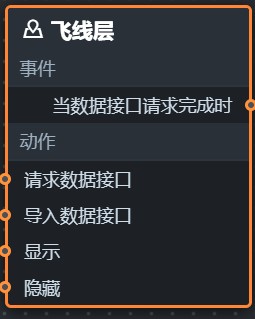
Event
When data request is complete: Triggered when a data request completes and any filters have been applied. The event provides the resulting data in JSON format. For a data example, see Data.
Action
Actions
Description
Request data
Requests new data from the server. It uses data from an upstream node as a request parameter. For example, if the API for the
data sourceis set tohttp://api.testand the data passed to the Request data action is{ id: '1'}, the final request URL ishttp://api.test?id=1.Import data
Redraws the component using a new local dataset. This action does not request new data from the server. The provided data must be in the required format. For a data example, see Data.
Show
Shows the component. No parameters are required.
Hide
Hides the component. No parameters are required.