The device-side software development kit (SDK) for IoT Platform includes a built-in over-the-air (OTA) update feature. You can adapt the cloud-based OTA service of IoT Platform for your modules and products. This topic describes how to use the OTA console to upgrade firmware for a private brand project.
Prerequisites
The device has a firmware version flashed and is connected to IoT Platform.
Background information
The OTA upgrade process consists of the following steps:
Develop the required firmware on the device.
Compile the new device-side firmware. The firmware must include a version number. After the device flashes the firmware and restarts, it reports the new version number to the OTA server.
Execute the upgrade process in the cloud console.
In the OTA console, you can perform operations such as uploading firmware, verifying firmware, performing batch upgrades, and managing firmware.
Confirm the upgrade and verify the result in the mobile app.
If app confirmation is enabled for the firmware upgrade, the console executes the upgrade only after a user confirms the task in the mobile app. After the upgrade is complete, you can verify the result in the mobile app.
I. Firmware required for device-side development and upgrades
The device side, using a Wi-Fi device as an example, uses three main topics to interact with the cloud. The following flowchart shows this process.
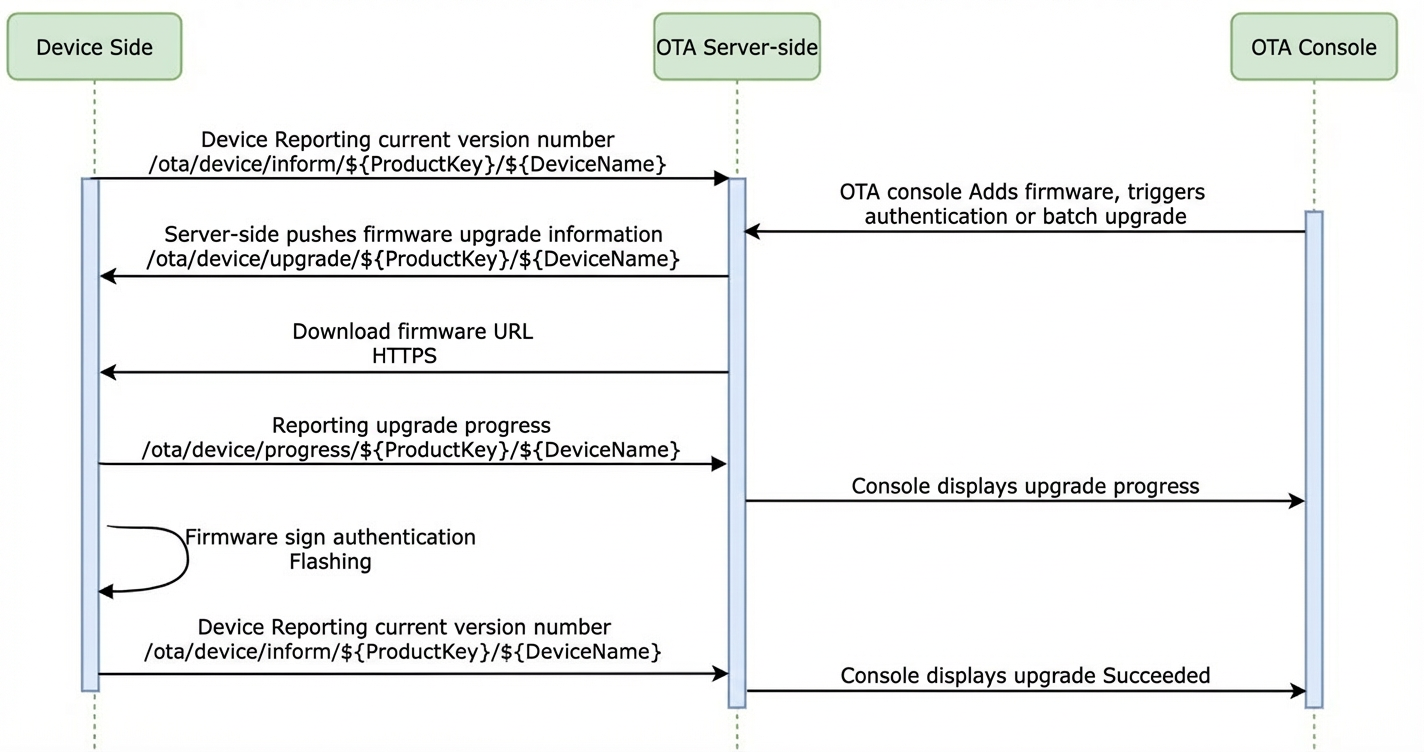
The device reports its current version number to the cloud over the following topic. A device typically reports its firmware version number once after it is powered on.
After the device downloads and flashes the OTA firmware and then restarts, it uses this topic to report the new firmware version.
Uplink data
/ota/device/inform/${productKey}/${deviceName}Request data format:
{
    "id":"123",
    "params":{
        "version":"1.0.1",
        "module":"MCU"
    }
}
Parameter
Type
Description
id
String
Message ID. A string of digits. The value must be unique for the device and range from 0 to 4294967295.
version
String
The version of the OTA module.
module
String
The name of the OTA module.
Note
When you report the version number of the default module, you can omit the module parameter.
The version number of the default module of a device represents the firmware version number of the entire device.
When a new firmware version is available, the cloud pushes the version information to the device over the following topic.
Downlink data
/ota/device/upgrade/${productKey}/${deviceName}The device reports the OTA upgrade progress to the cloud over the following topic. You can view the progress in the console and in the mobile app.
Uplink data
/ota/device/progress/${productKey}/${deviceName}NoteSet the device to report its progress no more than once every 3 seconds. If the device reports its progress too frequently, you may not be able to view all progress reports in the Batch Details section of the OTA update package details in the IoT Platform console.
{
    "id": "123",
    "params": {
        "step": "-1",
        "desc": "OTA update failed. Could not request the update package information.",
        "module": "MCU"
    }
}
Parameter
Type
Description
id
String
Message ID. A string of digits. The value must be unique for the device and range from 0 to 4294967295.
step
String
OTA upgrade progress.
Valid values:
An integer from 1 to 100: the upgrade progress percentage.
-1: The upgrade failed.
-2: The download failed.
-3: The verification failed.
-4: The flashing failed.
desc
String
A description of the current step. The description can be up to 128 characters in length. If an exception occurs, this field can contain the error message.
module
String
The name of the module to which the update package belongs. For more information about modules, see Add an update package.
Note When you report the OTA upgrade progress of the default module, you can omit the module parameter.
Develop the device firmware to be upgraded based on the device-side developer document and the device-cloud interaction flowchart. For more information about OTA programming, see Device OTA programming.
Compile the new device firmware and confirm its version number.
In the root directory of the SDK, run the compilation command.
aos make clean
aos make living_platform@<module_name>
The following snippet shows the logs during compilation. The value of app_version_new is the new firmware's version number.
Check if required tools for esp8266 exist
Making config file for first time
processing components: living_platform esp8266
platform/mcu/esp8266 vcall init auto_component
server region: MAINLAND
server env: ONLINE
APP: living_platform
Board: esp8266host
user: liuese
branch: rel_1.1.0
hash: 0f1596cffffd9a4646a3cce4d3c7ba9b4f14649d
app_version_new:app-1.0.0-20191107142256  // The version number of the new firmware
firmware type: RELEASE
FEATURE_SUPPORT_ITLS != y, so using normal TLS
app_version:app-1.0.0-20191107142256
kernel_version:AOS-R-1.3.4
server region: MAINLAND
server env: ONLINE
APP: living_platform Board: esp8266
2. Execute the upgrade process in the console
Log on to the IoT Platform console.
Upload the firmware.
Go to the page.
On the Firmware List tab, select a product from the product drop-down list and click Add Firmware.
Enter the firmware parameters and click OK.
A firmware is typically identified by a name and version number that are easy to recognize. We recommend that you keep the Firmware Version Number consistent with the device's actual firmware version number. For more information about the parameters, see Firmware Upgrade.
After you upload the firmware, verify it using test devices.
Firmware verification ensures firmware quality. We recommend that you select three to five test devices for firmware verification.
Ensure that the new firmware version is correct and that the firmware runs as expected.
Ensure that the OTA upgrade service runs as expected and that the device can complete the upgrade task.
Return to the page.
In the firmware list, find the firmware and click Verify Firmware in the Actions column.
Configure the parameters for firmware verification.
Source Version: The current device version number.
Devices to Verify: Select the devices for verification. You can select one, multiple, or all devices.
App Confirmation: Specify whether to enable app confirmation for the upgrade. If you use the Cloud Intelligence app to connect to the device, you can use the app to confirm the firmware upgrade.
Device Upgrade Timeout: Select a timeout period. If the firmware verification is not completed within the timeout period, the verification fails.
Click OK to start the firmware verification.
If you set App Confirmation to Yes, log on to the Cloud Intelligence app, go to , and click Confirm Upgrade. The firmware verification starts only after you confirm the upgrade.
Select new test devices and repeat the preceding steps.
Perform a batch upgrade.
After the firmware is verified, you can perform a batch upgrade. You can push the upgrade to all devices or to batches of devices.
Return to the page.
In the firmware list, find the firmware and click Batch Upgrade in the Actions column.
Configure the parameters for the batch upgrade and click OK.
Select parameters as needed to control the OTA upgrade pace and improve the success rate. For more information about the batch upgrade parameters, see Firmware upgrade.
Manage firmware upgrades.
The console lets you manage firmware. You can add firmware, list firmware by product, view the details of specific firmware, and delete firmware. On the firmware details page, you can view detailed information about the current firmware, including the total number of target devices and the number of successful and failed upgrades. This information helps manufacturers understand the results of the upgrade for this version. The following steps describe how to view the firmware upgrade results. For more information about other operations, see Firmware upgrade.
Go to the page.
In the firmware list, in the Actions column, click View.
On the Batch Management tab, click the Device List tab to view the upgrade status.
3. Multi-module upgrade
Scenarios
Some customers need to upgrade the Wi-Fi module and the MCU separately. You must define different modules to distinguish them. If multiple modules need to be upgraded at the same time, you must create sequential upgrade tasks in the console. A device can have only one active upgrade task at a time, which may cause an error. Follow the steps below to implement sequential upgrades.
For example, the current firmware versions of a device are Wi-Fi: 1.0.0 and MCU: 2.0.0.
The target firmware versions are Wi-Fi: 1.1.0 and MCU: 2.2.0.
(The module versions are independent of each other.)
Add firmware
Create a dynamic upgrade task for each module.
First, create a dynamic upgrade task to upgrade the Wi-Fi module from 1.0.0 to 1.1.0.
Then, create another dynamic upgrade task to upgrade the MCU module from 2.0.0 to 2.2.0.
A device can be in only one ongoing upgrade batch at a time (with a device status of To be pushed, Pushed, or Upgrading). Therefore, the second batch created for the MCU will immediately show a failed status. This is expected. First, confirm the Wi-Fi module upgrade. After the Wi-Fi module is successfully upgraded, the device reports MCU version 2.0.0 again. The status of the device in the MCU batch then changes to To be pushed, and the MCU module upgrade can proceed.
4. Confirm the upgrade and verify the result on the mobile app
The mobile app uses four main topics to interact with the cloud. The following flowchart shows this process.
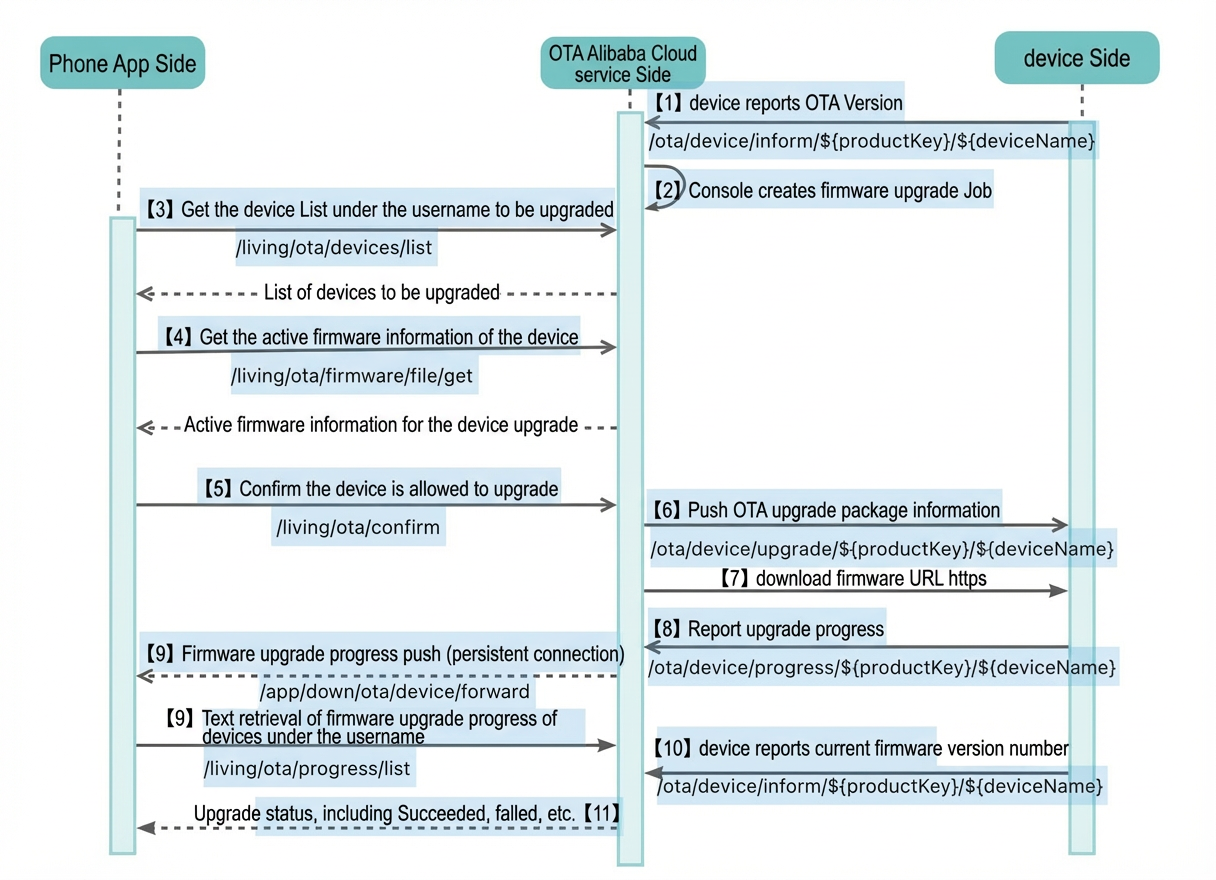
Query for firmware to be upgraded
The app queries for information about pending upgrades for the user's attached devices over the following topic. Based on the response, the app displays a list of device names that have pending upgrades. After you add a batch upgrade task in the console, the cloud returns a list of firmware upgrades that require confirmation to the mobile app.
/living/ota/firmware/file/getConfirm the device upgrade
When App Confirmation is set to Yes, the cloud starts the upgrade task only after it receives a confirmation message from the app over this topic. The cloud then pushes the task to the device.
/living/ota/confirmRetrieve the list of devices being upgraded (this topic is not currently used in the public app)
The app uses a UI interaction method, such as periodic polling or pull-to-refresh, to query for information about devices that are currently being upgraded over the following topic. The cloud returns a list of devices being upgraded and other information.
/living/ota/devices/listRetrieve upgrade information for a specific firmware
Persistent connection for real-time listening. This real-time notification method is convenient because it does not require polling.
Android persistent connection channel: For more information, see Persistent connection channel SDK.
iOS persistent connection channel: For more information, see Persistent connection channel SDK.
Persistent connection topic: For more information, see Persistent connection service.
TOPIC:
/sys/${productKey}/${deviceName}/app/down/ota/device/forward
API operation query
You must call an API operation to query by polling. For more information, see Query the firmware upgrade progress of devices under a username.
/living/ota/progress/list
Cancel the firmware upgrade
Cancel the firmware upgrade process for a specific device. For more information, see Cancel a firmware upgrade.
/living/ota/cancel
Do not use the Report firmware upgrade progress or Report firmware version information API operations. The device reports the firmware progress, so the app does not need to report it.
The following steps describe the operations in the Cloud Intelligence app.
Log on to the Cloud Intelligence app.
Go to .
View the firmware upgrade information. You can view information about pending upgrades, initiate a firmware upgrade, and view the upgrade results.