Complete these steps to integrate your Android app with mPaaS using the component-based method.
The component-based method requires the following steps:
Create a new project on the client
This section walks you through creating a new app in a Windows development environment, compiling and packaging it into a runnable .apk package.
Before you create a new project, complete the following prerequisites:
Create a Portal project
The component-based solution uses the Portal-Bundle method. Start by creating a Portal project.
A Portal project typically contains no business code. It merges Bundles into a runnable .apk package. When you create a Portal project, a Bundle project with the Launcher suffix is created by default.
Follow these steps:
-
After you start Android Studio, click Start a new mPaaS project on the welcome page.
-
In the Create New mPaaS Project window, select mPaaS Portal. Click Next.
-
Enter a Project name. For Path of configuration file (JSON) from console, select the .config configuration file that you downloaded from Code Management > Code Configuration in the console. The mPaaS plug-in automatically parses the configuration file and populates the Package Name. Click Next.
-
Select the mPaaS SDK version and select the required module dependencies. Click Next.
Important-
Select module dependencies as needed. For more information about dependencies, see the integration document for each component.
-
You can also select only the required framework dependencies. After you create the application, you can add other required dependencies using the mPaaS plug-in > Component Management feature. For more information, see the integration document for each component.
-
-
Confirm the information for the default Bundle project. Click Finish.
You have now created a Portal project and a default Bundle project.
Create a new Bundle project
The mPaaS framework supports multiple Bundles. You can add additional Bundle projects as needed.
-
Click File > New > Start a New mPaaS Project.
-
In the Create New mPaaS Project window, select mPaaS Portal. Click Next.
-
Enter a Project name. For Path of configuration file (JSON) from console, select the .config configuration file that you downloaded from Code Management > Code Configuration in the console. The mPaaS plug-in automatically parses the configuration file and populates the Package Name. Click Next.
-
Select the mPaaS SDK version and select the required module dependencies. Click Next.
-
Confirm the information for the default Bundle project. Click Finish.
You have now created a Bundle project. For more information about Bundle development, see Bundle project.
What to do next
See the integration document for each component to integrate and use mPaaS components.
Related links
Component-based method > Introduction: Outlines the code structure, compilation and packaging results, and the differences from native projects for Portal and Bundle projects.
Manage component dependencies
To simplify SDK baseline upgrades and component dependency management, upgrade the Android Studio mPaaS plug-in to the latest version first. For details, see Update the mPaaS plug-in.
Add component dependencies
To use mPaaS components, add their dependencies to the Portal and Bundle projects:
-
Dependencies in the Portal project are included in your APK during packaging.
-
Dependencies in the Bundle project allow you to call the component APIs from the Bundle project.
-
For a single Portal project, add the dependencies only to the Portal project.
-
If you already selected the components when you created the mPaaS project, you can still add or remove components by following the steps below.
Procedure
-
In Android Studio, choose mPaaS > Component-based Integration. In the integration panel that appears, click Start Configuration under Configure/Update Components.
-
In the component management window that appears, click the buttons to install the components you need.
-
For uninstalled components, the button is labeled "Not Installed". Click the button to install the component.
-
For installed components, the button is labeled "Installed". Click the button again to uninstall the component.
-
What to do next
If this is your first time using Component Management in the Android Studio mPaaS plug-in to add components, verify or update the following configurations.
-
In the
build.gradlefile in the root directory of the Portal or Bundle project, verify that it contains the following dependency at version 2.8.0 or later:buildscript { ... dependencies { classpath 'com.android.boost.easyconfig:easyconfig:2.8.4' } } -
In the
build.gradlefile in the main module of the Portal project, verify that it contains the following content:apply plugin: 'com.alipay.portal' portal { allSlinks true mergeAssets true } apply plugin: 'com.alipay.apollo.baseline.update' mpaascomponents{ excludeDependencies=[] } -
Delete old dependencies:
ImportantBack up the following content before you delete it.
-
For the Portal & Bundle mode, in the
build.gradlefile of the main module of the Portal project, delete the mPaaS component dependencies under the dependencies node. Do not deletempaas-baseresjar. -
For the single Portal project mode, in the
build.gradlefile of the main module, delete the following content:apply from: rootProject.getRootDir().getAbsolutePath() + "/mpaas_bundles.gradle" apply from: rootProject.getRootDir().getAbsolutePath() + "/mpaas_apis.gradle"Also, delete the
mpaas_bundles.gradleandmpaas_apis.gradlefiles from the project's root directory. Note that deleting thempaas_apis.gradlefile may cause the compilation to fail. You must modify the configuration in the sub-module as described below.
-
-
To call mPaaS component APIs in a sub-module:
-
For a Portal & Bundle mode project, add the following to the
build.gradlefile in the sub-module of the Bundle project:apply plugin: 'com.alipay.apollo.baseline.update' -
For a single Portal project mode, delete the following from the
build.gradlefile in the sub-module:apply from: rootProject.getRootDir().getAbsolutePath() + "/mpaas_apis.gradle"Then, add the following:
apply plugin: 'com.alipay.apollo.baseline.update'
-
-
If the old dependencies contain custom libraries, you must also add custom dependencies.
-
If the compilation fails due to library conflicts, see Overview.
Upgrade the baseline
-
In Android Studio, choose mPaaS > Component-based Integration. In the integration panel that appears, click Start Configuration under Integrate/Upgrade Baseline.
-
Click the version drop-down list, select a new version, and then click OK to upgrade the baseline.
Upgrade a single component
New version
-
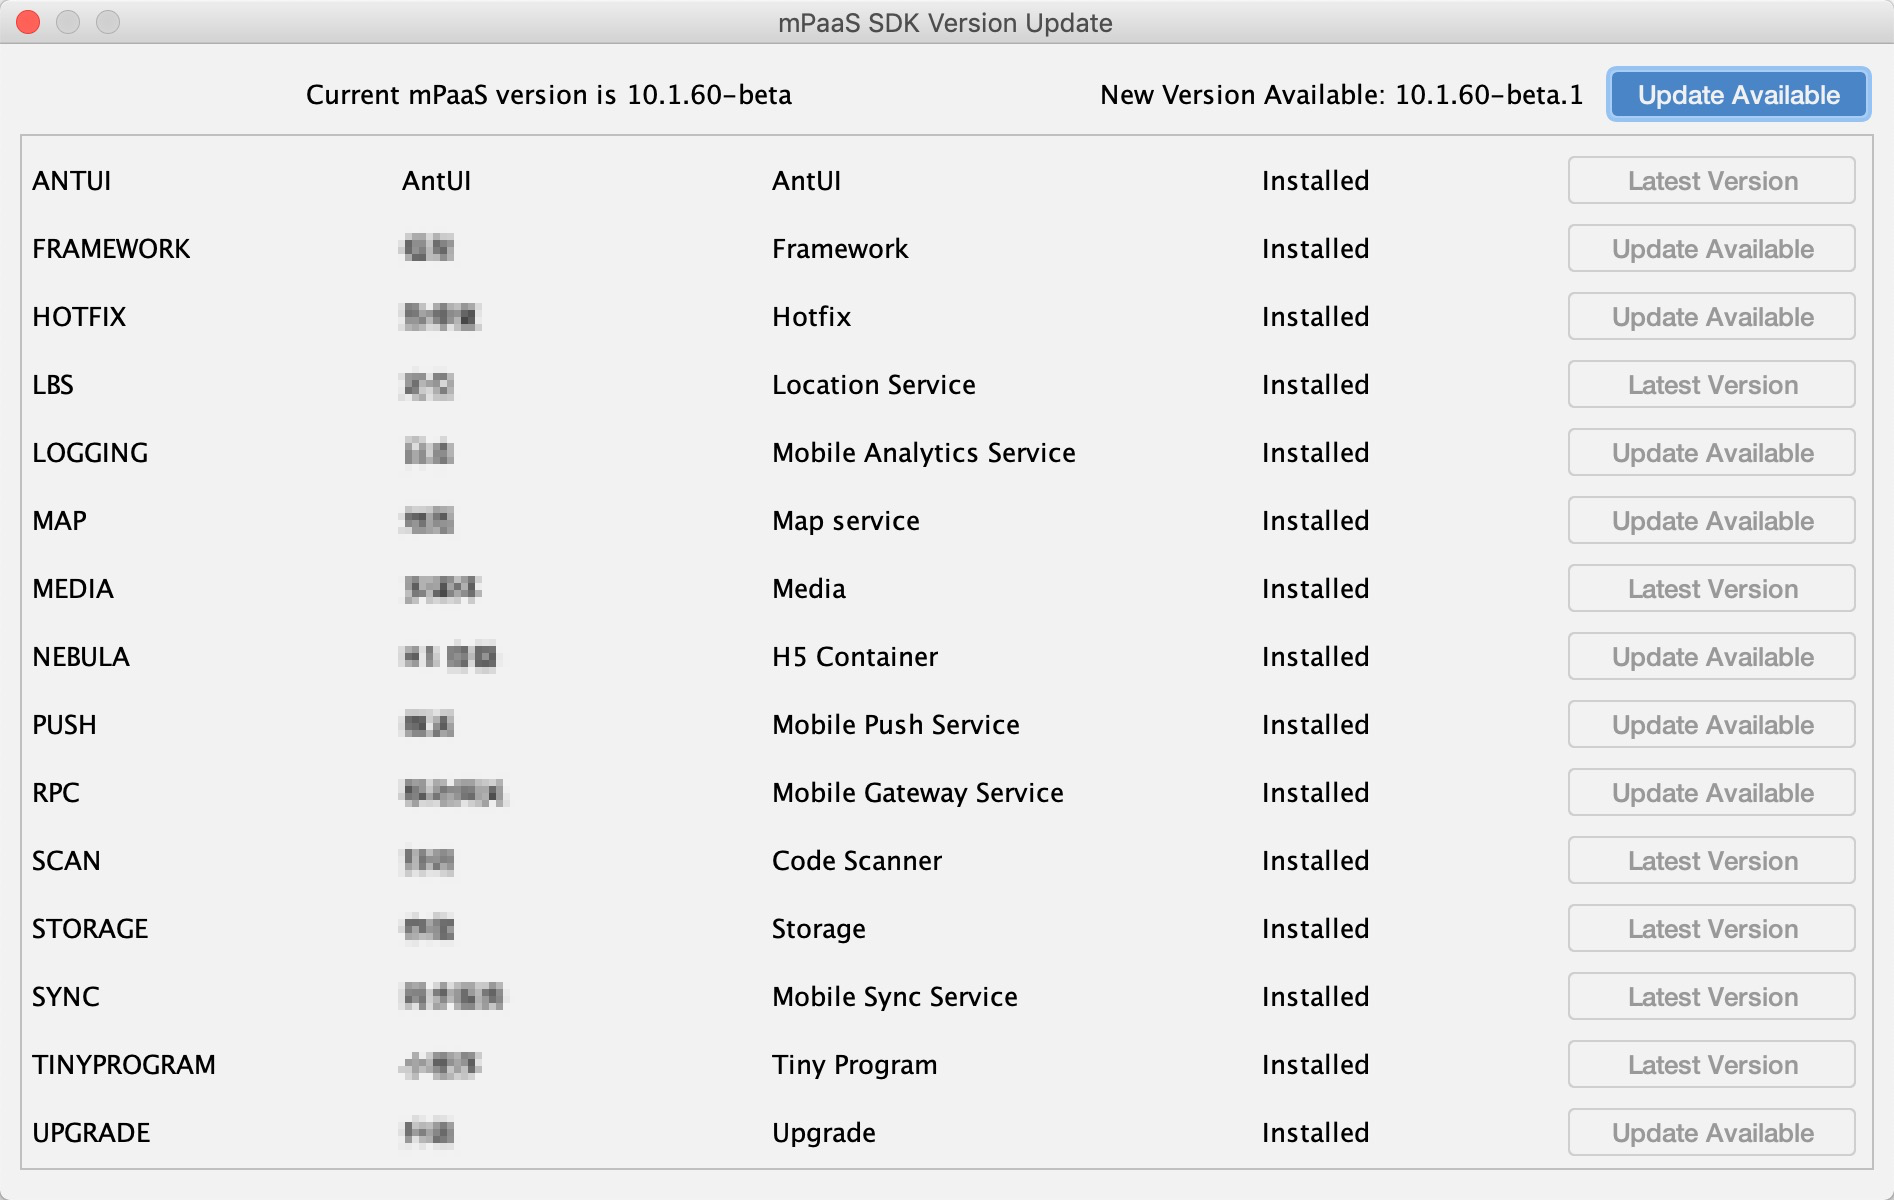
In Android Studio, choose mPaaS > Component Upgrade. A list of components appears.
-
Check the component status and perform the upgrade. If an update notification appears in the upper-right corner, click it to update the component.
Old version
-
In Android Studio, choose mPaaS > Component Upgrade. A list of components appears.
-
Check the component status and perform the upgrade:
-
If the status is Latest, the component does not need to be upgraded.
-
Otherwise, a new version is available. You can click the status button to upgrade the component.

-
Add custom dependencies
-
If this is your first time using Component Management to manage components and you have not upgraded the SDK, add the custom library under the dependencies node in the
build.gradlefile of the main module of the Portal project. For example:bundle 'com.alipay.android.phone.mobilesdk:logging-build:2.0.2.18032216xxxx@jar' manifest 'com.alipay.android.phone.mobilesdk:logging-build:2.0.2.18032216xxxx:AndroidManifest@xml' -
If this is your first time using Component Management to manage components and you have upgraded the SDK, or if you have upgraded the SDK using Baseline Upgrade, your custom library may require re-customization for the new version. Submit a ticket or contact the mPaaS technical support to confirm. After the library is re-customized, or after you confirm that re-customization is not required, you can add the custom dependency as described above.
Build
Click mPaaS > Build to compile the project using the mPaaS plug-in for Android Studio.