The H5 container lets you open online webpages, call native or custom JSAPIs from the frontend, and customize the H5 page title bar.
Open an online webpage in an application
-
Add a custom class named
MyApplicationto the project. This class inherits fromApplication. -
Initialize the custom
MyApplicationclass as follows:@Override public void onCreate() { super.onCreate(); MP.init(this); }For more information, see Initialize mPaaS.
-
In the
app/src/main/AndroidManifest.xmlfile, addandroid:name=".MyApplication".<?xml version="1.0" encoding="utf-8"?> <manifest xmlns:android="http://schemas.android.com/apk/res/android" package="com.example.h5application"> <application android:name=".MyApplication" android:allowBackup="true" android:icon="@mipmap/ic_launcher" android:label="@string/app_name" android:roundIcon="@mipmap/ic_launcher_round" android:supportsRtl="true" android:theme="@style/AppTheme"> <activity android:name=".MainActivity"> <intent-filter> <action android:name="android.intent.action.MAIN" /> <category android:name="android.intent.category.LAUNCHER" /> </intent-filter> </activity> </application> </manifest> -
In the
activity_main.xmlfile, set the button style and change its ID tostart_url_btn.<?xml version="1.0" encoding="utf-8"?> <androidx.constraintlayout.widget.ConstraintLayout xmlns:android="http://schemas.android.com/apk/res/android" xmlns:app="http://schemas.android.com/apk/res-auto" xmlns:tools="http://schemas.android.com/tools" android:layout_width="match_parent" android:layout_height="match_parent" tools:context=".MainActivity"> <Button android:id="@+id/start_url_btn" android:layout_width="match_parent" android:layout_height="wrap_content" android:layout_marginTop="40dp" android:background="#108EE9" android:gravity="center" android:text="Start an online page" android:textColor="#ffffff" app:layout_constraintEnd_toEndOf="parent" app:layout_constraintHorizontal_bias="0.0" app:layout_constraintStart_toStartOf="parent" app:layout_constraintTop_toTopOf="parent" /> </androidx.constraintlayout.widget.ConstraintLayout> -
In the
MainActivityclass, override the button's click event to open the official Ant Group Technology website. The code is as follows:findViewById(R.id.start_url_btn).setOnClickListener(new View.OnClickListener(){ @Override public void onClick(View v) { MPNebula.startUrl("https://tech.antfin.com/"); } }); -
In the main project module's
build.gradle(:app)file, add the following configuration: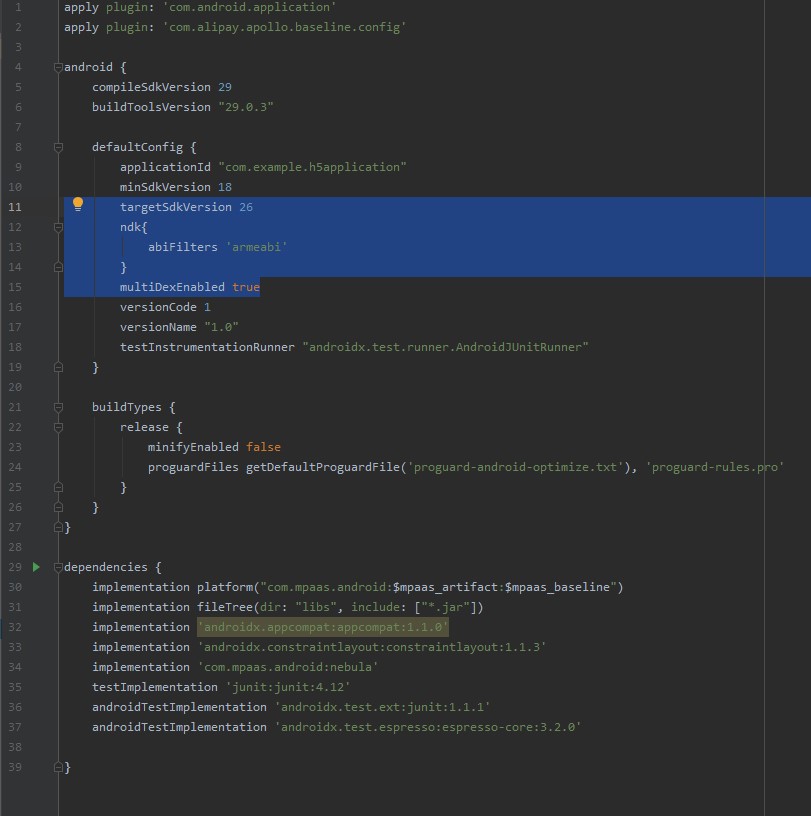
-
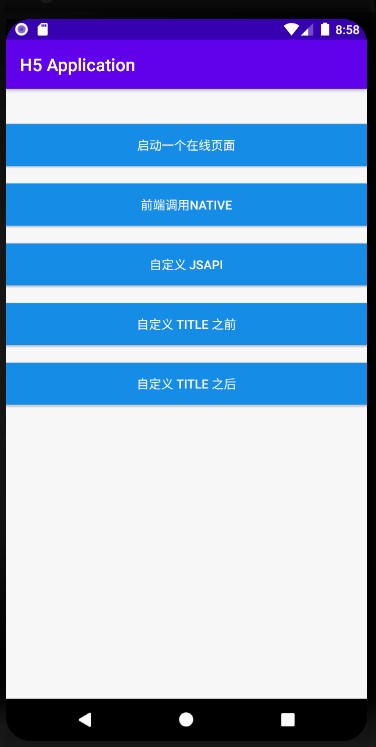
Compile the project and install the application on your phone. After you open the application, the interface appears as follows:
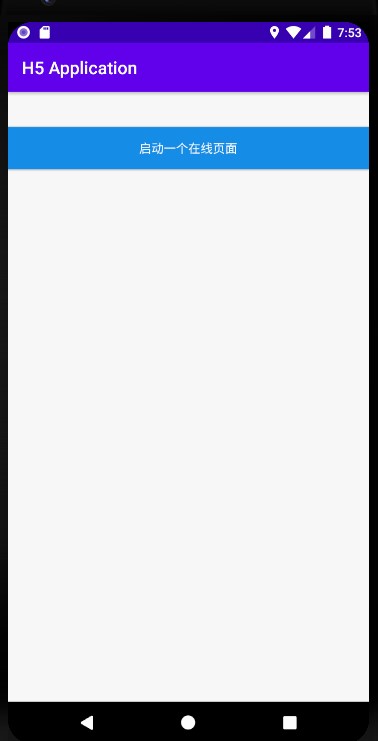
-
Click the button to open the Ant Group Technology homepage within the application, confirming that the API call was successful.

Call native APIs from the frontend
-
The Nebula container provides a bridge for frontend pages to communicate with native code through JSAPIs. It includes built-in JSAPI capabilities that you can call directly from your H5 page using
AlipayJSBridge.call:AlipayJSBridge.call('alert', { title: 'Native Alert Dialog', message: 'This is a native Alert Dialog', button: 'OK' }, function (e) { alert("The button was clicked."); });NoteThe URL
https://mcube-prod.oss-cn-hangzhou.aliyuncs.com/570DA89281533-default/20200121/0.0.0.8_all/nebula/fallback/mPaaSComponentTestWebview.htmlpoints to a pre-written frontend page. You can open this page to try the feature of calling native APIs from the frontend. -
In the
activity_main.xmlfile, add a button. Set the button ID toh5_to_native_btn.<Button android:id="@+id/h5_to_native_btn" android:layout_width="match_parent" android:layout_height="wrap_content" android:layout_marginTop="20dp" android:background="#108EE9" android:gravity="center" android:text="Frontend Calls Native" android:textColor="#ffffff" app:layout_constraintEnd_toEndOf="parent" app:layout_constraintHorizontal_bias="0.0" app:layout_constraintStart_toStartOf="parent" app:layout_constraintTop_toBottomOf="@+id/start_url_btn" /> -
In the
MainActivityclass, define the click behavior for theh5_to_native_btnbutton to open the frontend page. The code is as follows:findViewById(R.id.h5_to_native_btn).setOnClickListener(new View.OnClickListener() { @Override public void onClick(View v) { MPNebula.startUrl("https://mcube-prod.oss-cn-hangzhou.aliyuncs.com/570DA89281533-default/80000000/1.0.XX.XX_all/nebula/fallback/h5_to_native.html"); } }); -
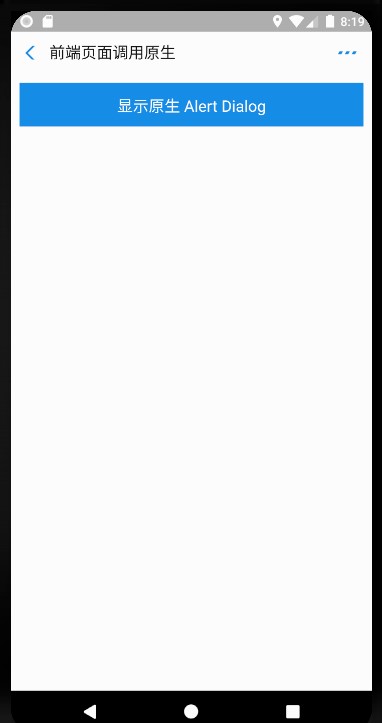
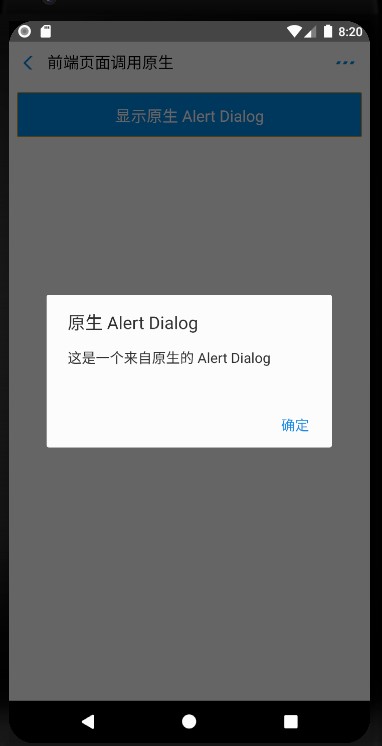
Compile the project and install the application on your phone. After you open the application, the interface appears as follows:
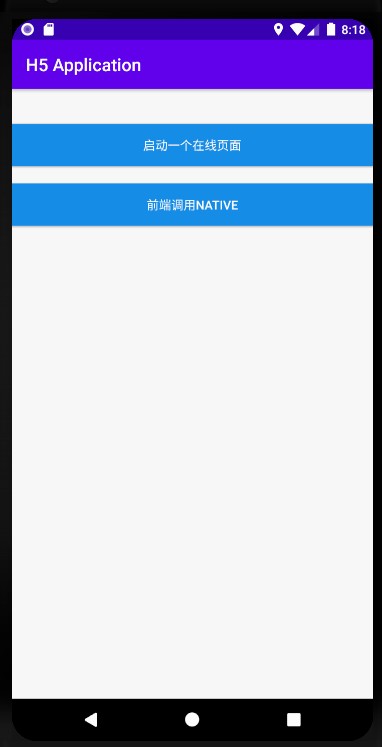
-
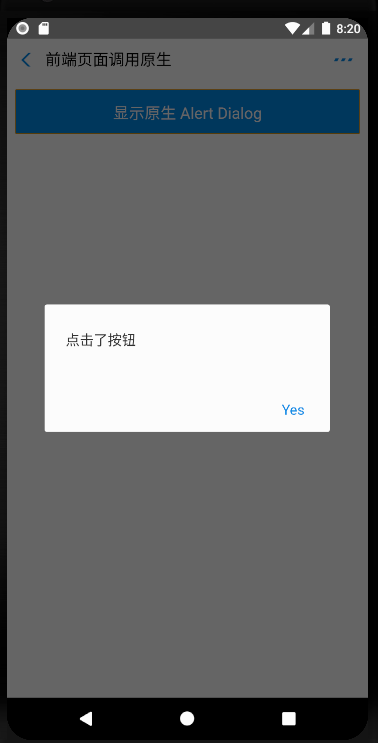
Click the button to open the frontend page, and then click Show Native Alert Dialog. A native alert dialog appears with the title Native Alert Dialog and the message This is a native Alert Dialog. Click OK. Another alert dialog appears with the content The button was clicked, confirming a successful native API call from the frontend.

Call custom JSAPIs from the frontend
-
Create a custom class named
MyJSApiPluginto define the custom JSAPI.package com.example.h5application; import com.alibaba.fastjson.JSONObject; import com.alipay.mobile.h5container.api.H5BridgeContext; import com.alipay.mobile.h5container.api.H5Event; import com.alipay.mobile.h5container.api.H5EventFilter; import com.alipay.mobile.h5container.api.H5SimplePlugin; public class MyJSApiPlugin extends H5SimplePlugin { private static final String API = "myapi"; @Override public void onPrepare(H5EventFilter filter) { super.onPrepare(filter); filter.addAction(API); } @Override public boolean handleEvent(H5Event event, H5BridgeContext context) { String action = event.getAction(); if (API.equalsIgnoreCase(action)) { JSONObject params = event.getParam(); String param1 = params.getString("param1"); String param2 = params.getString("param2"); JSONObject result = new JSONObject(); result.put("success", true); result.put("message", API + " with " + param1 + "," + param2 + " was handled by native."); context.sendBridgeResult(result); return true; } return false; } } -
Register the custom JSAPI
MyJSApiPluginin the project. The JSAPI is registered when the application starts. In this example, it is registered inMyApplication.public class MyApplication extends Application { @Override protected void attachBaseContext(Context base) { super.attachBaseContext(base); // Check if this is the main process. Initialize only in the main process. QuinoxlessFramework.setup(this, new IInitCallback() { @Override public void onPostInit() { // Start using mPaaS features here. // Call registerCustomJsapi() to register the custom JSAPI. registerCustomJsapi(); } }); } @Override public void onCreate() { super.onCreate(); QuinoxlessFramework.init(); } private void registerCustomJsapi(){ MPNebula.registerH5Plugin( // The class name of the plugin MyJSApiPlugin.class.getName(), // Leave it empty "", // For the applicable scope, enter "page" "page", // The name of the registered JSAPI new String[]{"myapi"}); } } -
Call the custom JSAPI from the frontend page. The following code shows an example:
AlipayJSBridge.call('myapi', { param1: 'JsParam1', param2: 'JsParam2' }, function (result) { alert(JSON.stringify(result)); });NoteThe URL
https://mcube-prod.oss-cn-hangzhou.aliyuncs.com/570DA89281533-default/80000001/1.0.XX.XX_all/nebula/fallback/custom_jsapi.htmlpoints to a pre-written frontend page. You can open this page to test the feature of calling a custom JSAPI from the frontend. -
In the
activity_main.xmlfile, add a button and set its ID tocustom_jsapi_btn.<Button android:id="@+id/custom_jsapi_btn" android:layout_width="match_parent" android:layout_height="wrap_content" android:layout_marginTop="20dp" android:background="#108EE9" android:gravity="center" android:text="Custom JSAPI" android:textColor="#ffffff" app:layout_constraintEnd_toEndOf="parent" app:layout_constraintHorizontal_bias="1.0" app:layout_constraintStart_toStartOf="parent" app:layout_constraintTop_toBottomOf="@+id/h5_to_native_btn" /> -
In the
MainActivityclass, define the click behavior for thecustom_jsapi_btnbutton to call the custom JSAPI from the frontend. The following code shows an example:findViewById(R.id.custom_jsapi_btn).setOnClickListener(new View.OnClickListener() { @Override public void onClick(View v) { MPNebula.startUrl("https://mcube-prod.oss-cn-hangzhou.aliyuncs.com/570DA89281533-default/80000001/1.0.XX.XX_all/nebula/fallback/custom_jsapi.html"); } }); -
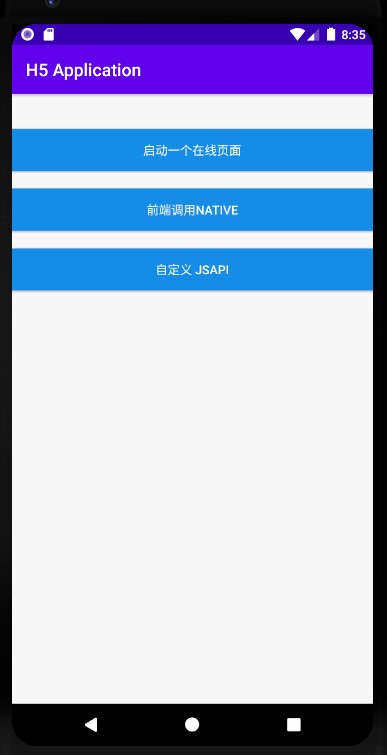
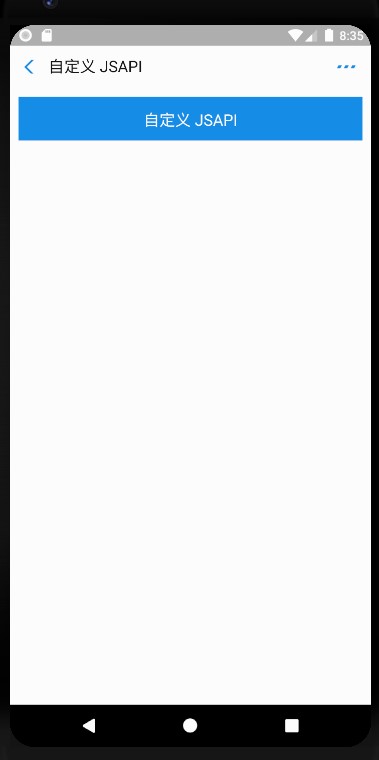
Compile the project and install the application on your phone. After you open the application, the interface appears as shown in the following figure:
-
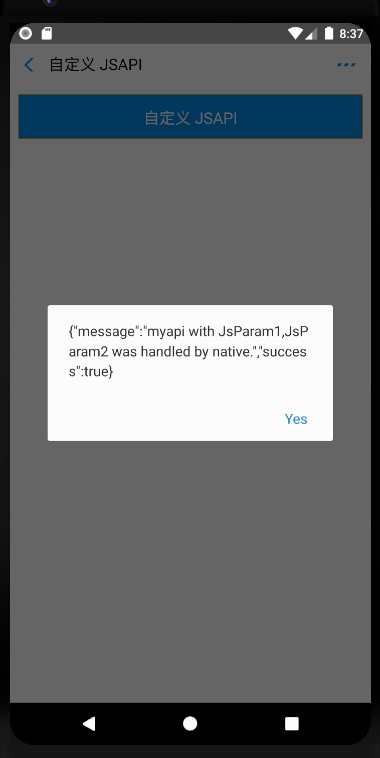
Click the button to open the frontend page, and then click Custom JSAPI. An alert dialog appears showing the parameters passed from the frontend, processed by the custom API handler.
Customize the title bar of an H5 page
The H5 container supports custom title bars. You can inherit the default title bar MpaasDefaultH5TitleView provided by mPaaS and override its methods, or implement H5TitleView directly. This tutorial uses MpaasDefaultH5TitleView.
-
Create an
H5ViewProviderimplementation class. In thecreateTitleViewmethod, return your customH5TitleView.package com.example.h5application; import android.content.Context; import android.view.ViewGroup; import com.alipay.mobile.nebula.provider.H5ViewProvider; import com.alipay.mobile.nebula.view.H5NavMenuView; import com.alipay.mobile.nebula.view.H5PullHeaderView; import com.alipay.mobile.nebula.view.H5TitleView; import com.alipay.mobile.nebula.view.H5WebContentView; import com.mpaas.nebula.adapter.view.MpaasDefaultH5TitleView; public class H5ViewProviderImpl implements H5ViewProvider { @Override public H5TitleView createTitleView(Context context) { return new MpaasDefaultH5TitleView(context); } @Override public H5NavMenuView createNavMenu() { return null; } @Override public H5PullHeaderView createPullHeaderView(Context context, ViewGroup viewGroup) { return null; } @Override public H5WebContentView createWebContentView(Context context) { return null; } } -
In the
activity_main.xmlfile, add a button and set itsbutton idtocustom_title_btn.<Button android:id="@+id/custom_title_btn_before" android:layout_width="match_parent" android:layout_height="wrap_content" android:layout_marginTop="20dp" android:background="#108EE9" android:gravity="center" android:text="Before Custom Title" android:textColor="#ffffff" app:layout_constraintEnd_toEndOf="parent" app:layout_constraintStart_toStartOf="parent" app:layout_constraintTop_toBottomOf="@+id/custom_jsapi_btn" /> <Button android:id="@+id/custom_title_btn_after" android:layout_width="match_parent" android:layout_height="wrap_content" android:layout_marginTop="20dp" android:background="#108EE9" android:gravity="center" android:text="After Custom Title" android:textColor="#ffffff" app:layout_constraintEnd_toEndOf="parent" app:layout_constraintHorizontal_bias="0.0" app:layout_constraintStart_toStartOf="parent" app:layout_constraintTop_toBottomOf="@+id/custom_title_btn_before" /> -
In the
MainActivityclass, define the click behavior for thecustom_title_btnbutton to set a custom View Provider for the container and open an online webpage:findViewById(R.id.custom_title_btn_before).setOnClickListener(new View.OnClickListener() { @Override public void onClick(View v) { MPNebula.startUrl("https://www.cloud.alipay.com/docs/2/49549"); } }); findViewById(R.id.custom_title_btn_after).setOnClickListener(new View.OnClickListener() { @Override public void onClick(View v) { // Set the custom title. You only need to set it once. MPNebula.setCustomViewProvider(new H5ViewProviderImpl()); // Start any URL. The title is already changed. MPNebula.startUrl("https://www.cloud.alipay.com/docs/2/49549"); } }); -
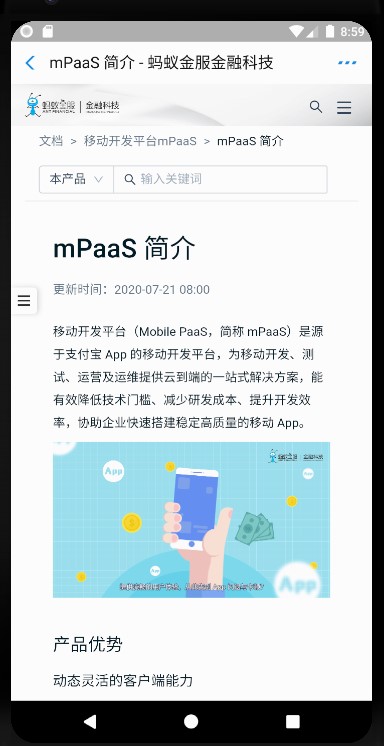
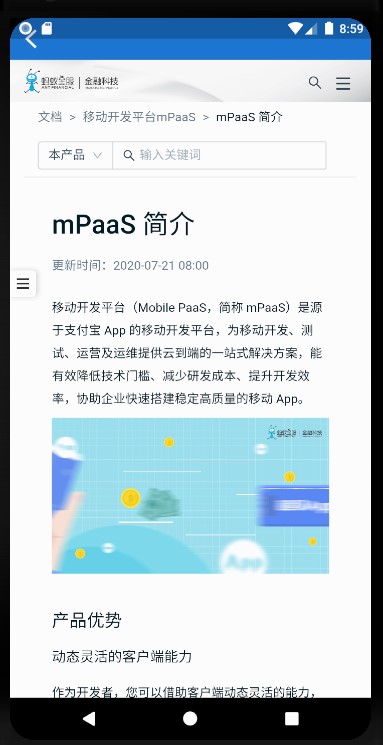
Compile the project and install the application on your phone. After you open the application, the following interface is displayed:
-
Click Before Custom TITLE and After Custom TITLE. Both buttons open the same online webpage, but with different title bar background and font colors.
-
Before customizing the title bar
-
After customizing the title bar
-