This topic describes how to use the real-device preview and debugging features for miniapps. The process includes the following six steps:
This feature is supported only in mPaaS 10.1.60 and later versions.
Procedure
Configure the debug path for the miniapp
Open the miniapp IDE configuration file that you downloaded from the mPaaS console. The following example shows a configuration file for a public cloud environment:
{
 "login_url":"https://mpaas-mappcenter.aliyuncs.com/ide/login",
 "uuid_url":"http://cn-hangzhou-mproxy.cloud.alipay.com/switch/uuid",
 "debug_url":"wss://cn-hangzhou-mproxy.cloud.alipay.com",
 "appId":"ONEX0D29541291400",
 "sign":"674f12adf7205358108839eb79f8a487",
 "tenantId":"AUDQKVYH",
 "upload_url":"https://mpaas-mappcenter.aliyuncs.com/ide/mappcenter/mds",
 "applist_url":"https://mpaas-mappcenter.aliyuncs.com/ide/mappcenter/mds/miniProgram/getAppListByApi",
 "workspaceId":"default"
}
Obtain the value of
debug_urlfrom the configuration file. For example:wss://cn-hangzhou-mproxy.cloud.alipay.comIn your Android project, open the
custom_config.jsonfile in the assets > config directory.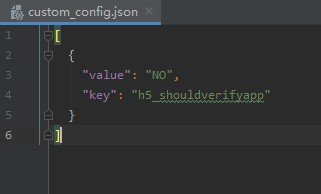
For this value, "NO" disables miniapp signature verification, and "YES" enables it. If you do not specify a value, "YES" is used by default. You can disable signature verification for quick integration during development and debugging. Before you publish the application, you must enable signature verification. For more information about how to configure miniapp package signature verification, see Configure a miniapp package.
Append
/host/to the value ofdebug_urland add the result to thecustom_config.jsonfile. The following example shows the result: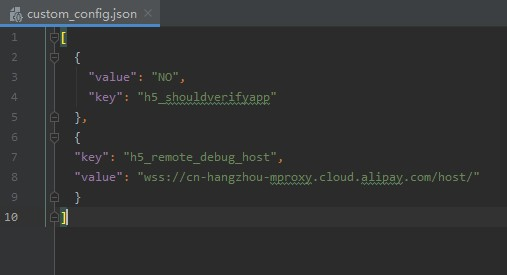
Set the VHost and user whitelist for the miniapp
Open the
MyApplicationclass and add the following code to the mPaaS initialization callback. This code sets the virtual domain name for the miniapp by calling `tinyHelper.setTinyAppVHost` before the application or the miniapp starts. The `VHost` value must be consistent with the Virtual Domain Name specified in the mPaaS console under Mini Program > Mini Program Publishing > Configuration Management > Domain Name Management.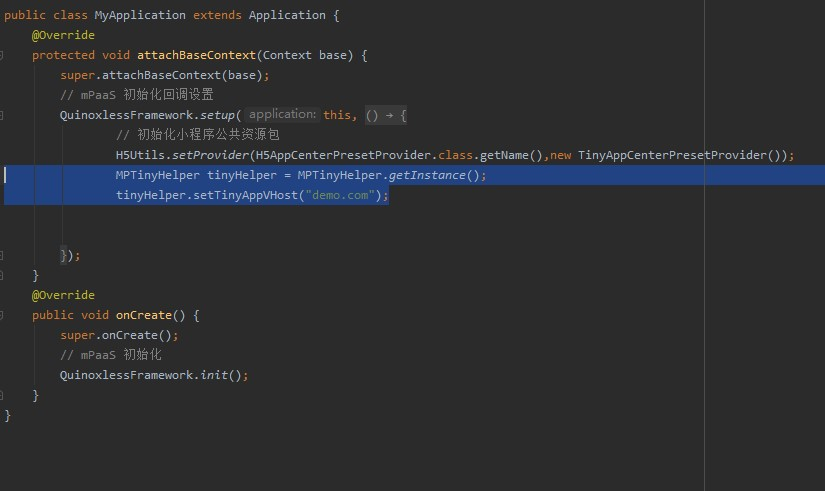
Open the miniapp developer tools. Click the mPaaS Toolbox icon (
 ), and then choose Settings > Whitelist Settings. Add users to the whitelist and click OK. A message appears indicating that the whitelist was modified successfully.
Open the
MyApplicationclass and add the following code to the mPaaS init callback to set the whitelisted user IDs.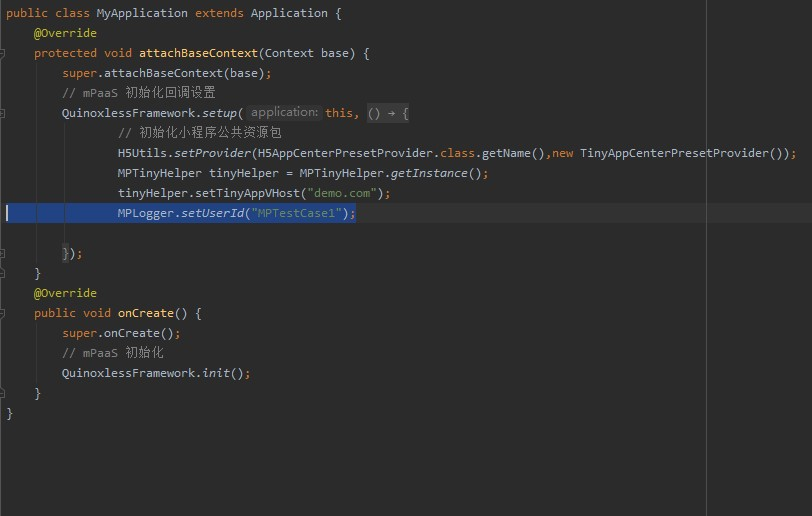
Add the miniapp QR code scanning component
In the Android Studio menu bar, choose mPaaS > Native AAR Integration.
Under Configure/Update Components, click Start Configuration.
Select the Miniapp QR Code Scanning component and click OK.
Implement the real-device preview and debugging features for the miniapp
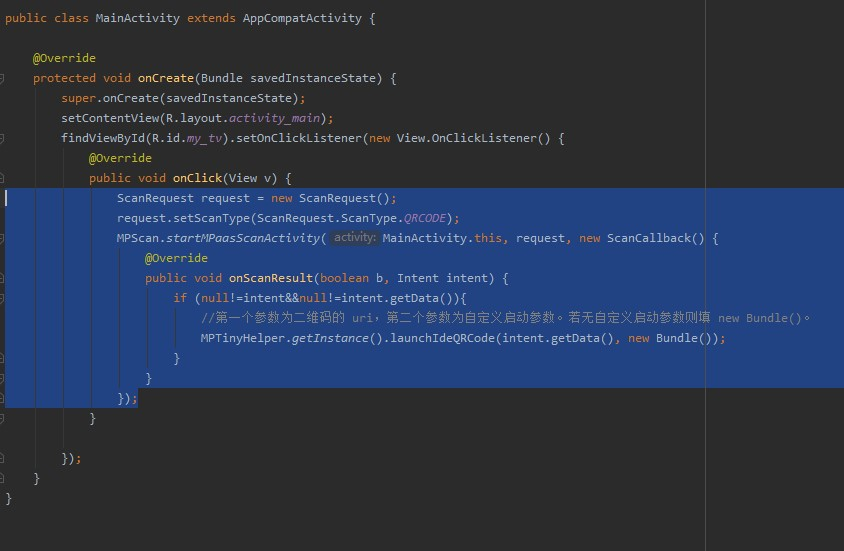
In
MainActivity, add a click event toTestViewto start the miniapp QR code scanning and preview feature.
Click
to run the program on a real device.Click Hello World! to start the QR code scanning feature.
In the dialog box that appears, click Always allow.
 to run the program on a real device.
Use the miniapp preview feature
In the miniapp developer tools navigation bar, click Preview. A QR code is generated.
Use the QR code scanning feature on your real device to scan the QR code. The miniapp then runs on your mobile phone.
Use the miniapp real-device debugging feature
In the miniapp developer tools navigation bar, click Real-device Debugging. A QR code is generated.
Use the QR code scanning feature on your real device to scan the QR code. A message appears on your mobile phone indicating that remote debugging is connected. You can then enter debugging mode.