This topic describes the product workflow and provides links to related content.
Product Usage Flow
The following figure shows the workflow for using EMAS: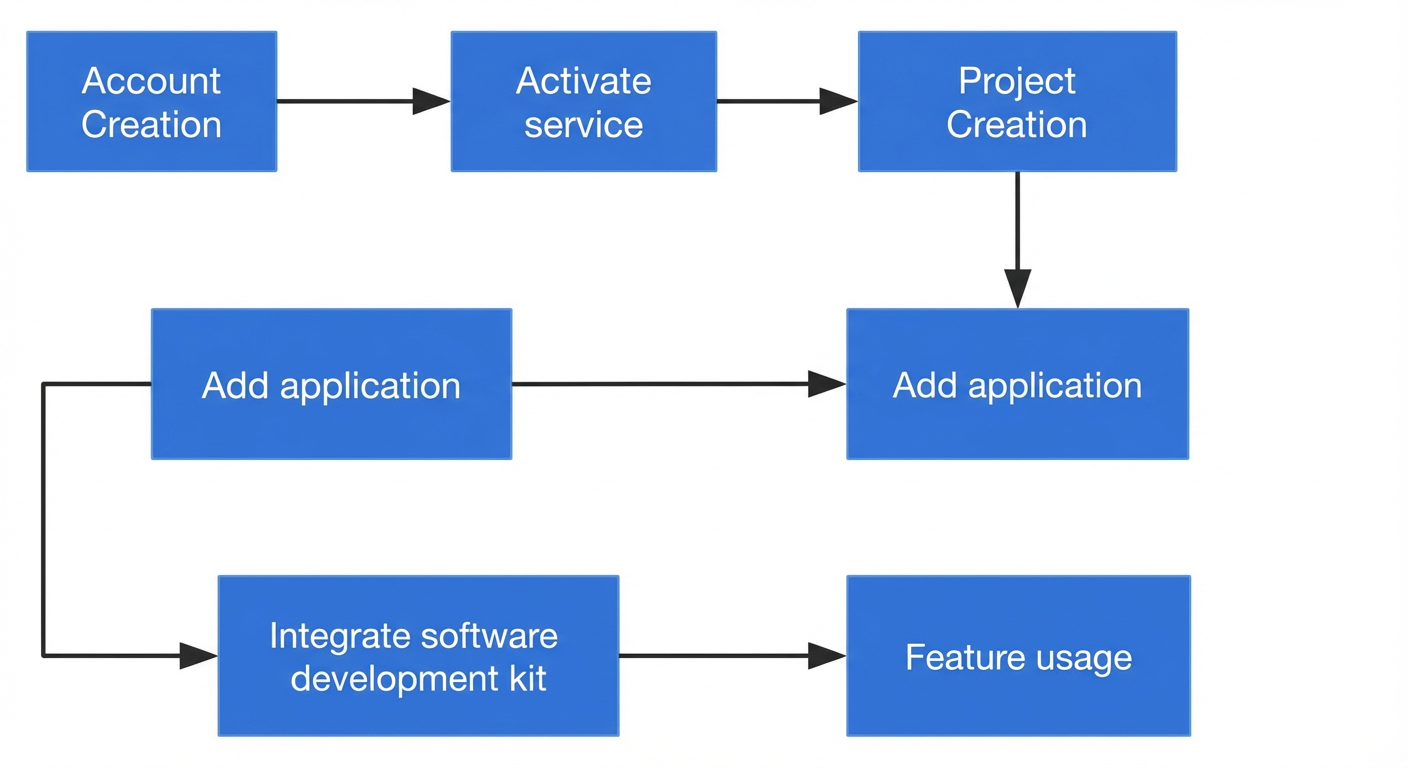
Create an account
Create an Alibaba Cloud account and complete the registration process. For more information, see Create an Alibaba Cloud Account.
Activate the service
Log on to the Alibaba Cloud Management Console.
Hover over the
 icon in the upper-left corner to open the list of products and services under Products & Services.
In the product list, choose Enterprise Cloud Services > Multiexperience Development Platform to open the product details page.
On the product details page, select the Terms of Service checkbox and click Activate Now.
HTTPDNS: After you activate the service, you can integrate the SDK directly, without creating a project or an application.
Serverless: To start using the service, create a project. You do not need to add an application or integrate an SDK.
Cloud Build: To start using the service, create a project and add an application. You do not need to integrate an SDK.
Application Monitoring, Mobile Push, Cloud Release, Mobile Hotfix, and Mobile Feedback: You must first create a project and add an application. Then, you must integrate the SDK before you can use these services.
Create a project
After you activate the product, go to the Multiexperience Development Platform EMAS console.
On the Project Management page, click Create Project. The Create Project panel opens on the right.
In the Create Project panel, enter the basic project information.
Option
Description
Project Name
Required. The name of the project.
Value range: 1 to 30 characters.
Character type: Chinese characters, uppercase or lowercase English letters, digits, or underscores.
Project Description
Optional. A brief description of the project's purpose.
Click Create and Enter to save the project and navigate to the application list page.
The application list page displays the applications in the current project and lets you Add Application or Integrate SDK.
Add an application
To use the features of the EMAS platform, you must create an application in the EMAS console. This application is a mapping of your client application on the EMAS platform. After you create the application, you must integrate the EMAS SDK into your client application to ensure they are correctly associated.
On the Application List page, click Add Application Now. The Add Application panel opens.
In the Add Application panel, select an Application Type and enter the basic application information.
-
Option
Description
Application Name
The name of the application.
Value range: 1 to 26 characters.
Character type: Chinese characters, uppercase or lowercase English letters, or digits.
Application Type
Includes Native and H5. Select a type as needed.
Select Platform
Includes Android, iOS, and HarmonyOS. Select the platform for your application.
PackageName
This option appears when you set Select Platform to Android. Enter the package name of the application.
BundleId
This option appears when you set Select Platform to iOS. Enter the Bundle ID of the application.
BundleName
This option appears when you set Select Platform to HarmonyOS. Enter the bundle name of the application.
Application Category
The category of the application, such as Social, Photo & Video, or Entertainment. Select a category based on your needs.
After completing the configuration, click Add Application to create the application.
ImportantAn Alibaba Cloud account supports a maximum of 45 applications. Exceeding this limit may incur additional charges. Please manage your application quota carefully.
After the application is added, a dialog box appears:
If you only want to add the application, click Later to skip SDK integration for now. To complete the integration later, see Integrate the SDK.
To use the related services, click Integrate Now. For detailed steps, see Integrate the SDK.
Application management (Optional)
Get application information
In the console, you can view and copy the application's basic information, such as the AppKey, AppSecret, and RSA key. This information is required for SDK integration. For detailed integration steps, see Integrate the SDK.
Log on to the Multiexperience Development Platform EMAS console, and navigate to the application list page for the relevant project.
On the Application List page, select the application. In the Basic Information section, click the copy buttons to obtain the information.
Delete an application
If you no longer need an application, navigate to the application list page for the project that contains the application.
On the Application List page, select the application to delete, and then click Delete Application.
Modify an application
Navigate to the application list page for the project that contains the application.
On the Application List page, select the application that you want to modify. Change the name, package name, or category, and then click Save.
Integrate the SDK
Go to SDK List:
After you create a new application, click Integrate Now in the dialog box to go to the SDK List page.
For products that do not require you to create a project and an application, or if you have an existing project and application:
In the Management Console, click Integrate SDK to open the SDK List page.
Alternatively, you can go to the project, select the application, and click Integrate SDK to open the SDK List page.
On the SDK List page, click Integration Document for the corresponding product to view the integration guide. EMAS supports two integration methods: remote dependency (using Maven, CocoaPods, or Ohpm) and local dependency.
NoteUse Maven, CocoaPods, or Ohpm to manage dependencies instead of downloading the SDK. Click Integration Document and follow the steps to add the dependency.
If you choose the local dependency method, click Integration Document in the corresponding module. In the document, click Download SDK at the bottom of the page to download the SDK package and follow the integration instructions.
Cloud Build and EMAS Serverless do not require SDK integration.
HTTPDNS
Connection Type
Integration Document
SDK Integration
HTTP API Integration
DoH Integration
Application Monitoring
Connection Type
Integration Document
SDK Integration
Mobile Push
Connection Type
Integration Document
SDK Integration
Cloud Release
Connection Type
Integration Document
SDK Integration
WindVane
Mobile Hotfix
Connection Type
Integration Document
SDK Integration
Mobile Feedback
Connection Type
Integration Document
SDK Integration
Use features
The following table lists the use cases and documentation links for each product.
Product |
Documentation Link |
Applicable Scope |
HTTPDNS |
Native application/H5 application |
|
Application Monitoring |
Native application |
|
Mobile Push |
Native application |
|
Cloud Build |
Native application/H5 application |
|
Cloud Release |
Native application/H5 application |
|
Mobile Hotfix |
Native application |
|
EMAS Serverless |
Native application/H5 application |
|
Web/H5 Monitoring |
H5 application |
|
Mobile Feedback |
Native application |