The Android Nebula Mini Program is being phased out. Migrate to the new miniapp container: Getting Started.
If you use the Nebula Mini Program, you must migrate to the new miniapp container to continue receiving our services. Thank you for your support.
The new miniapp container is fully upgraded. It provides more features, such as base libraries 2.0, a debug panel, and plugins. It is also compatible with the new version of the mPaaS Web kernel.
This topic describes how to get started with mini programs using the official mini program demo.
Currently, mini programs support the Native AAR and Component-based (Portal & Bundle) connection types. For more information, see Introduction to connection types.
Mini programs are supported only in baselines 10.1.60 and later.
If you have questions about the integration, you can join the DingTalk group by searching for the ID 145930007362. The mPaaS public cloud Q&A assistant is available in this DingTalk group to answer common integration questions. For more information about using the public cloud Q&A assistant, see Public cloud Q&A assistant.
Prerequisites
Native AAR
Complete the steps in Add mPaaS to your project.
Add the mini program dependency. In your project, install the Mini program component using Component Management (AAR).
Component-based (Portal & Bundle)
Complete the steps in Component-based integration process.
Add the mini program dependency. In the Portal and Bundle projects, install the Mini program component using Component Management. For more information, see Manage component dependencies > Add or remove component dependencies.
Integration steps
The integration steps for a mini program are as follows:
1. Initialize configurations
1.1 Initialize mPaaS
If you use the Native AAR connection type, you must initialize mPaaS.
Add the following code to the `Application` class:
public class MyApplication extends Application {

    @Override
    public void onCreate() {
        super.onCreate();

        MP.init(this,
            MPInitParam.obtain().setCallback(new MPInitParam.MPCallback() {
                @Override
                public void onInit() {
                    // Initialize the mini program public resource package
                    H5Utils.setProvider(H5AppCenterPresetProvider.class.getName(),new TinyAppCenterPresetProvider());
                }
            })
        );
    }

}
For more information, see Initialize mPaaS.
In the onPostInit method from the code above, the public resource package is configured as follows:
H5Utils.setProvider(H5AppCenterPresetProvider.class.getName(),new TinyAppCenterPresetProvider());If the TinyAppCenterPresetProvider class cannot be found, your baseline version may be earlier than 10.1.68.7. For more information, see Mini program base libraries.
1.2 Configure mini program signature verification
In the assets/config path of your Android project, create a custom_config.json file and add the following content:
[
  {
    "value": "NO",
      "key": "h5_shouldverifyapp"
  }
]
For the value parameter, NO disables miniapp signature verification. YES enables miniapp signature verification. If you do not specify a value, the default is YES. During the development and testing phase, you can disable signature verification for quick integration. Before you publish the application, we recommend that you enable signature verification. For instructions on how to configure signature verification for miniapp packages, see Configure a miniapp package.
Configure the request interval for mini program packages
mPaaS lets you configure the request interval for mini program packages. You can configure this interval globally or for a single package.
Global settings: You can add the following code to
custom_config.json:{ "value": "{\"config\":{\"al\":\"3\",\"pr\":{\"4\":\"86400\",\"common\":\"864000\"},\"ur\":\"1800\",\"fpr\":{\"common\":\"3888000\"}},\"switch\":\"yes\"}", "key": "h5_nbmngconfig" }The
\"ur\":\"1800\"parameter sets the global update interval in seconds. The default value is1800. You can modify this value to set the request interval for all mini program packages. The value can range from 0 to 86400, which corresponds to 0 to 24 hours. A value of 0 indicates that there is no limit on the request interval.ImportantDo not change other parameters.
Individual setting: This setting is configured for a single miniapp package. In the console, go to Add Mini Program Package > Extension Information and enter
{"asyncReqRate":"1800"}to set the request interval. For more information, see the Extension Information section in Create Mini Program Package.
To verify that the request interval configuration has taken effect, open a project that has the Mini Program integrated and filter the logcat logs for the H5BaseAppProvider keyword. If you see the following information, the configuration has taken effect.
lastUpdateTime: xxx updateRate: xxx1.3 Configure AndroidManifest
If you use the Native AAR connection type, add the following configuration to the `AndroidManifest.xml` file:
<application>
    ···
    <meta-data android:name="nebula.android.meta.enable" android:value="true"/>
  ···
</application>
1.4 Apply for the UC kernel
Before you can use a mini program, you must apply for and configure the UC kernel. The UC kernel is required for Android mini program integration. For more information, see the Apply for the UC kernel document.
Due to a change in product policy, public applications for a UC Key are not supported as of December 1, 2022.
Using the UC kernel enables same-layer rendering capabilities for mini programs, such as embedding a webview or a map. It also provides a better rendering experience.
2. Publish a mini program
Before you can start a mini program, you must first publish it in the mPaaS console.
2.1 Go to the mini program console
Log on to the mPaaS console. In your target application, navigate to Mini Program > Mini Program Release from the navigation pane on the left.
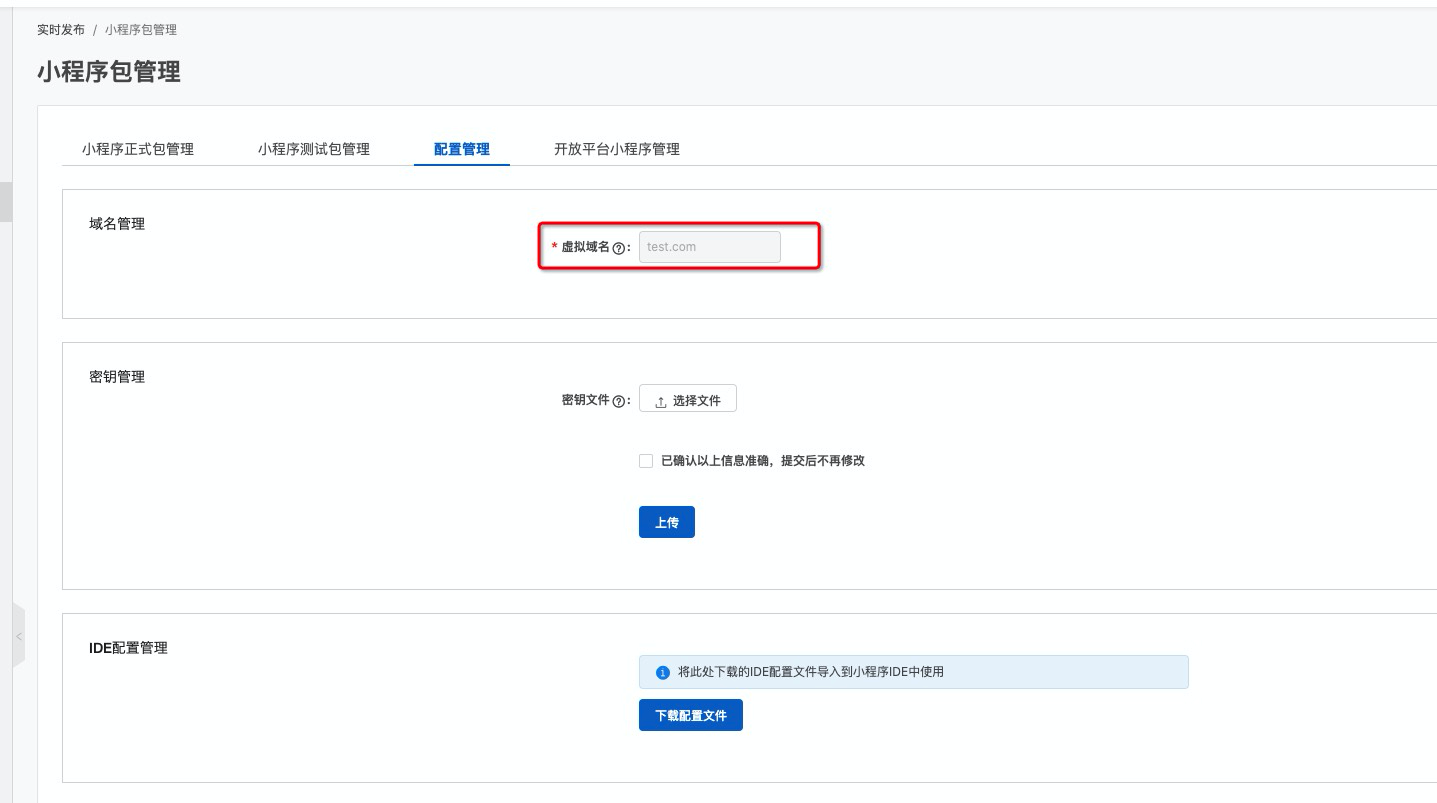
2.2 Configure a virtual domain name
If this is your first time using the service, you must first configure a virtual domain name in Mini Program > Mini Program Release > Configuration Management. You must use a second-level domain that is managed by your enterprise.
You must use a domain name that you have registered.
2.3 Create a mini program
In the mPaaS console, perform the following steps:
In the navigation pane on the left, click Mini Program > Mini Program Release.
On the mini program package list page that appears, click Create.
In the Create Mini Program window, enter the mini program ID and name, and then click Submit. The mini program ID is any 16-digit number, such as
2018080616290001.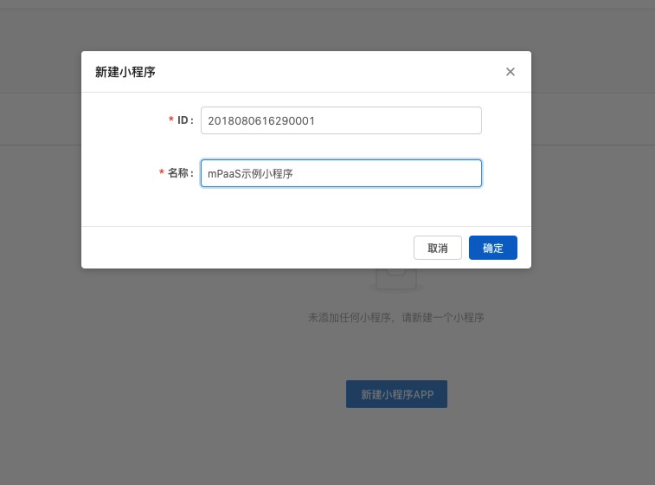
In the mini program app list, find the new mini program and click Add.
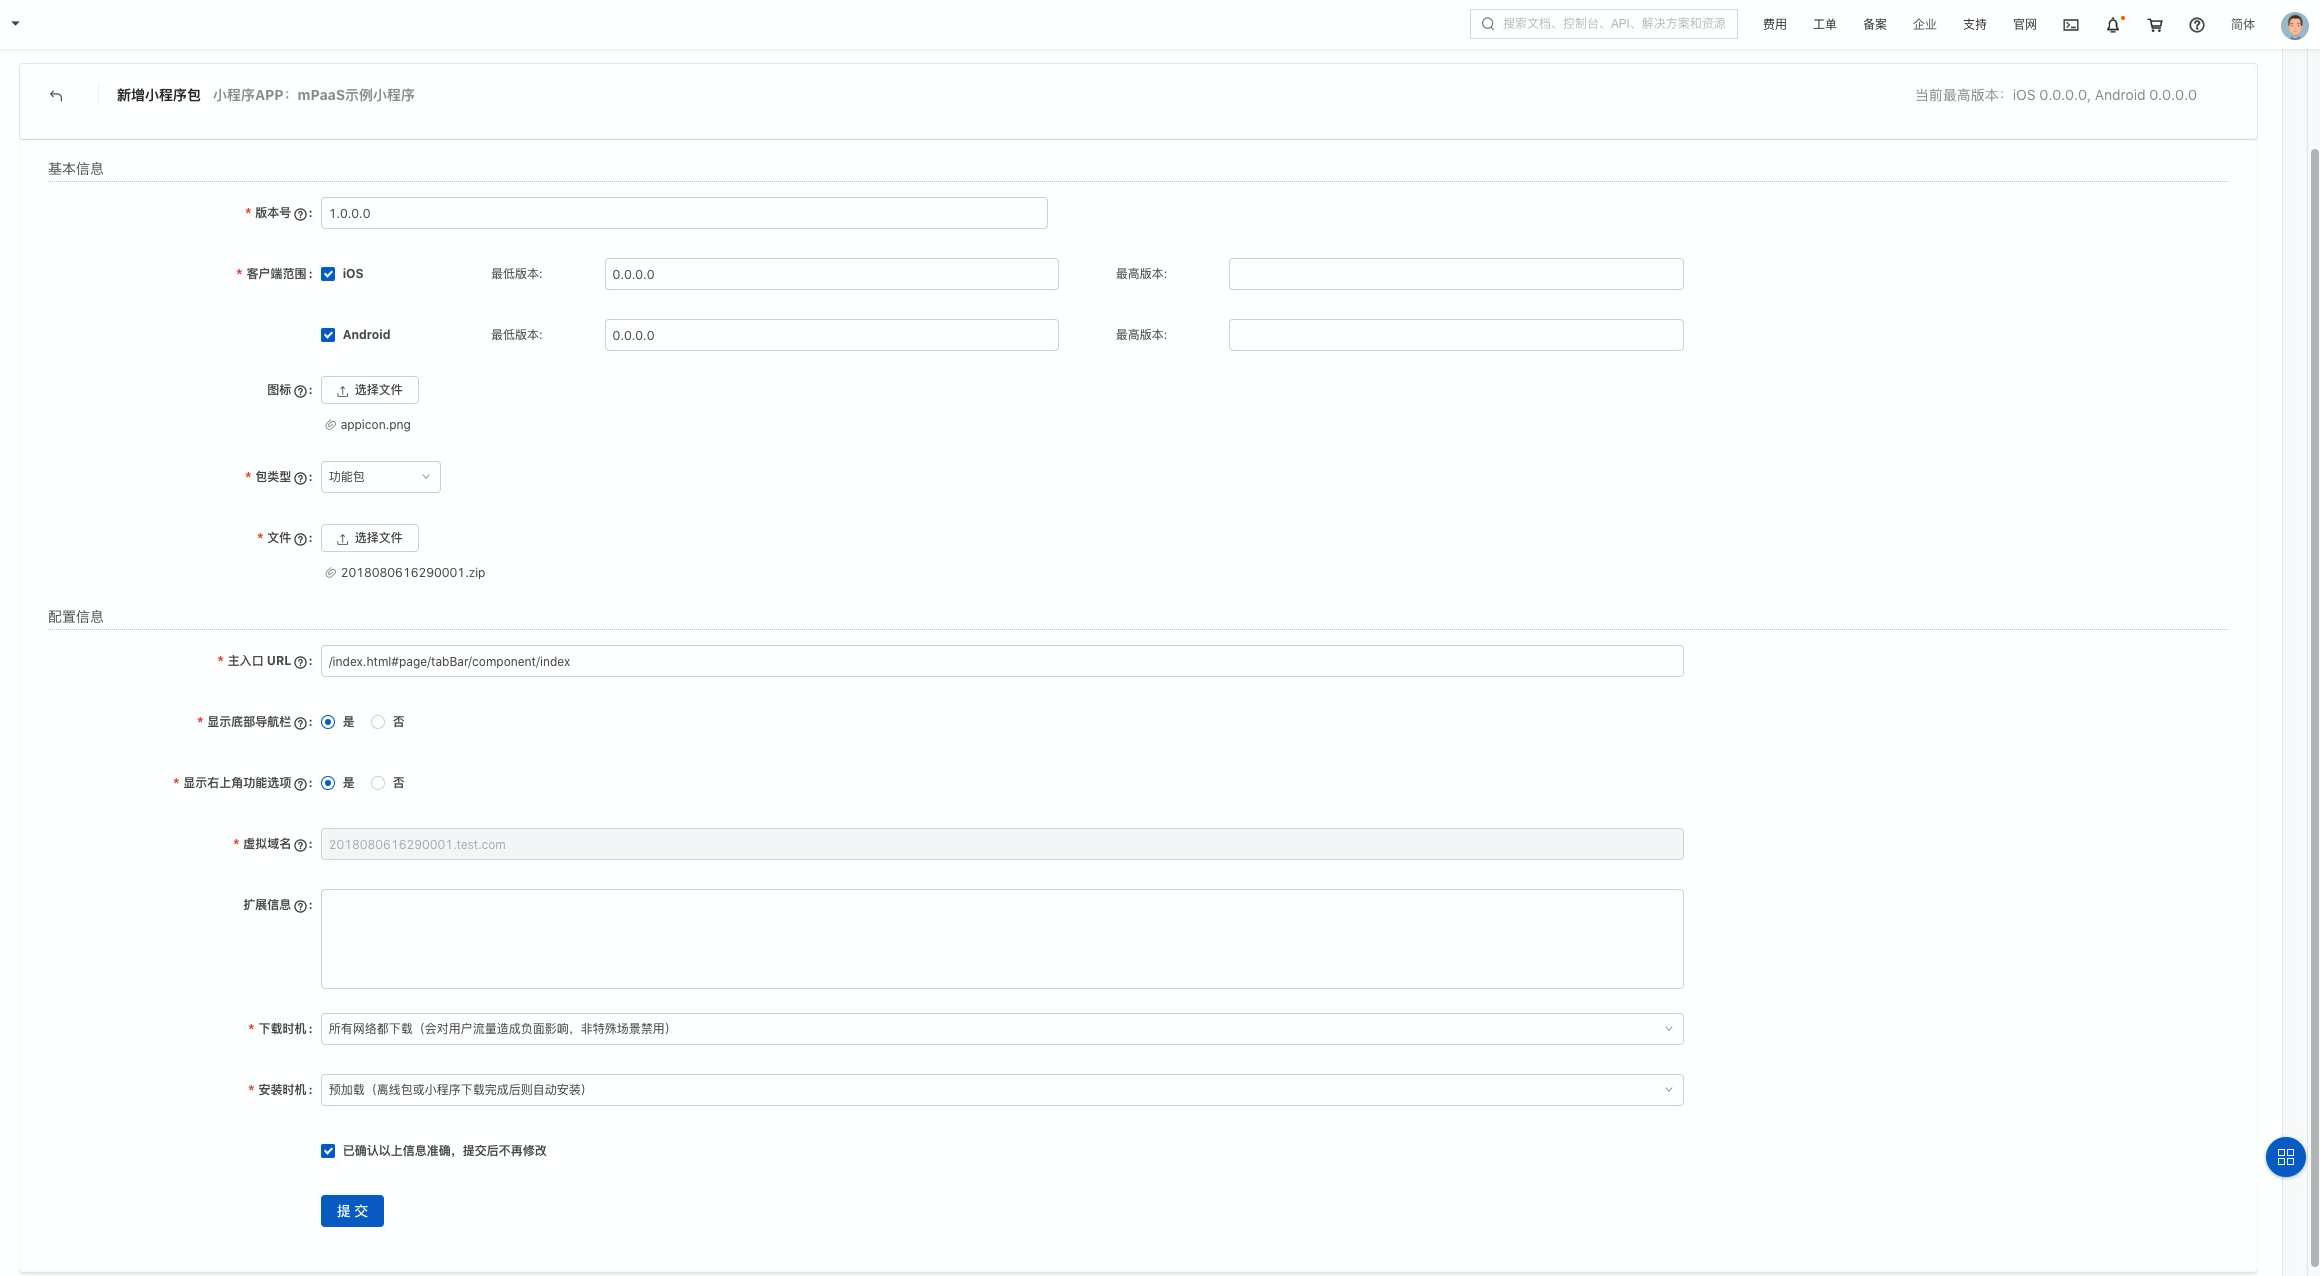
In the Basic Information section, complete the following configurations:
Version: Enter the version number of the mini program package, such as
1.0.0.0.Client Scope: Select the minimum and maximum versions of the Android client for the mini program app. Client apps within this version range can start the mini program. Otherwise, the mini program cannot be started. You can set the minimum version to
0.0.0and leave the maximum version empty. This means that all client versions can start this mini program.NoteMake sure to enter the Android client version, not the mini program version.
Icon: Click Select File to upload the icon for the mini program package. You must upload an icon when you create a mini program for the first time. The following is a sample icon:

File: Upload the mini program package resource file. The file format must be
.zip. An mPaaS sample mini program is available for download (click here to download). You can upload it directly.NoteBefore you upload, change the
.zipfile name of this sample mini program and the folder name inside the compressed package to the 16-digit ID of your mini program.
In the Configuration Information section, complete the following configurations:
Main Entry URL: Required. Specifies the homepage of the miniapp package. The URL must be in the format
/index.html#xxx/xxx/xxx/xxx, where thexxx/xxx/xxx/xxxpart after the#symbol is the first value in thepagesarray of the miniapp'sapp.jsonfile. For example, the main entry URL for the mPaaS sample miniapp is/index.html#page/tabBar/component/index.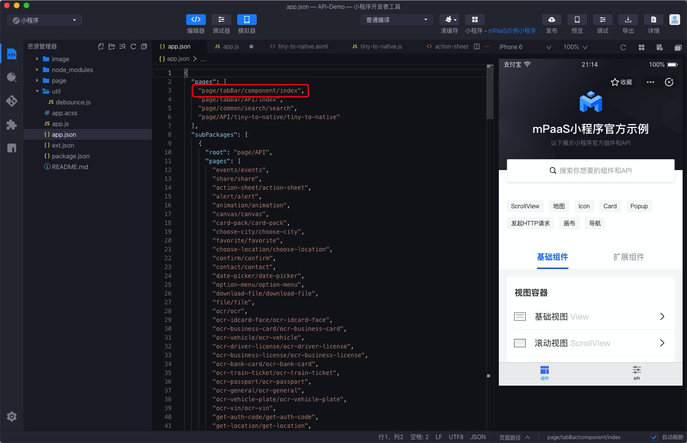
Keep the default settings for other configurations.
Select I have confirmed that the above information is accurate and will not be modified after submission.
Click Submit.
2.4 Publish the mini program
In the mPaaS console, perform the following steps:
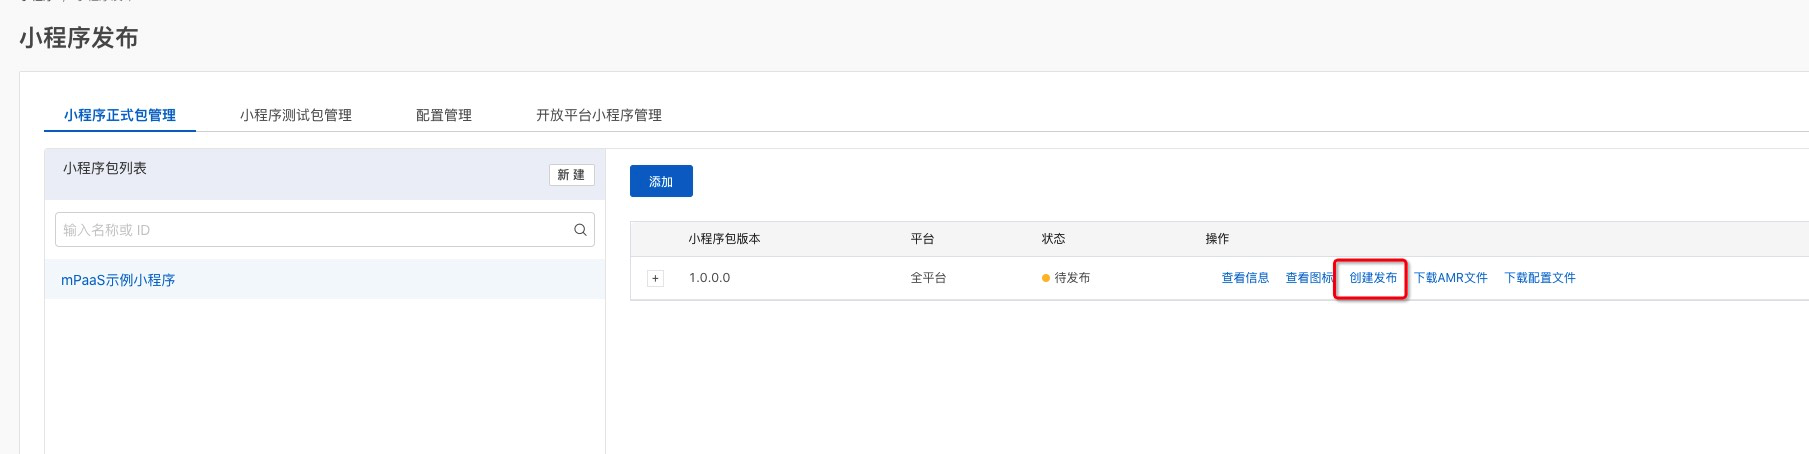
In the navigation pane on the left, click Mini Program > Mini Program Release > Official Mini Program Package Management.
On the mini program package list page that appears, select the mini program package and version that you want to publish, and then click Create Release.

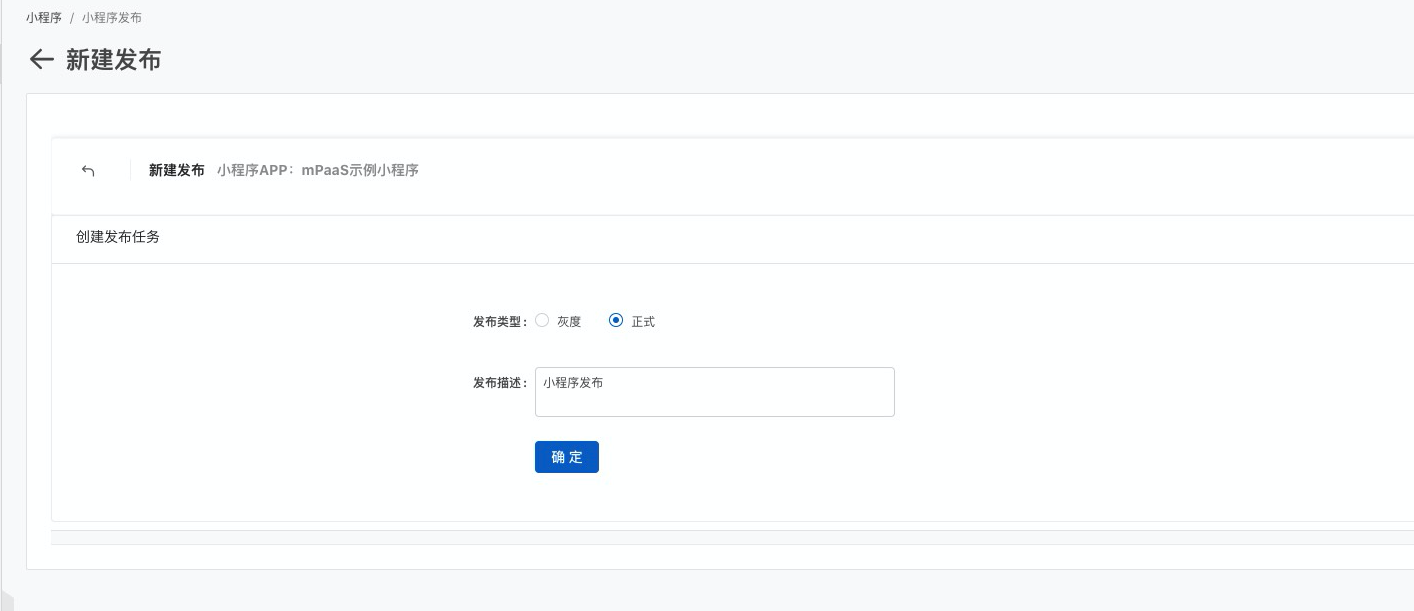
In the Create Release Task pane, complete the following configurations:
Release Type: Select the Official release type.
Release Description: Optional.
Click OK to create the release.
3. Start the mini program
After you complete the preceding steps, you can start the sample mini program in your Android project using the following code.
MPNebula.startApp("2018080616290001");The 2018080616290001 in the code is an example mini program ID. Replace this example ID with your actual mini program ID.