Creative Hub is a one-stop AI content creation and management platform integrated into the AI Website Builder product. It helps you efficiently generate, process, and manage various visual materials for your website, such as brand logos and promotional images. This simplifies the content creation process and improves website building efficiency.
Function overview
Core features
Feature module | Core value |
Material Management | Offers isolated material spaces and a recycle bin for unified and secure material storage and management. It integrates seamlessly with the website editor. |
Image Processing | Includes multiple AI tools, such as Logo Creation, AI Image Generation, and AI Image Editing. Quickly generate and edit high-quality images with simple text descriptions. |
Common scenarios
Initial website launch: Quickly design and generate a professional brand logo.
Content population: Create relevant promotional images for website banners and article illustrations using the AI Image Generation feature.
Material optimization: Modify existing images by replacing backgrounds, adjusting aspect ratios, or adding text to fit different page layouts.
Relationship with other products
Creative Hub is a core feature of AI Website Builder. You can access Creative Hub from the AI Website Builder console. You can seamlessly use materials created and managed in Creative Hub to build your website.
Billing
Generating content with AI consumes Inspiration Points. Inspiration Points are the resource quota for calling AI models in the Creative Mode of AI Website Builder.
Consumption scenario | Deduction rule | Inspiration Points consumed |
AI image generation | Per image | 20 |
For more information, see Inspiration Points explained.
Quick Start: Create a brand logo and promotional image for your website
The following example shows how to use Creative Hub to create a brand logo for your website, generate a product promotional image, and then manage these materials.
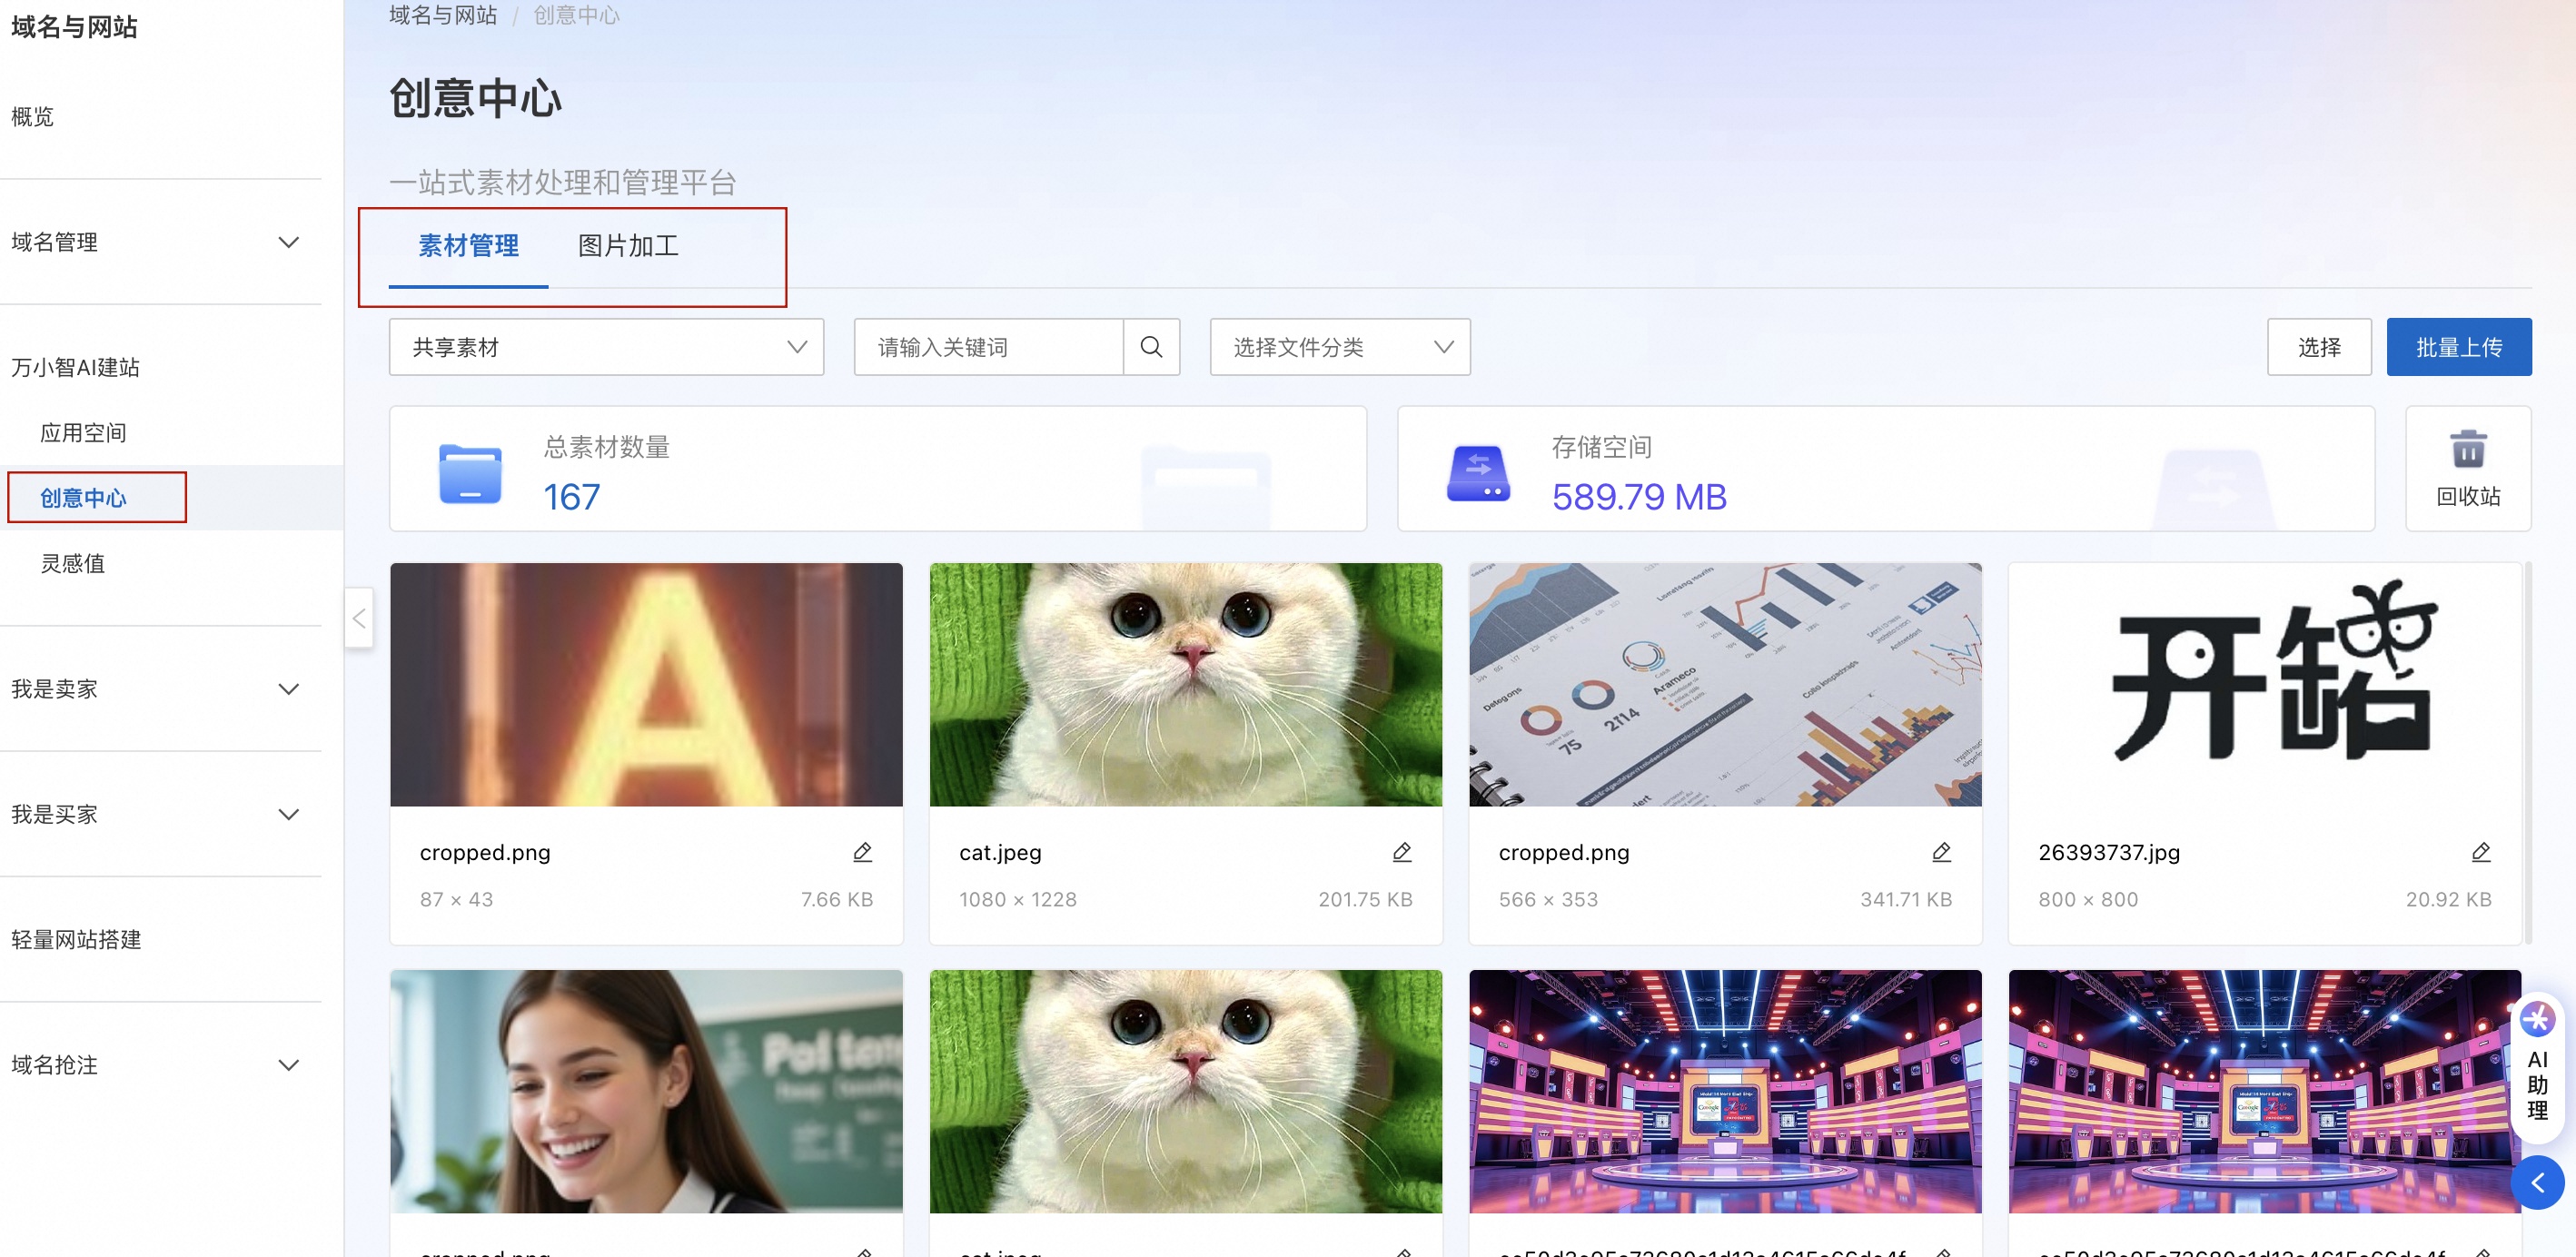
1. Go to Creative Hub
Log on to the Domain Names console.
In the navigation pane on the left, choose AI Website Builder > Creative Hub.
If you have already created an application, click .
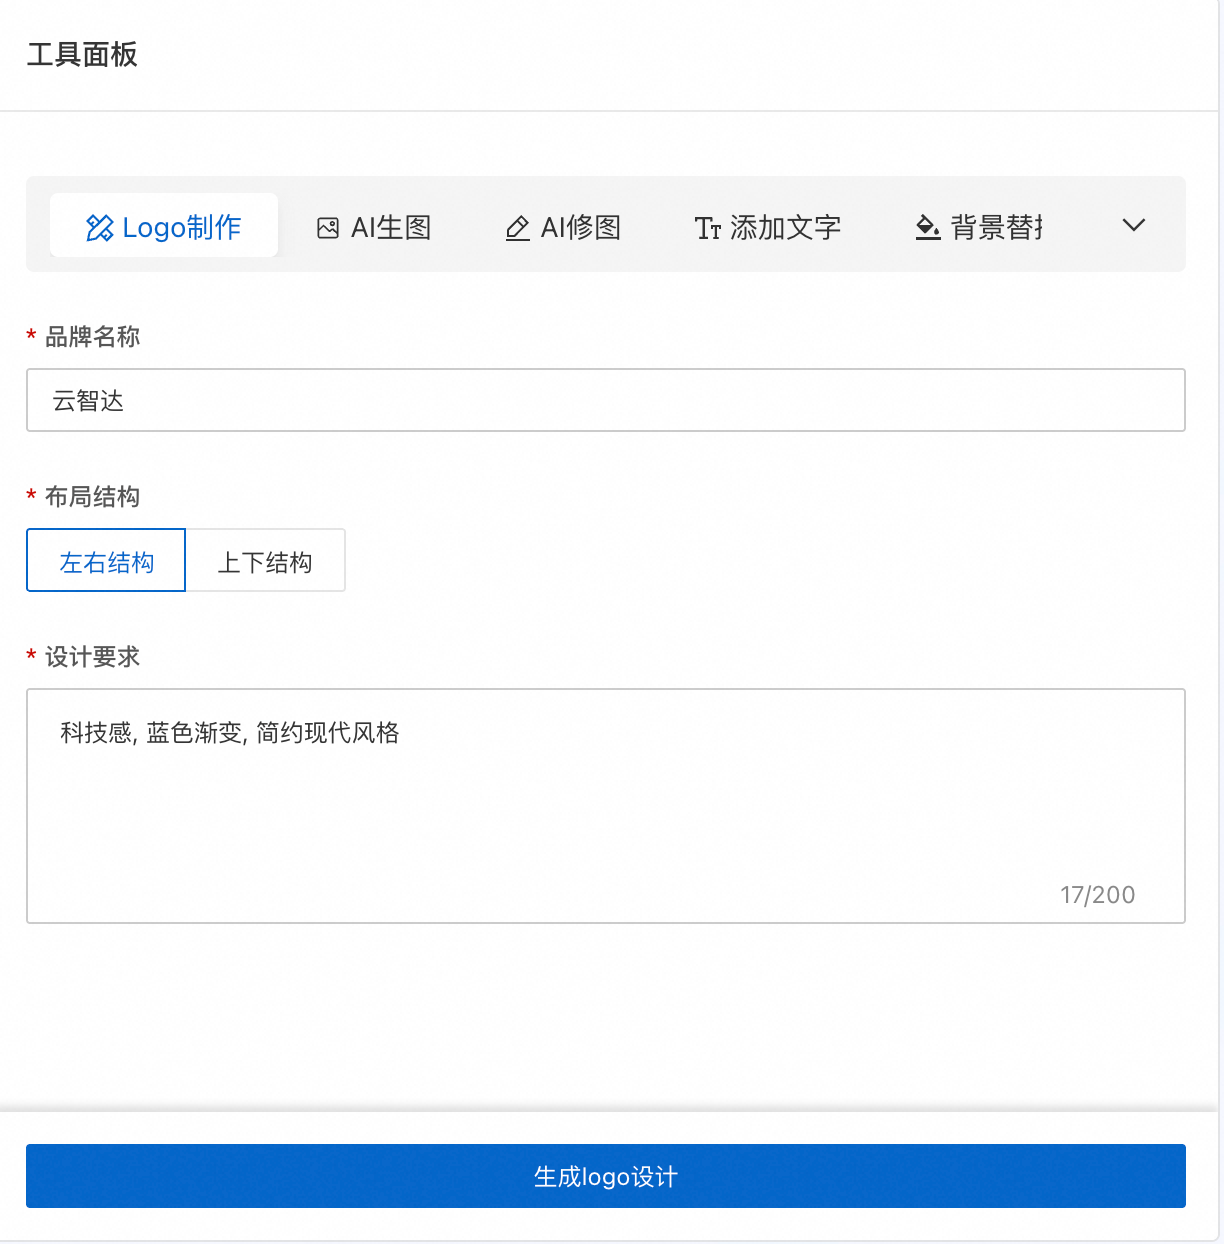
2. Create a brand logo
|
|
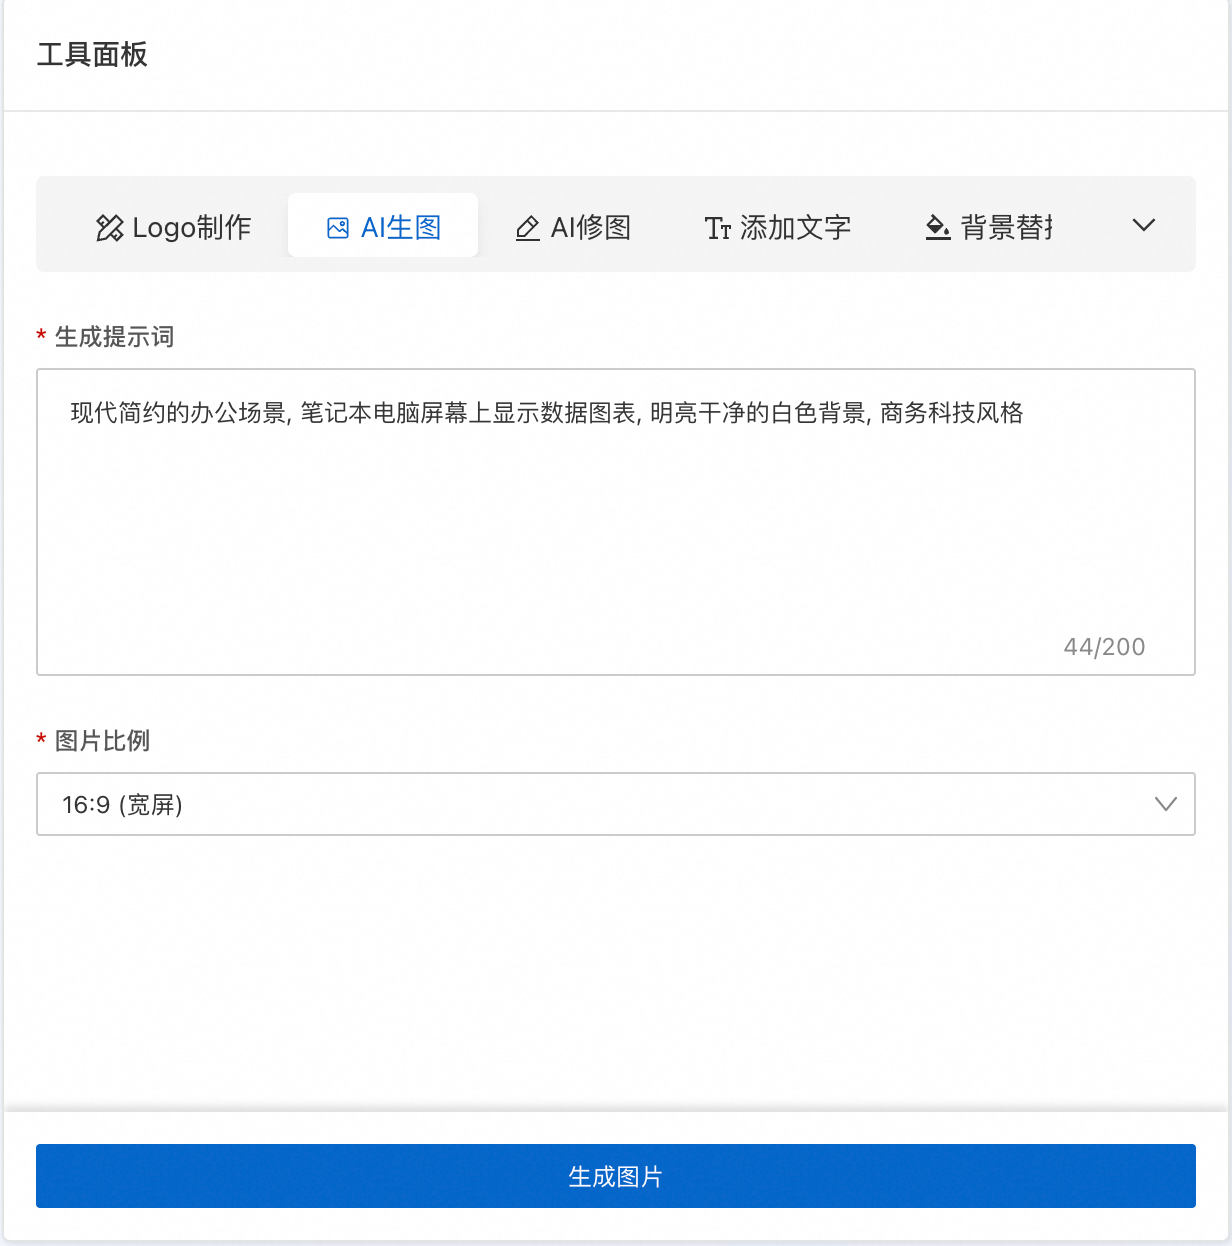
3. Generate a product promotional image
|
|
4. Manage your materials
Click the Material Management tab to view the logo and promotional image that you just saved.
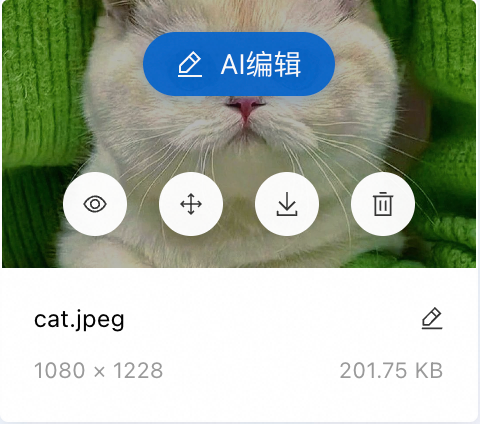
Hover over a material card to perform operations such as View, Download, and Rename.
To further edit the promotional image, such as replacing the background or adding text, click AI Edit and select a processing method to go to the Image Processing page.
After you complete these steps, your brand logo and promotional image are saved in the material library. You can use them directly when you edit your website.
Material management
The Material Management module is your cloud-based material hub. You can use it to centrally upload, store, organize, and find all your image materials.
Upload and manage images
You can add images to the Material Library in the following ways.
Manual upload:
On the Material Management tab, click Batch Upload in the upper-right corner of the page.
In the window that appears, select local image files.
Save from AI features: After Image Processing or Video Creation is complete, click Save to store the generated work directly in the Material Library.
After an image is uploaded, you can see its thumbnail, file name, dimensions, and size on the material card. Hover over the card to perform the following operations:
Operation | Description |
|
AI Edit | Perform secondary processing on the image, such as adding text or replacing the background. | |
View | Preview a larger version of the image. | |
Download | Save the image to your local computer. | |
Rename | Change the name of the image in the Material Library. | |
Delete | Move the image to the recycle bin. |
Use material spaces for isolation
Material spaces are used to isolate materials for different projects or teams to prevent confusion.
For example, you can create separate material spaces for a "Website Project" and a "Campaign".
Switch spaces: In the upper-left corner of the Material Management page, click the current material space name (the default is Shared Materials) and select the target space from the drop-down list.
Manage spaces: Click Manage at the bottom of the drop-down list to create, rename, or delete material spaces.
Search and recover
Keyword search: In the search box at the top of the page, enter a file name or related keywords to quickly find materials.
Recycle Bin: If you accidentally delete a material, click the Recycle Bin entry in the upper-right corner of the page to find and recover the deleted image. The recycle bin feature in Material Management lets you recover deleted materials to prevent accidental loss.
Image processing
The Image Processing module integrates six AI tools to help you create images from scratch or intelligently edit existing ones.
Access:
Direct access: On the Creative Hub homepage, click the Image Processing tab.
Edit from materials: In Material Management, hover over an image, click AI Edit, and select a processing method.
After processing is complete, you can click Save to store the result in the Material Library, or click Export to download it locally.
Logo creation
Quickly generate a professional brand logo based on brand information and design requirements.
On the Image Processing page, in the tool panel, click the Logo Creation tab.
Configure the following parameters.
Parameter
Description and suggestions
Brand Name
Required. Enter your brand name, up to 6 characters.
Layout Structure
Required. Select the relative position of the icon and text in the logo, such as "Left-right structure".
Design Requirements
Required. Describe your desired logo style. The more specific the description, the better the result. Up to 200 characters.
Good example:Tech feel, blue gradient, simple and modern style, using an abstract chip graphic.Click Generate logo design.
View the generated result in the preview area on the right. If you are not satisfied, click Generate again.
AI image generation
Generate new images from text descriptions (prompts).
In the tool panel, click the AI Image Generation tab.
Configure the following parameters.
Parameter
Description
Generation prompt
Describe the image content you want to generate in detail. Up to 200 characters.
Image aspect ratio
Select the aspect ratio for the generated image. Options: 1:1 (Square), 4:3 (Landscape), 3:4 (Portrait), 16:9 (Widescreen), 9:16 (Full Screen), 21:9 (Cinematic).
Click Generate Image.
View the generated result in the preview area on the right.
AI image editing
Use AI to intelligently edit existing images.
In the tool panel, click the AI Image Editing tab.
Configure the following parameters.
Parameter
Description
Original image
Click Upload local image or Select from material library.
Editing prompt
Describe the editing requirements, such as "remove clutter, brighten, keep skin tone natural". Up to 200 characters.
Image aspect ratio
Select the output image aspect ratio. Options: Keep original ratio, 1:1 (Square), 4:3 (Landscape), 3:4 (Portrait), 16:9 (Widescreen), 9:16 (Full Screen), 21:9 (Cinematic).
Click Start Editing.
View the edited result in the preview area on the right. You can click the preview image to view a larger version. If you are not satisfied, click Generate again.
Add text
Add AI-typeset text to an image.
In the tool panel, click the Add Text tab.
Configure the following parameters.
Parameter
Description
Original image
Click Upload local image or Select from material library.
Text content to add
Enter the text to add to the image. Up to 10 characters.
Additional requirements
Describe the text style requirements, such as "large white block text, place in the center of the image, add a shadow effect". Up to 200 characters.
Image aspect ratio
Select the output image aspect ratio.
Click Add Text.
View the result in the preview area on the right.
Background replacement
Use AI to replace an image background.
In the tool panel, click the Background Replacement tab.
Configure the following parameters.
Parameter
Description
Original image
Click Upload local image or Select from material library
Background description
Describe the desired background effect.
Target aspect ratio
Select the output image aspect ratio. Options: Keep original ratio, 1:1 (Square), 4:3 (Landscape), 3:4 (Portrait), 16:9 (Widescreen), 9:16 (Full Screen), 21:9 (Cinematic).
Click Replace Background.
View the result in the preview area on the right.
Adjust aspect ratio
Adjust the aspect ratio of an image.
In the tool panel, click the Adjust Aspect Ratio tab.
Configure the following parameters.
Parameter
Description
Original image
Click Upload local image or Select from material library.
Image aspect ratio
Select the target image aspect ratio. Options: 1:1 (Square), 4:3 (Landscape), 3:4 (Portrait), 16:9 (Widescreen), 9:16 (Full Screen), 21:9 (Cinematic).
Click Adjust Ratio.
View the result in the preview area on the right.